网络总览
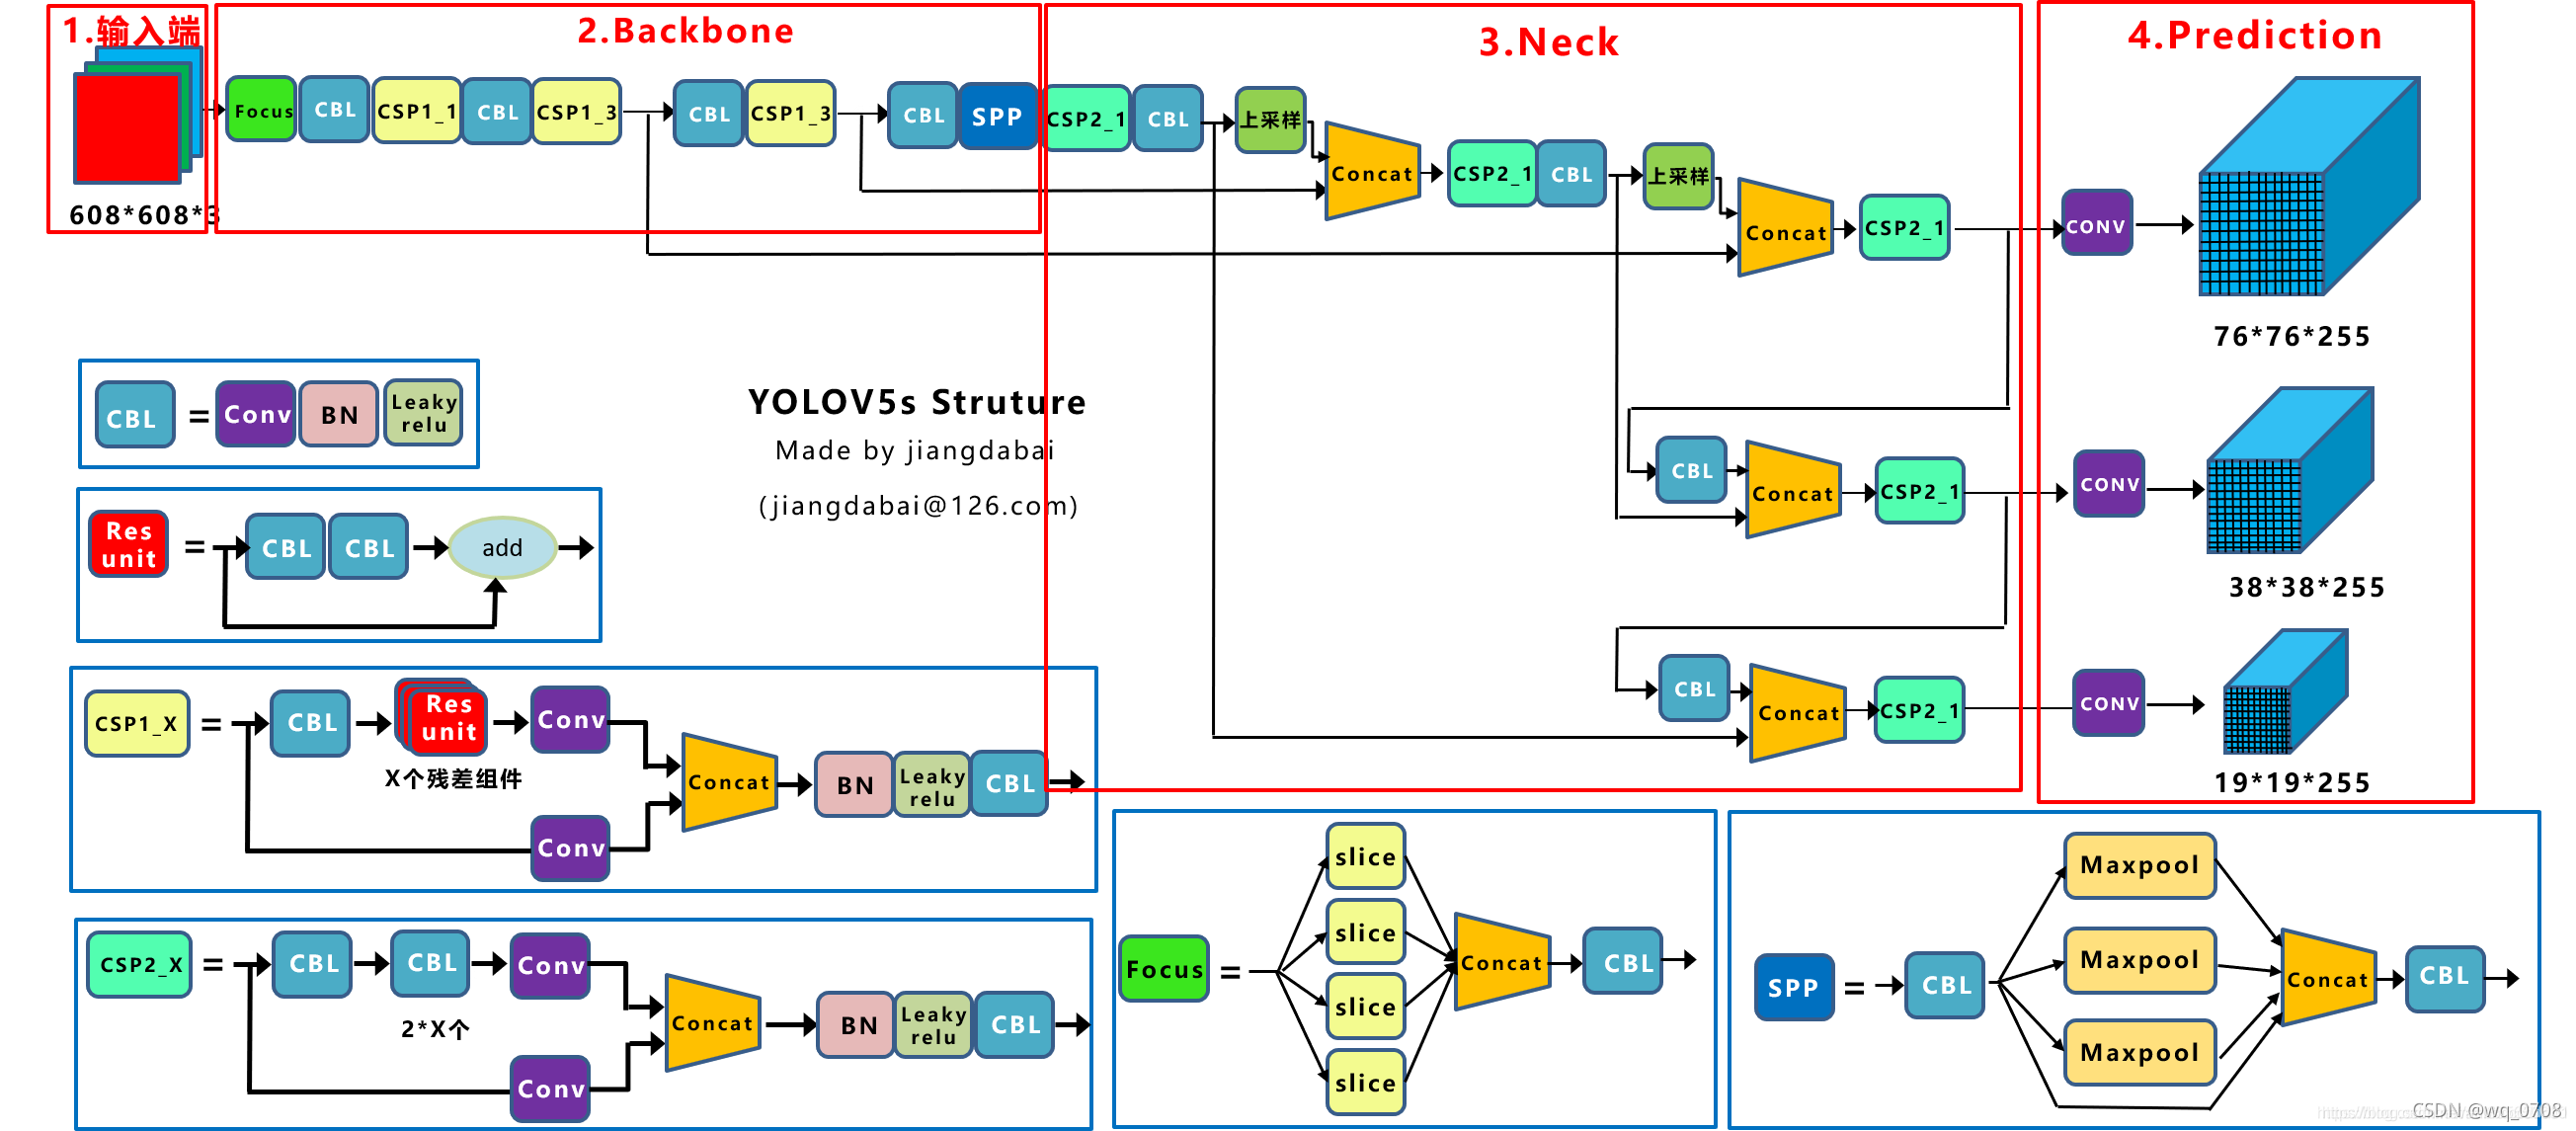
注意: 本文以yolov5s-v5.0网络为基础,上图是yolov5s网络总体结构,仅作参考,实际结构以代码为准,存在少量差异。
如何使用Python构建TensorRT引擎的过程可以参考使用Python部署TensorRT。
本文完整代码已开源至笔者Github仓库。
创建网络定义对象
import tensorrt as trt

#需要一个全局的Logger对象,用于记录日志信息
TRT_LOGGER = trt.Logger(trt.Logger.WARNING)
#创建一个网络生成器
builder = trt.Builder(TRT_LOGGER)
#使用builder类方法创建一个空的网络
network = builder.create_network()
这里可以使用with上下文语法:
with trt.Builder(TRT_LOGGER) as builder, builder.create_network() as network:
builder是构建器,他会自动搜索cuda内核目录以获得最快的可用实现,构建和运行时的GPU需要保持一致。由builder构建的引擎(engine)不能跨平台和TensorRT版本移植。上面由builder创建了一个空的网络结构,后面就需要通过tensorrt python api来逐层填充该网络结构,直至完整构建yolov5s-v4.0网络。
Backbone
Focus

Focus结构在Yolov3&Yolov4中并没有这个结构,其中比较关键是切片操作。比如右图的切片示意图,4×4×3的图像切片后变成2×2×12的特征图。
以Yolov5s的结构为例,原始640×640×3的图像输入Focus结构,采用切片操作,先变成320×320×12的特征图,再经过一次32个卷积核的卷积操作,最终变成320×320×32的特征图。
Focus结构的意义在于可以最大程度的减少信息损失而进行下采样操作。Focus结构中需要用到一个重要的tensorrt api就是add_slice,它用于创建一个Slice层。
def focus(network, weights, inp, inch, outch, ksize, lname):
    shape = trt.Dims3(inch, Yolo.INPUT_H//2, Yolo.INPUT_W//2)
    stride = trt.Dims3(1,2,2)
    s1 = network.add_slice(inp, trt.Dims3(0,0,0), shape, stride)
    s2 = network.add_slice(inp, trt.Dims3(0,1,0), shape, stride)
    s3 = network.add_slice(inp, trt.Dims3(0,0,1), shape, stride)
    s4 = network.add_slice(inp, trt.Dims3(0,1,1), shape, stride)
    input_tensors = [s1.get_output(0), s2.get_output(0), s3.get_output(0), s4.get_output(0)]
    cat = network.add_concatenation(input_tensors)  # 通道维度上的拼接
    conv = convBlock(network, weights, cat.get_output(0), outch, ksize, 1, 1, lname + ".conv")

    return conv
convBlock在下节CBL中讲解。
CBL
CBL即Conv+BN+Silu。注意,虽然上面的全局网络结构图中展示的CBL中的激活函数是LeakyRelu,但是在v4.0中激活函数是Silu(Sigmoid Weighted Linear Unit),是一种较为平滑的激活函数。
def convBlock(network, weights, inp, outch, ksize, s, g, lname):
    conv1_w = weights[lname + ".conv.weight"].numpy()
    conv1_b = trt.Weights(trt.float32)
    p = ksize//2
    conv1 = network.add_convolution_nd(inp, num_output_maps=outch, kernel_shape=trt.DimsHW(ksize, ksize), kernel=conv1_w, bias=conv1_b)
    assert conv1, "Add convolution_nd layer failed"
    conv1.stride_nd = trt.DimsHW(s, s)
    conv1.padding_nd = trt.DimsHW(p, p)
    conv1.num_groups = g
    bn1 = addBatchNorm2d(network, weights, conv1.get_output(0), lname+".bn", 1e-3)

    # silu = x * sigmoid
    sig = network.add_activation(bn1.get_output(0), trt.ActivationType.SIGMOID)
    assert sig, "Add activation layer failed"
    silu = network.add_elementwise(bn1.get_output(0), sig.get_output(0), trt.ElementWiseOperation.PROD)
    assert silu, "Add PROD layer failed"

    return silu
因为后面频繁用到该结构,这里拆开来详细讲解一下。
-
卷积层
调用add_convolution_nd来创建一个新的卷积层。 因为没有bias一项,定义的bias为空Weights对象,可以使用其第一个重载函数__init__(self: tensorrt.tensorrt.Weights, type: tensorrt.tensorrt.DataType = DataType.FLOAT) -> None初始化一个空Weights。stride,padding,num_groups等参数通过IConvolutionLayer的内部成员变量来设置。 -
BN层
由于TensorRT并未提供BatchNorm层,但提供了更通用的Scale层。可以使用Scale层来实现BN层。详细过程参考笔者另一篇文章使用Python API实现TRT版BatchNorm算子,这里不再赘述。 -
激活层
激活函数Silu:
f ( x ) = x ⋅ σ ( x ) f ′ ( x ) = f ( x ) + σ ( x ) ( 1 − f ( x ) ) f(x)=x⋅\sigma(x)\\[5pt] f^{'}(x)=f(x)+\sigma(x)(1−f(x)) f(x)=x⋅σ(x)f′(x)=f(x)+σ(x)(1−f(x))

从上面公式可以看出来其实就是给sigmoid激活函数加了一个权重,这个权重恰恰就是输入。
同样,TensorRT中也没有直接提供Silu的api,通过add_activation配合add_elementwise中的乘操作可以轻松构建Silu。
    sig = network.add_activation(bn1.get_output(0), trt.ActivationType.SIGMOID)
    silu = network.add_elementwise(bn1.get_output(0), sig.get_output(0), trt.ElementWiseOperation.PROD)
CSP
YOLOv5中设计了两种CSP结构,以YOLOv5s网络为例,CSP1_X结构应用于Backbone主干网络,另一种CSP2_X结构应用于Neck中。

注意: 上图仅供参考,yolov5s-v5.0实际结构以代码为准,有差异。
下面C3函数实现了CSP结构,通过输入参数控制宽度、深度及结构类型等。
def C3(network, weights, inp, c1, c2, n, shortcut, g, e, lname):
    c_ = int(float(c2)*e)  # e:expand param
    conv1 = convBlock(network, weights, inp, c_, 1, 1,1, lname+".cv1")
    conv2 = convBlock(network, weights, inp, c_, 1, 1,1, lname+".cv2")
    y1 = conv1.get_output(0)
    for i in range(n):
        b = bottleneck(network, weights, y1, c_, c_, shortcut, g, 1.0, lname + ".m." + str(i))
        y1 = b.get_output(0)

    input_tensors = [y1, conv2.get_output(0)]
    cat = network.add_concatenation(input_tensors)

    conv3 = convBlock(network, weights, cat.get_output(0), c2, 1,1,1, lname+".cv3")
    return conv3

width_128 = get_width(128, GW)  # =64
depth_3 = get_depth(3, GD)  # =1
# CSP:bottleneckCSP
c3_2 = C3(network, weights, conv1.get_output(0), width_128, width_128, depth_3, True, 1, 0.5, "model.2")
get_width和get_depth分别用来计算CSP结构的宽度和深度,YOLOv5s结构中gw,gd系数分别为0.50和0.33,所以get_width(128,gw)等于64,get_depth(3,gd)等于1。
def get_width(x: int, gw: float, divisor: int=8 ):
    """
    Using gw to control the number of kernels that must be multiples of 8.
    return math.ceil(x / divisor) * divisor
    """
    if x*gw % divisor == 0:
        return int(x*gw)
    return (int(x*gw/divisor)+1)*divisor

def get_depth(x: int, gd: float):
    if x==1:
        return 1
    else:
        return round(x*gd) if round(x*gd) > 1 else 1
CSP1_X中的X表示bottleneck的数量,CSP1_1即包含1个bottleneck,这里bottleneck由函数bottleneck()生成。
def bottleneck(network, weights, inp, c1: int, c2: int, shortcut: bool, g: int, e: int, lname: str):
    "Res Unit"
    conv1 = convBlock(network, weights, inp, int(float(c2)*e), 1,1,1, lname+".cv1")
    conv2 =convBlock(network, weights, conv1.get_output(0), c2, 3,1,g, lname+".cv2")
    if shortcut and c1 == c2:
        ew = network.add_elementwise(inp, conv2.get_output(0), op=trt.ElementWiseOperation.SUM)
        return ew
    return conv2
这是一个经典的bottleneck结构,只是要注意这里的conv实际上是CBL(conv+bn+silu)。这里的输入参数e固定为1,意味着第1个1x1的卷积不会降低通道数。一旦shortcut为False,这里的bottleneck就演变成了两个CBL的串联,X个残差组件变成了2*X个CBL。

整个Backbone中除了focus,CBL,CSP1_X之外还有一个重要的结构就是SPP。

SPP(Spatial Pyramid Pooling) 原理如上图,feature maps 是经过三个pooling窗口(蓝色,青绿,银灰的窗口) 进行pooling,将分别得到的结果在channel维度进行concat。SPP可以增大感受野,有助于解决anchor和feature map的对齐问题。SPP这个结构就是通过不同kernel size的pooling抽取不同尺度特征,再进行叠加进行特征融合。
def SPP(network, weights, inp, c1, c2, k1, k2,k3, lname):
    c_ = c1//2
    conv1 = convBlock(network, weights, inp, c_, 1,1,1, lname+".cv1")
    pool1 = network.add_pooling_nd(conv1.get_output(0), trt.PoolingType.MAX, trt.DimsHW(k1,k1))
    pool1.padding_nd = trt.DimsHW(k1//2, k1//2)
    pool1.stride_nd = trt.DimsHW(1,1)
    pool2 = network.add_pooling_nd(conv1.get_output(0), trt.PoolingType.MAX, trt.DimsHW(k2, k2))
    pool2.padding_nd = trt.DimsHW(k2 // 2, k2 // 2)
    pool2.stride_nd = trt.DimsHW(1, 1)
    pool3 = network.add_pooling_nd(conv1.get_output(0), trt.PoolingType.MAX, trt.DimsHW(k3, k3))
    pool3.padding_nd = trt.DimsHW(k3 // 2, k3 // 2)
    pool3.stride_nd = trt.DimsHW(1, 1)

    input_tensors = [conv1.get_output(0), pool1.get_output(0), pool2.get_output(0), pool3.get_output(0)]
    cat = network.add_concatenation(input_tensors)

    conv2 = convBlock(network, weights, cat.get_output(0), c2, 1,1,1, lname+".cv2")
    return conv2
在YOLOv5里pooling的kernel size分别是1x1, 5x5, 9x9, 13x13。在SPP中首先通过一个1x1卷积将通道减半,再将结果做不同尺度的Pooling,最后将Pooling的结果和通道减半后的结果进行拼接,拼接后的feature map还要再经过一个CBL。YOLOv5s-v5.0的backbone部分核心代码如下:
focus0 = focus(network, weights, data, 3, get_width(64, GW), 3, "model.0")
# CBL
width_128 = get_width(128, GW)  # =64
depth_3 = get_depth(3, GD)  # =1
conv1 = convBlock(network, weights, focus0.get_output(0), width_128, 3, 2, 1,"model.1")
# CSP1_1
c3_2 = C3(network, weights, conv1.get_output(0), width_128, width_128, depth_3, True, 1, 0.5, "model.2")
# CBL
width_256 = get_width(256, GW)
depth_9 = get_depth(9, GD)
conv3 = convBlock(network, weights, c3_2.get_output(0), width_256, 3, 2, 1,"model.3")
# CSP1_3
c3_4 = C3(network, weights, conv3.get_output(0), width_256, width_256, depth_9, True, 1, 0.5, "model.4")
# CBL
width_512 = get_width(512, GW)
conv5 = convBlock(network, weights, c3_4.get_output(0), width_512, 3, 2, 1, "model.5")
# CSP1_3
c3_6 = C3(network, weights, conv5.get_output(0), width_512, width_512, depth_9, True, 1, 0.5, "model.6")
# CBL
width_1024 = get_width(1024, GW)
conv7 = convBlock(network, weights, c3_6.get_output(0), width_1024, 3, 2, 1, "model.7")
# SPP
spp8 = SPP(network, weights, conv7.get_output(0), width_1024, width_1024, 5, 9, 13, "model.8")
Neck
YOLOv5的Neck部分采用FPN+PAN的结构,但在YOLOv5刚出来时,只使用了FPN结构,后面才增加了PAN结构,此外网络中其他部分也进行了调整。
PANet
PANet在FPN的基础上增加了Bottom-up Path Augmentation,主要是考虑到网络的浅层特征中包含了大量的边缘形状等特征,他们对于实例分割这种像素级别的分类任务起到至关重要的作用。

上图红色的箭头表示在FPN中,因为要经过自底向上的过程,浅层特征传到顶层要经过几十甚至上百层网络,浅层信息丢失严重。绿色的箭头表示作者添加的Bottom-up Path Augmentation结构,这个结构本生不到十层。这样,浅层特征经过原始FPN中的横向连接到P2,然后再从P2由Bottom-up Path Augmentation传到顶层,经过的层数很少,能较好的保存浅层特征。
注意: 这里的N2和P2表示的是同一个特征图,而N3,N4,N5和P3,P4,P5不一样,N3,N4,N5是P3,P4,P5融合后的结果。
YOLOv5的Neck网络仍然使用了FPN+PAN结构,但是在它的基础上做了一些改进操作,YOLOv4的Neck结构中,采用的都是普通的卷积操作。而YOLOv5的Neck网络中,采用借鉴CSPnet设计的CSP2结构,从而加强网络特征融合能力。下图展示了YOLOv4与YOLOv5的Neck网络的具体细节,通过比较我们可以发现:
- 灰色区域表示第1个不同点,YOLOv5不仅利用
CSP2_1结构代替部分CBL模块,而且去掉了下方的CBL模块; - 绿色区域表示第2个不同点,YOLOv5不仅将
Concat操作之后的CBL模块更换为CSP2_1模块,而且更换了另外一个CBL模块的位置; - 蓝色区域表示第3个不同点,YOLOv5中将原始的
CBL模块更换为CSP2_1模块。
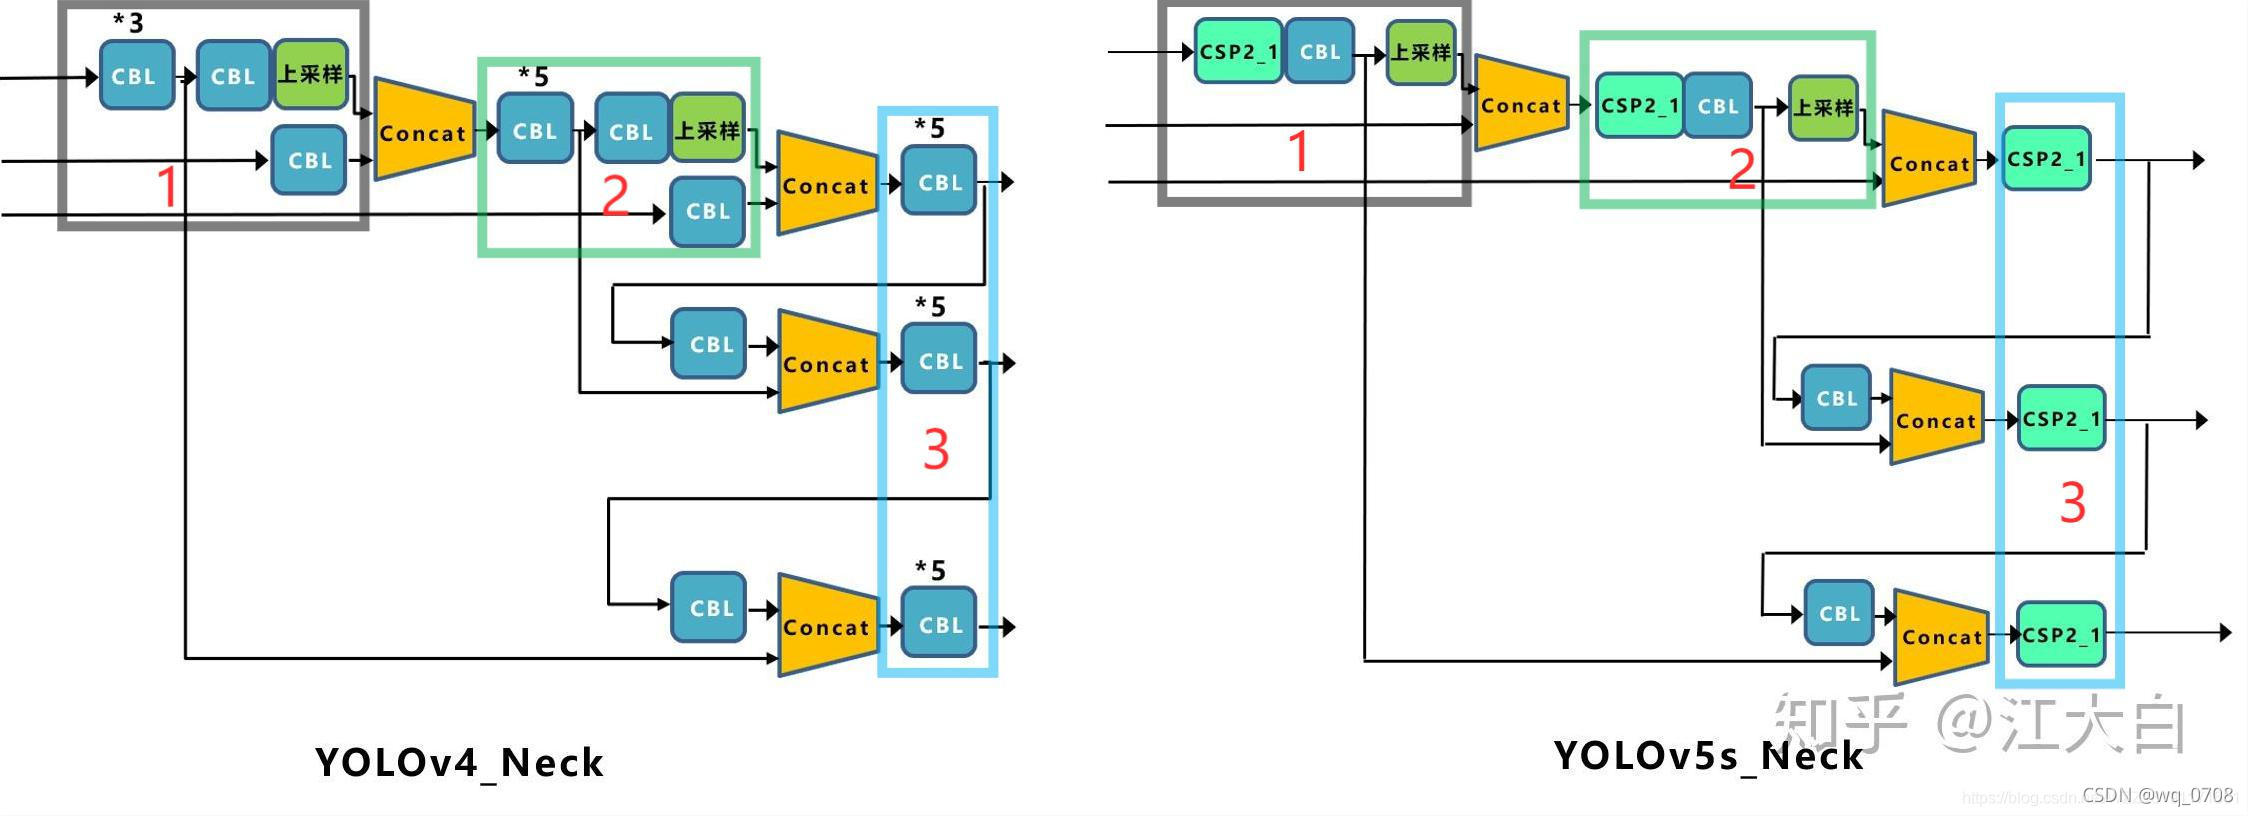
YOLOv5包含3个检测分支,分别在8x,16x,32x的特征图上,首先来使用tensort api来构造第一个分支的Neck部分。

c3_9 = C3(network, weights, spp8.get_output(0), width_1024, width_1024, depth_3, False, 1, 0.5, "model.9")
conv10 = convBlock(network, weights, c3_9.get_output(0), width_512, 1,1,1, "model.10")

#第一次上采样,32x->upsample->16x
upsample11 = network.add_resize(conv10.get_output(0))
assert upsample11, "Add upsample11 failed"
upsample11.resize_mode = trt.ResizeMode.NEAREST
upsample11.shape = c3_6.get_output(0).shape

#Concat
input_tensors12 = [upsample11.get_output(0), c3_6.get_output(0)]
cat12 = network.add_concatenation(input_tensors12)
c3_13 = C3(network, weights, cat12.get_output(0), width_1024, width_512, depth_3, False, 1, 0.5, "model.13")
conv14 = convBlock(network, weights, c3_13.get_output(0), width_256, 1, 1, 1, "model.14")

#第二次上采样,16x->upsample->8x
upsample15 = network.add_resize(conv14.get_output(0))
assert upsample15, "Add upsample15 failed"
upsample15.resize_mode = trt.ResizeMode.NEAREST
upsample15.shape = c3_4.get_output(0).shape

#Concat
input_tensors16 = [upsample15.get_output(0), c3_4.get_output(0)]
cat16 = network.add_concatenation(input_tensors16)
c3_17 = C3(network, weights, cat16.get_output(0), width_512, width_256, depth_3, False, 1, 0.5, "model.17")
Neck部分的CSP结构为CSP2_X,在前文提到过CSP2_X和CSP1_X最重要的区别就在于中间的若干Bottleneck结构变成了普通卷积。上采样部分借助add_resize函数来完成,经过两次上采样操作,将32x的特征图变化到8x大小。

再来构造第2和第3个分支,这个就相对简单了。
#The second branch
conv18 = convBlock(network, weights, c3_17.get_output(0), width_256, 3, 2, 1, "model.18")
input_tensors19 = [conv18.get_output(0), conv14.get_output(0)]
cat19 = network.add_concatenation(input_tensors19)
c3_20 = C3(network, weights, cat19.get_output(0), width_512, width_512, depth_3, False, 1, 0.5, "model.20")

#The third branch
conv21 = convBlock(network, weights, c3_20.get_output(0), width_512, 3, 2, 1, "model.21")
input_tensors22 = [conv21.get_output(0), conv10.get_output(0)]
cat22 = network.add_concatenation(input_tensors22)
c3_23 = C3(network, weights, cat22.get_output(0), width_1024, width_1024, depth_3, False, 1, 0.5, "model.23")
Head
YOLOv5的Head部分采用1x1的卷积结构,总共三组输出,输出特征图大小分辨率为:
{ B S × 255 × 76 × 76 B S × 255 × 38 × 38 B S × 255 × 19 × 19 \left\{ \begin{aligned} BS × 255 × 76 × 76 \\ BS × 255 × 38 × 38 \\ BS × 255 × 19 × 19 \end{aligned} \right. ⎩⎪⎨⎪⎧BS×255×76×76BS×255×38×38BS×255×19×19
其中,BS是Batch Size,255的计算方式为[na * (nc + 1 + 4)],具体参数
-
na(number of anchor) 为每组 anchor 的尺度数量(YOLOv5中一共有 3 组anchor,每组有3个尺度);
-
nc 为number of class (coco的class 为80);
-
1 为前景背景的置信度score;
-
4 为中心点坐标和宽高;
最后,输出的特征图上会应用锚定框,并生成带有类别概率、置信度得分和包围框的最终输出向量。

det0 = network.add_convolution_nd(c3_17.get_output(0), 3 * (CLASS_NUM + 5), trt.DimsHW(1, 1), weights["model.24.m.0.weight"], weights["model.24.m.0.bias"])
det1 = network.add_convolution_nd(c3_20.get_output(0), 3 * (CLASS_NUM + 5), trt.DimsHW(1, 1), weights["model.24.m.1.weight"], weights["model.24.m.1.bias"])
det2 = network.add_convolution_nd(c3_23.get_output(0), 3 * (CLASS_NUM + 5), trt.DimsHW(1, 1), weights["model.24.m.2.weight"], weights["model.24.m.2.bias"])
应用锚定框部分可以不跑在TensorRT上,也可以自己编写插件使用TensorRT执行解码。
附录
YOLOv5s参数配置表:
注意: 与本文YOLOv5-v5.0有些许差别。
                 from  n    params  module                                  arguments                       layer            cin    cout
---------------------------------------------------------------------------------------------------------------------------------------------
  0                -1  1      3520  models.common.Focus                     [3, 32, 3]                    	Focus          	   3	  32
  1                -1  1     18560  models.common.Conv                      [32, 64, 3, 2]                	Conv           	  32	  64
  2                -1  1     19904  models.common.BottleneckCSP             [64, 64, 1]                   	BottleneckCSP  	  64	  64
  3                -1  1     73984  models.common.Conv                      [64, 128, 3, 2]               	Conv           	  64	 128
  4                -1  1    161152  models.common.BottleneckCSP             [128, 128, 3]                 	BottleneckCSP  	 128	 128
  5                -1  1    295424  models.common.Conv                      [128, 256, 3, 2]              	Conv           	 128	 256
  6                -1  1    641792  models.common.BottleneckCSP             [256, 256, 3]                 	BottleneckCSP  	 256	 256
  7                -1  1   1180672  models.common.Conv                      [256, 512, 3, 2]              	Conv           	 256	 512
  8                -1  1    656896  models.common.SPP                       [512, 512, [5, 9, 13]]        	SPP            	 512	 512
  9                -1  1   1248768  models.common.BottleneckCSP             [512, 512, 1, False]          	BottleneckCSP  	 512	 512
 10                -1  1    131584  models.common.Conv                      [512, 256, 1, 1]              	Conv           	 512	 256
 11                -1  1         0  torch.nn.modules.upsampling.Upsample    [None, 2, 'nearest']          	Upsample       	 512	 256
 12           [-1, 6]  1         0  models.common.Concat                    [1]                           	Concat         	 512	 512
 13                -1  1    378624  models.common.BottleneckCSP             [512, 256, 1, False]          	BottleneckCSP  	 512	 256
 14                -1  1     33024  models.common.Conv                      [256, 128, 1, 1]              	Conv           	 256	 128
 15                -1  1         0  torch.nn.modules.upsampling.Upsample    [None, 2, 'nearest']          	Upsample       	 256	 128
 16           [-1, 4]  1         0  models.common.Concat                    [1]                           	Concat         	 256	 256
 17                -1  1     95104  models.common.BottleneckCSP             [256, 128, 1, False]          	BottleneckCSP  	 256	 128
 18                -1  1      2322  torch.nn.modules.conv.Conv2d            [128, 18, 1, 1]               	Conv2d         	 128	 255
 19                -2  1    147712  models.common.Conv                      [128, 128, 3, 2]              	Conv           	 128	 128
 20          [-1, 14]  1         0  models.common.Concat                    [1]                           	Concat         	 128	 256
 21                -1  1    313088  models.common.BottleneckCSP             [256, 256, 1, False]          	BottleneckCSP  	 256	 256
 22                -1  1      4626  torch.nn.modules.conv.Conv2d            [256, 18, 1, 1]               	Conv2d         	 256	 255
 23                -2  1    590336  models.common.Conv                      [256, 256, 3, 2]              	Conv           	 256	 256
 24          [-1, 10]  1         0  models.common.Concat                    [1]                           	Concat         	 256	 512
 25                -1  1   1248768  models.common.BottleneckCSP             [512, 512, 1, False]          	BottleneckCSP  	 512	 512
 26                -1  1      9234  torch.nn.modules.conv.Conv2d            [512, 18, 1, 1]               	Conv2d         	 512	 255
 27      [-1, 22, 18]  1         0  Detect                                  [1, anchors						Detect         	 512	 255

