云数据库的增删改查
前言
本小程序主要是为了拯救健忘的博主,我不想再经历每次登录的时候都要找回密码的痛苦了。
本人是个菜鸟,就跟着网课学过一点点小程序。今天也是跟着免费网课开始着手自己的第一个小程序,至于为什么是云开发,当然是因为入门简单啊。
毕竟我完全不知道后端怎么写,不会数据库,也不会架服务器,虽然好像有很多很好的脚手架工具,但我还没有摸索出门道,之后还会再写的,我还有几个小程序/APP想实现,又菜又有瘾,嘿嘿。
目前实现的效果:
小菜鸟的小程序——密码箱1
一、app.json
-
app.json - pages - 添加几个页面 - 保存后会自动创建文件
-
app.json - window - 页面配置
每一个小程序页面也可以使用 .json 文件来对本页面的窗口表现进行配置。页面中配置项在当前页面会覆盖 app.json 的 window 中相同的配置项。
其他页面的 json 文件里 直接在大括号里写以下配置,不需要写pages:或window:
"navigationBarBackgroundColor":"#000000"	导航栏背景颜色
"navigationBarTextStyle":"white"	导航栏标题颜色,仅支持 black / white
"navigationBarTitleText":"文字"		导航栏标题文字内容
"navigationStyle":default//导航栏样式,仅支持:custom 自定义导航栏,只保留右上角胶囊按钮。
"backgroundColor":"#ffffff"//	窗口的背景色
"backgroundTextStyle":"dark"//	下拉 loading 的样式,仅支持 dark / light
"backgroundColorTop":"#ffffff"//	顶部窗口的背景色
"backgroundColorBottom":"#ffffff"//	底部窗口的背景色
"enablePullDownRefresh":false	是否开启当前页面下拉刷新。
"onReachBottomDistance":"50"//	页面上拉触底事件触发时距页面底部距离,单位为px。
"pageOrientation":"portrait"//	屏幕旋转设置,支持 auto / portrait / landscape
"disableScroll":false//设置为 true 则页面整体不能上下滚动。只在页面配置中有效,无法在app.json 中设置
- app.json - tabBar - 设置 tab 栏
如果小程序是一个多 tab 应用(客户端窗口的底部或顶部有 tab 栏可以切换页面),可以通过 tabBar 配置项指定 tab 栏的表现,以及 tab 切换时显示的对应页面。
"color":"" 	tab 上的文字默认颜色,仅支持十六进制颜色
"selectedColor":"" 	tab 上的文字选中时的颜色,仅支持十六进制颜色
"backgroundColor":"" 	tab 的背景色,仅支持十六进制颜色
"borderStyle":"black"//	tabbar 上边框的颜色, 仅支持 black / white
"list": [{

    },{

    }] 	tab 的列表,详见 list 属性说明,最少 2 个、最多 5 个 tab
"position":"bottom"//	tabBar 的位置,仅支持 bottom / top
- app.json - tabBar - list - 设置两个底部分栏
icon 大小限制为 40kb,建议尺寸为 81px * 81px,不支持网络图片。当 position 为 top 时,不显示 icon。图标库:https://www.iconfont.cn/
"pagePath":"" 	页面路径,必须在 pages 中先定义
"text":"" 	tab 上按钮文字
"iconPath":"" 	图片路径
"selectedIconPath":"" 	选中时的图片路径
二、首页 index
- 安装组件库vant-weapp
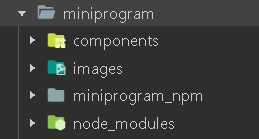
在 miniprogram 文件夹上左键 点击 在外部终端窗口打开,按教程 npm 安装
安装完成后可以看到有下图 后两个文件夹 及两个json文件 生成
不知道为什么网课里要用那个语句安装,每次引入组件的时候都要改路径
有赞这个组件库个人感觉比较适合商城小程序,有商品卡片、分类等等
- 引入组件
在 app.json 或 index.json 中引入组件
"usingComponents": {


  "van-field": "../../miniprogram_npm/vant-weapp/field/index"
}
注意是否需要修改引入路径
如果提示页面不存在,可以看下miniprogram_npm/vant-weapp这里有相应文件夹没有
不知道为什么下载的不是最新最全的,有好几个组件都没有
重要提醒:引用组件的时候,要及时修改里面的 名称 ,如变量值,函数名等
可以用中文!自己能看懂最重要!
1.功能实现
点击 云开发 - 点击 数据库 - 点击 集合 + - 添加集合 info
若有索引警告,点击警告里的链接,创建一个索引,即可消除警告
(1)增 —— 放置输入框,获取输入,点击提交按钮,上传数据到云数据库
											放置输入框
<van-cell-group>
  <van-field
    value="{

    { input_password }}"
    placeholder="请输入密码"
    bind:change="onPasswordChange"
  />
</van-cell-group>
											获取输入
Page({


  data: {


    input_password : '',
  },

  onPasswordChange(event) {


    console.log(event.detail);    // event.detail 为当前输入的值
	this.setData({


		input_password : event.detail    // 赋值
	})
    console.log(this.data.input_password);    // 需要用this.data.
  },
});
														  点击提交按钮
<button bindtap="add" >添加</button>
														上传数据到云数据库
const db = wx.cloud.database(); //初始化数据库

 add: function () {


    db.collection('info').add({

    				//add
      data: {


        "password": this.data.input_password //赋值
      }
    }).then(res => {

    				//成功
      console.log("添加成功");
    }).catch(err => {

    				//失败
      console.log(err);
    })
  },
(2)删 —— 点击删除按钮,获取需要删除项的id,从数据库中删除
 <button bindtap="delete" data-infoid="{

    {item._id}}">删除</button>
这里的 data-infoid="{ {item._id}}" 很重要
可以在js文件里通过 event.target.dataset.infoid 来用 item._id 的数据
delete: function (event) {


    console.log(event.target.dataset.infoid);

        db.collection('info').where({

    			//where
            _id: event.target.dataset.infoid
          }).remove()							//remove
      })
  },
(3)改 —— 点击修改,获取id等数据,弹出修改面板,获取输入,更新数据库
<button bindtap="icon_edit" data-infoid="{

    {item._id}}" data-infotype="{

    {item.type}}"
 data-infoidentity="{

    {item.identity}}" data-infopassword="{

    {item.password}}"
 data-infodesc="{

    {item.desc}}">修改</button>
这里与添加不同的是需要 在修改面板里显示 原始内容 ,所以传参很多
  icon_edit: function (event) {


    console.log("准备修改的数据id:", event.target.dataset.infoid)
    this.setData({


      showpop: true,		//将 是否弹窗 设置为true

      tempid: event.target.dataset.infoid,			//这里赋值 是为了 在xml文件里 将信息显示在页面上
      type: event.target.dataset.infotype,
      identity: event.target.dataset.infoidentity,
      password: event.target.dataset.infopassword,
      desc: event.target.dataset.infodesc,
    });
  },
弹窗用的是 popup弹出层
不知道为什么我用不了遮罩层这个组件,有东西,但是不显示遮罩那个层
showpop 用来控制弹窗是否显示
value 是输入框的内容 placeholder 是输入框空时的提示内容 label 是最右边的内容
class=“c” 的view是为了将两个按钮放在一排 需要 data-infoid="{ {tempid}}" 获取id
<!-- 修改弹窗 -->
<van-popup show="{

     { showpop }}" custom-style="width: 100%;">
	<!-- 输入框 -->
  <van-cell-group>
    <van-field value="{

     { type }}" placeholder="请输入账号类型" bind:change="onTypeChange" label="类型"/>
    <van-field value="{

     { identity }}" placeholder="请输入账号" bind:change="onIdentityChange" label="账号"/>
    <van-field value="{

     { password }}" placeholder="请输入密码" bind:change="onPasswordChange" label="密码"/>
    <van-field value="{

     { desc }}" placeholder="备注" bind:change="onDescChange" label="备注"/>
  </van-cell-group>
  <!-- 按钮 -->
  <view class="c">
    <button bindtap="onpopClickHide">取消</button>
    <button bindtap="querenedit" data-infoid="{

     {tempid}}">修改</button>
  </view>
</van-popup>
  onTypeChange(event) {

    									获取输入
    this.setData({


      type: event.detail
    })
  },
  onIdentityChange(event) {


  onPasswordChange(event) {


  onDescChange(event) {
使用 db.collection('info').doc(this.data.tempid).update({...}) 进行更新
(4)查 —— 获取输入,点击搜索,查询数据库
用 Search 搜索组件 写了一个固定在顶部的搜索框,能查询类型、账号、备注里包含某字符串的数据
<view class="top_box">
  <van-search value="{

     { searchvalue }}" placeholder="请输入搜索关键词"
    bind:change="onsearchChange" use-action-slot>
    <view slot="action" bind:tap="onsearchClick">搜索</view>
  </van-search>
</view>
/* 顶部 搜索框 ——固定的—— */
.top_box {


  position: fixed;
  top: 0rpx;
  z-index: 1;
  /* z-index 属性设置元素的堆叠顺序。拥有更高堆叠顺序的元素总是会处于堆叠顺序较低的元素的前面。*/
  width: 100%;
}
const _ = db.command

  onsearchChange(e) {


    this.setData({


      searchvalue: e.detail,		//获取输入
    });
  },
  onsearchClick() {


    db.collection('info').orderBy('type','desc').where(	//根据type从大到小排序
        _.or([{

    										//or
            type: db.RegExp({


              regexp: this.data.searchvalue,
              options: 'i',							//不分大小写
            }),
          },
          {


            identity: db.RegExp({


              regexp: this.data.searchvalue,
              options: 'i',
            }),
          },
          {


            desc: db.RegExp({


              regexp: this.data.searchvalue,
              options: 'i',
            }),
          }

        ])).get()
      .then(res => {


        console.log('查询成功:', res.data.length)
        if(res.data.length == 0){


          Toast.fail('没有数据');
        }
		else {


          var obj = JSON.stringify(res.data)
          wx.navigateTo({


            url: '../search/search?obj=' + obj,
          })
        }
      })
      .catch(res => {


        console.log('查询失败', res)
      	Toast.fail('查询失败');
      })
  },
orderBy(‘type’,‘desc’) //根据type从大到小排序
or //获取满足不同的条件的数据
因为查找的结果可能很多,所以写了个展示页面search
使用 wx.navigateTo({ url: ‘…/search/search?obj=’ + obj }) 进行跳转,obj 是传递到下个页面的数据,必须是字符串
使用 var obj = JSON.stringify(res.data) 将JSON对象变为字符串
一进入展示页面search ,就通过 var obj =JSON.parse(options.obj) 将字符串重新变为JSON对象
  data: {


    arrobj:''
  },

  onLoad: function (options) {


    var obj =JSON.parse(options.obj)
    this.setData({


      arrobj: obj
    })
  },
<view wx:for="{

    {arrobj}}" wx:key="index">
  <view class="box_card">
  <van-panel  class="box_incard">
      <view>类型:{

    {

    item.type}} </view>
    </van-panel>

    <van-swipe-cell right-width="{

    { 200 }}">
        <van-cell title="账号:{

    {item.identity}}" />
      <view class="right" slot="right">密码:{

    {

    item.password}}</view>
    </van-swipe-cell>

    <van-panel class="box_incard">
      <textarea  class="beizhu">备注:{

    {

    item.desc}} </textarea>
    </van-panel>
 </view>
</view>
.box_card{


  margin: 0 8%;
  margin-top: 20rpx;
  height: 300rpx;

  display: flex;
  flex-direction: column;
  justify-content: center;

  border-radius: 1.2rem ;
  background: #f0f0f0;
}
.box_incard{


  height: 100rpx;
  margin-left: 35rpx;
  margin-top: 25rpx;
  background: #f0f0f0;

}
.beizhu{


height: 50px;
  width: 239px;
  overflow: scroll;
  white-space: nowrap;
}
.right{


  margin-left: 35rpx;
  margin-top: 25rpx;
  background: #f0f0f0;
}
search 页面写的不是很好,没有写关键字高亮展示,也不能进行操作
总结
以上是云数据库增删改查部分,下一篇写一下怎么对组件库里的组件进行一些样式修改
都是一些我踩过的坑,主要是对折叠面板的修改
先说一下最大的坑,电脑上显示的颜色和你手机里显示的颜色不一定一样!!!
吐血心得:也许你辛辛苦苦调了半天颜色,显示在手机上却丑的不忍直视,所以一定要多在手机上看看