前言:
学习B站UP主狂神说视频笔记整理视频链接
狂神笔记链接
上篇笔记链接-Springboot学习笔记(一)快速上手
Web开发
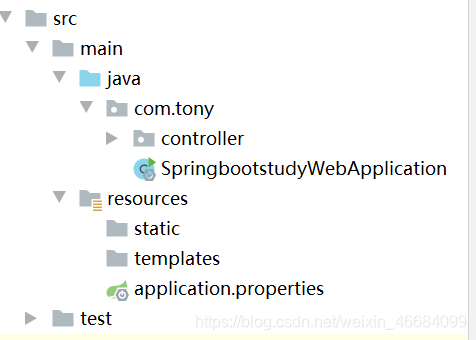
静态资源
在以往的SpringMVC中所有静态资源或者页面应该放在web目录下,不能直接访问的会放在web/WEB-INF下
现在我们的问题是SpringBoot项目的静态资源应该放在哪个目录下
源码分析
首先我们找到WebMvcAutoConfiguration的一段源码[添加资源处理器]
//添加资源处理器
public void addResourceHandlers(ResourceHandlerRegistry registry) {
//如果静态资源已经被自定义了 那么就自定义的生效
if (!this.resourceProperties.isAddMappings()) {
logger.debug("Default resource handling disabled");
} else {
Duration cachePeriod = this.resourceProperties.getCache().getPeriod();
CacheControl cacheControl = this.resourceProperties.getCache().getCachecontrol().toHttpCacheControl();
//获取静态资源方式一:找到webjars/路径下的静态资源 (此方式了解即可 一般不使用)
if (!registry.hasMappingForPattern("/webjars/**")) {
this.customizeResourceHandlerRegistration(registry.addResourceHandler(new String[]{
"/webjars/**"}).addResourceLocations(new String[]{
"classpath:/META-INF/resources/webjars/"}).setCachePeriod(this.getSeconds(cachePeriod)).setCacheControl(cacheControl));
}
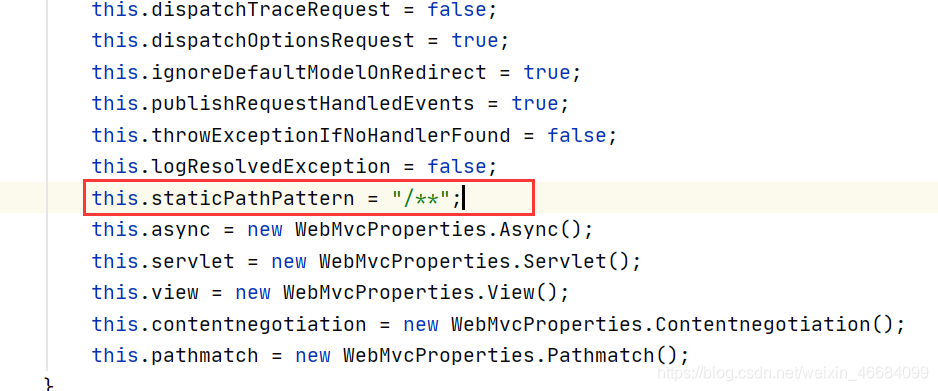
String staticPathPattern = this.mvcProperties.getStaticPathPattern();
//获取静态资源方式二: 获取当前目录下的静态资源 staticPathPattern
if (!registry.hasMappingForPattern(staticPathPattern)) {
this.customizeResourceHandlerRegistration(registry.addResourceHandler(new String[]{
staticPathPattern})
.addResourceLocations(WebMvcAutoConfiguration.getResourceLocations(this.resourceProperties.getStaticLocations()))
.setCachePeriod(this.getSeconds(cachePeriod)).setCacheControl(cacheControl));
}
}
}
点进staticPathPattern继续查看源码,staticPathPattern代表/**
点进(this.resourceProperties.getStaticLocations())会发现以下路径定义
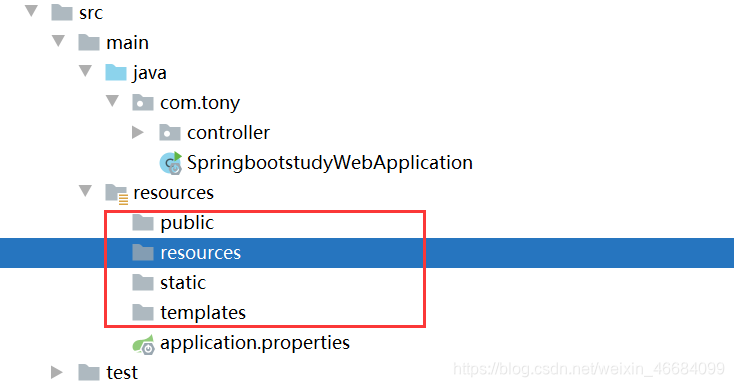
// 访问 /** 会去这几个目录下寻找静态资源
 private static final String[] CLASSPATH_RESOURCE_LOCATIONS = new String[]
 {

    "classpath:/META-INF/resources/",
 "classpath:/resources/",
 "classpath:/static/",
 "classpath:/public/"};
因此根据源码,当我们访问/**下,如:localhost:8080/test.js,它就会去这几个目录下寻找静态资源
优先级的探究
这几个目录下谁的优先级最高呢?
我们为这几个目录下准备了同名文件
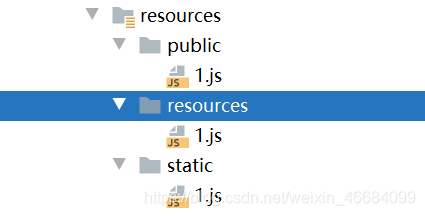
当访问localhost:8080/1.js时发现
| 目录 | 优先级 |
|---|---|
| resources | 高 |
| static | 中 |
| public | 低 |
扩展自定义路径
从源码的第一行我们可以看出,如果静态资源路径被自定义了,那么就会生效自定义的
如何自定义路径?
# 在application配置文件中 设置如下 覆盖默认路径
spring.mvc.static-path-pattern=/tutony
首页定制
对目前情况来说,运行项目是找不到首页的
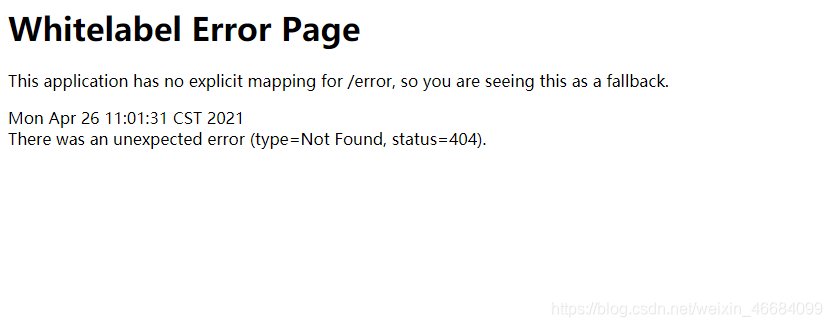
那么首页如何定义,在WebMvcAutoConfiguration有这样一句话
     //最后会被注入到bean
        @Bean //欢迎页的处理映射
        public WelcomePageHandlerMapping welcomePageHandlerMapping(ApplicationContext applicationContext, FormattingConversionService mvcConversionService, ResourceUrlProvider mvcResourceUrlProvider) {


            WelcomePageHandlerMapping welcomePageHandlerMapping = new WelcomePageHandlerMapping(new TemplateAvailabilityProviders(applicationContext), applicationContext,
            this.getWelcomePage(),
            //可以寻找自定义欢迎页
            this.mvcProperties.getStaticPathPattern());
            welcomePageHandlerMapping.setInterceptors(this.getInterceptors(mvcConversionService, mvcResourceUrlProvider));
            welcomePageHandlerMapping.setCorsConfigurations(this.getCorsConfigurations());
            return welcomePageHandlerMapping;
        }

       // 在静态目录下寻找
        private Optional<Resource> getWelcomePage() {


            String[] locations = WebMvcAutoConfiguration.getResourceLocations(this.resourceProperties.getStaticLocations());
            return Arrays.stream(locations).map(this::getIndexHtml).filter(this::isReadable).findFirst();
        }
        //返回静态资源目录下一个叫 index.html的文件
        private Resource getIndexHtml(String location) {


            return this.resourceLoader.getResource(location + "index.html");
        }
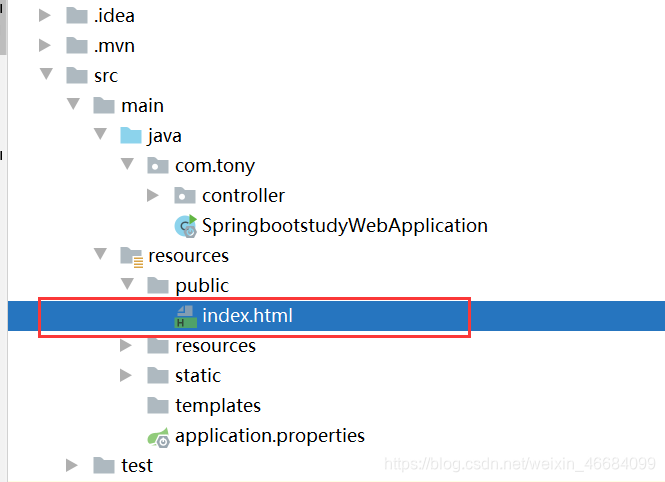
因此从源码可以看出我们在静态资源目录下定义一个index.html文件,SpringBoot将自动识别为首页(欢迎页)
图标log定制
新版本的SpringBoot放弃了对favicon.ico(图标)的支持,
那么如何设置网站图标,可以参考这篇博客自定义图标
模板引擎Thymeleaf
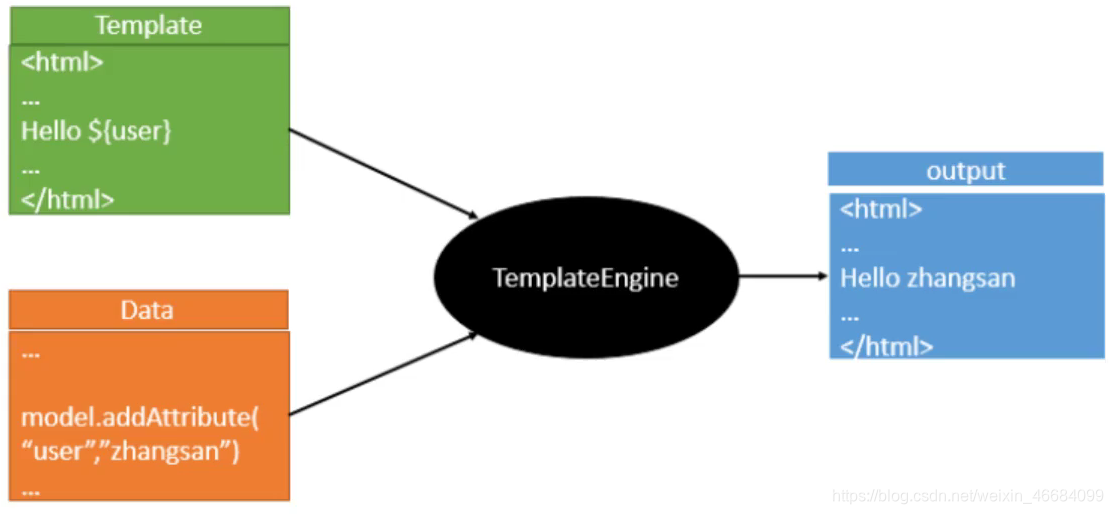
前端交给我们的页面,是html页面。如果是我们以前开发,我们需要把他们转成jsp页面,jsp好处就是当我们查出一些数据转发到JSP页面以后,我们可以用jsp轻松实现数据的显示,及交互等。jsp支持非常强大的功能,包括能写Java代码,但是呢,我们现在的这种情况,
SpringBoot这个项目首先是以jar的方式,不是war,像第二,我们用的还是嵌入式的Tomcat,所以呢,他现在默认是不支持jsp的。
那不支持jsp,如果我们直接用纯静态页面的方式,那给我们开发会带来非常大的麻烦,那怎么办呢,SpringBoot推荐你可以来使用模板引擎。
那么这模板引擎,我们其实大家听到很多,其实jsp就是一个模板引擎,还有以用的比较多的freemarker,包括SpringBoot给我们推荐的Thymeleaf,模板引擎有非常多,但再多的模板引擎,他们的思想都是一样的,什么样一个思想呢我们来看一下这张图。
thymeleaf中文文档:https://raledong.gitbooks.io/using-thymeleaf/content/Chapter1/
导入依赖
使用thymeleaf需要导入依赖
     <!--thymeleaf依赖 都是继续3.X版本开发-->
         <dependency>
            <groupId>org.thymeleaf</groupId>
            <artifactId>thymeleaf-spring5</artifactId>
        </dependency>
        <dependency>
            <groupId>org.thymeleaf.extras</groupId>
            <artifactId>thymeleaf-extras-java8time</artifactId>
        </dependency>
原理分析
根据以往的经验thymeleaf一定存在一个自动配置类ThymeleafProperties 里面标注着对thymeleaf的相关配置
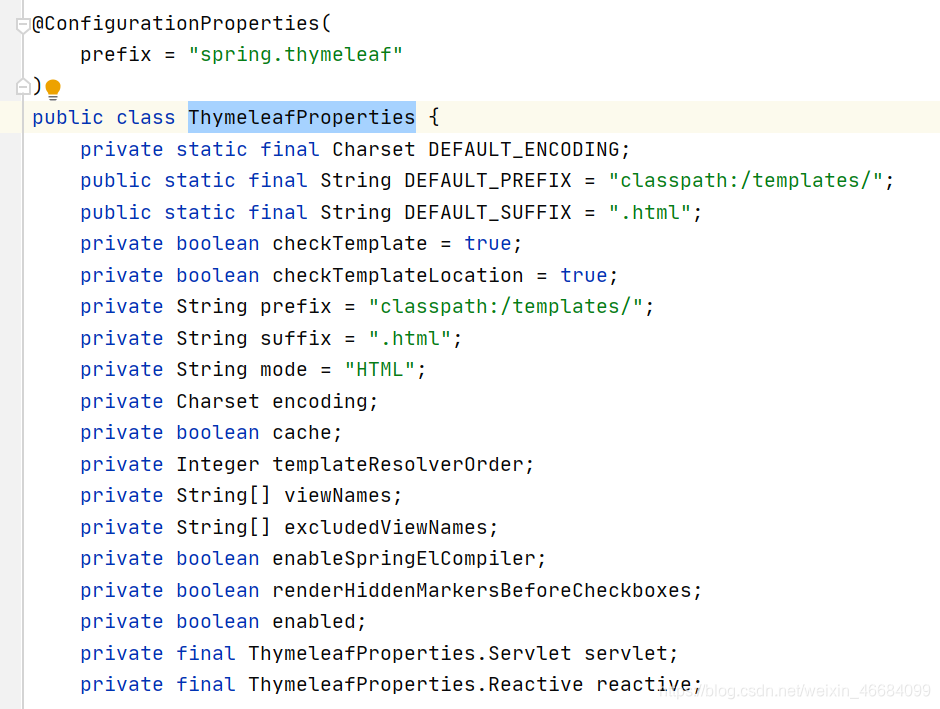
从源码可以看出需要把页面放置在templates目录下,后缀以.html结尾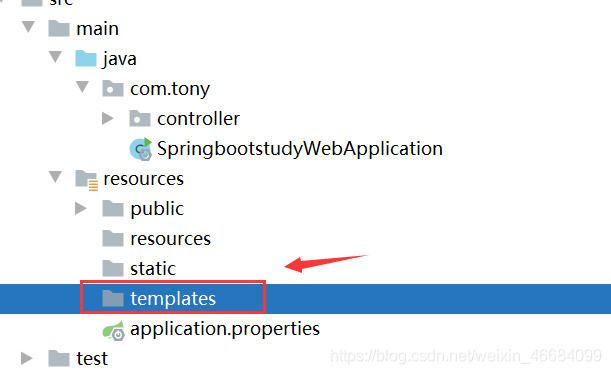
在templates目录下的页面不能直接被访问到,这就与MVC中web/WEB-INF/的目录一样,需要经过Controller跳转才能够访问
初次使用
在templates创建一个text.html页面
使用 需要导入约束
xmlns:th="http://www.thymeleaf.org"
<!DOCTYPE html>
<html lang="en" xmlns:th="http://www.thymeleaf.org">
<head>
    <meta charset="UTF-8">
    <title>Title</title>
</head>
<body>
<!--所有的htmL元素都可以被thymeLeaf替换按管:th:元素名-->
<h1 th:text="${hello}">这是一个测试页</h1>
</body>
</html>
编写Controller
@Controller
public class HelloController {


    @RequestMapping("/text")
    public String testHello(Model model){


        model.addAttribute("hello","hellospringboot");
        return "text";
    }
}
Thymeleaf语法
基本语法:
<!--文本输出-->
<div th:text="${msg}"></div>
<!--不转义文本-->
<div th:utext="${msg}"></div>
<!--遍历数组,集合-->
<h3 th:each="user:${users}" th:text="${user}"></h3>
<h3 th:each="user:${users}">[[${user}]]</h3>
组件:
`th:fragment="sidebar"` 抽取组件
`th:insert="~{dashboard::sidebar}"`插入组件
`th:replace="~{

     dashboard::nowrap}`替换组件,
定义:
url`@{

     }`国际化`#{

     }`参数`${

     }`组件`~{

     }`
方法:

Mvc如何扩展配置
/**
 * 扩展MVC 需要实现WebMvcConfigurer 接口
 * @author Tu_Yooo
 * @Date 2021/4/26 15:41
 */
@Configuration //标注为配置类
//@EnableWebMvc 不要标注此注解 否则此类全面接管MVC的全部配置
public class MyMvcConfig implements WebMvcConfigurer {


   //视图跳转
    @Override
    public void addViewControllers(ViewControllerRegistry registry) {


        //输入/kuang 跳转test页面
        registry.addViewController("/kuang").setViewName("test");
    }

    @Bean
    public ViewResolver myViewResolver(){


        //自动视图解析器交给spring管理
        return new MyViewResolver();
    }

    //实现了ViewResolver 实现了视图解析器的类 就是视图解析器
    public static class MyViewResolver implements ViewResolver {


        //自定义了一个视图解析器
        @Override
        public View resolveViewName(String s, Locale locale) throws Exception {


            return null;
        }
    }
    // 以上功能只是demo演示
}
如果需要一些定制化的功能,只要写这个组件,然后将它交给springboot,springboot就会帮我们自动装配!
为什么加了@EnableWebMvc注解 我们自定义配置类将全面接管MVC配置?
我们点进@EnableWebMvc注解查看,在里面它导入了DelegatingWebMvcConfiguration.class这个类
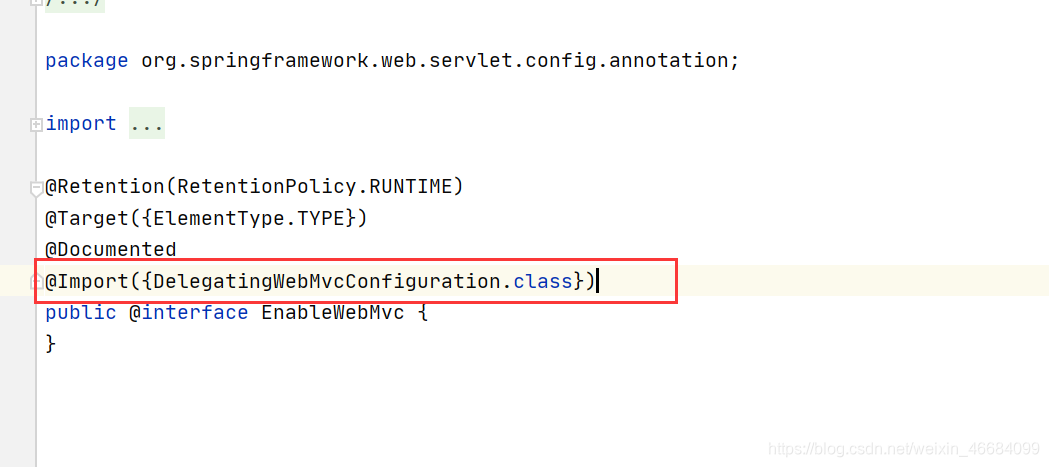
在DelegatingWebMvcConfiguration它继承了WebMvcConfigurationSupport
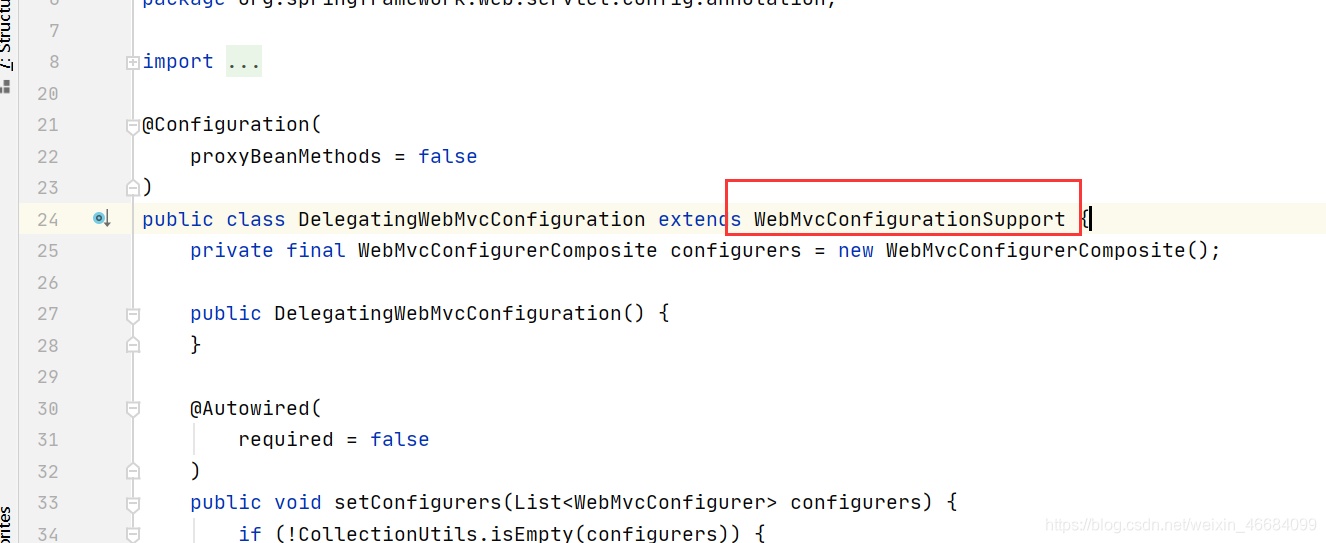
我们回头再看MVC自动配置类WebMvcAutoConfiguration
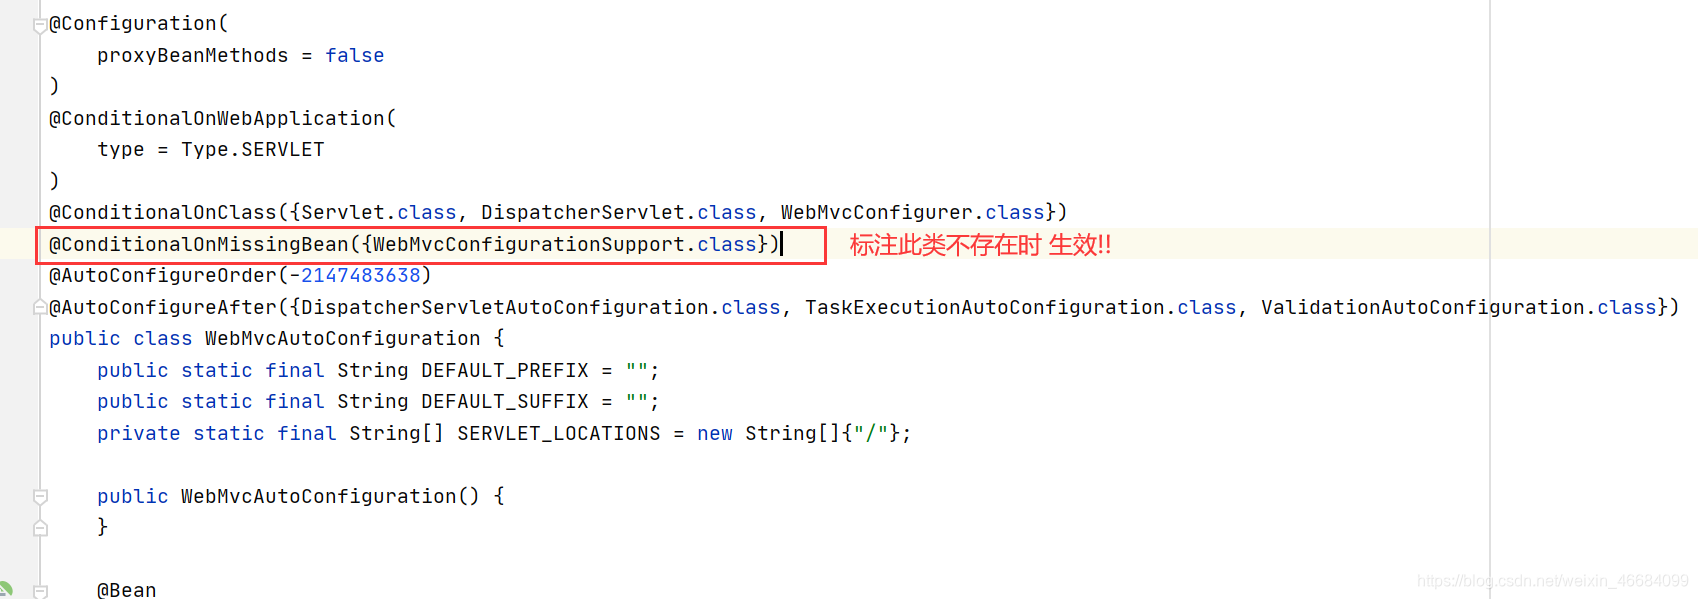
因此当我们在自定义配置类上使用@EnableWebMvc 注解它内部继承了WebMvcConfigurationSupport类 它存在了!! 此时SpringBoot自动配置类WebMvcAutoConfiguration通过@ConditionalOnMissingBean注解全部失效
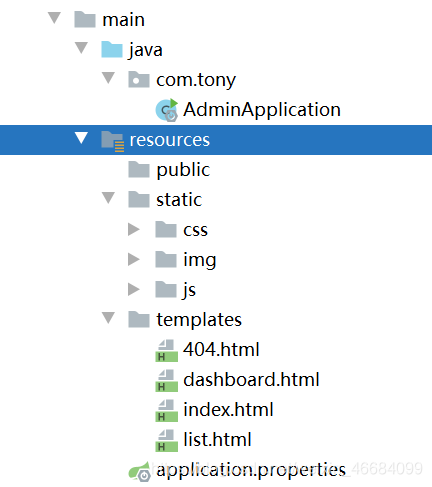
员工管理系统
项目预览
项目准备
静态页面下载地址模板
创建项目
1.创建springboot项目
2.导入静态资源
3.导入依赖
<dependencies>
        <!-- springfox-swagger2 -->
        <dependency>
            <groupId>io.springfox</groupId>
            <artifactId>springfox-swagger2</artifactId>
            <version>2.9.2</version>
        </dependency>
        <!--swagger-ui -->
        <dependency>
            <groupId>io.springfox</groupId>
            <artifactId>springfox-swagger-ui</artifactId>
            <version>2.9.2</version>
        </dependency>
        <!--lombok-->
        <dependency>
            <groupId>org.projectlombok</groupId>
            <artifactId>lombok</artifactId>
        </dependency>
        <!--springboot-web-->
        <dependency>
            <groupId>org.springframework.boot</groupId>
            <artifactId>spring-boot-starter-web</artifactId>
        </dependency>
        <!--thymeleaf模板引擎-->
        <dependency>
            <groupId>org.thymeleaf</groupId>
            <artifactId>thymeleaf-spring5</artifactId>
        </dependency>
        <dependency>
            <groupId>org.thymeleaf.extras</groupId>
            <artifactId>thymeleaf-extras-java8time</artifactId>
        </dependency>
        <!--测试类junit-->
        <dependency>
            <groupId>org.springframework.boot</groupId>
            <artifactId>spring-boot-starter-test</artifactId>
            <scope>test</scope>
            <exclusions>
                <exclusion>
                    <groupId>org.junit.vintage</groupId>
                    <artifactId>junit-vintage-engine</artifactId>
                </exclusion>
            </exclusions>
        </dependency>
    </dependencies>
swagger准备
创建配置类
/**
 * Swagger接口文档配置类
 * @author Tu_Yooo
 * @Date 2021/4/27 9:28
 */
@Configuration
@EnableSwagger2 //开启Swagger
public class SwaggerConfig {


    @Bean
    public Docket docket(){


        return new Docket(DocumentationType.SWAGGER_2)
                .apiInfo(toApiInfo())
                //指定扫描的接口
                .select()
                //扫描路径
                .apis(RequestHandlerSelectors.basePackage("com.tony.controller"))
                //配置过滤路径
                //.paths(PathSelectors.any())
                .build();
    }

    //配置API文档简介
    public ApiInfo toApiInfo(){


        //作者信息
        Contact contact = new Contact("tuTony", "www.kuangstudy.com", "[email protected]");
        return new ApiInfo(
                "员工管理系统API文档",
                "全体起立!",
                "v1.0",
                "www.kuangstudy.com",
                contact,
                "Apache 2.0",
                "http://www.apache.org/licenses/LICENSE-2.0",
                new ArrayList());

    }

}
Dao层准备
POJO
创建部门表
/**
 * 部门表
 * @author Tu_Yooo
 * @Date 2021/4/27 9:25
 */
@Data
@NoArgsConstructor
@AllArgsConstructor
@ApiModel("部门表")
public class Department {


    @ApiModelProperty("部门id")
    private Integer id;
    @ApiModelProperty("部门名称")
    private String departmentName;
}
创建员工表
/**
 * 员工表
 * @author Tu_Yooo
 * @Date 2021/4/27 9:39
 */
@Data
@NoArgsConstructor
@AllArgsConstructor
@ApiModel("员工表")
public class Employee {


    @ApiModelProperty("员工id")
    private Integer id;
    @ApiModelProperty("员工姓名")
    private String lastName;
    @ApiModelProperty("员工邮箱")
    private String email;
    @ApiModelProperty("员工性别")
    private int gander;//0:女 1:男
    @ApiModelProperty("员工部门")
    private Department department;
    @ApiModelProperty("日期")
    private Date birth;

    public Employee(Integer id, String lastName, String email, int gander, Department department) {


        this.id = id;
        this.lastName = lastName;
        this.email = email;
        this.gander = gander;
        this.department = department;
        this.birth = new Date();
    }
}
Dao
这里我们准备的是假数据
部门Dao:
/**
 * 部门dao
 * @author Tu_Yooo
 * @Date 2021/4/27 9:55
 */
@Repository
public class DepartmentDao {


    //模拟数据库里的数据
    private static Map<Integer, Department> map =null;

    static {


        map= new HashMap();//创建部门表
        map.put(1,new Department(1,"财务部"));
        map.put(2,new Department(2,"安保部"));
        map.put(3,new Department(3,"产品部"));
        map.put(4,new Department(4,"市场部"));
        map.put(5,new Department(5,"后勤部"));
    }


    //获得所有部门信息
    public Collection<Department> getAllDepartment(){


        return map.values();
    }

    //通过id得到部门
    public Department getIdDepartment(Integer id){


        return map.get(id);
    }

}
员工Dao:
/**
 * 员工Dao
 * @author Tu_Yooo
 * @Date 2021/4/27 10:06
 */
@Repository
public class EmployeeDao {


    //模拟数据库里的数据
    private static Map<Integer, Employee> map =null;
    //员工所属部门
    @Autowired
    private static DepartmentDao departmentDao;

    static {


        map= new HashMap();//创建部门表
        map.put(1,new Employee(1,"王根基","[email protected]",1,departmentDao.getIdDepartment(1)));
        map.put(2,new Employee(2,"陈映亦","[email protected]",0,departmentDao.getIdDepartment(2)));
        map.put(3,new Employee(3,"李宗原","[email protected]",1,departmentDao.getIdDepartment(3)));
        map.put(4,new Employee(4,"王泽宇","[email protected]",0,departmentDao.getIdDepartment(4)));
        map.put(5,new Employee(5,"谢雨轩","[email protected]",1,departmentDao.getIdDepartment(5)));

    }

    //获取全部员工
    public Collection<Employee> getAllEmployee(){


        return map.values();
    }

    //通过id得到员工
    public Employee getIdEmployee(Integer id){


        return map.get(id);
    }

    //移除员工
    public int delEmployee(Integer id){


        map.remove(id);
        return 1;
    }

    //主键自增
    public static int init =6;
    //新增员工
    public int insertEmployee(Employee employee){


        if(employee.getId()==null){


            employee.setId(init++);
        }
        map.put(employee.getId(),employee);
        return 1;
    }
}
首页实现
创建MVC配置类
/**
 * 扩展MVC
 * @author Tu_Yooo
 * @Date 2021/4/27 11:32
 */
@Configuration
public class MyMvcConfig implements WebMvcConfigurer {


    /**
     * 视图跳转
     * 添加首页控制
     * url:localhost:8080/ 跳转到首页
     * url:localhost:8080/index.html 跳转到首页
     * @param registry
     */
    @Override
    public void addViewControllers(ViewControllerRegistry registry) {


        registry.addViewController("/").setViewName("index");
        registry.addViewController("/index.html").setViewName("index");
    }
}
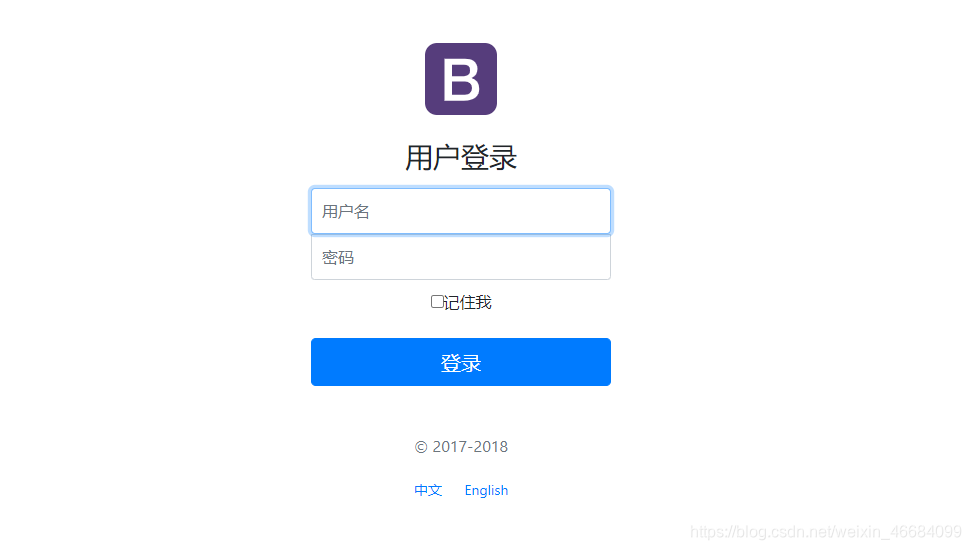
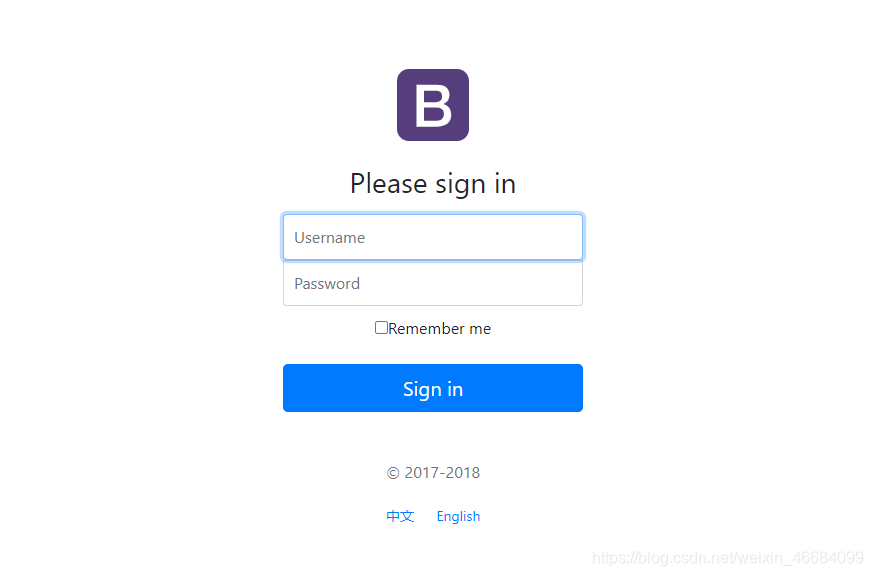
首页访问成功
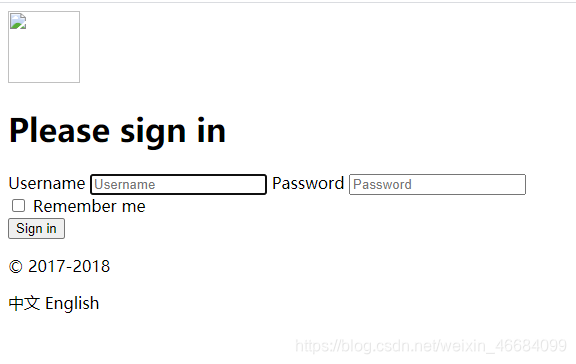
现在出现的问题是静态资源加载不进来
Thymeleaf加载静态资源
1.首先需要在头部导入Thymeleaf约束
xmlns:th="http://www.thymeleaf.org"
2.在Thymeleaf中,所有的链接使用@{}包裹
修改index.html页面
<!DOCTYPE html>
<html lang="en" xmlns:th="http://www.thymeleaf.org">
	<head>
		<meta http-equiv="Content-Type" content="text/html; charset=UTF-8">
		<meta name="viewport" content="width=device-width, initial-scale=1, shrink-to-fit=no">
		<meta name="description" content="">
		<meta name="author" content="">
		<title>首页登录界面</title>
		<!-- Bootstrap core CSS -->
		<!--thymeleaf 所有人url使用 @{}包裹-->
		<link th:href="@{/css/bootstrap.min.css}" rel="stylesheet">
		<!-- Custom styles for this template -->
		<link th:href="@{/css/signin.css}" rel="stylesheet">
	</head>

	<body class="text-center">
		<form class="form-signin" action="dashboard.html">
			<img class="mb-4" th:src="@{/img/bootstrap-solid.svg}" alt="" width="72" height="72">
			<h1 class="h3 mb-3 font-weight-normal">Please sign in</h1>
			<label class="sr-only">Username</label>
			<input type="text" class="form-control" placeholder="Username" required="" autofocus="">
			<label class="sr-only">Password</label>
			<input type="password" class="form-control" placeholder="Password" required="">
			<div class="checkbox mb-3">
				<label>
          <input type="checkbox" value="remember-me"> 记住我
        </label>
			</div>
			<button class="btn btn-lg btn-primary btn-block" type="submit">登录</button>
			<p class="mt-5 mb-3 text-muted">© 2017-2018</p>
			<a class="btn btn-sm">中文</a>
			<a class="btn btn-sm">English</a>
		</form>
	</body>

</html>
所有页面的链接都需要修改,这里就不一一列举了
国际化
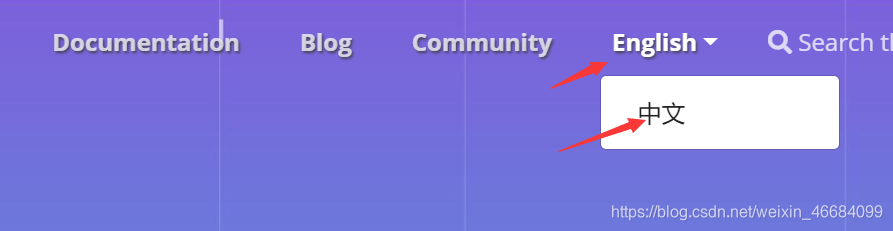
什么是页面国际化?
我们在很多网站上看到的中英文切换,这个就叫做国际化
Spring Boot 和 Spring 一脉相承,对于国际化的支持,默认是通过 AcceptHeaderLocaleResolver 解析器来完成的,这个解析器,默认是通过请求头的 Accept-Language 字段来判断当前请求所属的环境的,进而给出合适的响应。
国际化实现
1.在resource目录下新建i18n(国际化单词的简写)文件夹
国际化,也叫 i18n,为啥叫这个名字呢?因为国际化英文是 internationalization ,在 i 和 n 之间有 18 个字母,所以叫 i18n。我们的应用如果做了国际化就可以在不同的语言环境下,方便的进行切换,最常见的就是中文和英文之间的切换,国际化这个功能也是相当的常见。
2.创建Login.properties三个配置文件
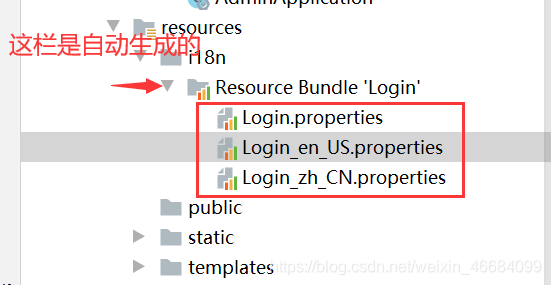
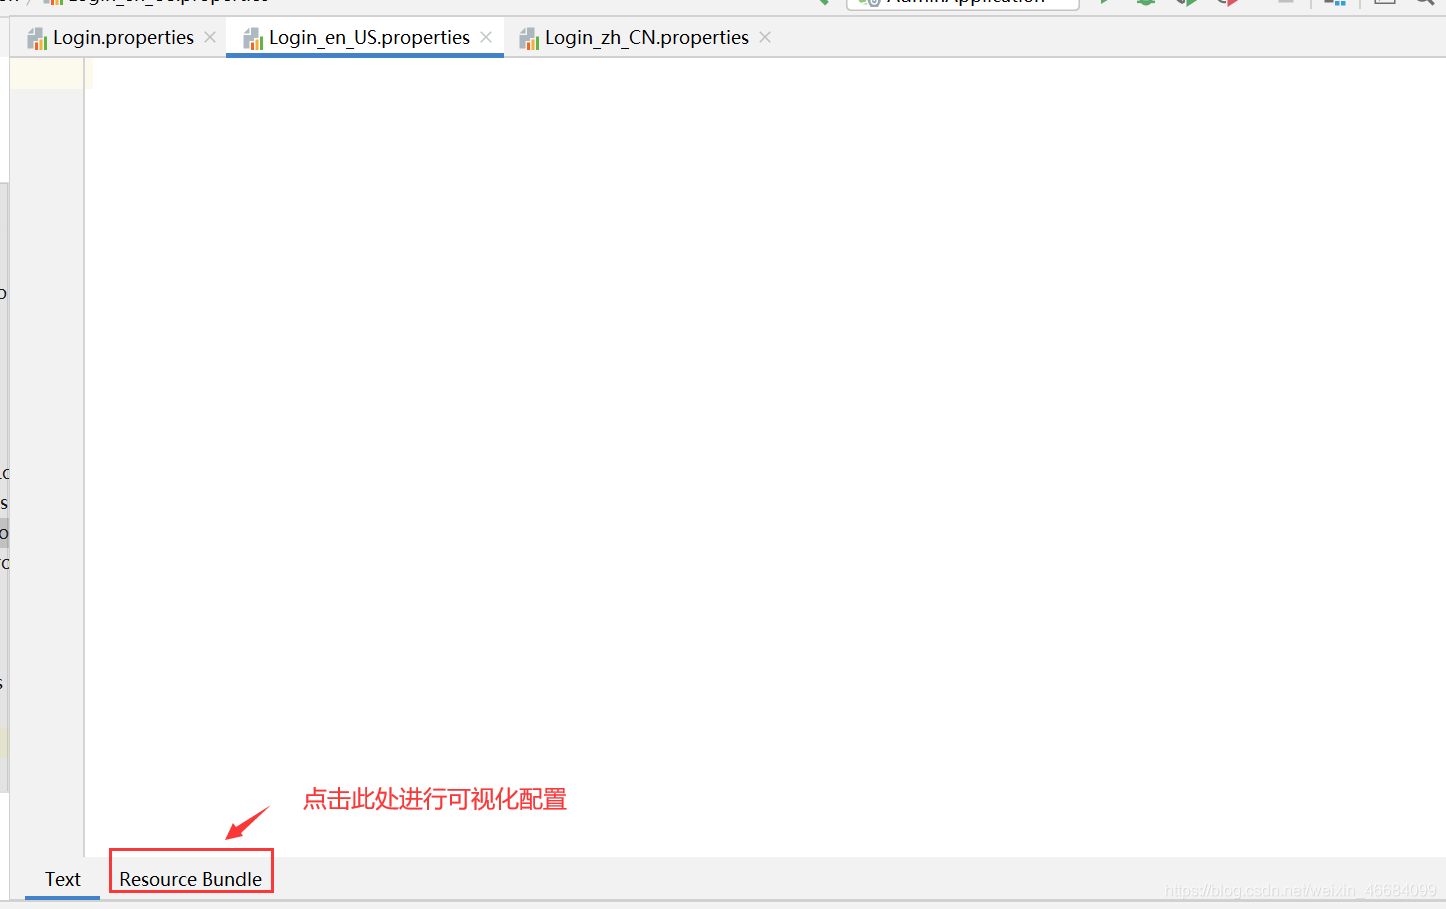
3.可视化配置

Login_en_US.properties(英语)
Login.tip=Please sign in
Login.password=Password
Login.remenber=Remember me
Login.username=Username
Login.sign=Sign in
Login_zh_CN.properties(中文)
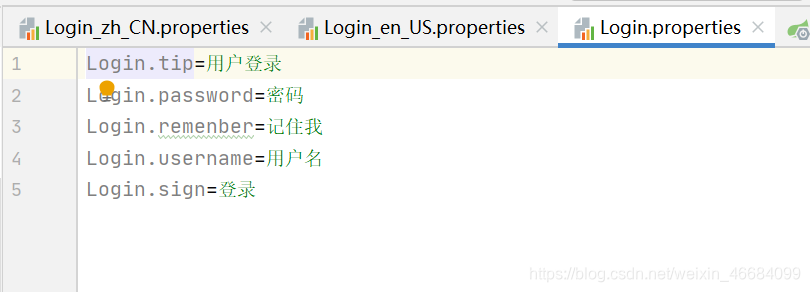
Login.tip=用户登录
Login.password=密码
Login.remenber=记住我
Login.username=用户名
Login.sign=登录
4.在springboot配置文件application.properties中指定国际化配置文件路径
# 配置国际化文件位置
spring.messages.basename=i18n.Login
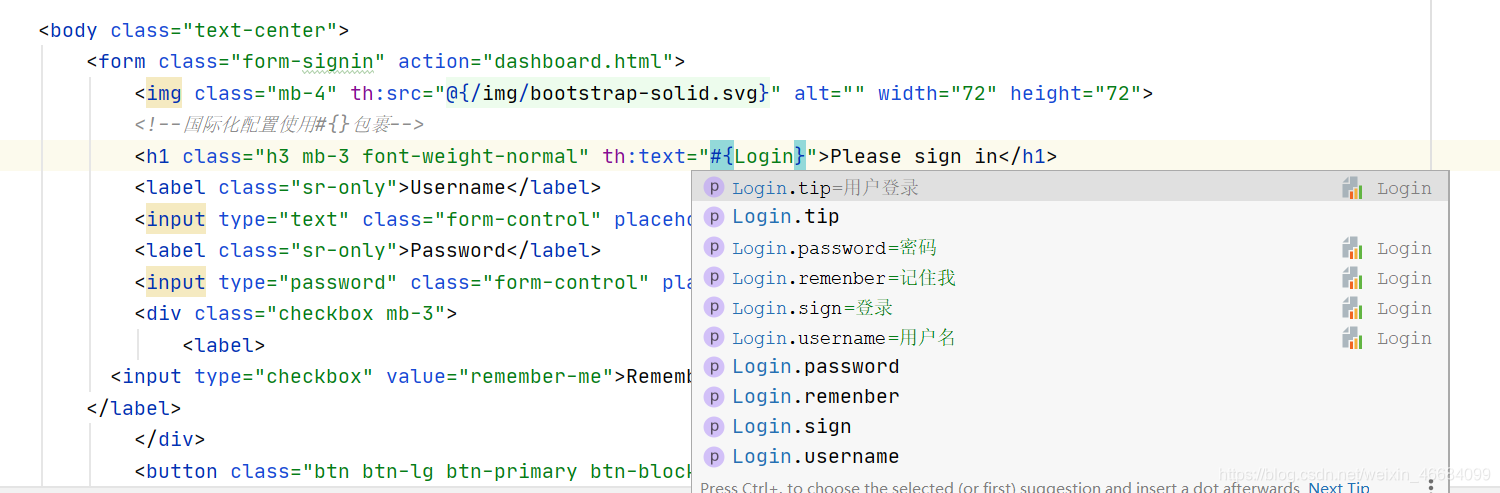
5.在Thymeleaf中国际化的配置需要使用#{}包裹
编辑index.html页面
<!DOCTYPE html>
<html lang="en" xmlns:th="http://www.thymeleaf.org">
	<head>
		<meta http-equiv="Content-Type" content="text/html; charset=UTF-8">
		<meta name="viewport" content="width=device-width, initial-scale=1, shrink-to-fit=no">
		<meta name="description" content="">
		<meta name="author" content="">
		<title>首页登录界面</title>
		<!-- Bootstrap core CSS -->
		<!--thymeleaf 所有人url使用 @{}包裹-->
		<link th:href="@{/css/bootstrap.min.css}" rel="stylesheet">
		<!-- Custom styles for this template -->
		<link th:href="@{/css/signin.css}" rel="stylesheet">
	</head>

	<body class="text-center">
		<form class="form-signin" action="dashboard.html">
			<img class="mb-4" th:src="@{/img/bootstrap-solid.svg}" alt="" width="72" height="72">
			<!--国际化配置使用#{}包裹-->
			<h1 class="h3 mb-3 font-weight-normal" th:text="#{Login.tip}">Please sign in</h1>
			<label class="sr-only">[[#{Login.username}]]</label>
			<input type="text" class="form-control" th:placeholder="#{Login.username}" required="" autofocus="">
			<label class="sr-only">[[#{Login.password}]]</label>
			<input type="password" class="form-control" th:placeholder="#{Login.password}" required="">
			<div class="checkbox mb-3">
				<label>
          <input type="checkbox" value="remember-me">[[#{Login.remenber}]]
        </label>
			</div>
			<button class="btn btn-lg btn-primary btn-block" type="submit" th:text="#{Login.sign}">Sign in</button>
			<p class="mt-5 mb-3 text-muted">© 2017-2018</p>
			<a class="btn btn-sm">中文</a>
			<a class="btn btn-sm">English</a>
		</form>

	</body>

</html>
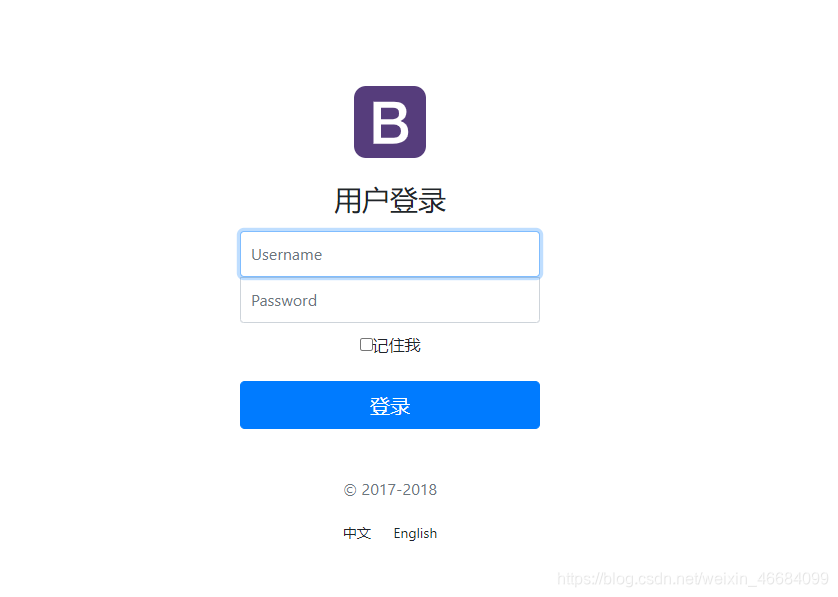
6.配置中英文切换
在index.html中配置中英文切换请求路径
 <!--配置国际化请求 在thymeleaf中参数用()包裹-->
	<a class="btn btn-sm" th:href="@{/index.html(l='zh_CN')}">中文</a>
	<a class="btn btn-sm" th:href="@{/index.html(l='en_US')}">English</a>
编写国际化配置类
/**
 * 国际化配置类
 * 需要实现LocaleResolver
 * @author Tu_Yooo
 * @Date 2021/4/27 15:17
 */
public class MyLocaleResolover implements LocaleResolver {


    //解析请求
    @Override
    public Locale resolveLocale(HttpServletRequest httpServletRequest) {


        //获取请求中的语言参数
        String languge = httpServletRequest.getParameter("l");
        Locale locale = Locale.getDefault();//如果没有泽使用默认的
        //如果请求的链接携带了国际化参数
        if(!StringUtils.isEmpty(languge)){


            //zh_CN
            String[] s = languge.split("_");
            //国际 地区
            locale = new Locale(s[0], s[1]);
        }
        return locale;
    }

    @Override
    public void setLocale(HttpServletRequest httpServletRequest, HttpServletResponse httpServletResponse, Locale locale) {


    }
}
将国际化配置类放入spring容器
/**
 * 扩展MVC
 * @author Tu_Yooo
 * @Date 2021/4/27 11:32
 */
@Configuration
public class MyMvcConfig implements WebMvcConfigurer {


    /**
     * 视图跳转
     * 添加首页控制
     * url:localhost:8080/ 跳转到首页
     * url:localhost:8080/index.html 跳转到首页
     * @param registry
     */
    @Override
    public void addViewControllers(ViewControllerRegistry registry) {


        registry.addViewController("/").setViewName("index");
        registry.addViewController("/index.html").setViewName("index");
    }

    /**
     * 讲国际化配置放到spring容器管理
     * @return 自定义的国际化配置
     */
    @Bean
    public LocaleResolver localeResolver(){


        return new MyLocaleResolover();
    }

}

小结
1.首页配置:
- 所有页面的静态资源都需要使用thymeleaf接管;
- url:@{}
1.页面国际化∶
- 我们需要配置
i18n文件 - 我们如果需要在项目中进行按钮自动切换,我们需要自定义一个组件
LocaleResolver - 记得将自己写的组件配置到spring容器
@Bean - 国际化使用:#{}
登录功能实现
编写index.html设置请求路径
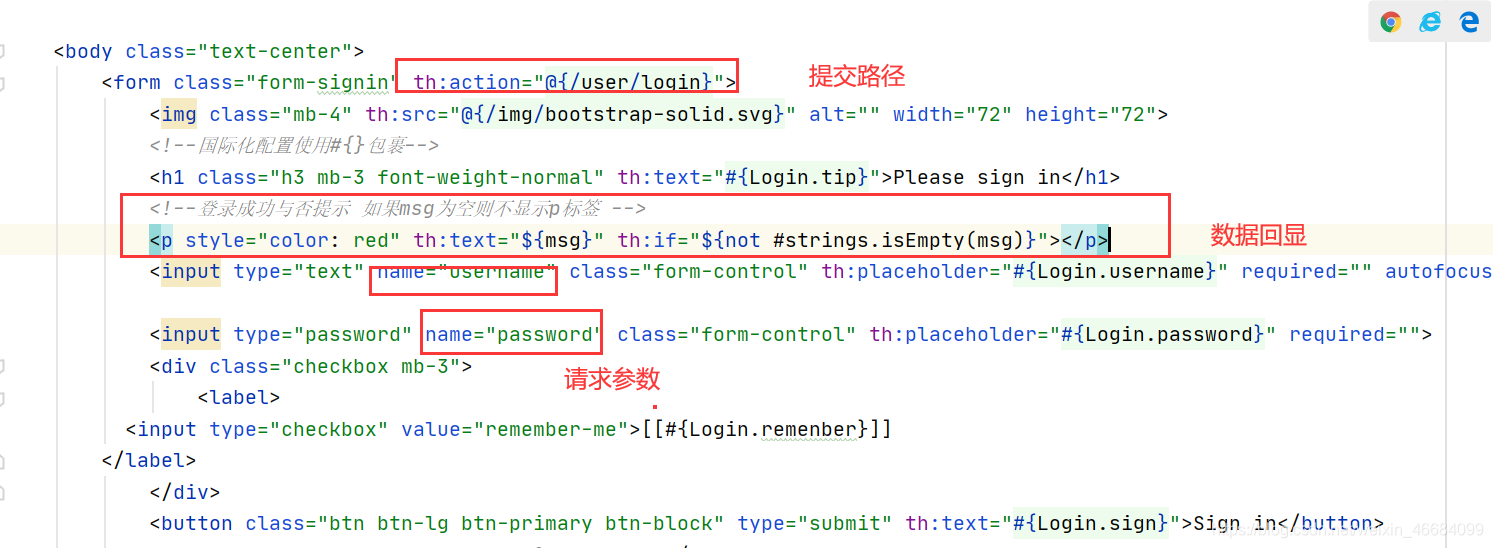
编写LoginController
/**
 * 登录功能实现
 * @author Tu_Yooo
 * @Date 2021/4/27 15:59
 */
@Controller
public class LoginController {


    //登录功能 伪造假数据
    @RequestMapping("/user/login")
    public String login(@RequestParam("username") String username, @RequestParam("password")String password, Model model){


        if (!StringUtils.isEmpty(username.trim()) && password.trim().equals("123456")){


            model.addAttribute("msg","登录成功");
            return "redirect: /main.html"; //重定向
        }
        model.addAttribute("msg","账号或密码错误");
        return "index";
    }
}
编写MVC自定义配置
   /**
     * 视图跳转
     * 添加首页控制
     * url:localhost:8080/ 跳转到首页
     * url:localhost:8080/index.html 跳转到首页
     * @param registry
     */
    @Override
    public void addViewControllers(ViewControllerRegistry registry) {


        registry.addViewController("/").setViewName("index");
        registry.addViewController("/index.html").setViewName("index");
        //登录重定向
        registry.addViewController("/main.html").setViewName("dashboard");
    }
拦截器
没有登录的用户不允许进入其他页面
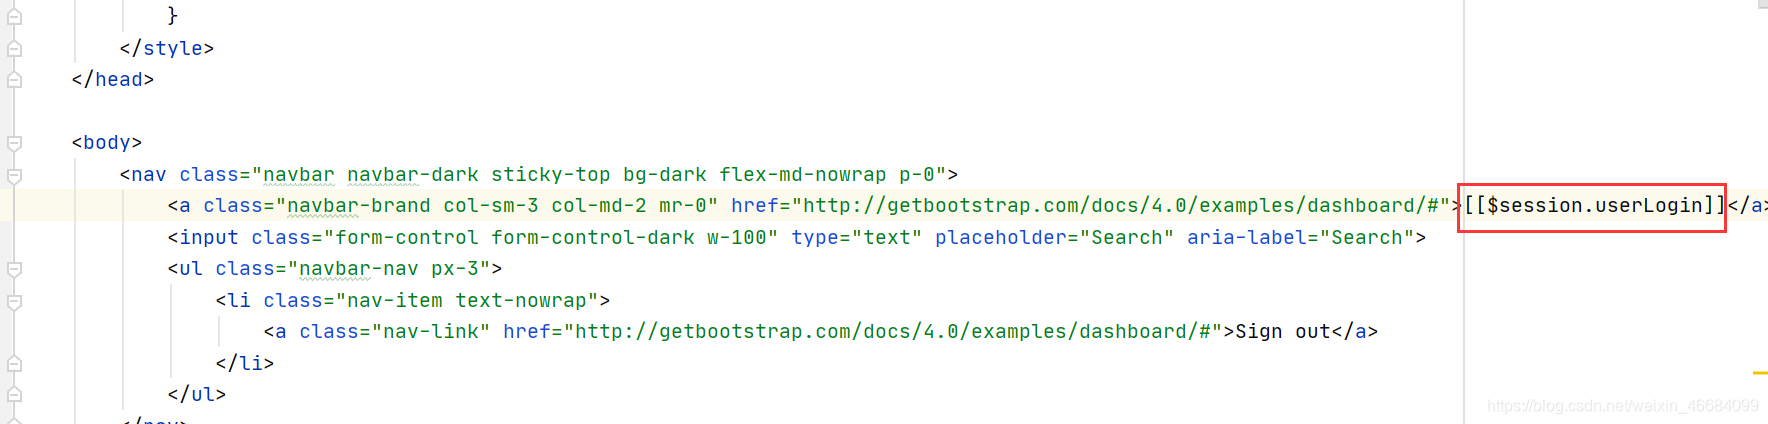
修改LoginController
修改LoginController代码,登录成功以后将用户信息放在session中:
   //登录功能 伪造假数据
    @RequestMapping("/user/login")
    public String login(@RequestParam("username") String username, @RequestParam("password")String password, Model model, HttpSession httpSession){


        if (!StringUtils.isEmpty(username.trim()) && password.trim().equals("123456")){


            model.addAttribute("msg","登录成功");
            httpSession.setAttribute("userLoginInfo",username);//登录成功以后将用户信息放置在Session中
            return "redirect:/main.html"; //重定向
        }
        model.addAttribute("msg","账号或密码错误");
        return "index";
    }
编写拦截器
/**
 * 自定义拦截器
 * 拦截未登录的用户
 * @author Tu_Yooo
 * @Date 2021/4/27 16:37
 */
public class MyInterceptor implements HandlerInterceptor {


    //判断用户是否登录 从session中判断
    @Override
    public boolean preHandle(HttpServletRequest request, HttpServletResponse response, Object handler) throws Exception {


        //获取Session
        HttpSession session = request.getSession();
        //判断是否在登录页面
        if(request.getRequestURI().contains("index")){


            return true;
        }
        //判断是否登录过了
        if(session.getAttribute("userLogin")!=null){


            return true;
        }
        // 用户没有登陆跳转到登陆页面
        request.setAttribute("msg","没有登录请先登录!");
        request.getRequestDispatcher("/").forward(request, response);
        return false;
    }
}
在MVC自定义配置类中设置
 //配置拦截器
    @Override
    public void addInterceptors(InterceptorRegistry registry) {


        registry.addInterceptor(new MyInterceptor())
                //拦截哪些请求
                .addPathPatterns("/**")
                //不拦截哪些请求 首页 登录请求 静态资源
                .excludePathPatterns("/","/index.html","/user/login","/css/**","/js/**","/img/**");
    }
在dashboard.html回显用户信息
编写dashboard.html
在需要回显的位置设置如下:
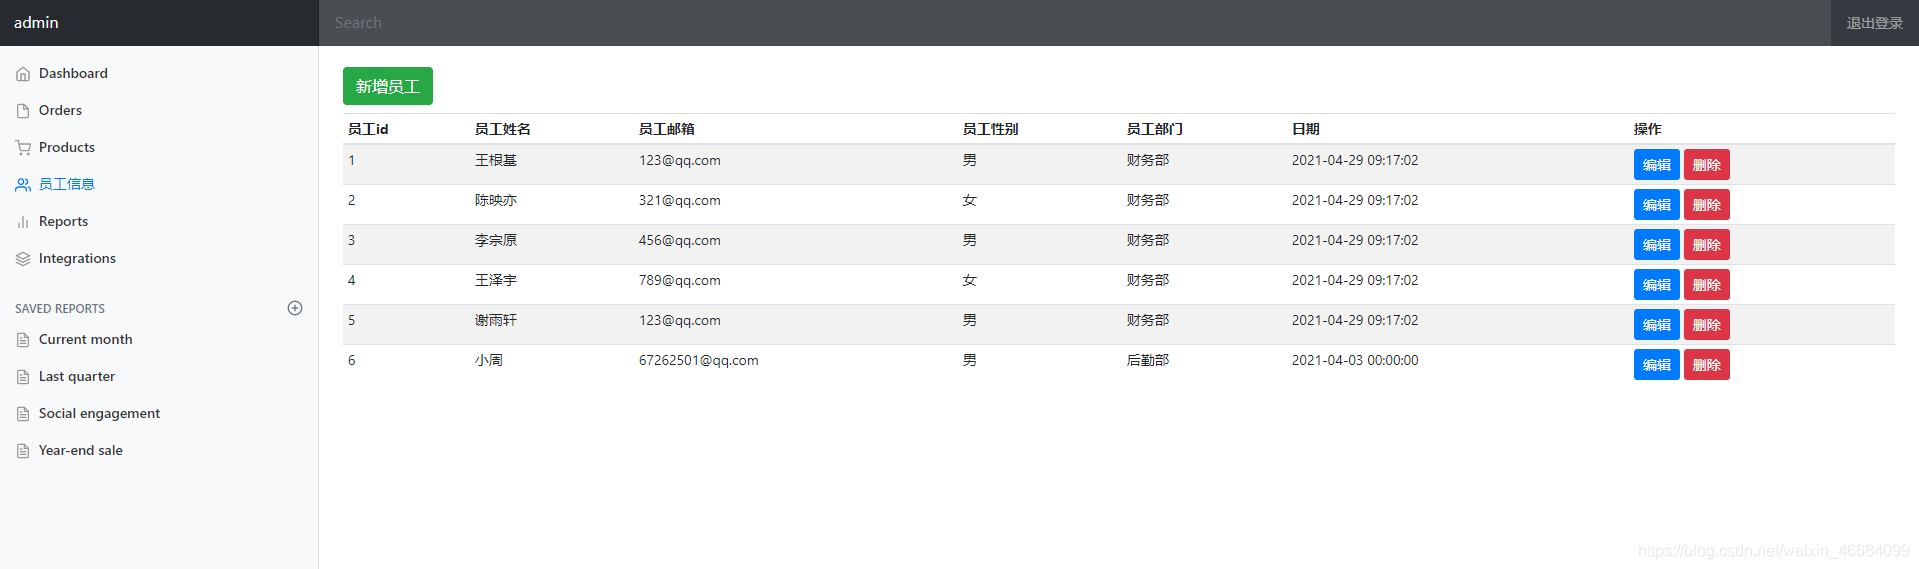
员工列表展示
编写EmployeeController
@Controller
@Api("员工信息服务")
public class EmployeeController {


    @Autowired
    private EmployeeDao employeeDao;
    /**
     * 查询全部员工
     * @param model 封装员工信息
     * @return 返回列表页
     */
    @GetMapping("/employee/alluser")
    public String qureyEmployeeAll(Model model){


        Collection<Employee> allEmployee = employeeDao.getAllEmployee();
        model.addAttribute("list",allEmployee);
        return "list";
    }
}
页面相关
组件说明
1.页面很多内容都是相同的,我们可以使用th:fragment="sidebar" 抽取组件
2.使用th:insert="~{dashboard::sidebar}"插入组件
3.还可以使用th:replace="~{dashboard::nowrap}替换组件,这两种方法都可以实现组件复用
4.注意点 组件的插入使用~{}
5.回顾之前:url@{},国际化#{}参数${}组件~{}
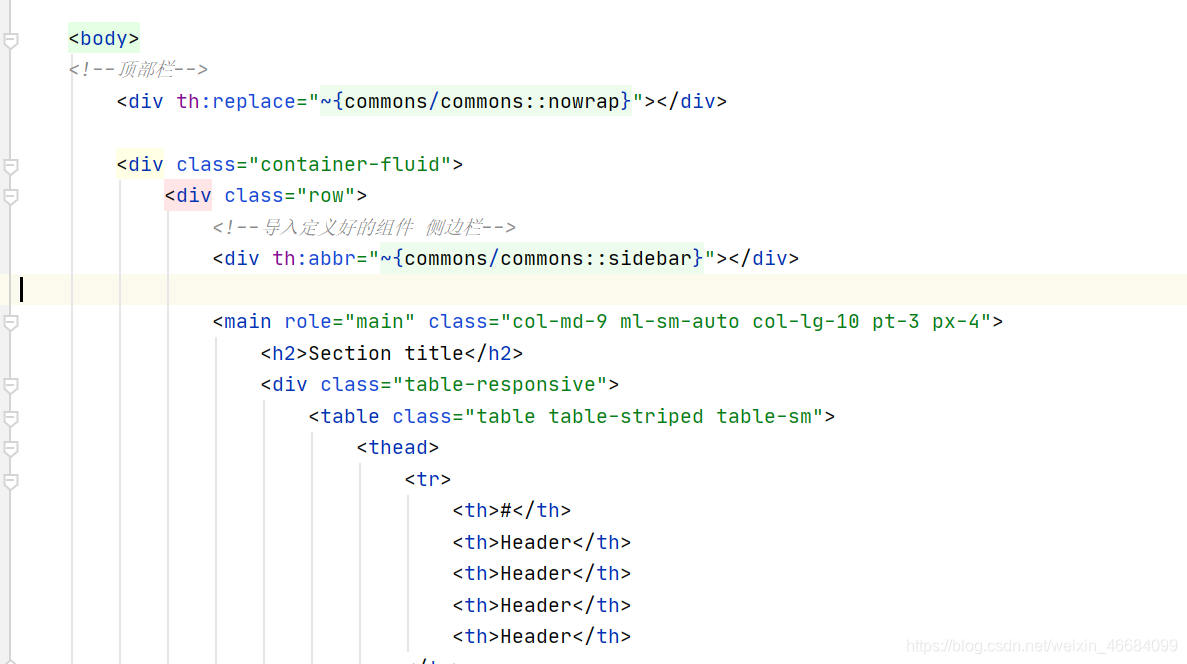
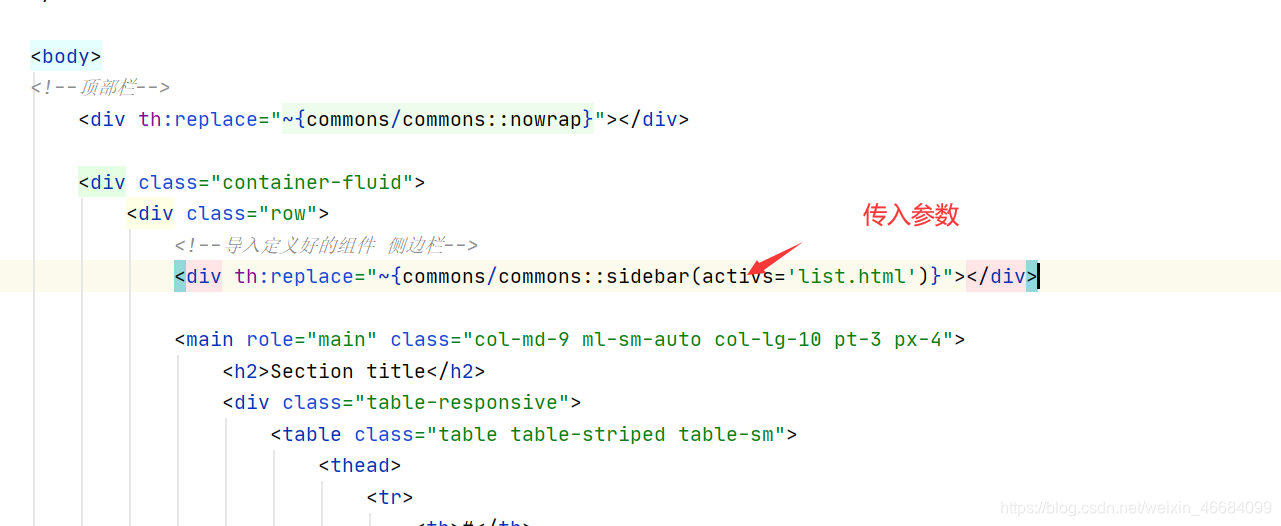
定义公共页面抽取组件
在templates下创建commons/commons.html统一定义组件
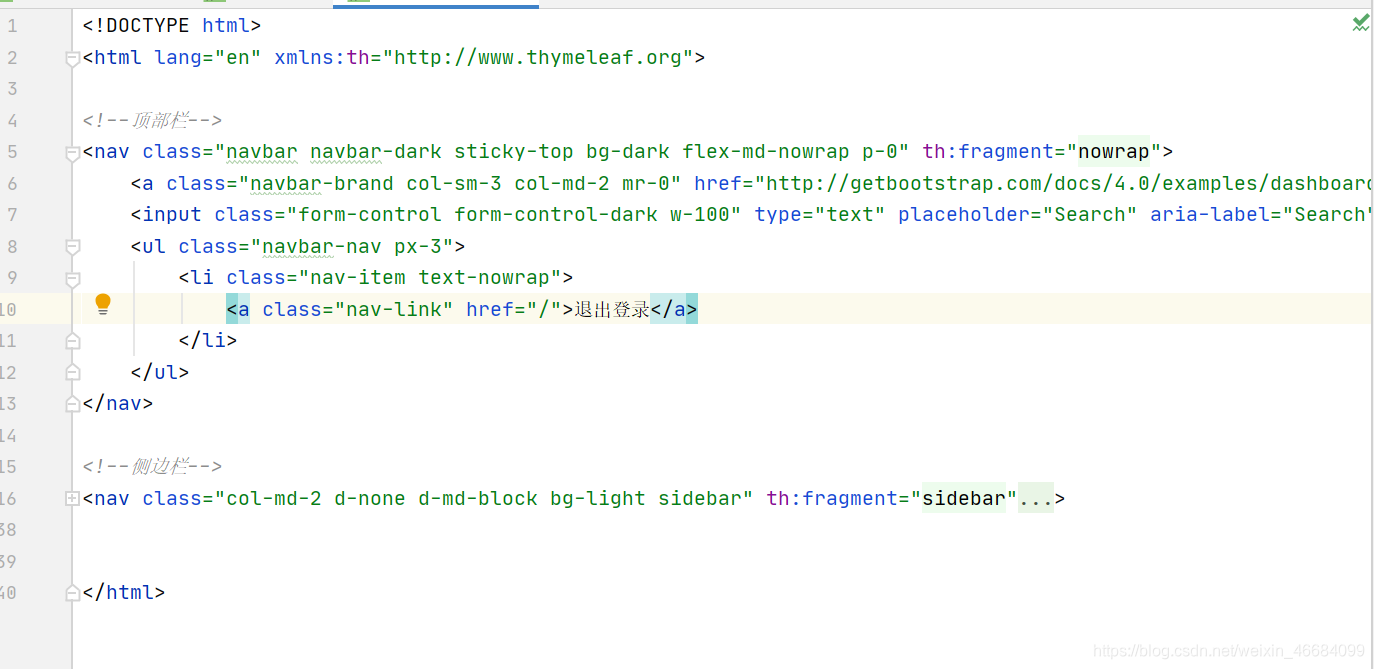
dashdashboard页面插入组件
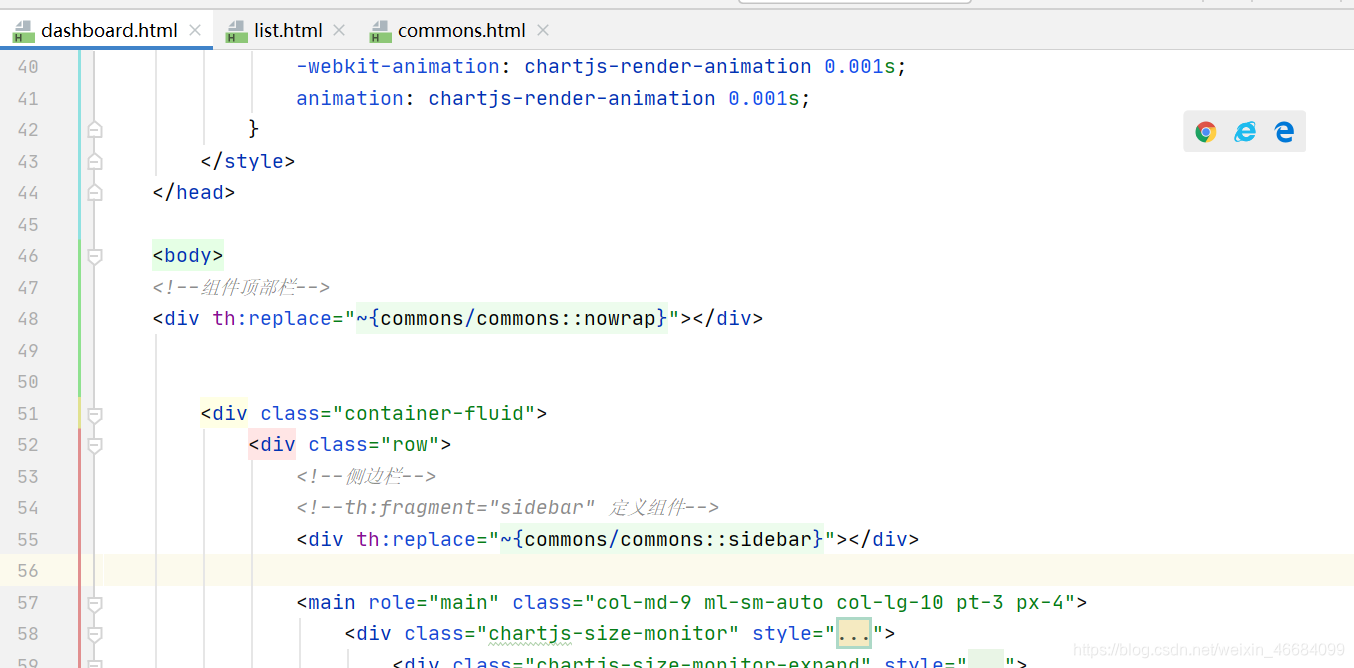
list页面插入组件
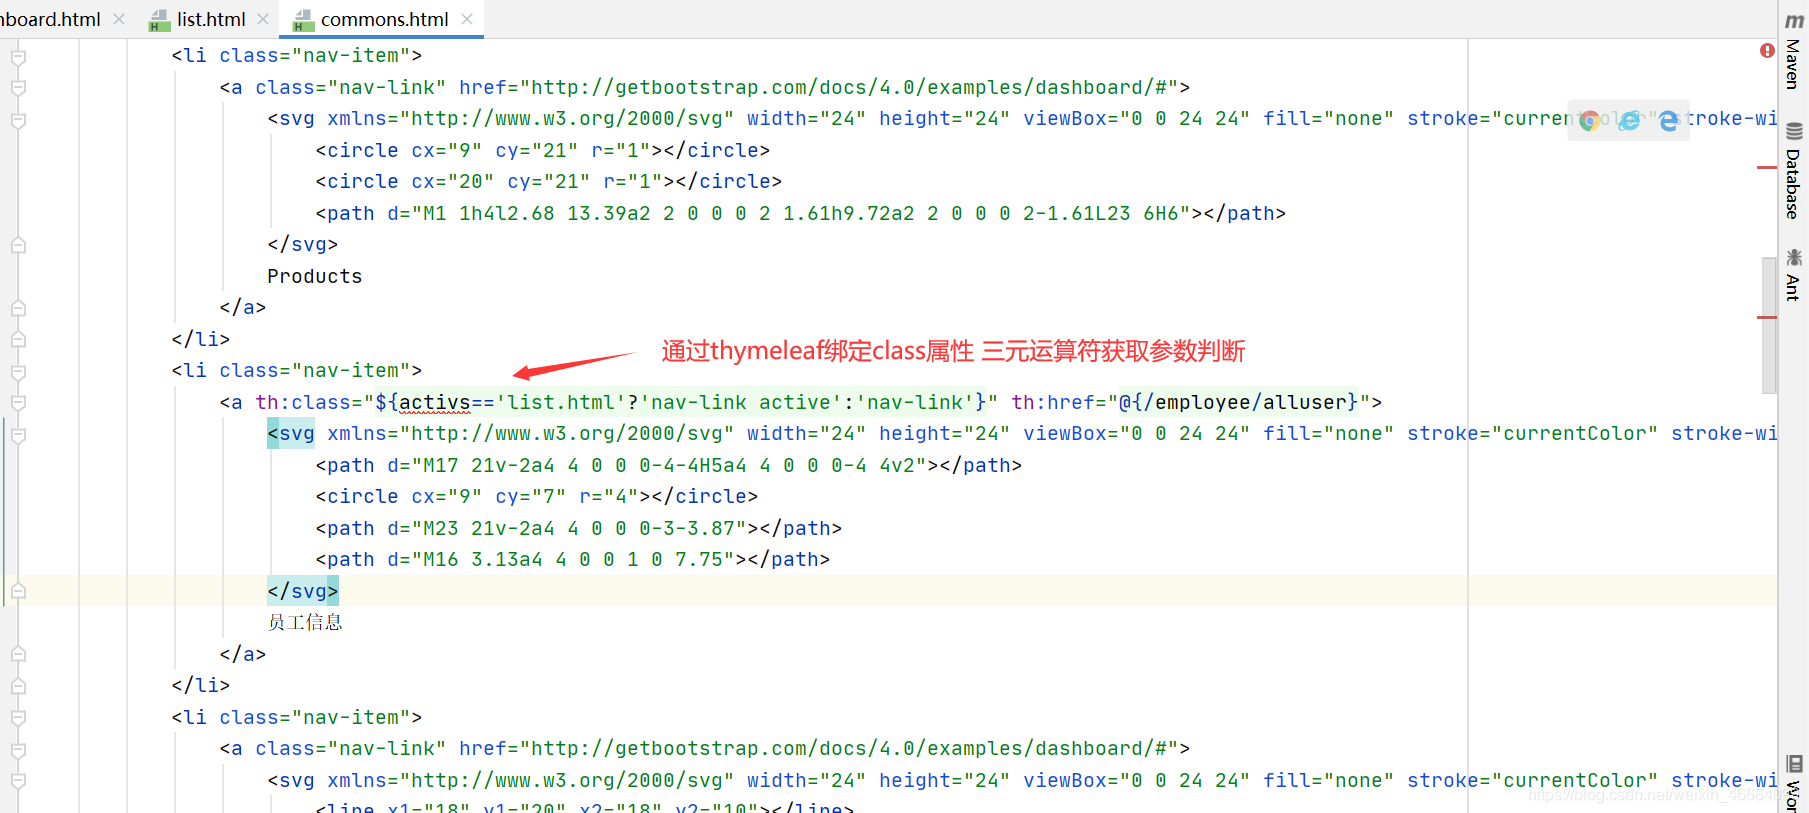
按钮高亮
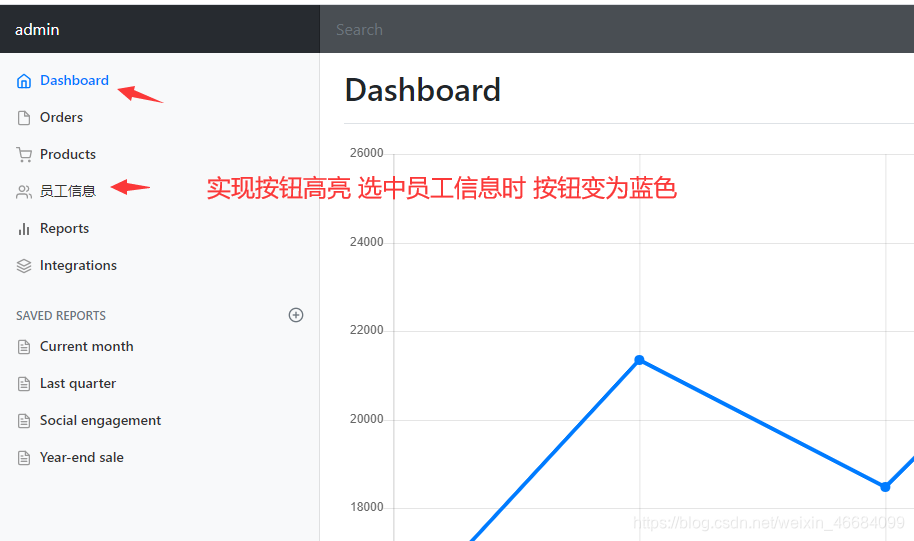
修改list.html
修改coomons.html
数据展示
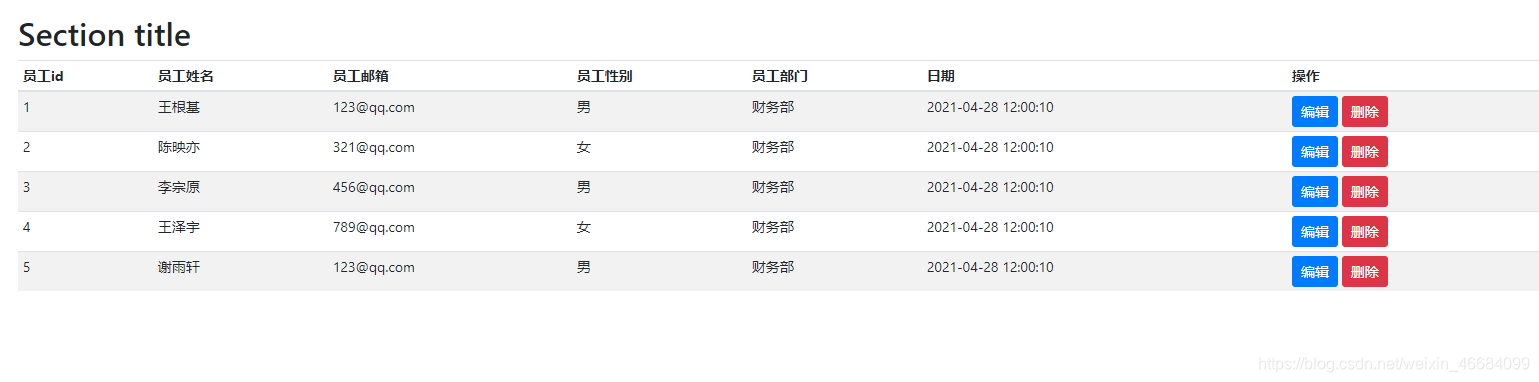
编辑list.html
<main role="main" class="col-md-9 ml-sm-auto col-lg-10 pt-3 px-4">
<h2>Section title</h2>
<div class="table-responsive">
<table class="table table-striped table-sm">
<thead>
<tr>
<th>员工id</th>
<th>员工姓名</th>
<th>员工邮箱</th>
<th>员工性别</th>
<th>员工部门</th>
<th>日期</th>
<th>操作</th>
</tr>
</thead>
<tbody>
<tr th:each="user:${list}">
<td th:text="${user.getId()}"></td>
<td th:text="${user.getLastName()}"></td>
<td th:text="${user.getEmail()}"></td>
<td th:text="${user.getGander()==0?'女':'男'}"></td>
<td th:text="${user.getDepartment().getDepartmentName()}"></td>
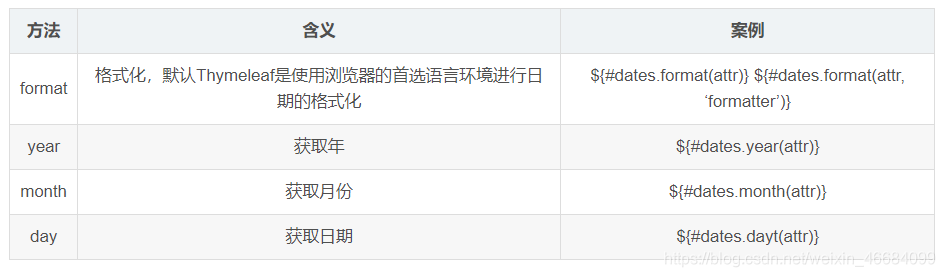
<td th:text="${#dates.format(user.getBirth(),'yyyy-MM-dd HH:mm:ss')}"></td>
<td>
<button class="btn btn-sm btn-primary">编辑</button>
<button class="btn btn-sm btn-danger">删除</button>
</td>
</tr>
</tbody>
</table>
</div>
</main>
404处理
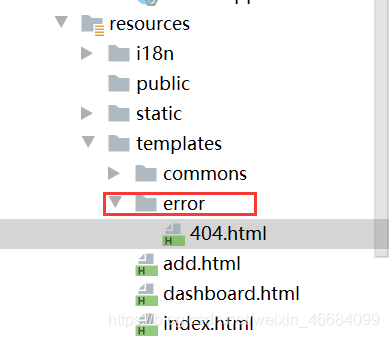
在SpringBoot中404的处理极其简单,只需要创建templates/error文件夹,并将404页面放置进来即可
补充
前端传进来的时间格式如果是yyyy/MM/dd 需要在Springboot配置文件中修改默认时间格式
#配置日期格式 默认是yyyy/MM/dd
spring.mvc.date-format=yyyy-MM-dd

# 关闭模板引擎的缓存
spring.thymeleaf.cache=false