模板引擎
常用的模板引擎:JSP,Velocity,Freemarker,Thymeleaf等等
SpringBoot使用嵌入式的Tomcat,默认不支持JSP
SpringBoot推荐Thymeleaf,语法更简单,功能更强大
<groupId>org.springframework.boot</groupId>
<artifactId>spring-boot-starter-thymeleaf</artifactId>
<java.version>1.8</java.version>
<thymeleaf.version>3.0.2.RELEASE</thymeleaf.version>
<!--布局功能的支持程序,Thymeleaf主程序已经指定版本3, 要求layout2以上的版本-->
<thymeleaf-layout-dialect.version>2.1.1</thymeleaf-layout-dialect.version>
只要把html页面放在类路径下的resources/templetes/文件夹下,Thymeleaf就可以自动帮我们渲染页面了
(1)导入Thymeleaf的名称空间,在html的文件头写上
<html lang="en" xmlns:th="http://www.thymeleaf.org">
<!---注意:xmlns:th="http://www.thymeleaf.org"这句话在头文件的声明是必要的,
<html lang="en" xmlns:th="http://www.thymeleaf.org">
//访问的资源实际是:resources/templates/helloPage.html
现在Controller后台请求参数中,添加一个map,用来承载返回给客户端可访问的数据遍历,如我添加一个helloTest的变量并赋值 :
public String helloPage(Map<String, Object> map)
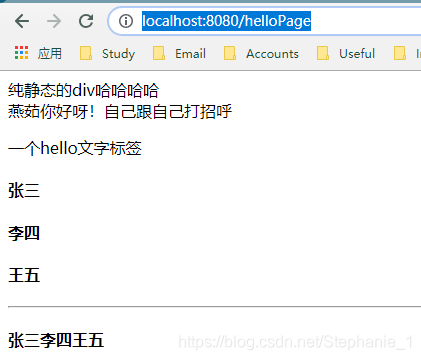
map.put("helloTest", "燕茹你好呀!自己跟自己打招呼");
//访问的资源实际是:resources/templates/helloPage.html
<!---注意:xmlns:th="http://www.thymeleaf.org"这句话在头文件的声明是必要的,
<html lang="en" xmlns:th="http://www.thymeleaf.org">
<div th:text="${helloTest}">默认内容会被覆盖的</div>
运行结果,如果helloTest这个变量成功取到,div内容直接展示${}中的值内容,运行截图:

<!--关于th的其他用法,每个th:后面的属性赋值 用来替换原先默认的id="id1"赋的值--->
<div id="id1" class="class2" th:id="myId" th:class="myClass"></div>
变量表达式: $ {...},功能:获取对象的属性,调用方法,使用内置基本对象(${#ctx的属性});
#request : (only in Web Contexts) the HttpServletRequest object.
#response : (only in Web Contexts) the HttpServletResponse object.
#session : (only in Web Contexts) the HttpSession object.
#servletContext : (only in Web Contexts) the ServletContext object.
#ctx : the context object. An implementation of org.thymeleaf.context.IContext or
org.thymeleaf.context.IWebContext depending on our environment (standalone or w
Note #vars and #root are synomyns for the same object, but using #ctx is recomm
* ======================================================================
* See javadoc API for class org.thymeleaf.context.IContext
* ======================================================================
* ======================================================================
* See javadoc API for class org.thymeleaf.context.IWebContext
* ======================================================================
#execInfo : information about the template being processed.
#messages : methods for obtaining externalized messages inside variables expressions, in the same way as they
would be obtained using #{…} syntax.
#uris : methods for escaping parts of URLs/URIs
#conversions : methods for executing the configured conversion service (if any).
#dates : methods for java.util.Date objects: formatting, component extraction, etc.
#calendars : analogous to #dates , but for java.util.Calendar objects.
#numbers : methods for formatting numeric objects.
#strings : methods for String objects: contains, startsWith, prepending/appending, etc.
#objects : methods for objects in general.
#bools : methods for boolean evaluation.
#aggregates : methods for creating aggregates on arrays or collections.
#ids : methods for dealing with id attributes that might be repeated (for example, as a result of an iteration).
<div th:object="${session.user}">
<p>Name: <span th:text="*{firstName}">Sebastian</span>.</p>
<p>Surname: <span th:text="*{lastName}">Pepper</span>.</p>
<p>Nationality: <span th:text="*{nationality}">Saturn</span>.</p>
<p>Name: <span th:text="${session.user.firstName}">Sebastian</span>.</p>
<p>Surname: <span th:text="${session.user.lastName}">Pepper</span>.</p>
<p>Nationality: <span th:text="${session.user.nationality}">Saturn</span>.</p>
public String helloPage(Map<String, Object> map)
map.put("helloTest", "燕茹你好呀!自己跟自己打招呼");
map.put("hello","<p>一个hello文字标签</p>");
map.put("users", Arrays.asList("张三","李四","王五"));//一个数组
//访问的资源实际是:resources/templates/helloPage.html
<!---注意:xmlns:th="http://www.thymeleaf.org"这句话在头文件的声明是必要的,
<html lang="en" xmlns:th="http://www.thymeleaf.org">
<div th:text="${helloTest}">默认内容会被覆盖的</div>
<div id="id1" class="class2" th:id="myId" th:class="myClass"></div>
<div th:utext="${hello}">默认1</div>
<!--循环语句,th:each每次遍历都会生成当前这个标签, th:text表示子元素的内容,这个写法会有3个H4-->
<h4 th:text="${user}" th:each="user:${users}"></h4>
<span th:each="user:${users}">[[${user}]]</span>
以下是Spring Boot 对SprinngMVC的自动配置:
The auto-configuration adds the following features on top of Spring’s defaults:
(1)Inclusion of ContentNegotiatingViewResolver and BeanNameViewResolver
beans.自动配置了ViewResolver(视图解析器:决定根据方法的返回值得到视图对象(View),视图对象决定如何渲染(是转发、还是重定向到页面)
ContentNegotiatingViewResolver :组合所有的视图解析器
如何定制:我们可以自己给容器中添加一个视图解析器,自动的将其组合进来;(我在本地测试添加自己的视图解析器的时候,没有运行成功)以下被注释的代码,启动时就会报错
import org.springframework.boot.SpringApplication;
import org.springframework.boot.autoconfigure.SpringBootApplication;
import org.springframework.context.annotation.Bean;
import org.springframework.web.servlet.View;
import org.springframework.web.servlet.ViewResolver;
public class DemoApplication {
public static void main(String[] args) {
SpringApplication.run(DemoApplication.class, args);
// @Bean //向容器中添加一个组件,添加一个自己自定义的视图解析器
// public ViewResolver myViewResolver()
// return new MyViewResolver();
// public static class MyViewResolver implements ViewResolver{
// public View resolveViewName(String viewName, Locale locale) throws Exception {
(2)Support for serving static resources, including support for WebJars
(3)Static index.html support.静态首页访问
(4)Custom Favicon support (see below).
(5) 自动注册了 Converter, GenericConverter, Formatter
Converter:转换器,public String hello(User user);类型转换使用Converter
这个格式化的配置相关,最新的Spring Boot已经跟视频对不上了。
添加格式化器的函数:(WebMvcAutoConfiguration自动配置类中)
public void addFormatters(FormatterRegistry registry) {
for (Converter<?, ?> converter : getBeansOfType(Converter.class)) {
registry.addConverter(converter);
for (GenericConverter converter : getBeansOfType(GenericConverter.class)) {
registry.addConverter(converter);
for (Formatter<?> formatter : getBeansOfType(Formatter.class)) {
registry.addFormatter(formatter);
(6)Support for HttpMessageConverters (see below).
HttpMessageConverters :SpringMVC用于转换Http请求和响应的。User->Json
HttpMessageConverters:是从容器中确定,获取所有的HttpMessageConverters
自己给容器中添加HttpMessageConverters,只需要将自己的组件注册到容器中
(7)Automatic registration of MessageCodesResolver (see below).定义错误代码生成规则
(8)Automatic use of a ConfigurableWebBindingInitializer bean (see
我们可以创建一个ConfigurableWebBindingInitializer来替换默认的(添加到容器)
org.springframework.boot.autoconfigure.web
先看容器中有没有用户自己配置的(@Bean,@Component)如果有就用用户配置的,如果没有,才自动配置;如果有的组件可以有多个(ViewResolver)将用户配置的和自己配置的组合起来;

<?xml version="1.0" encoding="UTF-8"?>
<beans xmlns="http://www.springframework.org/schema/beans"
xmlns:xsi="http://www.w3.org/2001/XMLSchema-instance" xmlns:mvc="http://www.springframework.org/schema/mvc"
xsi:schemaLocation="http://www.springframework.org/schema/beans http://www.springframework.org/schema/beans/spring-beans.xsd http://www.springframework.org/schema/mvc http://www.springframework.org/schema/mvc/spring-mvc.xsd">
<!--这个配置用来告诉视图解析器,即使请求helloTest,也返回helloPage的页面-->
<mvc:view-controller path="/helloTest" view-name="helloPage" />
<mvc:default-servlet-handler/>
(1)编写一个配置类(@Configuration),是WebMvcConfigurerAdapter类型;不能标注@EnableWebMvc注解
package com.example.demo.config;
import org.springframework.boot.autoconfigure.web.servlet.WebMvcAutoConfiguration;
import org.springframework.context.annotation.Configuration;
import org.springframework.web.servlet.config.annotation.ViewControllerRegistry;
import org.springframework.web.servlet.config.annotation.WebMvcConfigurerAdapter;
//使用 WebMvcConfigurerAdapter 可以用来扩展SprinngMVC的功能,
//但是目测在当前新版本的SpringBoot这个抽象类已经被丢弃了,找到了新的继承类?
public class MyMvcConfig extends WebMvcConfigurerAdapter {
public void addViewControllers(ViewControllerRegistry registry) {
//浏览器发送 /helloYanru,跳转到helloPage页面
registry.addViewController("/helloYanru").setViewName("helloPage");
运行效果:在浏览器请求localhost:8080/helloYanru,就可以跳转到helloPage.html
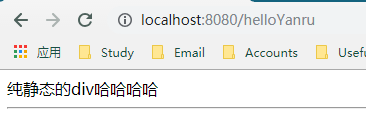
这个跟原先的请求接口没有冲突,相当于,请求helloPage和helloYanru都能跳转到这个页面
public String helloPage(Map<String, Object> map)
map.put("helloTest", "燕茹你好呀!自己跟自己打招呼");
map.put("hello","<p>一个hello文字标签</p>");
map.put("users", Arrays.asList("张三","李四","王五"));//一个数组
//访问的资源实际是:resources/templates/helloPage.html
(2)在做其他自动配置时,会导入@Import(EnableWebMvcAutoConfiguration.class)
@ConditionalOnWebApplication(type = Type.SERVLET)
@ConditionalOnClass({ Servlet.class, DispatcherServlet.class, WebMvcConfigurer.class })
@ConditionalOnMissingBean(WebMvcConfigurationSupport.class)
@AutoConfigureOrder(Ordered.HIGHEST_PRECEDENCE + 10)
@AutoConfigureAfter({ DispatcherServletAutoConfiguration.class,
TaskExecutionAutoConfiguration.class, ValidationAutoConfiguration.class })
public class WebMvcAutoConfiguration {
效果:SpringMVC的自动配置和我们的扩展配置都会起作用
SpringBoot对SpringMVC的自动配置不要了,所有都是我们自己配:需要在配置类中添加@EnableWebMvc,MyMvcConfig我自己的配置类添加了这个注解之后,结果就是所有的自动配置全都失效了。。一般来说是不需要这么用的!!!(但是这个注解在我的机器和Spring版本上,环境中并没有生效,如果生效了,则用户是无法直接访问原先的静态资源目录的!)
@EnableWebMvc这个注解是见WebMvcConfigurationSupport的组件导入进来,导入的只是SpringBoot的最基本的组件;
#配置项目的名称,以后访问该项目的资源就不是直接IP:端口/页面关键字了,而是得带上项目名称
server.servlet.context-path=/yanru
运行效果,此后请求地址就不能直接请求页面了,要在端口号后面添加项目名称:

(2)使用ResourceBundleMessageSource管理国际化资源文件

也可以直接以普通的属性文件方式编辑,如下是login_zh_CN.properties
(2)SpringBoot自动配置好了国家化的组件,在MessageSourceAutoConfiguration配置类:
@ConditionalOnMissingBean(value = MessageSource.class, search = SearchStrategy.CURRENT)
@AutoConfigureOrder(Ordered.HIGHEST_PRECEDENCE)
@Conditional(ResourceBundleCondition.class)
@EnableConfigurationProperties
public class MessageSourceAutoConfiguration {
//yanru备注:我们的配置文件,可以放在类路径下的message.properties
@ConfigurationProperties(prefix = "spring.messages")
public MessageSourceProperties messageSourceProperties() {
return new MessageSourceProperties();
public MessageSource messageSource(MessageSourceProperties properties) {
ResourceBundleMessageSource messageSource = new ResourceBundleMessageSource();
if (StringUtils.hasText(properties.getBasename())) {
messageSource.setBasenames(StringUtils.commaDelimitedListToStringArray(
StringUtils.trimAllWhitespace(properties.getBasename())));
if (properties.getEncoding() != null) {
messageSource.setDefaultEncoding(properties.getEncoding().name());
messageSource.setFallbackToSystemLocale(properties.isFallbackToSystemLocale());
Duration cacheDuration = properties.getCacheDuration();
messageSource.setCacheMillis(cacheDuration.toMillis());
messageSource.setAlwaysUseMessageFormat(properties.isAlwaysUseMessageFormat());
messageSource.setUseCodeAsDefaultMessage(properties.isUseCodeAsDefaultMessage());
(3)配置application.properties指定使用哪个多语言文件:
spring.messages.basename=language.login
注意:在使用配置文件涉及中文的时候,要对file编码进行设置,设置本项目的编码方式:

对IDEA全局文件进行设置,不然上图的设置只是针对当前项目的:
File->Other Setting-> Settings for New Projects 中的File Encodings
(4)在html页面取值并使用。取值方式,例如:#{login.btn}取登陆按钮的文本,然后Web运行环境去取用哪种翻译,取决于当前浏览器设置的默认语言。这样
<a href="javascript: showLoginForm();" th:text="#{login.btn}"></a>
国际化Locale(区域信息对象):LocaleResolver(获取区域信息)
具体见配置类WebMvcAutoConfiguration:
@ConditionalOnProperty(prefix = "spring.mvc", name = "locale")
public LocaleResolver localeResolver() {
.getLocaleResolver() == WebMvcProperties.LocaleResolver.FIXED) {
return new FixedLocaleResolver(this.mvcProperties.getLocale());
AcceptHeaderLocaleResolver localeResolver = new AcceptHeaderLocaleResolver();
localeResolver.setDefaultLocale(this.mvcProperties.getLocale());
默认的区域信息解析,就是根据请求头携带的信息,确定要用什么多语言去做
(5)编写自己的多语言解析器,提供接口让用户自己去编辑修改语言
import com.sun.corba.se.spi.resolver.LocalResolver;
import org.apache.tomcat.jni.Local;
import org.springframework.web.servlet.LocaleResolver;
import org.thymeleaf.util.StringUtils;
import javax.servlet.http.HttpServletRequest;
import javax.servlet.http.HttpServletResponse;
public class MyLocaleResolver implements LocaleResolver {
public Locale resolveLocale(HttpServletRequest request)
String l = request.getParameter("l");
Locale locale = Locale.getDefault();
String [] split = l.split("_");
locale = new Locale(split[0], split[1]);
public void setLocale(HttpServletRequest request, HttpServletResponse response, Locale locale)
public LocaleResolver localeResolver()
return new MyLocaleResolver();
(7)运行项目,在登陆页面的地址中添加参数l=??来指定语言,如:
http://localhost:8080/yanru/login?l=en_US指定当前语言是英文,如果login?l=zh_CN,则请求页面将会用中文展示
import org.springframework.lang.Nullable;
import org.springframework.ui.Model;
import org.springframework.web.servlet.HandlerInterceptor;
import org.springframework.web.servlet.ModelAndView;
import javax.servlet.ServletException;
import javax.servlet.http.HttpServletRequest;
import javax.servlet.http.HttpServletResponse;
public class LoginHandlerInterceptor implements HandlerInterceptor {
public boolean preHandle(HttpServletRequest request, HttpServletResponse response, Object handler) throws ServletException, IOException {
Object user = request.getSession().getAttribute("loginUser");
System.out.println("用户登录了么 user="+user+"@");
if(user == null) //没有登录,返回登录页面
request.setAttribute("message", "没有权限请先登录!");
request.getRequestDispatcher("/login.html").forward(request,response); //跳转回登录页面
public void postHandle(HttpServletRequest request, HttpServletResponse response, Object handler,
@Nullable ModelAndView modelAndView) throws Exception {
public void afterCompletion(HttpServletRequest request, HttpServletResponse response, Object handler, @Nullable Exception ex) throws Exception {
package com.example.demo.config;
import component.LoginHandlerInterceptor;
import component.MyLocaleResolver;
import org.springframework.boot.autoconfigure.web.servlet.WebMvcAutoConfiguration;
import org.springframework.context.annotation.Bean;
import org.springframework.context.annotation.Configuration;
import org.springframework.web.servlet.LocaleResolver;
import org.springframework.web.servlet.config.annotation.EnableWebMvc;
import org.springframework.web.servlet.config.annotation.InterceptorRegistry;
import org.springframework.web.servlet.config.annotation.ViewControllerRegistry;
import org.springframework.web.servlet.config.annotation.WebMvcConfigurerAdapter;
//使用 WebMvcConfigurerAdapter 可以用来扩展SprinngMVC的功能,
//但是目测在当前新版本的SpringBoot这个抽象类已经被丢弃了,找到了新的继承类?
//@EnableWebMvc //标注这是一个SpringMVC的配置类
public class MyMvcConfig extends WebMvcConfigurerAdapter {
public void addViewControllers(ViewControllerRegistry registry) {
//浏览器发送 /helloYanru,跳转到helloPage页面
registry.addViewController("/helloYanru").setViewName("helloPage");
public WebMvcConfigurerAdapter webMvcConfigurerAdapter()
WebMvcConfigurerAdapter adapter = new WebMvcConfigurerAdapter(){
public void addViewControllers(ViewControllerRegistry registry)
registry.addViewController("/").setViewName("templates/login");
registry.addViewController("/login.html").setViewName("templates/login");
public void addInterceptors(InterceptorRegistry registry)
//除了登录页面以外的请求都忽略,使得保证用户必须是登录状态才能访问其他页面
//静态资源,已经做好了静态资源映射,不用单独处理拦截,也可以正常访问静态资源
registry.addInterceptor(new LoginHandlerInterceptor()).addPathPatterns("/**").excludePathPatterns("/login.html","/","/user/login");
public LocaleResolver localeResolver()
return new MyLocaleResolver();
第三步:此后用户访问除了登陆以外的页面,都要验证 用户是否已登陆,否则就跳转到登陆页面让他登陆
package com.example.demo.controller;
import org.springframework.stereotype.Controller;
import org.springframework.web.bind.annotation.PostMapping;
import org.springframework.web.bind.annotation.RequestMapping;
import org.springframework.web.bind.annotation.RequestMethod;
import org.springframework.web.bind.annotation.RequestParam;
import org.thymeleaf.util.StringUtils;
import javax.servlet.http.HttpSession;
public class LoginController {
// @PostMapping(value = "/user/login")
@RequestMapping(value = "/userLogin", method = RequestMethod.POST)
public String login(@RequestParam("username") String username, @RequestParam("password") String password, Map<String,Object> map, HttpSession session)
System.out.println("收到的数据 username="+username+",password="+password+"@");
if(!StringUtils.isEmpty(username) && !StringUtils.isEmpty(password))
session.setAttribute("loginUser", username);
return "redirect:mainPage.html";//redirect防止表单重复提交这句话是重定向到mainPage页面,具体实现能访问mainPage是在 MyMvcConfig的addViewControllers()方法中
map.put("message", "用户名密码错误");
// @RequestMapping(value = "/mainPage")
REST是一种软件架构风格,或者说是一种规范,其强调HTTP应当以资源为中心,并且规范了URI的风格;规范了HTTP请求动作(GET/PUT/POST/DELETE/HEAD/OPTIONS)的使用,具有对应的语义。
分析第一步:URI:/资源名称/资源标识,HTTP请求方式区分对资源CRUD操作
|
|
普通CRUD(URI来区分操作) |
RestfulCRUD |
| 查询 |
getEmp |
emp-GET |
| 添加 |
addEmp?xxx |
emp-POST |
| 修改 |
updateEmp?id=xxx&xx=xxxx |
emp/{id}-PUT |
| 删除 |
deleteEmp?id=1 |
emp/{id}-DELETE |
|
|
请求URI |
请求方式 |
| 查询所有员工 |
emps |
GET |
| 查询某个员工 |
emp/{id} |
GET |
| 来到添加页面 |
emp |
GET |
| 添加员工 |
emp |
POST |
| 来到修改页面(查出员工并回显) |
emp/{id} |
GET |
| 修改员工 |
emp |
PUT |
| 删除员工 |
emp/123,123表示员工id |
DELETE |
<div th:insert="~{footer :: copy}"></div>
~{template:fragmentname} 模板名,片段名
<!--这是一个公共的页面 yanru备注,想公用这个div,第一步,定义fragment-->
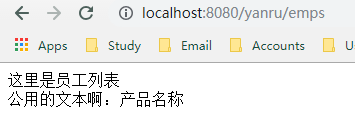
<div th:fragment="productTitle">公用的文本啊:产品名称</div>
<a th:href="@{/emps}">点击员工管理</a>
<!--模板名:会使用Thymeleaf的前后缀配置规则进行解析,如下 表示想要公用mainPage的div-->
<div th:insert="~{mainPage::productTitle}"></div>
<div th:insert="footer :: copy"></div>
<div th:replace="footer :: copy"></div>
<div th:include="footer :: copy"></div>
© 2011 The Good Thymes Virtual Grocery
© 2011 The Good Thymes Virtual Grocery
© 2011 The Good Thymes Virtual Grocery
#############################################################################
WebJars以jar包的形式来使用前端的各种框架、组件,如jquery、bootstrap
WebJars将客户端(浏览器)资源(JavaScript,Css等)打成jar包文件,以对资源进行统一依赖管理。WebJars的jar包部署在Maven中央仓库上。
<groupId>org.webjars</groupId>
<artifactId>jquery</artifactId>
<groupId>org.webjars</groupId>
<artifactId>bootstrap</artifactId>

在.html页面引用资源的写法,比如像引用上图红色框的bootstrap4.0.0的js,则写法:
<!--引用webjar的bootstrap,yanru备注引用 webjars的资源,以webjars为大头的路径-->
<script src="webjars/bootstrap/4.0.0/js/bootstrap.js" type="text/javascript"></script>
如果既要引用bootstrap样式又要使用自己的样式,写法:
