时间在2021年2月2日,寒假放假在家好好学一学nRF52840
开发板:初雪的100出头那块 NRF52840 EVAL KIT
下载工具:JINLK V11(最好是JLINK V9以上 也有人用JLINK OB也行,其他的下载器诸如STLINK,DAP不建议用)
版本号: KEIL5编程环境,CMSIS为5.3.0, NRF52840的CMSIS为8.35.0

参考资料: NRF52840-Eval-Kit-Schematic.pdf(原理图)
nRF5_SDK_17.0.2_d674dde(官方例程)
nRF5_SDK_17.0.0_offline_doc(官方文档)
nRF52840_PS_v1.1.pdf(官方数据手册)
这章为ADC, 有两个实验,都为一个工程
1) 光敏电阻
2) 滑动变阻器,也叫电位器 (摇杆,X和Y轴)
SAADC介绍
nrf52840 的 ADC 为逐次逼近(successive-approximation)模拟数字转换器

SAADC 有三种工作模式,分别为:单次转换模式,连续转换模式,扫描模式
ADC引脚为固定引脚,无法remap重映射
| ADCx(0~7) |
对应引脚 |
| ADC0 |
2 |
| ADC1 |
3 |
| ADC2 |
4 |
| ADC3 |
5 |
| ADC4 |
28 |
| ADC5 |
29 |
| ADC6 |
30 |
| ADC7 |
31 |
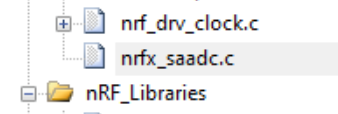
添加驱动文件

..\..\..\..\..\..\modules\nrfx\drivers\src\nrfx_saadc.c
添加SDK_CONFIG代码

看原理图

光敏电阻为P0.05
摇杆 VRX接在P0.28,VRY接在P0.29, 摇杆里面的VCC接在了3,3V,GND接在GND,按键不接
即
IO5 -> ADC3 光敏
IO28 -> ADC4 摇杆X轴
IO29 -> ADC5 摇杆Y轴

添加头文件
#include "nrf_drv_saadc.h"代码:
定义一个存放ADC数值的
	nrf_saadc_value_t  saadc_val = 0; //获取ADC数值的

	nrf_saadc_channel_config_t channel_config = //使用SDK_CONFIG那边的默认设置,通道为ADC3
				NRFX_SAADC_DEFAULT_CHANNEL_CONFIG_SE(NRF_SAADC_INPUT_AIN3);
// 选择12位ADC模式 ,LP低功耗模式(好像是32768时钟跑的)

	nrf_drv_saadc_init(NULL, My_ADCInterrupt);

	nrfx_saadc_channel_init(0, &channel_config);

	while(1)
	{
		if(flag_500ms)
		{ 	// 获取通道0的ADC值
			nrfx_saadc_sample_convert(0,&saadc_val);
			// 输出获取的值
			printf("Sample value is:  %d\r\n", saadc_val);
			// 输出电压值, 注意3.6V是 0.6V *6的结果,其中0.6V为内部的稳压源产生

			printf("Differential Voltage = %.3fV\r\n", saadc_val * 3.6 /4096);

			flag_500ms = 0;
		}
//		printf("hello world! \r\n");
	}
完整代码如下: (又添加了摇杆的2个ADC)
#include "boards.h"

#include <stdbool.h>
#include <stdint.h>
#include "nrf_delay.h"
#include "nrf_gpio.h"
#include "nrf_drv_gpiote.h"

#include "nrf_uart.h"
#include "app_uart.h"
#include "nrf_drv_timer.h"

#include "nrf_drv_rtc.h"
#include "nrf_drv_clock.h"

#include "nrf_drv_saadc.h"

uint32_t LED0,LED1,LED2,LED3;
uint32_t KEY0,KEY1,KEY2,KEY3;

void KEY_Interrupt(nrfx_gpiote_pin_t pin, nrf_gpiote_polarity_t action);


#define UART_TX_BUF_SIZE 256                         /**< UART TX buffer size. */
#define UART_RX_BUF_SIZE 256                         /**< UART RX buffer size. */

void uart_interrupt(app_uart_evt_t * p_event);


const nrf_drv_timer_t My_Timer0 = NRF_DRV_TIMER_INSTANCE(4);
// 0~4共5个定时计数器
void My_Timer0_Interrupt(nrf_timer_event_t event_type,
									void  * p_context);


const nrf_drv_rtc_t rtc = NRF_DRV_RTC_INSTANCE(0); /**< Declaring an instance of nrf_drv_rtc for RTC0. */
void My_RTCInterrupt(nrfx_rtc_int_type_t int_type);

void My_ADCInterrupt(nrfx_saadc_evt_t const *p_event);

uint8_t flag_500ms = 0;

/**
 * @brief Function for application main entry.
 */
int main(void)
{
	nrf_drv_gpiote_in_config_t key_ex_config; //按键中断配置用

	LED0 =  NRF_GPIO_PIN_MAP(0,13);
	LED1 =  NRF_GPIO_PIN_MAP(0,14);
	LED2 =  NRF_GPIO_PIN_MAP(1,9);
	LED3 =  NRF_GPIO_PIN_MAP(0,16);

	KEY0 =  NRF_GPIO_PIN_MAP(0,11);
	KEY1 =  NRF_GPIO_PIN_MAP(0,24);
	KEY2 =  NRF_GPIO_PIN_MAP(0,20);
	KEY3 =  NRF_GPIO_PIN_MAP(0,17);

	nrf_gpio_cfg_output(LED0);
	nrf_gpio_cfg_output(LED1);
	nrf_gpio_cfg_output(LED2);
	nrf_gpio_cfg_output(LED3);

	nrf_gpio_pin_set(LED0);
	nrf_gpio_pin_set(LED1);
	nrf_gpio_pin_set(LED2);
	nrf_gpio_pin_set(LED3);

	nrf_gpio_cfg_input(KEY0,NRF_GPIO_PIN_PULLUP );
	nrf_gpio_cfg_input(KEY1,NRF_GPIO_PIN_PULLUP );
	nrf_gpio_cfg_input(KEY2,NRF_GPIO_PIN_PULLUP );
	nrf_gpio_cfg_input(KEY3,NRF_GPIO_PIN_PULLUP );

	nrf_drv_gpiote_init();//启动GPIOTE时钟,可以这么说

	key_ex_config.hi_accuracy=false; // 启用低精确度PORT事件
	key_ex_config.pull = NRF_GPIO_PIN_PULLUP ; //上啦
	key_ex_config.sense = NRF_GPIOTE_POLARITY_HITOLO ;//下降沿

	nrf_drv_gpiote_in_init(KEY0, &key_ex_config, KEY_Interrupt);
	nrf_drv_gpiote_in_init(KEY1, &key_ex_config, KEY_Interrupt);
	nrf_drv_gpiote_in_init(KEY2, &key_ex_config, KEY_Interrupt);
	nrf_drv_gpiote_in_init(KEY3, &key_ex_config, KEY_Interrupt);

	nrf_drv_gpiote_in_event_enable(KEY0, true);//启动KEY0中断
	nrf_drv_gpiote_in_event_enable(KEY1, true);//启动KEY1中断
	nrf_drv_gpiote_in_event_enable(KEY2, true);//启动KEY2中断
	nrf_drv_gpiote_in_event_enable(KEY3, true);//启动KEY3中断


    const app_uart_comm_params_t comm_params =
      {
          8,
          6,
          0,
          0,
          APP_UART_FLOW_CONTROL_DISABLED,
          false,
          NRF_UART_BAUDRATE_115200
      };
	uint32_t err_code;
    APP_UART_FIFO_INIT(&comm_params,
                         UART_RX_BUF_SIZE,
                         UART_TX_BUF_SIZE,
                         uart_interrupt,
                         APP_IRQ_PRIORITY_LOWEST,
                         err_code);

	nrf_drv_timer_config_t timer_cfg = NRF_DRV_TIMER_DEFAULT_CONFIG;	//定义定时器结构体
	timer_cfg.bit_width= NRF_TIMER_BIT_WIDTH_16 ;
	timer_cfg.frequency= NRF_TIMER_FREQ_1MHz;
	timer_cfg.interrupt_priority= 7;
	timer_cfg.mode=NRF_TIMER_MODE_TIMER ;

	nrf_drv_timer_init(&My_Timer0, &timer_cfg,My_Timer0_Interrupt);

	uint32_t time_ticks ;
	time_ticks = nrfx_timer_ms_to_ticks(&My_Timer0, 1); //算出1ms需要计数多少次

	nrf_drv_timer_extended_compare( //       time_ticks可以直接写1000
         &My_Timer0, NRF_TIMER_CC_CHANNEL5 , time_ticks, NRF_TIMER_SHORT_COMPARE5_CLEAR_MASK, true);
/* 使用定时器实例0, CC通道0(定时器0可以用0~3), 比较时间为time_ticks次(1000次),
	清除比较器CC0的任务, 开启定时器0CC通道 */

	nrf_drv_timer_enable(&My_Timer0);


	nrf_drv_clock_init(); // 开启时钟
	nrf_drv_clock_lfclk_request(NULL); // 请求低频时钟请求,没有配置事件中断

    nrf_drv_rtc_config_t config = NRF_DRV_RTC_DEFAULT_CONFIG; //使用SDK_CONFIG那边的默认配置
	config.prescaler = 33; // 1/ (32768/33) = 1ms

	nrf_drv_rtc_init(&rtc, &config, My_RTCInterrupt); // 使用RTC0,写入结构体,中断函数
	nrf_drv_rtc_tick_enable(&rtc,true); //开启滴答定时器事件中断
	nrf_drv_rtc_enable(&rtc); //启动RTC定时器


	nrf_saadc_value_t  saadc_val = 0; //获取ADC数值的

	nrf_saadc_channel_config_t channel_config = //使用SDK_CONFIG那边的默认设置,通道为ADC3
				NRFX_SAADC_DEFAULT_CHANNEL_CONFIG_SE(NRF_SAADC_INPUT_AIN3);

	nrf_drv_saadc_init(NULL, My_ADCInterrupt); // 启动adc(相当于开启时钟)

	nrfx_saadc_channel_init(0, &channel_config); //使用通道0(0~7任用), 把默认ADC写入寄存器中

	channel_config.pin_p  = (nrf_saadc_input_t)(NRF_SAADC_INPUT_AIN4);
	nrfx_saadc_channel_init(1, &channel_config);

	channel_config.pin_p  = (nrf_saadc_input_t)(NRF_SAADC_INPUT_AIN5);
	nrfx_saadc_channel_init(2, &channel_config);

	while(1)
	{
		if(flag_500ms)
		{ 	// 获取通道0的ADC值
			nrfx_saadc_sample_convert(0,&saadc_val);
			// 输出获取的值
			printf("Sample value is:  %d\r\n", saadc_val);
			// 输出电压值, 注意3.6V是 0.6V *6的结果,其中0.6V为内部的稳压源产生

			printf("Differential Voltage = %.3fV\r\n", saadc_val * 3.6 /4096);

			nrfx_saadc_sample_convert(1,&saadc_val);
			printf("Sample value is:  %d\r\n", saadc_val);
			printf("Differential Voltage = %.3fV\r\n", saadc_val * 3.6 /4096);

			nrfx_saadc_sample_convert(2,&saadc_val);
			printf("Sample value is:  %d\r\n", saadc_val);
			printf("Differential Voltage = %.3fV\r\n", saadc_val * 3.6 /4096);

			flag_500ms = 0;
		}
//		printf("hello world! \r\n");
	}

}

void KEY_Interrupt(nrfx_gpiote_pin_t pin, nrf_gpiote_polarity_t action)
{
	if(KEY0 == pin)
		nrf_gpio_pin_toggle(LED0);
	if(KEY1 == pin)
		nrf_gpio_pin_toggle(LED1);
	if(KEY2 == pin)
		nrf_gpio_pin_toggle(LED2);
	if(KEY3 == pin)
		nrf_gpio_pin_toggle(LED3);
}

void uart_interrupt(app_uart_evt_t * p_event)
{
	uint8_t dat;
    if (p_event->evt_type == APP_UART_COMMUNICATION_ERROR)
    {
        APP_ERROR_HANDLER(p_event->data.error_communication);
    }
    else if (p_event->evt_type == APP_UART_FIFO_ERROR)
    {
        APP_ERROR_HANDLER(p_event->data.error_code);
    }

    else if (p_event->evt_type == APP_UART_DATA_READY)
	{//数据已到达串口 , 可以读数据了
		app_uart_get(&dat); //读取数据
		app_uart_put(dat); // 原路发回
	}
    else if (p_event->evt_type == APP_UART_TX_EMPTY)
	{//发送完成
		//发送完成不知道要做什么的,可以点个灯提醒
		nrf_gpio_pin_toggle(LED0);
	}
}

void My_Timer0_Interrupt(nrf_timer_event_t event_type,
									void  * p_context) //1ms
{
	static uint16_t flag_500ms;
    switch (event_type)
    {
        case NRF_TIMER_EVENT_COMPARE5: // 匹配到了1ms的次数了
			if( ++flag_500ms == 500 ) //500ms
			{
				nrf_gpio_pin_toggle(LED1);
				flag_500ms = 0;
			}
            break;

        default:
            //Do nothing.
            break;
    }
}


void My_RTCInterrupt(nrfx_rtc_int_type_t int_type)
{
	static uint16_t flag500ms = 0;

    if (int_type == NRF_DRV_RTC_INT_COMPARE0)
    { //无法恢复正常,只能使用1次,所以不要用比较了
//		nrf_gpio_pin_toggle(LED0);
    }

    //滴答中断 这边是 1/ 32768 * 33 = 1ms
    else if (int_type == NRF_DRV_RTC_INT_TICK)
    {
		if( ++flag500ms == 500 )
		{
			nrf_gpio_pin_toggle(LED3);
			flag500ms = 0;
			flag_500ms = 1;
		}
    }
}

void My_ADCInterrupt(nrfx_saadc_evt_t const *p_event)
{

}

/**
 *@}
 **/
注意 4096是12位ADC, 3.6V是因为内部0.6V的ADC稳压源,然后有6倍加持
还有, 低功耗时钟 和 高频时钟 读出来的ADC都差不多的,误差不大,建议用低频的,省电