前面的教程我们遗留了一个问题:我们的列表只能请求第一页,本节我们将实现分页加载的效果和下拉刷新的效果。
本节内容您将学习到如下内容:
- 用Paging库实现加载更多
- 用Paging库和SwipeRefreshLayout结合实现下拉刷新
- 给RecyclerView添加Footer
- 加载失败进行重试
- Android帧动画的实现方式
Paging的优势
Paging库之前,我们进行分页加载使用的方法是监听RecyclerView的滚动事件,当快滚动到底部的时候进行新数据的请求。
这个方法有一定的问题,譬如当用户在接近底部的时候快速上下移动,有可能会有多次请求发出,如果处理不当,就有可能漏掉数据或者产生重复数据。
Google引入的Paging,它抽象出来一些自动加载的逻辑类,我们在这里逻辑类里面填入所需要的内容,然后自动分页加载的过程就由Paging库自动给我们完成了。
Paging实现分页加载更多
- 首先需要引入Paging依赖库
// 添加依赖
def paging_version = '2.1.2'
implementation "androidx.paging:paging-runtime:$paging_version"
- 选择合适的DataSource
DataSource就是数据源,顾名思义就是列表数据从这个类里面获取得到。
Paging提供有三种DataSource
- ItemKeyedDataSource - 使用场景:通过ID请求这个ID后面的数据
- PageKeyedDataSource - 使用场景:通过Page请求下一个Page的数据
- PositionalDataSource - 使用场景:请求从第X条到第Y条的数据
通过上面的介绍,我们已经确定我们需要的是PageKeyedDataSource。
新建PlaylistDataSource继承自PageKeyedDataSource
class PlaylistDataSource : PageKeyedDataSource<Int, PlayItem>() {
    override fun loadInitial(
        params: LoadInitialParams<Int>,
        callback: LoadInitialCallback<Int, PlayItem>
    ) {
        TODO("Not yet implemented")
    }

    override fun loadBefore(params: LoadParams<Int>, callback: LoadCallback<Int, PlayItem>) {
        TODO("Not yet implemented")
    }

    override fun loadAfter(params: LoadParams<Int>, callback: LoadCallback<Int, PlayItem>) {
        TODO("Not yet implemented")
    }
}
新建的这个类构造函数有一个泛型<Int, PlayItem>, Int是分页的时候传入的页数,PlayItem是每个Item对应的数据模型。
初始化的时候需要复写三方方法:
loadInitial是最开始加载的时候调用的数据请求方法loadBefore是页面向上滚动的时候时候调用数据请求的方法loadAfter是页面向上滚动的时候时候调用的数据请求方法
- 改造DataSource
我们知道了这三方复写方法的含义后,我们修改下代码:
// 1
class PlaylistDataSource(private val type: String, private val scope: CoroutineScope) : PageKeyedDataSource<Int, PlayItem>() {

    override fun loadInitial(
        params: LoadInitialParams<Int>,
        callback: LoadInitialCallback<Int, PlayItem>
    ) {
        scope.launch {
            try {
                when (type) {
                    "推荐" -> {
                        // 2
                        val response = PlaylistRepository.getRecommendPlaylist(params.requestedLoadSize, 0)
                        // 3
                        callback.onResult(response.playlists, -1, 1)
                    }
                    "精品" -> {
                        val response = PlaylistRepository.getHighQualityPlaylist(params.requestedLoadSize, 0)
                        callback.onResult(response.playlists, -1, 1)
                    }
                    "官方" -> {
                        val response = PlaylistRepository.getOrgPlaylist(params.requestedLoadSize, 0)
                        callback.onResult(response.playlists, -1, 1)
                    }
                    else -> {
                        val response = PlaylistRepository.getPlaylistByCat(params.requestedLoadSize, 0, type)
                        callback.onResult(response.playlists, -1, 1)
                    }
                }
            } catch (e: Exception) {
                Log.d("PlaylistDataSource", "$e")
            }
        }
    }

    override fun loadAfter(params: LoadParams<Int>, callback: LoadCallback<Int, PlayItem>) {
        scope.launch {
            try {
                when (type) {
                    "推荐" -> {
                        // 4
                        val response = PlaylistRepository.getRecommendPlaylist(params.requestedLoadSize, params.key)
                        // 5
                        callback.onResult(response.playlists, params.key + 1)
                    }
                    "精品" -> {
                        val response = PlaylistRepository.getHighQualityPlaylist(params.requestedLoadSize, params.key)
                        callback.onResult(response.playlists, params.key + 1)
                    }
                    "官方" -> {
                        val response = PlaylistRepository.getOrgPlaylist(params.requestedLoadSize, params.key)
                        callback.onResult(response.playlists, params.key + 1)
                    }
                    else -> {
                        val response = PlaylistRepository.getPlaylistByCat(params.requestedLoadSize, params.key, type)
                        callback.onResult(response.playlists, params.key + 1)
                    }
                }
            } catch (e: Exception) {
                Log.d("PlaylistDataSource", "$e")
            }
        }
    }

    // 6
    override fun loadBefore(params: LoadParams<Int>, callback: LoadCallback<Int, PlayItem>) {
        TODO("Not yet implemented")
    }

}
一步步解释下代码的含义:
- 构造函数添加了两个变量
type和scope,分别为歌单类型和协程作用域 params.requestedLoadSize是PlaylistDataSource初始化的时候配置的,代表每页请求多少个Item,项目中配置的是15。如何配置后续介绍。callback.onResult是通过回调将结果返回,这个方法有三个参数,第一个参数response.playlists是数据结果,第二个参数-1是请求上一页需要传入的页的数值(我们的项目中这个值没有实际意义),第三个参数1是请求下一页需要传入的页的数值
提示:1 这个数值会通过Paging传给
loadAfter方法中的params: LoadParams<Int>这个参数
params.requestedLoadSize和步骤2中的意义相同,params.key就是上面callback.onResult传的值1callback.onResult(response.playlists, params.key + 1)中的params.key + 1就是将页面数值设置成当前的数值+1loadBefore我们用不到,所以可以不用覆写方法
- DataSource.Factory
DataSource一般由DataSource.Factory来初始化。
class PlaylistDataSourceFactory(private val type: String, private val scope: CoroutineScope) : DataSource.Factory<Int, PlayItem>() {

    override fun create(): DataSource<Int, PlayItem> {
        return PlaylistDataSource(type, scope)
    }

}
DataSource.Factory 需要覆写create方法,返回一个DataSource对象就可以了。
- 改造Adapter 为PagedListAdapter
使用Paging功能需要将PlaylistItemAdapter继承由ListAdapter改为PagedListAdapter。这样就可以了,因为PagedListAdapter中实现了对Paging的支持。
class PlaylistItemAdapter:
    PagedListAdapter<PlayItem, PlaylistItemAdapter.PlaylistItemHolder>(DiffCallback) {
    ...
    }
问题:可否不使用DataSource.Factory来创建DataSource对象?
- 修改PlayListViewModel
由于网络请求移到了DataSource,ViewModel的代码就大大精简了。只留下一个变量。
class PlayListViewModel(private val type: String) : ViewModel() {

    var pagedlistLiveData = LivePagedListBuilder<Int, PlayItem>(
        PlaylistDataSourceFactory(type, viewModelScope),
        PagedList.Config.Builder().setPageSize(15).build()
    ).build()
}
这段代码比较长,我们分布解释下:
LivePagedListBuilder有两个参数,第一个参数就是DataSource对象,这里是通过上面创建的工厂方法创建的。这里要求传入的是DataSource.FactoryPagedList.Config.Builder().setPageSize(15).build()这个setPageSize(15)代表的是每页请求15条数据。当然PagedList.Config还可以进行其他一些配置。LivePagedListBuilder通过build方法返回的是一个LiveData
public LiveData<PagedList<Value>> build() {
    ...
}
问题1:什么是PagedList?
PagedList是一个改造后的List,当用户滑动列表接近底部的时候就会委托DataSource去请求新的数据。
问题2:为什么需要用LiveData包装PagedList?
首先LiveData包装PagedList可以使其能被观察,这样就能实现数据驱动UI的重绘;
再次,用户进行下拉刷新的时候通过只需要调用invalidate方法,LiveData会重新生成一个新的PagedList,这个PagedList会委托DataSource去请求新的数据 这样所有的流程就又可以重新开始自动进行了。
- 修改Fragment
var viewModel = ViewModelProviders.of(this, object : ViewModelProvider.Factory {
    override fun <T : ViewModel?> create(modelClass: Class<T>): T {
        if (modelClass.isAssignableFrom(PlayListViewModel::class.java)) {
            return PlayListViewModel(it)  as T
        }
        throw  IllegalArgumentException(" unKnown ViewModel class ")
    }
}).get(PlayListViewModel::class.java)
由于需要初始ViewModel的时候需要传参,这里修改了ViewModel的初始化方法,重写ViewModelProvider.Factory的create方法。
监听LiveData
viewModel.pagedlistLiveData.observe(viewLifecycleOwner, Observer {
    playAdapter.submitList(it)
})
到目前为止,加载更多的功能就实现了。
Paging和SwipRefreshLayout组合实现下拉刷新
- 实现下来刷新需要修改下布局,将根布局设置成SwipeRefreshLayout。
<?xml version="1.0" encoding="utf-8"?>
<androidx.swiperefreshlayout.widget.SwipeRefreshLayout
    xmlns:android="http://schemas.android.com/apk/res/android"
    xmlns:app="http://schemas.android.com/apk/res-auto"
    xmlns:tools="http://schemas.android.com/tools"
    android:id="@+id/refreshlayout"
    android:layout_width="match_parent"
    android:layout_height="match_parent"
    tools:context=".Fragment.PlayListFragment">

    <androidx.constraintlayout.widget.ConstraintLayout
        android:id="@+id/constraint_root"
        android:layout_width="match_parent"
        android:layout_height="match_parent">

        <androidx.recyclerview.widget.RecyclerView
            android:id="@+id/recyclerview"
            android:layout_width="0dp"
            android:layout_height="0dp"
            app:layout_constraintBottom_toBottomOf="parent"
            app:layout_constraintEnd_toEndOf="parent"
            app:layout_constraintStart_toStartOf="parent"
            app:layout_constraintTop_toTopOf="parent" />
    </androidx.constraintlayout.widget.ConstraintLayout>

</androidx.swiperefreshlayout.widget.SwipeRefreshLayout>
- 添加重新开始请求的方法
/* 下拉刷新 */
fun resetQuery() {
    pagedlistLiveData.value?.dataSource?.invalidate()
}
这个方法在前面有解释,就不再赘述了。
- 下拉监听
viewModel.pagedlistLiveData.observe(viewLifecycleOwner, Observer {
    playAdapter.submitList(it)
    // 1
    refreshlayout.isRefreshing = false
})

// 2
refreshlayout.setOnRefreshListener {
    viewModel.resetQuery()
}
- 刷新完成后,
isRefreshing置为false, 这时候刷新动画会取消 - 监听下拉执行刷新

给RecyclerView添加加载状态的Footer
细心的你可能会发现当RecyclerView滑到底部的时候可以实现自动加载更多,但是会有小小的卡顿,特别是网络不太好的时候,因为网络请求是需要加载时间的。
为了良好的用户体验,可以加载过程中需要添加一个Footer,给用户一个正在加载的反馈。此外也可以通过修改Footer的文案,当加载出现错误或者所有数据都加载完后给用户一个提示。
示例如下:


点击重试可以重新加载请求失败的页的数据
- 首先建一个Footer而布局文件
<LinearLayout xmlns:android="http://schemas.android.com/apk/res/android"
    xmlns:app="http://schemas.android.com/apk/res-auto"
    android:layout_width="match_parent"
    android:layout_height="40dp"
    android:gravity="center">

    <ImageView
        android:id="@+id/loading_iv"
        android:layout_width="20dp"
        android:layout_height="20dp"
        android:layout_marginEnd="10dp"
        android:layout_weight="0"
        android:background="@drawable/loading_list" />

    <TextView
        android:id="@+id/loading_tv"
        android:layout_width="wrap_content"
        android:layout_height="match_parent"
        android:layout_weight="0"
        android:gravity="center_vertical"
        android:text="加载中..."
        android:textColor="#9E9E9E"
        android:textSize="16sp" />
</LinearLayout>
footer比较简单,就是有一个图片loading_iv和文本loading_tv
- 由于这个Footer是放在Recyclervie中,所以需要建立一个LoadingViewHolder
class LoadingViewHolder(v: View) : RecyclerView.ViewHolder(v) {

    companion object {
        // 1
        fun instance(parent: ViewGroup): LoadingViewHolder {
            val v = LayoutInflater.from(parent.context).inflate(R.layout.loading_layout, parent, false)
            return LoadingViewHolder(v)
        }
    }

    // 2
    fun bindNetWorkStatus(loadingStatus: LoadingStatus?) {
        // 3
        when(loadingStatus) {
            LoadingStatus.Failed -> {
                itemView.loading_tv.text = "点击重试"
                itemView.loading_iv.visibility = View.GONE
                itemView.isClickable = true
            }
            LoadingStatus.Completed -> {
                itemView.loading_tv.text = "加载完毕"
                itemView.loading_iv.visibility = View.GONE
                itemView.isClickable = false
            }
            LoadingStatus.Loading -> {
                itemView.loading_tv.text = "加载中..."
                itemView.loading_iv.visibility = View.VISIBLE
                itemView.isClickable = false
            }
        }
    }
}
代码解释如下:
- 创建了一个类方法
instance,加载布局文件,初始化LoadingViewHolder。 bindNetWorkStatus根据不同的LoadingStatus展示不同的样式,LoadingStatus.Failed时候可以点击重试
加载状态的枚举定义如下:
// 加载的状态
enum class LoadingStatus {
    InitalLoading, // 初次加载
    Loading,       // 正在加载
    Failed,        // 加载失败
    Completed      // 数据全部加载完
}
- 改造Adapter
先定义一个是否显示Footer的变量并且添加覆写两个方法:
class PlaylistItemAdapter(private val viewModel: PlayListViewModel):
    PagedListAdapter<PlayItem, RecyclerView.ViewHolder>(DiffCallback) {

    // 1
    private var hasLoadingFooter = false

    // 2
    override fun getItemCount(): Int {
        return super.getItemCount() + if (hasLoadingFooter) 1 else 0
    }

    // 3
    override fun getItemViewType(position: Int): Int {
        return if (hasLoadingFooter && position == itemCount - 1) R.layout.loading_layout else R.layout.item_playlist
    }

}
代码解释如下:
- 定义一个
hasLoadingFooter的变量控制是否显示Footer,第一次加载的时候不显示Footer,因为我们已经有下拉刷新了。 getItemCount是返回显示多少Item,hasLoadingFooter为真的时候得比Item多加一行,getItemViewType是返回每个Item对应的布局文件, 因为不同的Item显示的样式不一样,需要通过这个方法指定
修改两个覆写方法
override fun onCreateViewHolder(
    parent: ViewGroup,
    viewType: Int
): RecyclerView.ViewHolder {
    return when(viewType) {
        R.layout.item_playlist -> {
            PlaylistItemHolder.instance(parent)
        }
        else -> {
            LoadingViewHolder.instance(parent)
        }
    }
}

override fun onBindViewHolder(holder: RecyclerView.ViewHolder, position: Int) {
    when(holder.itemViewType) {
        R.layout.loading_layout -> {
            (holder as LoadingViewHolder).bindNetWorkStatus(_loadingStatus)
        }
        else -> {
            getItem(position)?.let {
                (holder as PlaylistItemHolder).bindPlayItem(it)
            }
        }
    }
}
onCreateViewHolder根据不同的viewType返回不同的ViewHolderonBindViewHolder根据不同的itemViewType进行不同的绑定
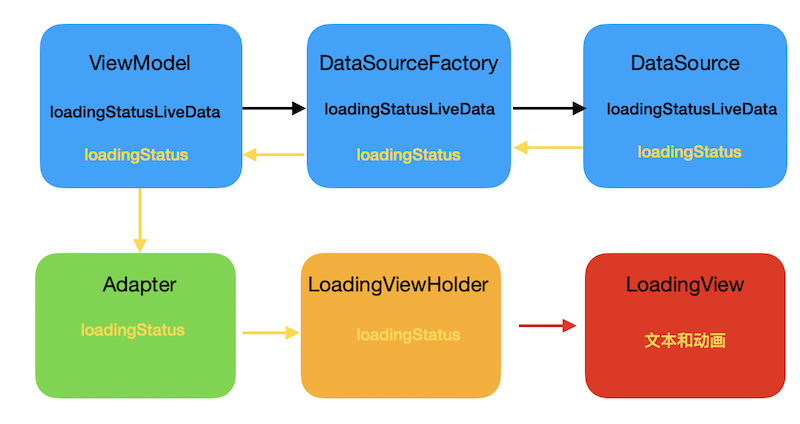
目前为止Adapter准备好了,也就是说UI层面的逻辑好了,那现在就需要有一个加载状态的触发了。很明显加载状态触发的位置是DataSource。
疑问: DataSource被ViewModel持有,如何反向传递数据呢? 上节有介绍可以有CallBack和LiveData等形式。
采取LiveData反向传递如何实现呢?
- 实现Datasource回传LoadingStatus给ViewModel
实现逻辑是ViewModel 定义一个LiveData,层层传递给Datasource。
Datasource持有这个LiveData,就可以修改值了。
<!-- PlayListViewModel -->
class PlayListViewModel(type: String) : ViewModel() {

    // 1
    var loadingStatusLiveData: LiveData<LoadingStatus> = _loadingStatusLiveData

    // 2
    var pagedListLiveData = LivePagedListBuilder<Int, PlayItem>(
        PlaylistDataSourceFactory(type, viewModelScope, _loadingStatusLiveData),
        PagedList.Config.Builder().setPageSize(15).build()
    ).build()

}

<!-- PlaylistDataSourceFactory -->
class PlaylistDataSourceFactory(private val type: String, private val scope: CoroutineScope, private val loadingStatusLiveData: MutableLiveData<LoadingStatus>) : DataSource.Factory<Int, PlayItem>() {

    override fun create(): DataSource<Int, PlayItem> {
        return PlaylistDataSource(type, scope, loadingStatusLiveData)
    }

}

<!-- PlaylistDataSource -->
// 1
class PlaylistDataSource(private val type: String, private val scope: CoroutineScope, private val loadingStatusLiveData: MutableLiveData<LoadingStatus>) : PageKeyedDataSource<Int, PlayItem>() {

    override fun loadInitial(
        params: LoadInitialParams<Int>,
        callback: LoadInitialCallback<Int, PlayItem>
    ) {
        // 2
        loadingStatusLiveData.postValue(LoadingStatus.InitalLoading)
        scope.launch {
            try {
                ...
            } catch (e: Exception) {
                // 2
                loadingStatusLiveData.postValue(LoadingStatus.Failed)
            }
        }
    }

    override fun loadAfter(params: LoadParams<Int>, callback: LoadCallback<Int, PlayItem>) {
        // 2
        loadingStatusLiveData.postValue(LoadingStatus.Loading)
        scope.launch {
            try {
                ...
            } catch (e: Exception) {
                // 2
                loadingStatusLiveData.postValue(LoadingStatus.Failed)
            }
        }
    }

}
- Adapter监听LoadingStatus的变化
<!-- PlayListFragment -->
viewModel.loadingStatusLiveData.observe(viewLifecycleOwner, Observer {
    playAdapter.updateLoadingStatus(it)
})

<!-- PlaylistItemAdapter -->
// 更新加载状态
fun updateLoadingStatus(loadingStatus: LoadingStatus) {
    _loadingStatus = loadingStatus
    if (loadingStatus == LoadingStatus.InitalLoading) {
        hideLoading()
    } else {
        showLoading()
    }
}

private fun hideLoading() {
    if (hasLoadingFooter) {
        notifyItemRemoved(itemCount - 1)
    }
    hasLoadingFooter = false
}

private fun showLoading() {
    if (hasLoadingFooter) {
        notifyItemChanged(itemCount - 1)
    } else {
        hasLoadingFooter = true
        notifyItemInserted(itemCount - 1)
    }
}
这几个方法的意义比较简单,就是LoadingStatus改变后刷新RecyclerView,及Footer的显示和隐藏。
一个小的功能写了不少代码,主要是流程比较的长,但是由于分层,逻辑却是很清晰。
遗留问题,由于GridLayoutManager,是每行三列,所以Footer也只有三分之一宽度。需要改成全屏,覆写onAttachedToRecyclerView方法:
// 这个方法解决Footer 全屏
override fun onAttachedToRecyclerView(recyclerView: RecyclerView) {
    super.onAttachedToRecyclerView(recyclerView)
    var layoutManager:RecyclerView.LayoutManager = recyclerView.layoutManager!!
    if (layoutManager is GridLayoutManager) {
        layoutManager.spanSizeLookup = object : GridLayoutManager.SpanSizeLookup(){
            override fun getSpanSize(position: Int): Int {
                return if (getItemViewType(position) == R.layout.loading_layout) {
                    layoutManager.spanCount  // Footer时返回三个的单元格,从而占据整个一行的宽度
                } else {
                    1  // 正常情况下返回一个单元格
                }
            }
        }
    }
}
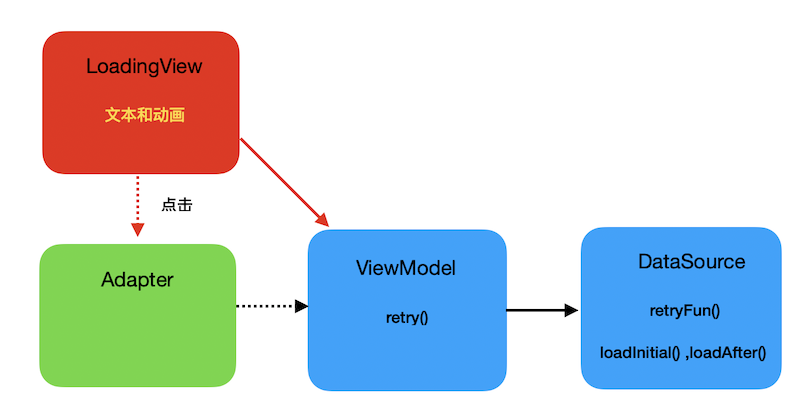
发生网络错误后重试
- 用一个函数队形保留错误现场
public var retryFun: (() -> Any)? = null

override fun loadInitial(
    params: LoadInitialParams<Int>,
    callback: LoadInitialCallback<Int, PlayItem>
) {
    ...
    // 1
    retryFun = null
    scope.launch {
        try {
        } catch (e: Exception) {
            ...
            // 2
            retryFun = {loadInitial(params, callback)}
        }
    }
}

override fun loadAfter(params: LoadParams<Int>, callback:LoadCallback<Int, PlayItem>) {
    // 1
    retryFun = null
    scope.launch {
        try {
            ...
        } catch (e: Exception) {
            ...
            // 2
            retryFun = { loadAfter(params, callback) }
        }
    }
}
这段代码的意思是:
定义retryFun变量,如果发生错误就把调用的方法和参数赋值给retryFun记录下来。
- ViewModel中定义
retryFun函数
// 重新尝试
fun retry() {
    (pagedListLiveData.value?.dataSource as PlaylistDataSource).let {
        it.retryFun?.invoke()
    }
}
- 在Adapter中调用
retryFun函数
LoadingViewHolder.instance(parent).also {
    it.itemView.setOnClickListener {
        viewModel.retry()
    }
}
Adapter和ViewModel是独立的,所以可以把ViewModel传入Adapter。
PlaylistItemAdapter(private val viewModel: PlayListViewModel)
这样整个流程也就完成了。
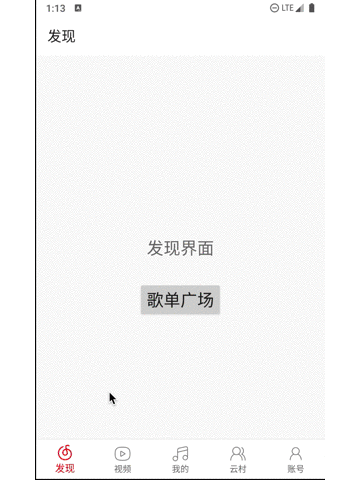
最后的效果如下所示:
帧动画
Footer有一个帧动画,由于我在本机网络加载较快,所以可能不太明显。效果如
接下来我们就实现下这个帧动画的效果
-
在Drawable文件中加入四个图片,这四个图片将用来轮流显示
icn_loading1,icn_loading2,icn_loading3,icn_loading4 -
在Drawable文件创建一个loading_list.xml文件, 代码如下
<?xml version="1.0" encoding="utf-8"?>
<animation-list xmlns:android="http://schemas.android.com/apk/res/android"
    android:oneshot="false">
    <item android:drawable="@drawable/icn_loading1" android:duration="150" />
    <item android:drawable="@drawable/icn_loading2" android:duration="150" />
    <item android:drawable="@drawable/icn_loading3" android:duration="150" />
    <item android:drawable="@drawable/icn_loading4" android:duration="150" />
</animation-list>
- 将这个Drawable文件作为ImageView的背景
<ImageView
    android:id="@+id/loading_iv"
    ...
    android:background="@drawable/loading_list" />
- 代码中开始动画和结束动画
private fun startAnimation() {
    val drawable = itemView.loading_iv.background as? AnimationDrawable

    drawable?.let {
        if (!it.isRunning) it.start()
    }
}

fun stopAnimation() {
    val drawable = itemView.loading_iv.background as? AnimationDrawable
    drawable?.let {
        if (it.isRunning) it.stop()
    }
}
通过这几步,这个加载动画就实现了。