本节教程我们来实现云音乐的主页展示,实现的效果如下图所示:
本节内容您将学习到如下内容:
- vlayout的介绍
- vlayout嵌套横向RecyclerView的使用
- Banner三方库的简单使用
- 自定义Moshi的JsonAdapter来解析同一个字段不同的数据类型的数据
vlayout架构分析
vlayout是RecyclerView的LayoutManager扩展库,VirtualLayoutManager这个类负责RecyclerView的UI布局。继承于RecyclerView.Adapter的VirtualLayoutAdapter则是配合VirtualLayoutManager的对应的适配类。
大概的架构图如下所示:
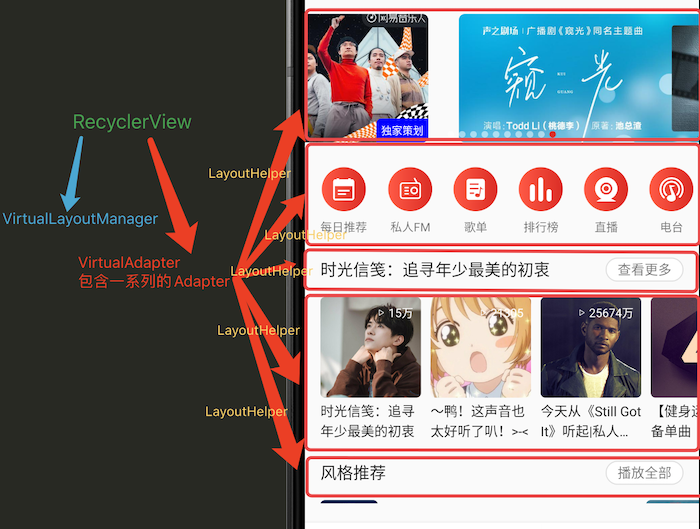
- VirtualLayoutManager负责整个RecyclerView界面布局排版绘制等工作
- VirtualLayoutAdapter包含一系列的子Adapter,每个子Adapter负责RecyclerView某一部分的UI和数据的绑定工作。
- 每个子Adapter包含一个下节会介绍的LayoutHelper,LayoutHelper负责对应界面部分的UI排版布局绘制等工作
说明:这个架构中,大部分的内容vlayout以为为我们实现完成了,我们只需要在子Adapter中实现Layout和Data的绑定工作就可以了。
vlayout布局介绍
vlayout主要提供了以下一系列的布局:
- LinearLayoutHelper
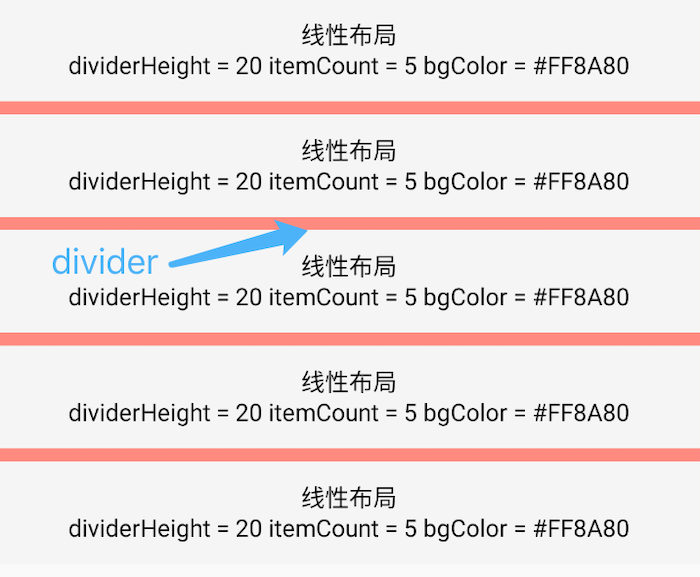
LinearLayoutHelper和系统提供的线性布局类似,能设置
bgColor—背景颜色,bgImg—背景图片,diverHeight—分隔线高度等
- GridLayoutHelper
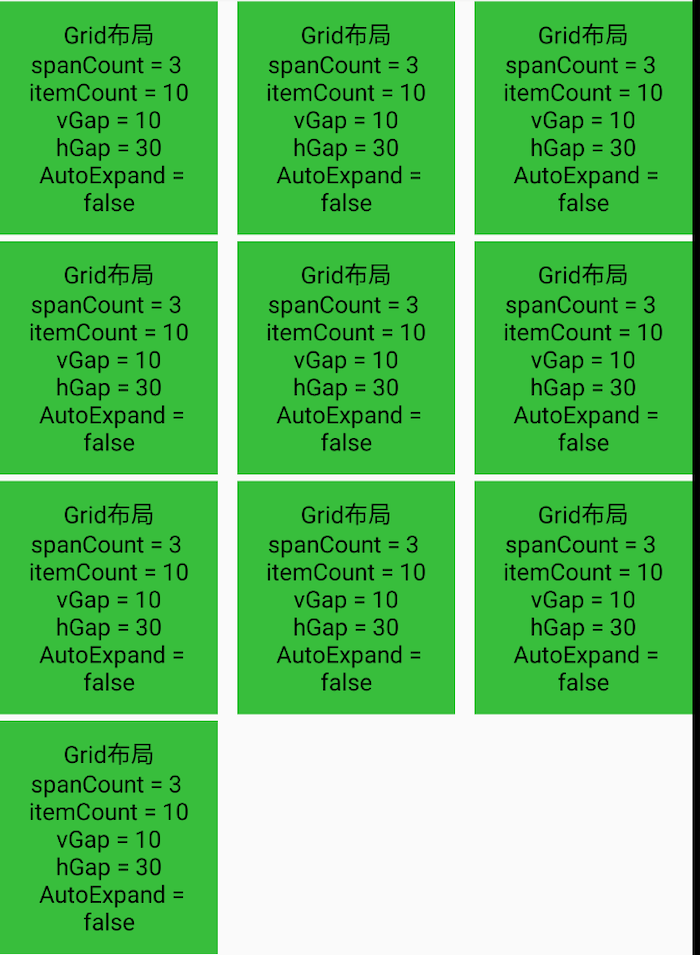
GridLayoutHelper 和系统提供的网格布局类似,能设置
spanCount—一行有几列,itemCount—总共多少个Item,vGap— item间的垂直间距,hGap— item间的水平间距,AutoExpand—最后一行如果没有足够的列数,是否充满整行
- FixLayoutHelper
FixLayoutHelper的位置是固定的,不会随着RecyclerView滚动而滚动,位置可以根据
alignType(TOP_LEFT,TOP_RIGHT,BOTTOM_LEFT,BOTTOM_RIGHT)和X,Y值来确定。
- ScrollFixLayoutHelper
ScrollFixLayoutHelper 和 FixLayoutHelper类似也是固定位置显示的,但是可以当滚动到一定的位置时候才显示,如果
showType设置为SHOW_ALWAYS,那两者就没有区别了
- FloatLayoutHelper
FloatLayoutHelper 可以设置
setDragEnable为true来实现可以拖动的效果。
- StickyLayoutHelper
StickyLayoutHelper可以设置
StickyStart来控制吸附在顶部或者底部,这个用来设置不同Section的Header挺方便
- ColumnLayoutHelper

ColumnLayoutHelper是设置几个Item占据一整行,通过设置
setWeights让每个Item占据相应的比例宽度。
- StaggeredGridLayoutHelper
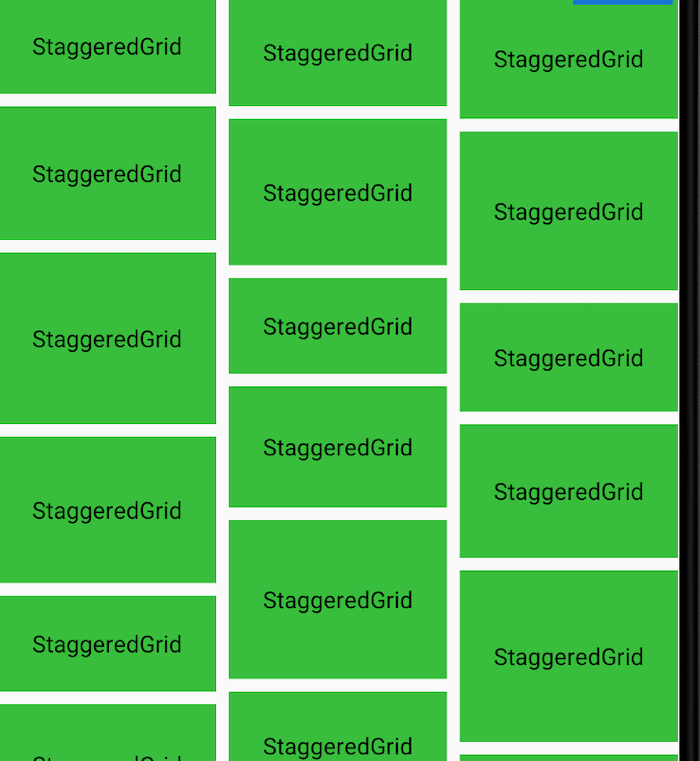
瀑布流布局,可以设置Item间的横向
hGap和纵向vGap间距
- OnePlusNLayoutHelper
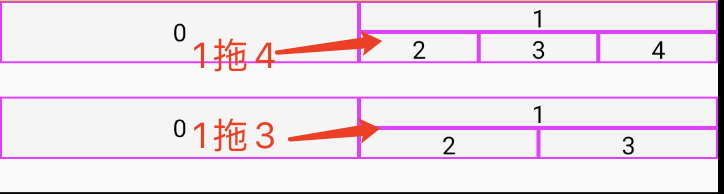
1拖N的布局中每个Item占剩余空间的一半。可以设置
itemCount来控制显示几个Item。
基础工作准备
- 修改首页布局文件内容
<?xml version="1.0" encoding="utf-8"?>
<androidx.constraintlayout.widget.ConstraintLayout xmlns:android="http://schemas.android.com/apk/res/android"
    xmlns:app="http://schemas.android.com/apk/res-auto"
    xmlns:tools="http://schemas.android.com/tools"
    android:id="@+id/frameLayout"
    android:layout_width="match_parent"
    android:layout_height="match_parent"
    tools:context=".Fragment.DiscoveryMainFragment">

    <androidx.recyclerview.widget.RecyclerView
        android:id="@+id/main_recyclerview"
        android:layout_width="0dp"
        android:layout_height="0dp"
        android:paddingBottom="20dp"
        app:layout_constraintBottom_toBottomOf="parent"
        app:layout_constraintEnd_toEndOf="parent"
        app:layout_constraintStart_toStartOf="parent"
        app:layout_constraintTop_toTopOf="parent" />
</androidx.constraintlayout.widget.ConstraintLayout>
- 设置LayoutManager,Adapter和RecycledViewPool
// 1
RecyclerView.RecycledViewPool().also {
    it.setMaxRecycledViews(1, 6)
    it.setMaxRecycledViews(2, 6)
    it.setMaxRecycledViews(3, 6)
    it.setMaxRecycledViews(4, 6)
    it.setMaxRecycledViews(5, 6)
    it.setMaxRecycledViews(6, 6)
    it.setMaxRecycledViews(7, 6)
    it.setMaxRecycledViews(8, 6)
    it.setMaxRecycledViews(9, 6)
    main_recyclerview.setRecycledViewPool(it)
    }

// 2
val layoutManager = VirtualLayoutManager(requireActivity()).also {
    main_recyclerview.layoutManager = it
}

// 3
main_recyclerview.adapter = DelegateAdapter(layoutManager, false)
- 首先设置回收池,需要针对不同的视图类型ViewType进行设置,需要根据不同的数据进行合理的设置,我们这里对每个都设为6
- 设置VirtualLayoutManager对象为RecyclerView的LayoutManager
- 设置DelegateAdapter对象为RecyclerView的Adapter,DelegateAdapter是vlayout提供的VirtualLayoutAdapter子类,可以直接使用
这里比较简单不做过多介绍。
- 对子Adapter - DelegateAdapter.Adapter 进行抽象
由于子Adapter在项目中会非常的多,所以可以把一些公共的功能抽提出来,进行代码复用
open class BaseDelegateAdapter(protected val context: Context, private val layoutHelper: LayoutHelper, private val layoutId: Int, private val count: Int, protected val mViewType: Int) : DelegateAdapter.Adapter<BaseViewHolder>() {

    /* 创建ViewHolder */
    override fun onCreateViewHolder(parent: ViewGroup, viewType: Int): BaseViewHolder {
        val v = LayoutInflater.from(parent.context).inflate(layoutId, parent, false)
        return BaseViewHolder(v)
    }

    /* 绑定ViewHolder */
    override fun onBindViewHolder(holder: BaseViewHolder, position: Int) {
    }

    /* 多少个Item */
    override fun getItemCount(): Int {
        return count
    }

    /* LayoutHelper */
    override fun onCreateLayoutHelper(): LayoutHelper {
        return layoutHelper
    }
}
BaseDelegateAdapter被抽提出来成为所有子Adapter的父类。构造函数中的context和layoutHelper好理解,layoutId是对应界面的布局文件ID,count对应的是layoutHelper显示几个Item,mViewType标记视图类型,供RecyclerView进行View的复用。
上面的文件中还有一个BaseViewHolder类,它是RecyclerView.ViewHolder的子类,抽取了一些方法供子类复用。可以参考 BaseRecyclerViewAdapterHelper
vlayout实现轮播图
我们接下来实现轮播图的功能,效果如下:
- Banner的使用
- 引入库
// banner
implementation 'com.youth.banner:banner:2.1.0'
- Banner的使用
<com.youth.banner.Banner
        android:id="@+id/main_banner"
        android:layout_width="match_parent"
        android:layout_height="166dp"
        app:banner_auto_loop="true"
        app:banner_indicator_gravity="center"
        app:banner_indicator_marginBottom="21dp"
        app:banner_indicator_normal_color="#80FFFFFF"
        app:banner_indicator_normal_width="7dp"
        app:banner_indicator_selected_color="@color/colorAccent"
        app:banner_indicator_selected_width="7dp"
        app:banner_indicator_space="5dp"
        app:banner_infinite_loop="true" />
banner_auto_loop- 自动开始滚动;
banner_indicator_gravity- 指示器的位置;
banner_indicator_marginBottom- 指示器底部间距;
banner_indicator_normal_color- 指示器的颜色;
banner_indicator_selected_color- 指示器选中后的颜色;
banner_indicator_space- 指示器之间的间距;
banner_infinite_loop- 循环滚动;
- 为Banner添加Adapter
如果每个Item只是显示一张图片,可以不用自定义Adapter,Banner库有提供一些默认的Adapter。
我们每个Item显示一个图片,右下角还有个文本标签,我们自定义BannerImageTitleAdapter,代码如下:
class BannerImageTitleAdapter(data: List<HomeBanner>) : BannerAdapter<HomeBanner, BaseViewHolder>(data) {

    override fun onCreateHolder(parent: ViewGroup?, viewType: Int): BaseViewHolder {
        // viewHolder创建
        val view = LayoutInflater.from(parent!!.context).inflate(R.layout.layout_item_home_banner, parent, false)
        view.clipViewCornerByDp(6.0F)
        return BaseViewHolder(view)
    }

    override fun onBindView(holder: BaseViewHolder?, data: HomeBanner?, position: Int, size: Int) {

        val imageView = holder?.getView<ImageView>(R.id.banner_iv)
        val textView = holder?.getView<TextView>(R.id.bannber_title)

        // 设置图片
        imageView?.let {
            data?.let { bannerData ->
                Glide.with(holder!!.itemView)
                    .load(bannerData.pic)
                    .into(it)
            }
        }

        // 设置文本
        textView?.let {
            data?.let { bannerData ->
                it.text = bannerData.typeTitle
            }
        }

        // 设置背景颜色
        val shapeDrawable = holder?.getView<TextView>(R.id.bannber_title)?.background as? GradientDrawable
        shapeDrawable?.let {
            data?.let { bannerData ->
                it.setColor(Color.parseColor(bannerData.titleColor))
                holder.getView<TextView>(R.id.bannber_title).background = it
            }
        }
    }

}
BannerImageTitleAdapter中的这些方法是不是都很熟悉。没错Banner基于RecyclerView,所以BannerAdapter是RecyclerView.Adapter的子类,将HomeBanner和layout_item_home_banner绑定在一起,然后将这些信息提供给Banner。
data class HomeBanner(
    val pic: String,
    val typeTitle: String,
    val titleColor: String,
    val targetType: Long
)
<!-- layout_item_home_banner.xml -->
<?xml version="1.0" encoding="utf-8"?>
<androidx.constraintlayout.widget.ConstraintLayout xmlns:android="http://schemas.android.com/apk/res/android"
    xmlns:app="http://schemas.android.com/apk/res-auto"
    xmlns:tools="http://schemas.android.com/tools"
    android:id="@+id/linearLayout"
    android:layout_width="match_parent"
    android:layout_height="match_parent"
    android:layout_marginStart="16dp"
    android:layout_marginTop="16dp"
    android:layout_marginEnd="16dp"
    android:layout_marginBottom="16dp">

    <ImageView
        android:id="@+id/banner_iv"
        android:layout_width="0dp"
        android:layout_height="0dp"
        android:scaleType="centerCrop"
        app:layout_constraintBottom_toBottomOf="parent"
        app:layout_constraintEnd_toEndOf="parent"
        app:layout_constraintStart_toStartOf="parent"
        app:layout_constraintTop_toTopOf="parent"
        tools:srcCompat="@tools:sample/avatars" />

    <TextView
        android:id="@+id/bannber_title"
        android:layout_width="wrap_content"
        android:layout_height="wrap_content"
        android:background="@drawable/left_top_corner_5_shape"
        android:paddingStart="5dp"
        android:paddingTop="5dp"
        android:paddingEnd="5dp"
        android:paddingBottom="5dp"
        android:text="TextView"
        android:textColor="#FFFFFF"
        android:textSize="11sp"
        app:layout_constraintBottom_toBottomOf="parent"
        app:layout_constraintEnd_toEndOf="parent" />

</androidx.constraintlayout.widget.ConstraintLayout>
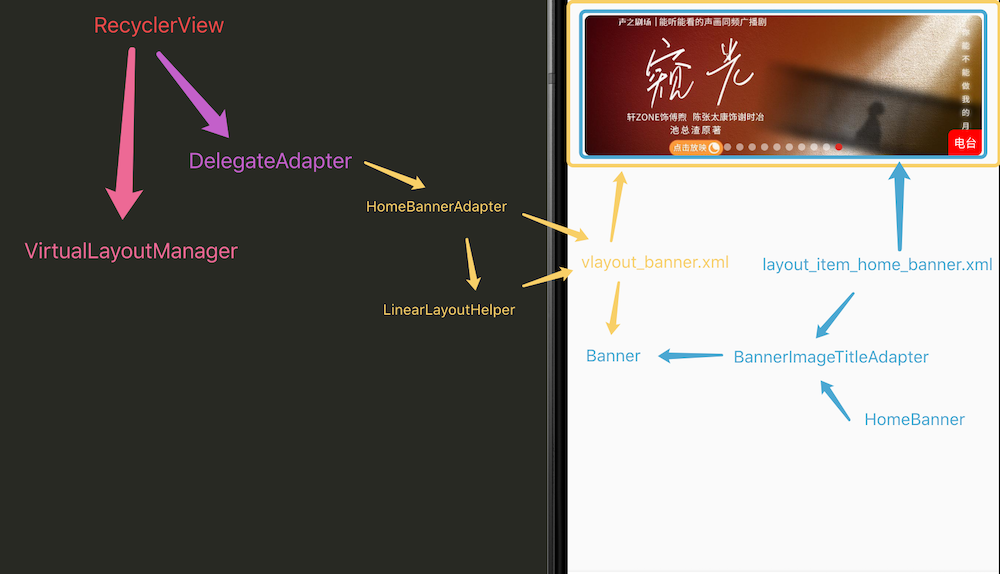
- 实现包含Banner的HomeBannerAdapter
我们用HomeBannerAdapter来负责轮播图那部分的展示。
layoutHelper我们可以使用LinearLayoutHelper,layoutId使用的布局文件如下,count为1,viewType可以定义为1.
<!-- vlayout_banner.xml -->
<?xml version="1.0" encoding="utf-8"?>
<LinearLayout xmlns:android="http://schemas.android.com/apk/res/android"
    android:layout_width="match_parent"
    android:layout_height="wrap_content"
    xmlns:app="http://schemas.android.com/apk/res-auto"
    android:orientation="vertical">

    <com.youth.banner.Banner
        android:id="@+id/main_banner"
        android:layout_width="match_parent"
        android:layout_height="166dp"
        app:banner_auto_loop="true"
        app:banner_indicator_gravity="center"
        app:banner_indicator_marginBottom="21dp"
        app:banner_indicator_normal_color="#80FFFFFF"
        app:banner_indicator_normal_width="7dp"
        app:banner_indicator_selected_color="@color/colorAccent"
        app:banner_indicator_selected_width="7dp"
        app:banner_indicator_space="5dp"
        app:banner_infinite_loop="true" />

</LinearLayout>
HomeBannerAdapter文件中代码如下:
class HomeBannerAdapter(
    context: Context,
    layoutHelper: LayoutHelper,
    layoutId: Int,
    count: Int,
    mViewType: Int,
    private val bannerList: List<HomeBanner>,
    private val lifecycleOwner: LifecycleOwner
) : BaseDelegateAdapter(context, layoutHelper, layoutId, count, mViewType) {

    override fun onCreateViewHolder(parent: ViewGroup, viewType: Int): BaseViewHolder {
        val holder = super.onCreateViewHolder(parent, viewType)
        holder.getView<Banner<HomeBanner, BannerImageTitleAdapter>>(R.id.main_banner).apply {
            //
            adapter = BannerImageTitleAdapter(bannerList)
            addBannerLifecycleObserver(lifecycleOwner)
            indicator = CircleIndicator(context)
        }
        return holder
    }

}
此外,HomeBannerAdapter还多了两个构造参数,bannerList是Banner的数据数组,lifecycleOwner是Banner在适当的时候取消加载图片和滚动的生命周期观察者。
- 将HomeBannerAdapter做为子Adapter添加到DelegateAdapter中
// 添加HomeBannerAdapter
val bannerAdapter = HomeBannerAdapter(requireActivity(), LinearLayoutHelper(), R.layout.vlayout_banner, 1, ViewType.HOME_VIEW_TYPE_BANNER, data, this)
adapters.add(bannerAdapter)
至此,轮播图功能完成了。代码有点多且零散,还是来一张图片来总结下吧。
vlayout嵌套横向滑动RecyclerView
我们先来看下下面横向滑动的需求:
通过Banner的练习,我们可以联想到可以用一个横向滑动的RecyclerView搭配LinearLayoutHelper实现。我们开始吧。
- 定义横向RecyclerView布局
<!-- vlayout_recyclerview.xml -->
<?xml version="1.0" encoding="utf-8"?>
<FrameLayout xmlns:android="http://schemas.android.com/apk/res/android"
    xmlns:app="http://schemas.android.com/apk/res-auto"
    xmlns:tools="http://schemas.android.com/tools"
    android:id="@+id/frame"
    android:layout_width="match_parent"
    android:layout_height="match_parent">

    <androidx.recyclerview.widget.RecyclerView
        android:id="@+id/recyclerview_hor"
        android:layout_width="match_parent"
        android:layout_height="match_parent"
        android:overScrollMode="never"
        android:scrollbars="none"
        app:fastScrollEnabled="false" />
</FrameLayout>
- 定义Item 布局
<!-- layout_item_home_playlist -->
<?xml version="1.0" encoding="utf-8"?>
<androidx.constraintlayout.widget.ConstraintLayout xmlns:android="http://schemas.android.com/apk/res/android"
    xmlns:app="http://schemas.android.com/apk/res-auto"
    xmlns:tools="http://schemas.android.com/tools"
    android:id="@+id/constraint"
    android:layout_width="wrap_content"
    android:layout_height="wrap_content">

    <ImageView
        android:id="@+id/live_iv"
        android:layout_width="105dp"
        android:layout_height="105dp"
        app:layout_constraintEnd_toEndOf="parent"
        app:layout_constraintStart_toStartOf="parent"
        app:layout_constraintTop_toTopOf="parent"
        app:srcCompat="@mipmap/default_pic" />

    <LinearLayout
        android:id="@+id/live_tip_ll"
        android:layout_width="0dp"
        android:layout_height="wrap_content"
        app:layout_constraintEnd_toEndOf="parent"
        app:layout_constraintStart_toStartOf="parent"
        app:layout_constraintTop_toTopOf="parent">

        <TextView
            android:id="@+id/live_tip_tv"
            android:layout_width="wrap_content"
            android:layout_height="wrap_content"
            android:layout_weight="0"
            android:background="@drawable/right_bottom_corner_5_90percent_shape"
            android:ellipsize="end"
            android:lines="1"
            android:paddingStart="6dp"
            android:paddingTop="3dp"
            android:paddingEnd="6dp"
            android:paddingBottom="3dp"
            android:text="TextView"
            android:textColor="@color/colorPrimary"
            android:textSize="10sp" />
    </LinearLayout>

    <TextView
        android:id="@+id/live_tv"
        android:layout_width="0dp"
        android:layout_height="wrap_content"
        android:layout_marginTop="4dp"
        android:ellipsize="end"
        android:lines="2"
        android:text="TextView"
        android:textColor="@color/black_21_color"
        android:textSize="14sp"
        app:layout_constraintEnd_toEndOf="parent"
        app:layout_constraintStart_toStartOf="parent"
        app:layout_constraintTop_toBottomOf="@+id/live_iv" />

</androidx.constraintlayout.widget.ConstraintLayout>
- 定义Adapter - HomePlayListAdapter
Adapter的代码如下:
class HomePlayListAdapter(
    context: Context,
    layoutHelper: LayoutHelper,
    layoutId: Int,
    count: Int,
    mViewType: Int,
    private val creatives: List<Creatives>
): BaseDelegateAdapter(context, layoutHelper, layoutId, count, mViewType) {

    override fun onCreateViewHolder(parent: ViewGroup, viewType: Int): BaseViewHolder {
        val viewHolder = super.onCreateViewHolder(parent, viewType)
        // 1.
        viewHolder.getView<RecyclerView>(R.id.recyclerview_hor).apply {
            // 2
            layoutManager = LinearLayoutManager(context, RecyclerView.HORIZONTAL, false)
            // 3
            addItemDecoration(object : RecyclerView.ItemDecoration() {
                override fun getItemOffsets(
                    outRect: Rect,
                    view: View,
                    parent: RecyclerView,
                    state: RecyclerView.State
                ) {
                    val position = parent.getChildAdapterPosition(view)
                    if (position == RecyclerView.NO_POSITION) return
                    when (position) {
                        0 -> outRect.set(context.dp2px(16.0F), 0, context.dp2px(10.0F), 0)
                        creatives.size - 1 -> outRect.set(0, 0, context.dp2px(16.0F), 0)
                        else -> outRect.set(0, 0, context.dp2px(10.0F), 0)
                    }
                }
            })
            // 4
            adapter = object : RecyclerView.Adapter<BaseViewHolder>() {

                override fun onCreateViewHolder(
                    parent: ViewGroup,
                    viewType: Int
                ): BaseViewHolder {
                    return BaseViewHolder(
                        LayoutInflater.from(parent.context)
                            .inflate(R.layout.layout_item_home_playlist, parent, false)
                    )
                }

                override fun onBindViewHolder(holder: BaseViewHolder, position: Int) {
                    holder.getView<ImageView>(R.id.vlog_iv).apply {
                        loadRoundCornerImage(
                            context,
                            EmptyEx.checkStringNull(creatives[position]?.uiElement?.image?.imageUrl)
                        )
                    }
                    holder.getView<TextView>(R.id.vlog_title_tv).text =
                        EmptyEx.checkStringNull(creatives[position]?.uiElement?.mainTitle?.title)
                    holder.getView<TextView>(R.id.vlog_zan_tv).text =
                        EmptyEx.checkLongNull(creatives[position]?.resources?.get(0)?.resourceExtInfo?.playCount)
                            .playCountString(context)
                }

                override fun getItemCount(): Int {
                    return creatives.size
                }
            }
        }
        return viewHolder
    }

}
代码解释如下:
onCreateViewHolder创建ViewHolder的时候找到RecyclerView.- RecyclerView的LayoutManager设置为横向
RecyclerView.HORIZONTAL - 添加ItemDecoration,让Item间有适当的间隔。
- 添加Adapter,布局文件为上面的添加的布局
- 将HomePlayListAdapter做为子Adapter添加到DelegateAdapter中
val playAdapter = HomePlayListAdapter(requireActivity(), LinearLayoutHelper(), R.layout.vlayout_recyclerview, 1, ViewType.HOME_VIEW_TYPE_SLIDE_PLAYLIST, creative)
adapters.add(playAdapter)
至此vlayout嵌套横向RecyclerView的功能就完成了。
字段内容类型不一致
首页的接口有一个特殊的地方,ExtInfo在博客的列表中是Map,在直播的列表中是List。如果直接解析肯定是有问题,会直接崩溃。
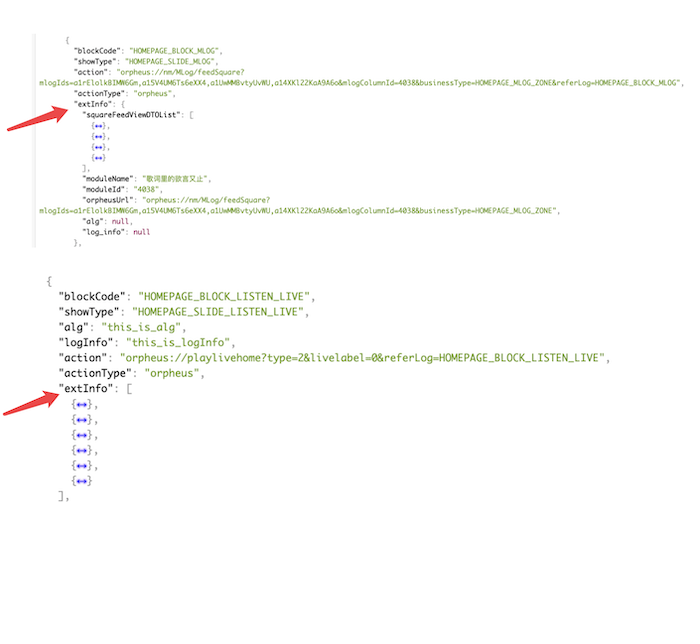
解决方案是自定义Moshi的JsonAdapter。
- 修改ExtInfo类,可以接收两种数据类型
data class ExtInfo constructor (
    val liveExt: List<LiveExt>?,
    val blogExt: BlogExt?
) {
    constructor(liveExt: List<LiveExt>) : this(liveExt, null)
    constructor(blogExt: BlogExt): this(null, blogExt)
}
如果表示直播就是给liveExt赋值,如果表示博客就是给blogExt赋值。
- 添加ExtInfo类的JsonAdapter
class ExtInfoAdapter {
    // 1
    @FromJson fun fromJson(reader: JsonReader): ExtInfo {
        val jsonValue = reader.readJsonValue()
        return when (jsonValue) {
            is List<*> -> {
                var lists = mutableListOf<LiveExt>()
                jsonValue.forEach {
                    val map = it as? Map<String, Any>
                    map?.let { map ->
                        val popularity = (map["popularity"] as Double).toLong()
                        val verticalCover = map["verticalCover"] as String
                        val startStreamTagName = map["startStreamTagName"] as String
                        val title = map["title"] as String
                        val ext = LiveExt(
                            popularity,
                            verticalCover, startStreamTagName, title
                        )
                        lists.add(ext)
                    }
                }
                // 2
                ExtInfo(lists)
            }
            is Map<*, *> -> {
                var title: String? = jsonValue["moduleName"] as String?
                val squareFeedViewDTOList =
                    jsonValue["squareFeedViewDTOList"] as? List<Map<String, *>>
                var lists = mutableListOf<BlogDetail>()
                squareFeedViewDTOList?.let { feedList ->
                    for (map in feedList) {
                        val resources = map["resource"] as? Map<String, *>
                        val mlogBaseData = resources?.get("mlogBaseData") as? Map<String, *>
                        val coverUrl = mlogBaseData?.get("coverUrl") as? String
                        val id = mlogBaseData?.get("id") as? String

                        val talk = mlogBaseData?.get("talk") as? Map<String, *>
                        val talkDesc = talk?.get("talkDesc") as? String

                        val mlogExt = resources?.get("mlogExt") as? Map<String, *>
                        val likedCount = (mlogExt?.get("likedCount") as Double).toLong()

                        lists.add(BlogDetail(id, talkDesc, coverUrl, likedCount))
                    }
                }
                // 3
                ExtInfo(BlogExt(lists, title))
            }
            // 4
            else -> throw JsonDataException("Expected a field of type List or Map")
        }
    }

}
@FromJson表示从JSON转ExtInfo对象时候调用这个方法List<*>的时候解析数据,调用ExtInfo(lists)构造函数Map<*>的时候解析数据,调用ExtInfo(BlogExt(lists, title))构造函数- 其他数据类型,报错
- 修改Retrofit的ConverterFactory
// 1
val moshi = Moshi.Builder()
                .add(ExtInfoAdapter())
                .build()

val retrofit = Retrofit.Builder()
                .baseUrl(MusicApiConstant.BASE_URL)
                .client(okHttpClient)
                // 2
                .addConverterFactory(MoshiConverterFactory.create(moshi))
                .build()
- moshi解析器添加ExtInfoAdapter
- MoshiConverterFactory构造的时候传入moshi
至此,Retrofit解析ExtInfo时就能自动解析不同的数据类型了。
总结
首页的其他内容也类似,只是layout不一样,然后定义相应类型的Adapter 然后加入到添加到DelegateAdapter中。这样其他的工作就交给vlayout去自动实现了。