本节教程我们将来介绍下ExoPlayer的视频播放功能。
我们在本节将主要介绍以下知识点:
- ExoPlayer高级自定义的实现
- 视频的全屏播放和退出全屏播放
- ExoPlayer在RecyclerView中的复用
ExoPlayer介绍
MediaPlayer和ExoPlayer是Google官方支持的两种播放器,但是ExoPlayer比MediaPlayer多了支持基于 HTTP 的动态自适应流 (DASH)、SmoothStreaming 和通用加密等功能。
并且重要的是它独立于Android代码框架,以一个开源代码库的形式存在,所以在自定义上更有优势。
ExoPlayer简单的使用方法
- 引入依赖库
implementation 'com.google.android.exoplayer:exoplayer:2.12.0'
- 布局中引入PlayerView
播放视频我们需要使用PlayerView,我们简单来看下PlayerView的源码,其继承于FrameLayout,其中有三个重要的属性,
public class PlayerView extends FrameLayout implements AdsLoader.AdViewProvider {
    @Nullable private final View surfaceView;
    @Nullable private final PlayerControlView controller;
    private Player player;
}
surfaceView是呈现视频的View,可以是TextureView,SurfaceView, 默认是SurfaceView。controller是播放控制的View,上面提供一些控件可以控制视频的播放,暂停,显示当前进度等。默认是PlayerControlView。player是视频的播放器,在构造函数初始化的时候没有赋值,需要单独设置。
总结:PlayerView通过
player播放视频显示在surfaceView上,用户可以通过提供的controller进行播放的控制。
介绍了基本的知识点后,我们在布局文件中引入PlayerView:
<?xml version="1.0" encoding="utf-8"?>
<androidx.constraintlayout.widget.ConstraintLayout
    xmlns:android="http://schemas.android.com/apk/res/android"
    xmlns:app="http://schemas.android.com/apk/res-auto"
    xmlns:tools="http://schemas.android.com/tools"
    android:layout_width="match_parent"
    android:layout_height="match_parent"
    tools:context=".DefaultViewActivity">

    <com.google.android.exoplayer2.ui.PlayerView
        android:id="@+id/video_player"
        android:layout_width="match_parent"
        android:layout_height="match_parent"
        app:show_buffering="always"
        app:layout_constraintBottom_toBottomOf="parent"
        app:layout_constraintLeft_toLeftOf="parent"
        app:layout_constraintRight_toRightOf="parent"
        app:layout_constraintTop_toTopOf="parent"/>

</androidx.constraintlayout.widget.ConstraintLayout>
- 设置播放器
val player: SimpleExoPlayer = SimpleExoPlayer.Builder(this@MainActivity).build().also { it.playWhenReady = true }
video_player.player = player
我们前面提到PlayerView的两个属性在构造函数调用时赋值了,但是player没有,需要主动设置。这里我们设置成SimpleExoPlayer对象。
SimpleExoPlayer是库中提供的播放器,可以直接使用。
- 设置播放源
// play item
val uri = Uri.parse("https://storage.googleapis.com/exoplayer-test-media-0/BigBuckBunny_320x180.mp4")
val dataSourceFactory = DefaultHttpDataSourceFactory()
val videoSource = ProgressiveMediaSource.Factory(dataSourceFactory).createMediaSource(uri)
// prepare
player.prepare(videoSource)
- 监听播放器的状态
我们可以监听播放器的状态,代码如下:
player.addListener(object: Player.EventListener {
    override fun onPlayerStateChanged(playWhenReady: Boolean, playbackState: Int) {
    Log.d("JJMusic","playWhenReady: $playWhenReady playbackState: $playbackState")
    when (playbackState) {
        Player.STATE_BUFFERING ->
            Log.d("JJMusic","加载中")
        Player.STATE_READY ->
            Log.d("JJMusic","准备完毕")
        Player.STATE_ENDED ->
            Log.d("JJMusic","播放完成")
        }
    }

    override fun onPlayerError(error: ExoPlaybackException) {
        Log.e("JJMusic","ExoPlaybackException: $error")
    }
})
最后得到的效果如下所示:
ExoPlayer简单自定义
我们目前使用的是默认的播放控制布局文件,我们可以修改播放的布局文件达到自定义效果。
- 自定义播放控制的布局文件
假设我们把布局文件设计如下所示:
<!-- layout_video_simple.xml -->
<?xml version="1.0" encoding="utf-8"?>
<androidx.constraintlayout.widget.ConstraintLayout xmlns:android="http://schemas.android.com/apk/res/android"
    xmlns:app="http://schemas.android.com/apk/res-auto"
    xmlns:tools="http://schemas.android.com/tools"
    android:id="@+id/constraint"
    android:layout_width="match_parent"
    android:layout_height="match_parent">

    <ImageView
        android:id="@+id/exo_play"
        android:layout_width="wrap_content"
        android:layout_height="wrap_content"
        android:contentDescription="@null"
        app:layout_constraintBottom_toBottomOf="parent"
        app:layout_constraintEnd_toEndOf="parent"
        app:layout_constraintStart_toStartOf="parent"
        app:layout_constraintTop_toTopOf="parent"
        app:srcCompat="@mipmap/exo_btn_play" />

    <ImageView
        android:id="@+id/exo_pause"
        android:layout_width="wrap_content"
        android:layout_height="wrap_content"
        android:contentDescription="@null"
        app:layout_constraintBottom_toBottomOf="parent"
        app:layout_constraintEnd_toEndOf="parent"
        app:layout_constraintStart_toStartOf="parent"
        app:layout_constraintTop_toTopOf="parent"
        app:srcCompat="@mipmap/exo_btn_pause" />

    <TextView
        android:id="@+id/exo_position"
        android:layout_width="wrap_content"
        android:layout_height="wrap_content"
        android:layout_marginStart="6dp"
        android:layout_marginBottom="12dp"
        android:contentDescription="@null"
        android:text="1"
        android:textColor="@color/colorPrimary"
        android:textSize="12sp"
        app:layout_constraintBottom_toBottomOf="parent"
        app:layout_constraintStart_toStartOf="parent" />

    <TextView
        android:id="@+id/splash_tv"
        android:layout_width="wrap_content"
        android:layout_height="wrap_content"
        android:layout_marginStart="1dp"
        android:layout_marginBottom="12dp"
        android:contentDescription="@null"
        android:text="/"
        android:textColor="@color/colorPrimary"
        android:textSize="12sp"
        app:layout_constraintBottom_toBottomOf="parent"
        app:layout_constraintStart_toEndOf="@+id/exo_position"
        tools:text="/" />

    <TextView
        android:id="@+id/exo_duration"
        android:layout_width="wrap_content"
        android:layout_height="wrap_content"
        android:layout_marginStart="1dp"
        android:layout_marginBottom="12dp"
        android:contentDescription="@null"
        android:text="1"
        android:textColor="@color/colorPrimary"
        android:textSize="12sp"
        app:layout_constraintBottom_toBottomOf="parent"
        app:layout_constraintStart_toEndOf="@+id/splash_tv" />

    <com.google.android.exoplayer2.ui.DefaultTimeBar
        android:id="@+id/exo_progress"
        android:layout_width="0dp"
        android:layout_height="15dp"
        app:layout_constraintBottom_toBottomOf="parent"
        app:layout_constraintEnd_toEndOf="parent"
        app:layout_constraintStart_toStartOf="parent"
        app:bar_height="2dp"
        app:unplayed_color="@color/exo_gray_ripple"
        app:played_color="@color/colorAccent"
        app:scrubber_color="@color/colorAccent"
        app:buffered_color="@color/colorPrimary"
        />

</androidx.constraintlayout.widget.ConstraintLayout>
- id为
exo_play的按钮和id为exo_pause的按钮在屏幕正中间位置 - id为
exo_position的文本和id为exo_duration的文本在左下角 - id为
exo_progress的进度条在最底部。进度条的类是DefaultTimeBar,可以设置一些属性。譬如上面的bar_height(进度条的高度),unplayed_color(未缓冲部分的颜色),played_color(已播放部分的颜色)和buffered_color(已缓冲完部分的颜色)等等。
注意:这些id是PlayerControlView源代码中能找到的id,否则是没有效果的。
- 修改PlayerView布局文件
<com.google.android.exoplayer2.ui.PlayerView
    ...
    app:controller_layout_id="@layout/layout_video_simple"
    />
其他的和前面的类似,只是加了个属性controller_layout_id,值为我们刚才设计的布局文件layout_video_simple。
简单自定义得到的效果如下所示:
ExoPlayer高级自定义
简单的自定义我们只是更改了PlayerControlView的布局文件,复用了其中的id,能修改的很有限,没有涉及到源代码的修改。
高级自定义就需要修改源代码了。其实就是修改PlayerView,PlayerControlView,甚至是TimeBar的源代码。
接下来我们就用高级自定义来实现下网易云音乐的全屏播放功能,需要的效果如下:
- 修改PlayerControlView
新建一个JJPlayerControlView类,然后将PlayerControlView所有源代码拷贝在这个类中。
public class JJPlayerControlView extends FrameLayout {
    // PlayerControlView内容
}
接下来在JJPlayerControlView中加入一个全屏按钮属性。
public class JJPlayerControlView extends FrameLayout {
    // 全屏按钮
    private final ImageButton maxButton;
    // PlayerControlView内容
    public JJPlayerControlView(
            Context context,
            @Nullable AttributeSet attrs,
            int defStyleAttr,
            @Nullable AttributeSet playbackAttrs) {
        ...
        maxButton = findViewById(R.id.exo_max_btn);
        if (maxButton != null) {
            maxButton.setOnClickListener(componentListener);
        }
        ...
    }
}
- 修改PlayerView
新建一个JJPlayerView类,然后将PlayerView所有源代码拷贝在这个类中。
public class JJPlayerView extends FrameLayout implements AdsLoader.AdViewProvider {
// PlayerView的内容
}
将JJPlayerView的controller指定为JJPlayerControlView,即:
public class JJPlayerView extends FrameLayout implements AdsLoader.AdViewProvider {
    @Nullable private final JJPlayerControlView controller;
    // PlayerView的其他内容
}
- 修改TimeBar
如果需要修改进度条,新建一个JJTimeBar类,然后将DefaultTimeBar所有源代码拷贝在这个类中。
public class JJTimeBar extends View implements TimeBar {
    ...
}
当然修改将JJPlayerControlView中的timeBar改为JJTimeBar类。
public class JJPlayerControlView extends FrameLayout {
    // 全屏按钮
    private final ImageButton maxButton;
    // 自定义进度条
    @Nullable private JJTimeBar timeBar;
    // PlayerControlView内容
    public JJPlayerControlView(
            Context context,
            @Nullable AttributeSet attrs,
            int defStyleAttr,
            @Nullable AttributeSet playbackAttrs) {
        ...
        maxButton = findViewById(R.id.exo_max_btn);
        if (maxButton != null) {
            maxButton.setOnClickListener(componentListener);
        }
        ...
    }
}
- 修改JJPlayerControlView布局文件
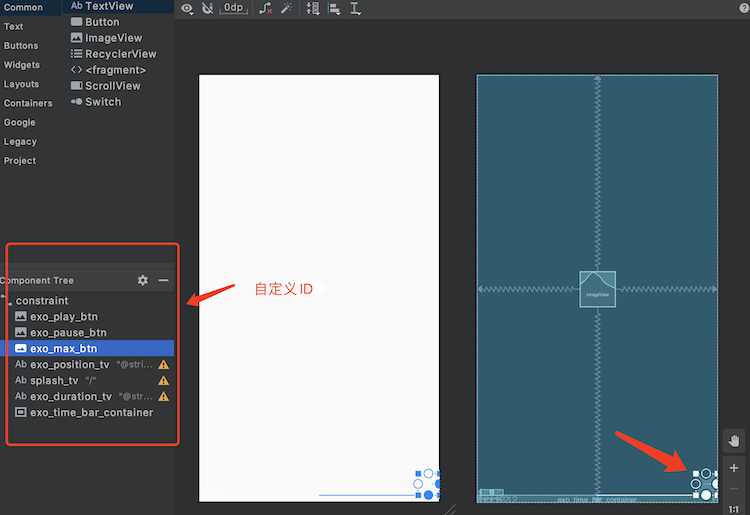
layout_video_recyclerview.xml相对前面,我们多添加了一个id为exo_max_btn的按钮。
为了看的更加明显,我把其他的按钮或者文本的id都改了,不再使用默认的id,这时候为了找到对应的控件,就需要修改对应的源代码了。譬如我把播放按钮的id改为了exo_play_btn。
public class JJPlayerControlView extends FrameLayout {
    // 代码修改
    playButton = findViewById(R.id.exo_play_btn);
    if (playButton != null) {
        playButton.setOnClickListener(componentListener);
    }
}
- JJPlayerView布局文件
JJPlayerView使用JJPlayerControlView自定义的布局文件
<com.johnny.jjmusic.exoplayer.JJPlayerView
    xmlns:android="http://schemas.android.com/apk/res/android"
    xmlns:app="http://schemas.android.com/apk/res-auto"
    android:layout_width="match_parent"
    android:layout_height="match_parent"
    app:show_buffering="always"
    app:controller_layout_id="@layout/layout_video_recyclerview"
    >

</com.johnny.jjmusic.exoplayer.JJPlayerView>
- 全屏和退出全屏的实现逻辑
我们先来看一张图就能很清晰的了解全屏和退出全屏的逻辑了:
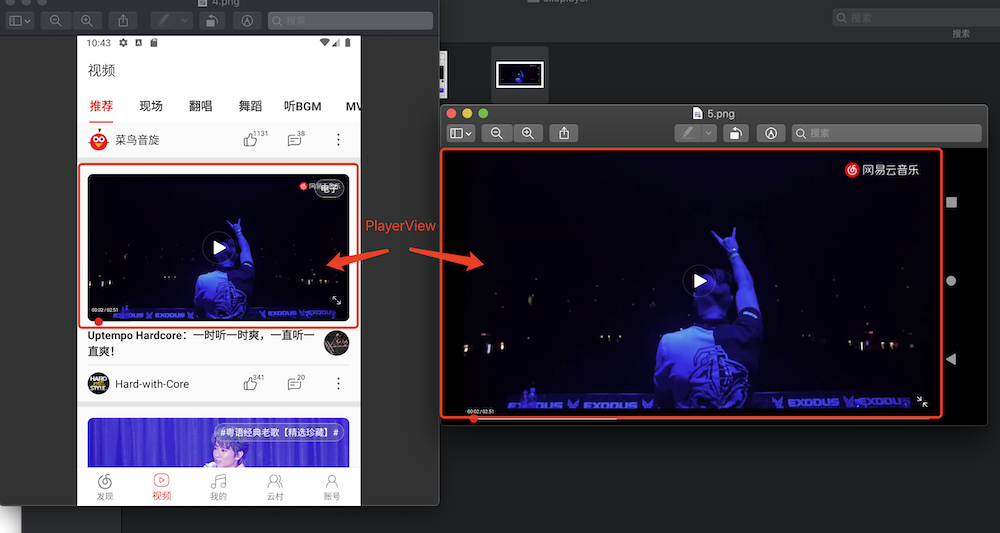
全屏的时候JJPlayerView放在Activity的R.id.content上,隐藏ActionBar,切换成横屏显示,退出全屏的时候就重新放在RecyclerView的ItemView上,显示ActionBar,切换成竖屏显示。
所以最后很简单,只要处理maxButton点击事件时实现这个功能就可以了。
进入全屏播放
fun enterFullScreen() {
    // 横竖屏状态判断
    if (viewModel.playMode == VideoPlayMode.MODE_FULL_SCREEN) return
    // 隐藏ActionBar
    playerView.context.hideActionBar()
    // 旋转屏幕
    playerView.context.activity?.requestedOrientation = ActivityInfo.SCREEN_ORIENTATION_LANDSCAPE
    // 将JJPlayerView从RecyclerView移除,加入Activity的R.id.content下
    playerView.context.activity?.let {
        val contentView = it.findViewById<ViewGroup>(android.R.id.content)
        // remove
        removePlayerView()
        viewModel.isVideoViewAdded = true

        // add
        val params = ViewGroup.LayoutParams(ViewGroup.LayoutParams.MATCH_PARENT, ViewGroup.LayoutParams.MATCH_PARENT)
        contentView.addView(playerView, params)

        val frameParams = FrameLayout.LayoutParams(FrameLayout.LayoutParams.MATCH_PARENT, FrameLayout.LayoutParams.MATCH_PARENT)
        playerView.controller?.timeBarContainer?.addView(timeBar, frameParams)

        viewModel.playMode = VideoPlayMode.MODE_FULL_SCREEN
    }

}
退出全屏播放
/* 退出全屏 */
    fun exitFullScreen() {
    // 横竖屏状态判断
    if (viewModel.playMode == VideoPlayMode.MODE_NORMAL) return
    // 显示ActionBar
    playerView.context.showActionBar()
    // 旋转屏幕
    playerView.context.activity?.requestedOrientation = ActivityInfo.SCREEN_ORIENTATION_PORTRAIT
    // 将JJPlayerView从Activity的R.id.content移除,加入RecyclerView的ItemView下
    playerView.context.activity?.let {
        // remove
        val contentView = it.findViewById<ViewGroup>(android.R.id.content)
        contentView.removeView(playerView)
        playerView.controller?.timeBarContainer?.removeView(timeBar)

        // add
        viewModel.viewModelScope.launch {
            delay(100)
            addPlayerView()
        }

        viewModel.playMode = VideoPlayMode.MODE_NORMAL
    }
}
上面代码中涉及到的几个扩展方法,也一同贴出来:
//----------Activity----------
val Context.activity: Activity?
    get() {
        return when (this) {
            is Activity -> {
                this
            }
            is ContextWrapper -> {
                this.baseContext.activity
            }
            else -> {
                null
            }
        }
    }

val Context.appCompActivity: AppCompatActivity?
    get() {
        return when (this) {
            is AppCompatActivity -> {
                this
            }
            is ContextThemeWrapper -> {
                this.baseContext.appCompActivity
            }
            else -> {
                null
            }
        }
    }

//---------- ActionBar ----------
@SuppressLint("RestrictedApi")
fun Context.showActionBar() {
    this.appCompActivity?.supportActionBar?.let {
        it.setShowHideAnimationEnabled(false)
        it.show()
    }
    this.activity?.window?.clearFlags(WindowManager.LayoutParams.FLAG_FULLSCREEN)
}

@SuppressLint("RestrictedApi")
fun Context.hideActionBar() {
    this.appCompActivity?.supportActionBar?.let {
        it.setShowHideAnimationEnabled(false)
        it.hide()
    }
    this.activity?.window?.setFlags(WindowManager.LayoutParams.FLAG_FULLSCREEN, WindowManager.LayoutParams.FLAG_FULLSCREEN)
}
至此ExoPlayer的高级自定义就到此为止了。
由于可以修改源码,所以进行高度自定义就变得可实现了。当然是在熟悉源码的前提下进行修改。
ExoPlayer在RecyclerView中的复用
上面的实现效果中,我们点击RecyclerView不同的Item,都能播放视频,如果每个ItemView都有一个PlayerView那是非常不合适的。对PlayerView复用是一个非常合适的解决方案。
其实这个解决方案和全屏的方案也非常相似,就是将PlayerView在不同的Item中移除和加入。然后播放新的视频。
其中有一些细节需要处理,譬如播放的进度需要记录下来,下次再点击的时候从上次停止的地方进行播放。还譬如需要监听RecyclerView.OnChildAttachStateChangeListener,当执行onChildViewDetachedFromWindow时候,如果在播放需要将播放器停止。等等
有了思路,解决起来也就很简单了。这里不再贴代码了。