三章FFmpeg视频解码器
在阅读这章节之前建议先读:FFmpeg+SDL-----学习大纲
目录
• 视频解码知识
• VC下FFmpeg开发环境的搭建
• 示例程序运行
• FFmpeg解码的函数
• FFmpeg解码的数据结构
• 练习
视频解码知识
1、纯净的视频解码流程
▫ 压缩编码数据->像素数据。
▫ 例如解码H.264,就是“H.264码流->YUV”。
2、一般的视频解码流程
▫ 视频码流一般存储在一定的封装格式(例如MP4、AVI等)中。封装格式中通常还包含音频码流等内容。
▫ 对于封装格式中的视频,需要先从封装格式中提取中视频码流,然后再进行解码。
▫ 例如解码MKV格式的视频文件,就是“MKV->H.264码流->YUV”。
PS:本课程直接讨论第二种流程
VC下FFmpeg开发环境的搭建
1、新建控制台工程
▫ 打开VC++
▫ 文件->新建->项目->Win32控制台应用程序
2、拷贝FFmpeg开发文件
▫ 头文件(.h)拷贝至项目文件夹的include子文件夹下
▫ 导入库文件(.lib)拷贝至项目文件夹的lib子文件夹下
▫ 动态库文件(*.dll)拷贝至项目文件夹下
PS:如果直接使用官网上下载的FFmpeg开发文件。则可能还需要将MinGW安装目录中的inttypes.h,stdint.h,_mingw.h三个文件拷贝至项目文件夹的include子文件夹下。
3、配置开发文件
- 打开属性面板
- 解决方案资源管理器->右键单击项目->属性
- 头文件配置
- 配置属性->C/C+±>常规->附加包含目录,输入“include”(刚才拷贝头文件的目录)
- 导入库配置
- 配置属性->链接器->常规->附加库目录,输入“lib” (刚才拷贝库文件的目录)
- 配置属性->链接器->输入->附加依赖项,输入“avcodec.lib; avformat.lib; avutil.lib; avdevice.lib; avfilter.lib; postproc.lib; swresample.lib; swscale.lib”(导入库的文件名)
- 动态库不用配置
测试
- 创建源代码文件
- 在工程中创建一个包含main()函数的C/C++文件(如果已经有了可以跳过这一步)。
- 包含头文件
- 如果是C语言中使用FFmpeg,则直接使用下面代码
#include "libavcodec/avcodec.h" - 如果是C++语言中使用FFmpeg,则使用下面代码
#define __STDC_CONSTANT_MACROS extern "C" { #include "libavcodec/avcodec.h " }
- 如果是C语言中使用FFmpeg,则直接使用下面代码
- main()中调用一个FFmpeg的接口函数
- 例如下面代码打印出了FFmpeg的配置信息如果运行无误,则代表FFmpeg已经配置完成。
int main(int argc, char* argv[]){
	printf("%s", avcodec_configuration());
return 0;
}
FFmpeg库简介
FFmpeg一共包含8个库:
▫ avcodec:编解码(最重要的库)。
▫ avformat:封装格式处理。
▫ avfilter:滤镜特效处理。
▫ avdevice:各种设备的输入输出。
▫ avutil:工具库(大部分库都需要这个库的支持)。
▫ postproc:后加工。
▫ swresample:音频采样数据格式转换。
▫ swscale:视频像素数据格式转换。
FFmpeg解码的流程图如下所示
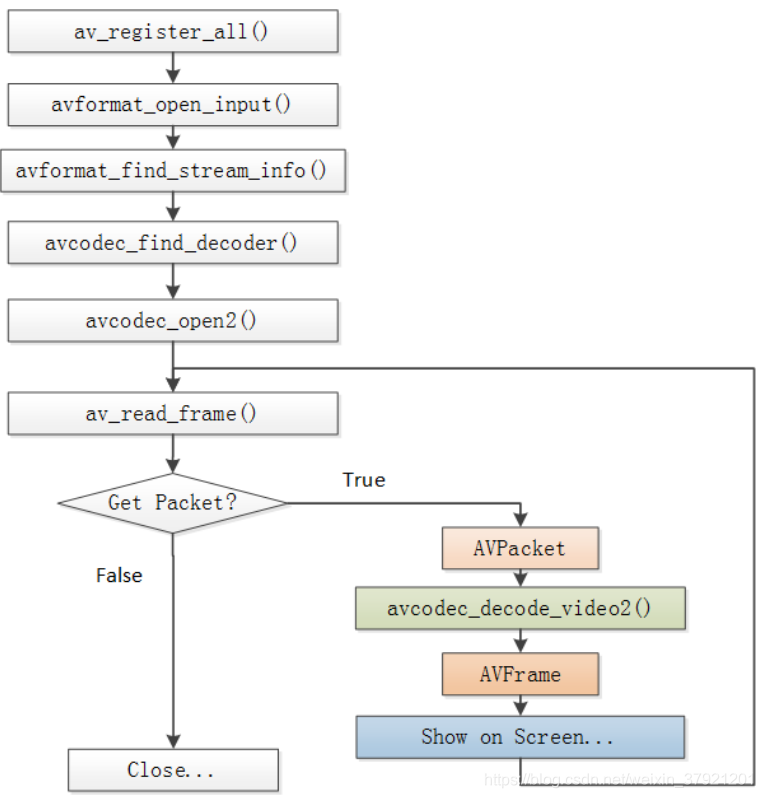
FFmpeg解码函数简介
av_register_all:所有ffmpeg开头都是调用这个函数,注册需要的组件
avformat_open_input():打开视频流域(如果VC++调试,第二个参数文件应该和.cpp文件一个目录下)
avformat_find_stream_info():获取视频流信息,解码器类型、宽高等
avcodec_find_decoder():找出对应解码器
avcodec_open2():打开解码器
av_read_frame():每调用一次,读取一帧的压缩数据,即H.264码流
AVPacket:上面函数读取出帧信息之后,填充到这个结构体里面 ,里面装的是264
avcode_decode_video2():解码函数
AVFrame:解码完之后的信息填充到这个结构体里面,填充的是YUV
avcodec_close():关闭解码器。
avformat_close_input():关闭输入视频文件
FFmpeg解码的数据结构
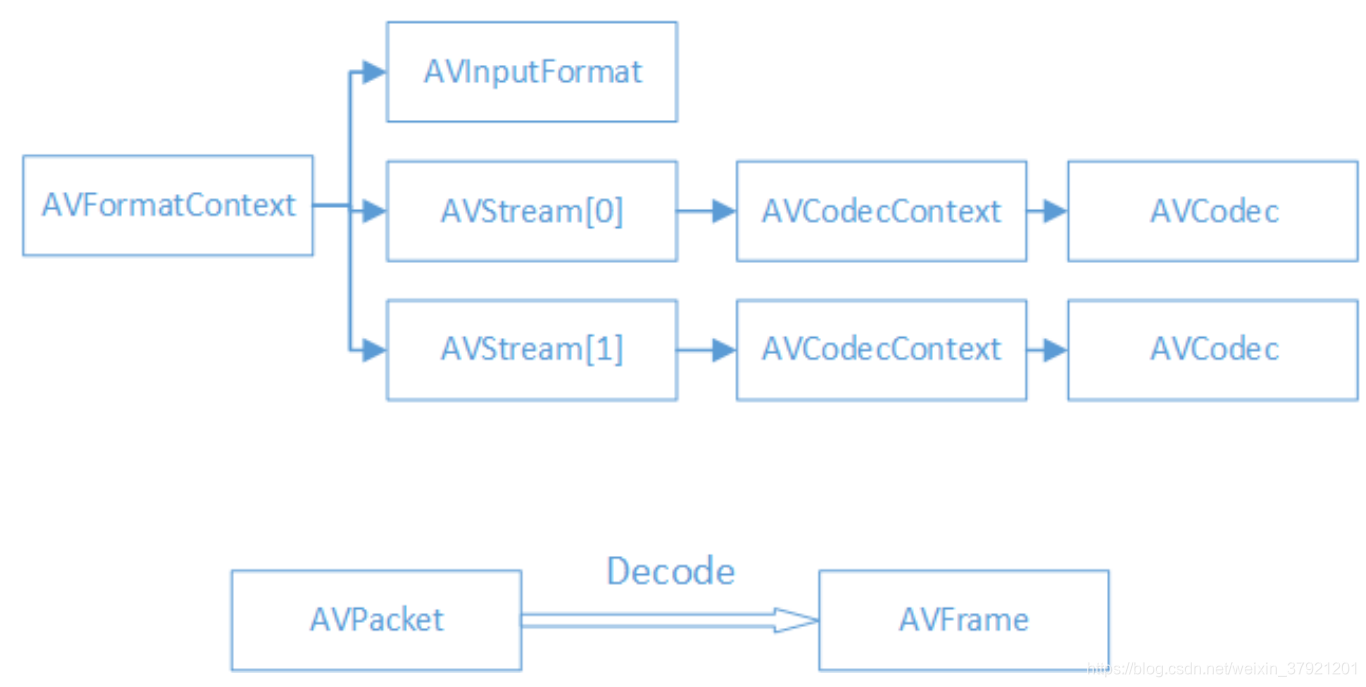
FFmpeg解码的数据结构简介
▫ AVFormatContext:封装格式上下文结构体,也是统领全局的结构体,保存了视频文件封装格式相关信息。
▫ AVInputFormat:每种封装格式(例如FLV, MKV, MP4, AVI)对应一个该结构体。
▫ AVStream:视频文件中每个视频(音频)流对应一个该结构体。
▫ AVCodecContext:编码器上下文结构体,保存了视频(音频)编解码相关信息。
▫ AVCodec:每种视频(音频)编解码器(例如H.264解码器)对应一个该结构体。
▫ AVPacket:存储一帧压缩编码数据。
▫ AVFrame:存储一帧解码后像素(采样)数据。
FFmpeg数据结构分析
- AVFormatContext
- iformat:输入视频的AVInputFormat
- nb_streams :输入视频的AVStream 个数
- streams :输入视频的AVStream []数组
- duration :输入视频的时长(以微秒为单位)
- bit_rate :输入视频的码率
- VInputFormat
- name:封装格式名称
- long_name:封装格式的长名称
- extensions:封装格式的扩展名
- id:封装格式ID
- 一些封装格式处理的接口函数
- AVStream
- id:序号
- codec:该流对应的AVCodecContext
- time_base:该流的时基
- _frame_rate:该流的帧率
- AVCodecContext
- codec:编解码器的AVCodec
- width, height:图像的宽高(只针对视频)
- pix_fmt:像素格式(只针对视频)
- sample_rate:采样率(只针对音频)
- channels:声道数(只针对音频)
- sample_fmt:采样格式(只针对音频)
- AVCodec
- name:编解码器名称
- long_name:编解码器长名称
- type:编解码器类型
- id:编解码器ID
- 一些编解码的接口函数
- AVPacket
- pts:显示时间戳(和前面的time_base相乘组合使用)
- dts :解码时间戳
- data :压缩编码数据
- size :压缩编码数据大小
- stream_index :所属的AVStream(表示前面AVStream的数组下标)
- AVFrame
- data:解码后的图像像素数据(音频采样数据)。
- linesize:对视频来说是图像中一行像素的大小;对音频来说是整个音频帧的大小
- width, height:图像的宽高(只针对视频)。
- key_frame:是否为关键帧(只针对视频) 。
- pict_type:帧类型(只针对视频) 。例如I,P,B。
补充小知识
▫ 解码后的数据为什么要经过sws_scale()函数处理?
解码后YUV格式的视频像素数据保存在AVFrame的data[0]、data[1]、data[2]中。但是这些像素值并不是连续存储的,每行有效像素之后存储了一些无效像素 。 以亮度 Y 数据为例 , data[0] 中一共包含了linesize[0]*height个数据。但是出于优化等方面的考虑,linesize[0]实际上并不等于宽度width,而是一个比宽度大一些的值。因此需要使用sws_scale()进行转换。转换后去除了无效数据,width和linesize[0]取值相等。
PS:也可以不使用sws_scale()处理,想想该怎么做?
源代码:
#include <stdio.h>

#define __STDC_CONSTANT_MACROS

extern "C"
{
#include "libavcodec/avcodec.h"
#include "libavformat/avformat.h"
#include "libswscale/swscale.h"
};


int main(int argc, char* argv[])
{
	AVFormatContext	*pFormatCtx;
	int				i, videoindex;
	AVCodecContext	*pCodecCtx;
	AVCodec			*pCodec;
	AVFrame	*pFrame,*pFrameYUV;
	uint8_t *out_buffer;
	AVPacket *packet;
	int y_size;
	int ret, got_picture;
	struct SwsContext *img_convert_ctx;
	//输入文件路径
	char filepath[]="Titanic.ts";			//在当前目录下

	int frame_cnt;

	av_register_all();
	avformat_network_init();
	pFormatCtx = avformat_alloc_context();

	if(avformat_open_input(&pFormatCtx,filepath,NULL,NULL)!=0){
		printf("Couldn't open input stream.\n");
		return -1;
	}
	if(avformat_find_stream_info(pFormatCtx,NULL)<0){
		printf("Couldn't find stream information.\n");
		return -1;
	}
	videoindex=-1;
	for(i=0; i<pFormatCtx->nb_streams; i++)
		if(pFormatCtx->streams[i]->codec->codec_type==AVMEDIA_TYPE_VIDEO){
			videoindex=i;
			break;
		}
	if(videoindex==-1){
		printf("Didn't find a video stream.\n");
		return -1;
	}

	pCodecCtx=pFormatCtx->streams[videoindex]->codec;
	pCodec=avcodec_find_decoder(pCodecCtx->codec_id);
	if(pCodec==NULL){
		printf("Codec not found.\n");
		return -1;
	}
	if(avcodec_open2(pCodecCtx, pCodec,NULL)<0){
		printf("Could not open codec.\n");
		return -1;
	}
	/*
	 * 在此处添加输出视频信息的代码
	 * 取自于pFormatCtx,使用fprintf()
	 */
	pFrame=av_frame_alloc();
	pFrameYUV=av_frame_alloc();
	out_buffer=(uint8_t *)av_malloc(avpicture_get_size(PIX_FMT_YUV420P, pCodecCtx->width, pCodecCtx->height));
	avpicture_fill((AVPicture *)pFrameYUV, out_buffer, PIX_FMT_YUV420P, pCodecCtx->width, pCodecCtx->height);
	packet=(AVPacket *)av_malloc(sizeof(AVPacket));
	//Output Info-----------------------------
	printf("--------------- File Information ----------------\n");
	av_dump_format(pFormatCtx,0,filepath,0);
	printf("-------------------------------------------------\n");
	img_convert_ctx = sws_getContext(pCodecCtx->width, pCodecCtx->height, pCodecCtx->pix_fmt,
		pCodecCtx->width, pCodecCtx->height, PIX_FMT_YUV420P, SWS_BICUBIC, NULL, NULL, NULL);

	frame_cnt=0;
	while(av_read_frame(pFormatCtx, packet)>=0){
		if(packet->stream_index==videoindex){
				/*
				 * 在此处添加输出H264码流的代码
				 * 取自于packet,使用fwrite()
				 */
			ret = avcodec_decode_video2(pCodecCtx, pFrame, &got_picture, packet);
			if(ret < 0){
				printf("Decode Error.\n");
				return -1;
			}
			if(got_picture){
				sws_scale(img_convert_ctx, (const uint8_t* const*)pFrame->data, pFrame->linesize, 0, pCodecCtx->height,
					pFrameYUV->data, pFrameYUV->linesize);
				printf("Decoded frame index: %d\n",frame_cnt);

				/*
				 * 在此处添加输出YUV的代码
				 * 取自于pFrameYUV,使用fwrite()
				 */

				frame_cnt++;

			}
		}
		av_free_packet(packet);
	}

	sws_freeContext(img_convert_ctx);

	av_frame_free(&pFrameYUV);
	av_frame_free(&pFrame);
	avcodec_close(pCodecCtx);
	avformat_close_input(&pFormatCtx);

	return 0;
}