背景
- STM32F107VCT6的RT-Thread开发环境搭建成功
- STM32F10C7VCT6有两路CAN总线
- 调试CAN总线,研究RT-Thread CAN驱动框架的实现方法
移植
首先需要移植并实现RT-Thread 最小系统。
熟悉硬件原理图,确认MSH cmd串口、CAN总线引脚,这里使用CAN1.

通过 STM32CubeMX,配置CAN 引脚,初始化引脚与CAN时钟。

初始化代码
更新后的: stm32f1xx_hal_msp.c 文件。
/**
* @brief CAN MSP Initialization
* This function configures the hardware resources used in this example
* @param hcan: CAN handle pointer
* @retval None
*/
void HAL_CAN_MspInit(CAN_HandleTypeDef* hcan)
{
  GPIO_InitTypeDef GPIO_InitStruct = {0};
  if(hcan->Instance==CAN1)
  {
  /* USER CODE BEGIN CAN1_MspInit 0 */

  /* USER CODE END CAN1_MspInit 0 */
    /* Peripheral clock enable */
    __HAL_RCC_CAN1_CLK_ENABLE();

    __HAL_RCC_GPIOB_CLK_ENABLE();
    /**CAN1 GPIO Configuration
    PB8     ------> CAN1_RX
    PB9     ------> CAN1_TX
    */
    GPIO_InitStruct.Pin = GPIO_PIN_8;
    GPIO_InitStruct.Mode = GPIO_MODE_INPUT;
    GPIO_InitStruct.Pull = GPIO_NOPULL;
    HAL_GPIO_Init(GPIOB, &GPIO_InitStruct);

    GPIO_InitStruct.Pin = GPIO_PIN_9;
    GPIO_InitStruct.Mode = GPIO_MODE_AF_PP;
    GPIO_InitStruct.Speed = GPIO_SPEED_FREQ_HIGH;
    HAL_GPIO_Init(GPIOB, &GPIO_InitStruct);

    __HAL_AFIO_REMAP_CAN1_2();

  /* USER CODE BEGIN CAN1_MspInit 1 */

  /* USER CODE END CAN1_MspInit 1 */
  }

}

/**
* @brief CAN MSP De-Initialization
* This function freeze the hardware resources used in this example
* @param hcan: CAN handle pointer
* @retval None
*/
void HAL_CAN_MspDeInit(CAN_HandleTypeDef* hcan)
{
  if(hcan->Instance==CAN1)
  {
  /* USER CODE BEGIN CAN1_MspDeInit 0 */

  /* USER CODE END CAN1_MspDeInit 0 */
    /* Peripheral clock disable */
    __HAL_RCC_CAN1_CLK_DISABLE();

    /**CAN1 GPIO Configuration
    PB8     ------> CAN1_RX
    PB9     ------> CAN1_TX
    */
    HAL_GPIO_DeInit(GPIOB, GPIO_PIN_8|GPIO_PIN_9);

  /* USER CODE BEGIN CAN1_MspDeInit 1 */

  /* USER CODE END CAN1_MspDeInit 1 */
  }

}
CAN功能配置
使能RT-Thread CAN驱动框架,这里暂时不使用硬件滤波器(地址过滤)
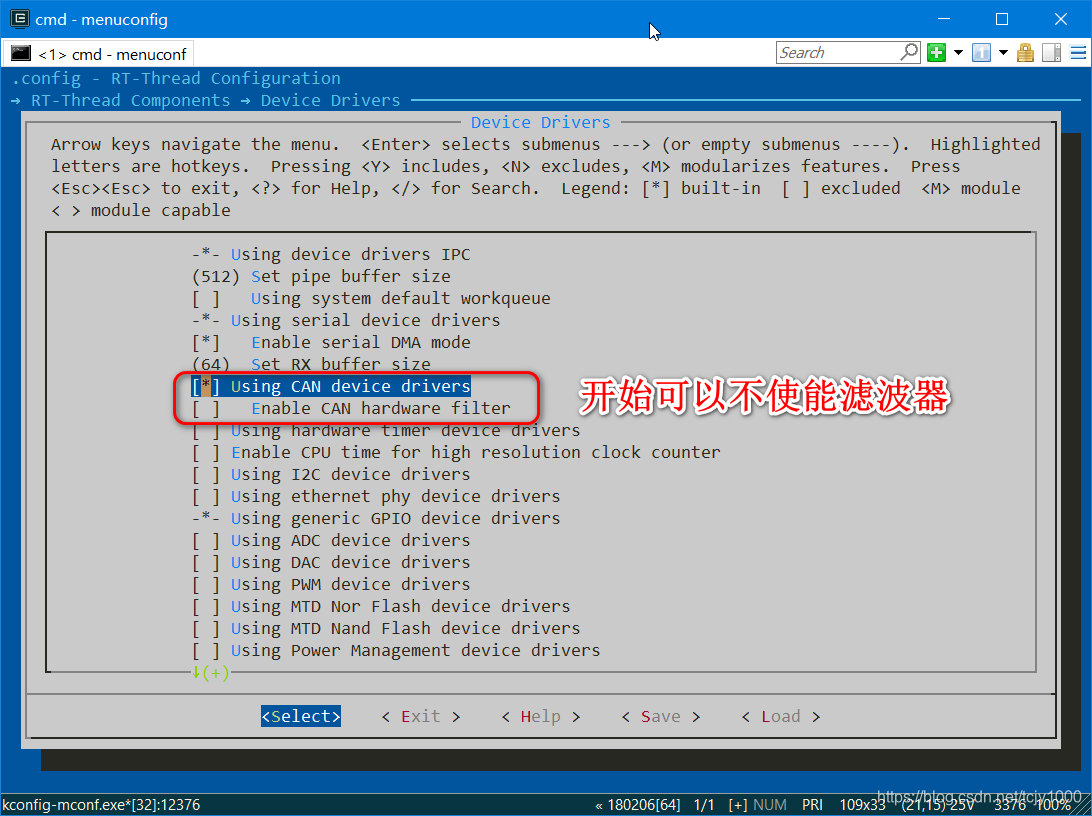

使能CAN
HAL库模块


配置board下的Kconfig文件,使能 宏:BSP_USING_CAN1
    menuconfig BSP_USING_CAN
        bool "Enable CAN"
        select RT_USING_CAN
        default n
        if BSP_USING_CAN
            config BSP_USING_CAN1
                bool "Enable CAN1"
                default y

            config BSP_USING_CAN2
                bool "Enable CAN2"
                default n
        endif

例程
把CAN的测试代码,放在工程目录下。
/*
 * 程序清单:这是一个 CAN 设备使用例程
 * 例程导出了 can_sample 命令到控制终端
 * 命令调用格式:can_sample can1
 * 命令解释:命令第二个参数是要使用的 CAN 设备名称,为空则使用默认的 CAN 设备
 * 程序功能:通过 CAN 设备发送一帧,并创建一个线程接收数据然后打印输出。
*/

#include <rtthread.h>
#include "rtdevice.h"

#define CAN_DEV_NAME       "can1"      /* CAN 设备名称 */

static struct rt_semaphore rx_sem;     /* 用于接收消息的信号量 */
static rt_device_t can_dev;            /* CAN 设备句柄 */

/* 接收数据回调函数 */
static rt_err_t can_rx_call(rt_device_t dev, rt_size_t size)
{
    /* CAN 接收到数据后产生中断,调用此回调函数,然后发送接收信号量 */
    rt_sem_release(&rx_sem);

    return RT_EOK;
}

static void can_rx_thread(void *parameter)
{
    int i;
    //rt_err_t res;
    struct rt_can_msg rxmsg = {0};

    /* 设置接收回调函数 */
    rt_device_set_rx_indicate(can_dev, can_rx_call);


#if 0
    struct rt_can_filter_item items[5] =
    {
        RT_CAN_FILTER_ITEM_INIT(0x100, 0, 0, 1, 0x700, RT_NULL, RT_NULL), /* std,match ID:0x100~0x1ff,hdr 为 - 1,设置默认过滤表 */
        RT_CAN_FILTER_ITEM_INIT(0x300, 0, 0, 1, 0x700, RT_NULL, RT_NULL), /* std,match ID:0x300~0x3ff,hdr 为 - 1 */
        RT_CAN_FILTER_ITEM_INIT(0x211, 0, 0, 1, 0x7ff, RT_NULL, RT_NULL), /* std,match ID:0x211,hdr 为 - 1 */
        RT_CAN_FILTER_STD_INIT(0x486, RT_NULL, RT_NULL),                  /* std,match ID:0x486,hdr 为 - 1 */
        {0x555, 0, 0, 1, 0x7ff, 7,}                                       /* std,match ID:0x555,hdr 为 7,指定设置 7 号过滤表 */
    };
    struct rt_can_filter_config cfg = {5, 1, items}; /* 一共有 5 个过滤表 */
    /* 设置硬件过滤表 */
    res = rt_device_control(can_dev, RT_CAN_CMD_SET_FILTER, &cfg);
    RT_ASSERT(res == RT_EOK);
#endif

    while (1)
    {
        /* hdr 值为 - 1,表示直接从 uselist 链表读取数据 */
        rxmsg.hdr = -1;
        /* 阻塞等待接收信号量 */
        rt_sem_take(&rx_sem, RT_WAITING_FOREVER);
        /* 从 CAN 读取一帧数据 */
        rt_device_read(can_dev, 0, &rxmsg, sizeof(rxmsg));
        /* 打印数据 ID 及内容 */
        rt_kprintf("ID:%x", rxmsg.id);
        for (i = 0; i < 8; i++)
        {
            rt_kprintf("%2x", rxmsg.data[i]);
        }

        rt_kprintf("\n");
    }
}

int can_sample(int argc, char *argv[])
{
    struct rt_can_msg msg = {0};
    rt_err_t res;
    rt_size_t  size;
    rt_thread_t thread;
    char can_name[RT_NAME_MAX];

    if (argc == 2)
    {
        rt_strncpy(can_name, argv[1], RT_NAME_MAX);
    }
    else
    {
        rt_strncpy(can_name, CAN_DEV_NAME, RT_NAME_MAX);
    }
    /* 查找 CAN 设备 */
    can_dev = rt_device_find(can_name);
    if (!can_dev)
    {
        rt_kprintf("find %s failed!\n", can_name);
        return RT_ERROR;
    }

    /* 初始化 CAN 接收信号量 */
    rt_sem_init(&rx_sem, "rx_sem", 0, RT_IPC_FLAG_FIFO);

    /* 以中断接收及发送方式打开 CAN 设备 */
    res = rt_device_open(can_dev, RT_DEVICE_FLAG_INT_TX | RT_DEVICE_FLAG_INT_RX);
    RT_ASSERT(res == RT_EOK);
    /* 创建数据接收线程 */
    thread = rt_thread_create("can_rx", can_rx_thread, RT_NULL, 1024, 25, 10);
    if (thread != RT_NULL)
    {
        rt_thread_startup(thread);
    }
    else
    {
        rt_kprintf("create can_rx thread failed!\n");
    }

    msg.id = 0x78;              /* ID 为 0x78 */
    msg.ide = RT_CAN_STDID;     /* 标准格式 */
    msg.rtr = RT_CAN_DTR;       /* 数据帧 */
    msg.len = 8;                /* 数据长度为 8 */
    /* 待发送的 8 字节数据 */
    msg.data[0] = 0x00;
    msg.data[1] = 0x11;
    msg.data[2] = 0x22;
    msg.data[3] = 0x33;
    msg.data[4] = 0x44;
    msg.data[5] = 0x55;
    msg.data[6] = 0x66;
    msg.data[7] = 0x77;
    /* 发送一帧 CAN 数据 */
    size = rt_device_write(can_dev, 0, &msg, sizeof(msg));
    if (size == 0)
    {
        rt_kprintf("can dev write data failed!\n");
    }

    return res;
}

void can_send_test(void)
{
    struct rt_can_msg msg = {0};
    rt_size_t  size;
    static rt_uint8_t num = 0;

    msg.id = 0x78;              /* ID 为 0x78 */
    msg.ide = RT_CAN_STDID;     /* 标准格式 */
    msg.rtr = RT_CAN_DTR;       /* 数据帧 */
    msg.len = 8;                /* 数据长度为 8 */

    /* 待发送的 8 字节数据 */
    msg.data[0] = 0x00;
    msg.data[1] = num++;
    msg.data[2] = 0x22;
    msg.data[3] = 0x33;
    msg.data[4] = num++;
    msg.data[5] = 0x55;
    msg.data[6] = 0x66;
    msg.data[7] = 0x77;
    /* 发送一帧 CAN 数据 */
    size = rt_device_write(can_dev, 0, &msg, sizeof(msg));
    if (size == 0)
    {
        rt_kprintf("can dev write data failed!\n");
    }
}

/* 导出到 msh 命令列表中 */
MSH_CMD_EXPORT(can_sample, can device sample);
MSH_CMD_EXPORT(can_send_test, can send test);
调试
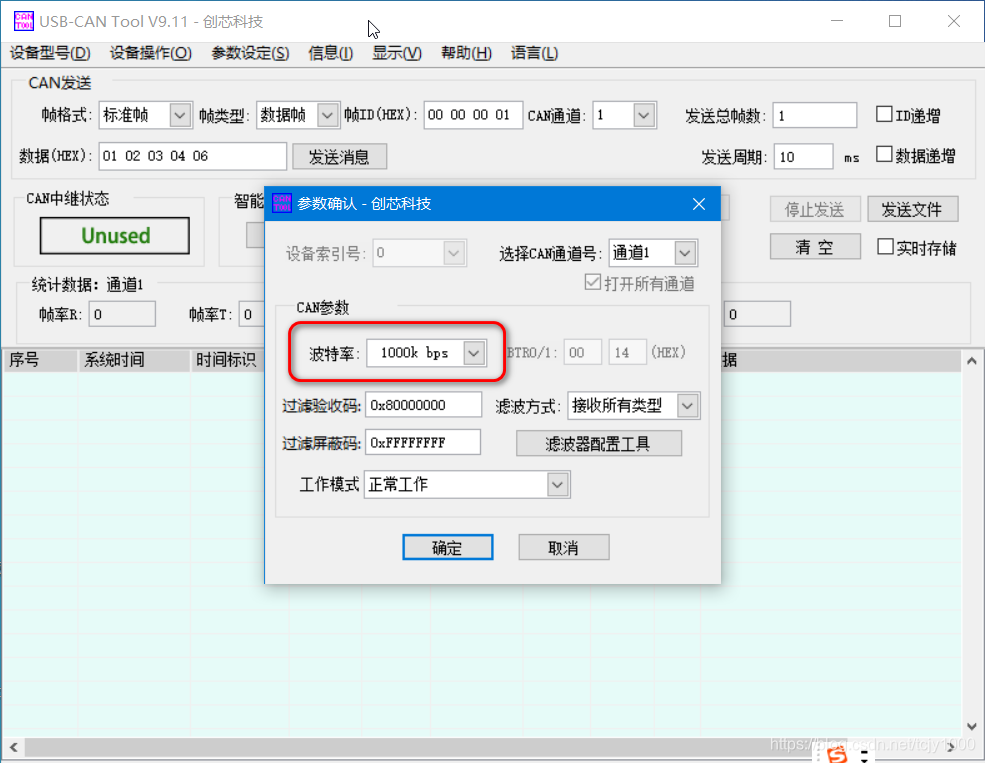
- 这里使用USB-CAN,上位机使用USB_CAN TOOL 工具进行调试。
- 注意CAN波特率设置,这里默认配置为1Mbps。
开启CAN通信
CAN测试命令,需要手动输入。
can_sample : 开启CAN Demo通信
can_send_test : 发送CAN数据帧

CAN适合双向通信!多主机、多从机通信。

CAN双向通信初步成功。
总结
- CAN本身属于串行通信的一种。
- CAN使用硬件滤波器,可以过滤不必要的CAN节点的通信,从而不被频繁的总线通信所中断。
- CAN本身的特性,适合多个主机通信。
- 注意CAN的接线方式:CANH <----> CANH CANL <-----> CANL。差分总线,可以不共GND。