vue笔记记录第三部分
1.vue项目中常用的2个ajax库
1.1. vue-resource           vue 插件, 非官方库, vue1.x 使用广泛
1.2. axios         通用的 ajax 请求库, 官方推荐, vue2.x 使用广泛
1.1 vue-resource的使用
使用文档链接:link
//下载命令
npm install vue-resource --save

-------在main.js文件中----------
// 引入模块
import VueResource from 'vue-resource'
// 使用插件
Vue.use(VueResource)

---------在App.vue文件中-------------
<template>
  <div id="app">
    <div v-if="!reportUrl">loading</div>
    <div>获取到的name为: <a :href="reportUrl">{

    {

    reportName}}</a></div>
    <div>获取到的html_url为: <a :href="reportUrl">{

    {

    reportUrl}}</a></div>
  </div>
</template>

<script>
export default {


  name: 'App',
  data() {


    return {


      reportUrl:'',
      reportName:''
    }
  },
  mounted(){


    //通过vue/组件对象发送ajax请求,获取数据
    const url='https://api.github.com/search/repositories?q=vue&sort=stars';
    this.$http.get(url).then(
      //成功的回调
      (response)=>{


        const result=response.data;
        //得到最靠前的请求
        const mostReport=result.items[0];
        this.reportUrl=mostReport.html_url;
        this.reportName=mostReport.name;
        },
      //失败的回调
      (response)=>{

    alert(请求失败)})
  }
}
</script>


1.2 axios的使用
使用文档:link
//下载命令
npm install axios --save

------在App.vue文件中-------
<template>
  <div id="app">
    <hr>
    <div v-if="!reportUrl2">loading...</div>
    <div>axios获取到的login为: <a :href="reportUrl2">{

    {

    reportLogin2}}</a></div>
    <div>axios获取到的id为: {

    {

    reportId}}</div>
    <div>axios获取到的html_url2为: <a :href="reportUrl2">{

    {

    reportUrl2}}</a></div>
  </div>
</template>

<script>
import axios from 'axios'
export default {


  name: 'App',
  data() {


    return {


      reportUrl2:'',
      reportLogin2:'',
      reportId:''
    }
  },
  mounted(){


      const url2='https://api.github.com/search/users?q=carlos';
      axios.get(url2).then(
        (response)=>{


        const result2=response.data;
        //获取最靠前的请求
        const mostReport2=result2.items[0];
        this.reportUrl2=mostReport2.html_url;
        this.reportLogin2=mostReport2.login;
        this.reportId=mostReport2.id;
        }).catch(error=>{

    alert("axios请求失败")});
  }
}
</script>


2 .Vue UI组件库
腾讯云文档:link
 mint-ui: 饿了么开源的基于 vue 的 UI 组件库(移动端)
 element-ui: 饿了么开源的基于 vue 的 UI 组件库(PC 端)
 iView-ui: 基于 Vue.js 的开源 UI 组件库,主要服务于 PC 界面的中后台产品
使用Mint UI
1.下载
npm install --save mint-ui
2.实现按需打包
npm install --save-dev babel-plugin-component
修改babel的配置(添加)
plugins": ["transform-runtime",["component", [
{ "libraryName": "mint-ui", "style": true }
]]]
3.mint-ui组件分类
  1.标签组件  2,非标签组件
1.因为mint-ui属于移动端,所以要在index.html中加入以下代码
<meta name="viewport" content="width=device-width, initial-scale=1, maximum-scale=1, minimum-scale=1, user-scalable=no" />
<script src="https://as.alipayobjects.com/g/component/fastclick/1.0.6/fastclick.js"></script>
<script> if ('addEventListener' in document) {
document.addEventListener('DOMContentLoaded', function() {
FastClick.attach(document.body); }, false); }if(!window.Promise) {
document.writeln('<script src="https://as.alipayobjects.com/g/component/es6-promise/3.2.2/es6-promise.min.js" '+'>'+'<'+'/'+'script>'); } </script>
2.在main.js中引入部分组件
import {
Button,Cell} from 'mint-ui'
Vue.component(Button.name,Button)
Vue.component(Cell.name,Cell)
/**或者写为
* Vue.use(Button)
* Vue.use(Cell)
*/
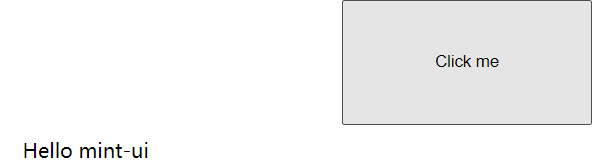
3.在App.vue中
<template>
<mt-button @click="handleClick" type="primary" style="height:100px;width:200px">Click me</mt-button>
</template>
<script>
import {
Toast} from 'mint-ui'
export default {
methods: {
handleClick () {
Toast('Hello mint-ui'); } } }
关于事件绑定:
在 Vue 2.0 中,为自定义组件绑定原生事件必须使用 .native 修饰符:
<my-component @click.native="handleClick">Click Me</my-component>
从易用性的角度出发,对 Button 组件进行了处理,使它可以监听 click 事件
<mt-button @click="handleButtonClick">Click Me</mt-button>
但是对于其他组件,还是需要添加 .native 修饰符。
3.vue-router 路由
1.官方提供的用来实现SPA的vue插件
2.文档链接:https://router.vuejs.org/zh/installation.html
3.下载命令: npm install vue-router --save
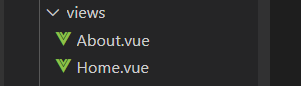
4.路由组件(About与Home)放在views或者paths文件下
非路由组件放在components文件下
1.配置路由---	在router文件夹下的index.js中
/**
 * 路由器模块
 */
import Vue from 'vue'
import Router from 'vue-router'
import About from '../views/About.vue'
import Home from '../views/Home.vue'

Vue.use(Router)

export default new Router({


  //n个路由配置
  routes: [
    {


      path: '/about',
      component: About
    },
    {


      path:'/home',
      component:Home
    },
    {


    //自动跳转到该路由
      path:'/',
      redirect:'/about'
    }
  ]
})

2.注册路由器---在main.js中
import router from './router'
new Vue({


  el: '#app',
  components: {

     App },
  template: '<App/>',
  //配置对象的属性名都是一些确定的名称,不能随便修改
  router
})

3.使用路由组件标签接下来开始在App.vue中写页面
如下图
1. <router-link>: 用来生成路由链接
2. <router-view>: 用来显示当前路由组件界面

npm start 保存启动项目

总结:编写使用路由的三步
1.定义路由组件
2.注册路由器
3.使用路由组件标签 <router-link> <router-view>
优化路由器配置:linkActiveClass: 'active', // 指定选中的路由链接的 class
4.嵌套路由
1.定义路由组件news与messages
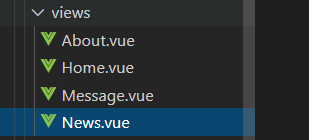
----News.vue文件
<template>
    <div>
        <ul>
            <li v-for="(news,index) in newsArr" :key="index">{

    {

    news}}</li>
        </ul>
    </div>
</template>
<script>
export default {


    data(){


        return {


            newsArr:['news01','news02','news03','news04']
        }
    }

}
</script>
<style >
</style>

-----Message.vue文件
<template>
    <div>
        <ul>
            <li v-for="(message,index) in messages" :key="index">
                <a href="">{

    {

    message}}</a></li>
        </ul>
    </div>
</template>
<script>
export default {


    data(){


        return{


            messages:[]
        }
    },
    mounted(){


        //模拟ajax请求从后台获取数据
        setTimeout(()=>{


            const messages=[
                {


                    id:1,
                    title:'message001'
                },
                {


                    id:2,
                    title:'message002'
                },
                {


                    id:3,
                    tilte:'message003'
                }
            ]
            this.messages=messages
        },1000)
    }
}
</script>
<style>
</style>
2.注册路由器时嵌套路由
在main.js中
import News from '../views/News.vue'
import Message from '../views/Message.vue'
export default new Router({


  //n个路由配置
  routes: [
    {


      path: '/about',
      component: About
    },
    {


      path:'/home',
      component:Home,
      children:[
        {


          path:'/home/news',
          component:News
        },
        {


           path:'/home/message',//简化写法
           component:Message
        },
        {


        path:'/',
        redirect:'/home/news'
        }
      ]
    },
    {


      path:'/',
      redirect:'/about'
    }
  ]
})
3.使用路由组件标签
在Home.vue文件中
<template>
    <div>
        <h2>Home</h2>
        <div><ul>
            <li><router-link to="/home/news">News</router-link>
            <router-link to="/home/message">Message</router-link>
            </li>
        </ul>
        </div>
        <div>
            <router-view></router-view>
            <hr>
        </div>
    </div>
</template>
<script>
export default {


}
</script>
<style>
*{


    margin: 0;
    padding: 0;
    list-style: none;
}
</style>


5.缓存路由组件
1) 默认情况下, 被切换的路由组件对象会死亡释放, 再次回来时是重新创建的
2) 如果可以缓存路由组件对象, 可以提高用户体验
代码如下
<keep-alive>
<router-view></router-view>
</keep-alive>
6.向路由组件传递数据
方式1:路由路径携带参数
创建MessageDetail组件
 1) 配置路由   在router下的index.js文件中

 import MessageDetail from '../views/MessageDetail.vue

 {


           path:'/home/message',//简化写法
           component:Message,
           children:[
             {


               path:'/home/message/detail:id',
               component:MessageDetail
             }
           ]
        }

 2) 路由路径  在Message组件中

     <div>
        <ul>
            <li v-for="(message,index) in messages" :key="index">
                <router-link to="`/home/message/detail/${message.id}`">{

    {

    message.title}}</router-link>
            </li>
        </ul>
        <hr>
        <router-view></router-view>
    </div>

 3) 路由组件中读取请求参数 this.$route.params.id
 在MessageDetail组件中

<template>
    <div>
        <p>ID:{

    {

    $route.params.id}}</p>
        <ul>
            <li>id:{

    {

    messageDetail.id}}</li>
            <li>title:{

    {

    messageDetail.tilte}}</li>
            <li>content:{

    {

    messageDetail.content}}</li>
        </ul>
    </div>
</template>
<script>

    export default{


        data(){


            return {


                messageDetail:{

    }
            }
        },
        mounted(){


            setTimeout(()=>{


                             const allMessageDetails=[
        {


          id:1,
          title:'jack01',
          content:'香克斯'
        },
                {


          id:3,
          title:'bm',
          content:'BigMom'
        },
                {


          id:5,
          title:'kd',
          content:'凯多'
        },
    ]
    this.allMessageDetails=allMessageDetails
    const id=this.$route.params.id*1
    this.messageDetail=allMessageDetails.find(detail=>detail.id===id)
            },1000)
        }
    }
</script>
<style lang="" scoped>
</style>

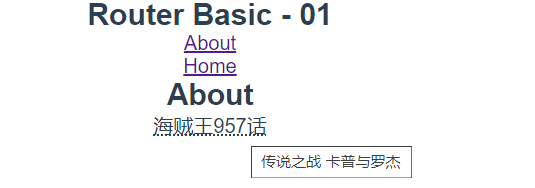
方式2:router-view属性携带数据
<router-view :msg="msg"></router-view>
1.在App.vue中
<router-view msg='数码宝贝最终进化'></router-view>
2,在想要验证的组件页面中编写
 如下图


7.编程式路由导航
相关API
1) this.$router.push(path): 相当于点击路由链接(可以返回到当前路由界面)
2) this.$router.replace(path): 用新路由替换当前路由(不可以返回到当前路由界面)
3) this.$router.back(): 请求(返回)上一个记录路由
4) this.$router.go(-1): 请求(返回)上一个记录路由
5) this.$router.go(1): 请求下一个记录路由