大部分内容源自于网络,主要用于记录笔记心得和与网友分享,非商业用途,侵删。
SpringMVC 框架教程
Spring web MVC 框架提供了模型-视图-控制的体系结构和可以用来开发灵活、松散耦合的 web 应用程序的组件。MVC 模式导致了应用程序的不同方面(输入逻辑、业务逻辑和 UI 逻辑)的分离,同时提供了在这些元素之间的松散耦合。
模型封装了应用程序数据,并且通常它们由 POJO 组成。
视图主要用于呈现模型数据,并且通常它生成客户端的浏览器可以解释的 HTML 输出。
控制器主要用于处理用户请求,并且构建合适的模型并将其传递到视图呈现。
DispatcherServlet
Spring Web 模型-视图-控制(MVC)框架是围绕 DispatcherServlet 设计的,DispatcherServlet 用来处理所有的 HTTP 请求和响应。Spring Web MVC DispatcherServlet 的请求处理的工作流程如下图所示:
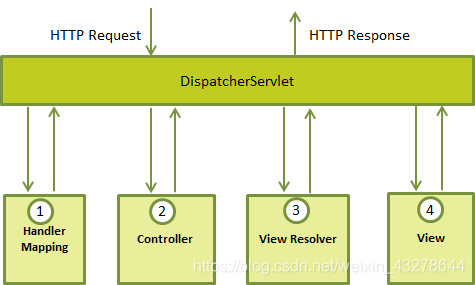
下面是对应于 DispatcherServlet 传入 HTTP 请求的事件序列:
1.收到一个 HTTP 请求后,DispatcherServlet 根据 HandlerMapping 来选择并且调用适当的控制器。
2.控制器接受请求,并基于使用的 GET 或 POST 方法来调用适当的 service 方法。Service 方法将设置基于定义的业务逻辑的模型数据,并返回视图名称到 DispatcherServlet 中。
3.DispatcherServlet 会从 ViewResolver 获取帮助,为请求检取定义视图。
4.一旦确定视图,DispatcherServlet 将把模型数据传递给视图,最后呈现在浏览器中。
上面所提到的所有组件,即 HandlerMapping、Controller 和 ViewResolver 是 WebApplicationContext 的一部分,而 WebApplicationContext 是带有一些对 web 应用程序必要的额外特性的 ApplicationContext 的扩展。
需求的配置
你需要映射你想让 DispatcherServlet 处理的请求,通过使用在 web.xml 文件中的一个 URL 映射。下面是一个显示声明和映射 HelloWeb DispatcherServlet 的示例:
<web-app id="WebApp_ID" version="2.4"
    xmlns="http://java.sun.com/xml/ns/j2ee"
    xmlns:xsi="http://www.w3.org/2001/XMLSchema-instance"
    xsi:schemaLocation="http://java.sun.com/xml/ns/j2ee
    http://java.sun.com/xml/ns/j2ee/web-app_2_4.xsd">
    <display-name>Spring MVC Application</display-name>
   <servlet>
      <servlet-name>HelloWeb</servlet-name>
      <servlet-class>
         org.springframework.web.servlet.DispatcherServlet
      </servlet-class>
      <load-on-startup>1</load-on-startup>
   </servlet>
   <servlet-mapping>
      <servlet-name>HelloWeb</servlet-name>
      <url-pattern>*.jsp</url-pattern>
   </servlet-mapping>
</web-app>
web.xml 文件将被保留在你的应用程序的 WebContent/WEB-INF 目录下。在初始化 HelloWeb DispatcherServlet 时,该框架将尝试加载位于该应用程序的 WebContent/WEB-INF 目录中文件名为 [servlet-name]-servlet.xml 的应用程序内容。在这种情况下,我们的文件将是 HelloWeb-servlet.xml。
接下来, 标签表明哪些 URLs 将被 DispatcherServlet 处理。这里所有以 .jsp 结束的 HTTP 请求将由 HelloWeb DispatcherServle t处理。
如果你不想使用默认文件名 [servlet-name]-servlet.xml 和默认位置 WebContent/WEB-INF,你可以通过在 web.xml 文件中添加 servlet 监听器 ContextLoaderListener 自定义该文件的名称和位置,如下所示:
<web-app...>

....
<context-param>
   <param-name>contextConfigLocation</param-name>
   <param-value>/WEB-INF/HelloWeb-servlet.xml</param-value>
</context-param>
<listener>
   <listener-class>
      org.springframework.web.context.ContextLoaderListener
   </listener-class>
</listener>
</web-app>
现在,检查 HelloWeb-servlet.xml 文件的请求配置,该文件位于 web 应用程序的 WebContent/WEB-INF 目录下:
<beans xmlns="http://www.springframework.org/schema/beans"
   xmlns:context="http://www.springframework.org/schema/context"
   xmlns:xsi="http://www.w3.org/2001/XMLSchema-instance"
   xsi:schemaLocation="
   http://www.springframework.org/schema/beans
   http://www.springframework.org/schema/beans/spring-beans-3.0.xsd
   http://www.springframework.org/schema/context
   http://www.springframework.org/schema/context/spring-context-3.0.xsd">

   <context:component-scan base-package="com.tutorialspoint" />

   <bean class="org.springframework.web.servlet.view.InternalResourceViewResolver">
      <property name="prefix" value="/WEB-INF/jsp/" />
      <property name="suffix" value=".jsp" />
   </bean>

</beans>
以下是关于 HelloWeb-servlet.xml 文件的一些要点:
1.[servlet-name]-servlet.xml 文件将用于创建 bean 定义,重新定义在全局范围内具有相同名称的任何已定义的 bean。
2.标签将用于激活 Spring MVC 注释扫描功能,该功能允许使用注释,如 @Controller 和 @RequestMapping 等等。
3.InternalResourceViewResolver 将使用定义的规则来解决视图名称。按照上述定义的规则,一个名称为 hello 的逻辑视图将发送给位于 /WEB-INF/jsp/hello.jsp 中实现的视图。
定义控制器
DispatcherServlet 发送请求到控制器中执行特定的功能。@Controller 注释表明一个特定类是一个控制器的作用。@RequestMapping 注释用于映射 URL 到整个类或一个特定的处理方法。
@Controller
@RequestMapping("/hello")
public class HelloController{


   @RequestMapping(method = RequestMethod.GET)
   public String printHello(ModelMap model) {


      model.addAttribute("message", "Hello Spring MVC Framework!");
      return "hello";
   }
}
@Controller 注释定义该类作为一个 Spring MVC 控制器。在这里,第一次使用的 @RequestMapping 表明在该控制器中处理的所有方法都是相对于 /hello 路径的。下一个注释 @RequestMapping(method = RequestMethod.GET) 用于声明 printHello() 方法作为控制器的默认 service 方法来处理 HTTP GET 请求。你可以在相同的 URL 中定义其他方法来处理任何 POST 请求。
你可以用另一种形式来编写上面的控制器,你可以在 @RequestMapping 中添加额外的属性,如下所示:
@Controller
public class HelloController{


   @RequestMapping(value = "/hello", method = RequestMethod.GET)
   public String printHello(ModelMap model) {


      model.addAttribute("message", "Hello Spring MVC Framework!");
      return "hello";
   }
}
value属性表明 URL 映射到哪个处理方法,方法属性定义了 service 方法来处理 HTTP GET 请求。关于上面定义的控制器,这里有以下几个要注意的要点:
1.你将在一个 service 方法中定义需要的业务逻辑。你可以根据每次需求在这个方法中调用其他方法。
2.基于定义的业务逻辑,你将在这个方法中创建一个模型。你可以设置不同的模型属性,这些属性将被视图访问并显示最终的结果。这个示例创建了一个带有属性 “message” 的模型。
3.一个定义的 service 方法可以返回一个包含视图名称的字符串用于呈现该模型。这个示例返回 “hello” 作为逻辑视图的名称。
创建 JSP 视图
对于不同的表示技术,Spring MVC 支持许多类型的视图。这些包括 JSP、HTML、PDF、Excel 工作表、XML、Velocity 模板、XSLT、JSON、Atom 和 RSS 提要、JasperReports 等等。但我们最常使用利用 JSTL 编写的 JSP 模板。所以让我们在 /WEB-INF/hello/hello.jsp 中编写一个简单的 hello 视图:
<html>
   <head>
   <title>Hello Spring MVC</title>
   </head>
   <body>
   <h2>${message}</h2>
   </body>
</html>
Spring MVC Hello World 例子
这里是 HelloController.java 文件的内容:
package com.tutorialspoint;
import org.springframework.stereotype.Controller;
import org.springframework.web.bind.annotation.RequestMapping;
import org.springframework.web.bind.annotation.RequestMethod;
import org.springframework.ui.ModelMap;
@Controller
@RequestMapping("/hello")
public class HelloController{


   @RequestMapping(method = RequestMethod.GET)
   public String printHello(ModelMap model) {


      model.addAttribute("message", "Hello Spring MVC Framework!");
      return "hello";
   }
}
下面是 Spring Web 配置文件 web.xml 的内容
<web-app id="WebApp_ID" version="2.4"
   xmlns="http://java.sun.com/xml/ns/j2ee"
   xmlns:xsi="http://www.w3.org/2001/XMLSchema-instance"
   xsi:schemaLocation="http://java.sun.com/xml/ns/j2ee
   http://java.sun.com/xml/ns/j2ee/web-app_2_4.xsd">

   <display-name>Spring MVC Application</display-name>

   <servlet>
      <servlet-name>HelloWeb</servlet-name>
      <servlet-class>
         org.springframework.web.servlet.DispatcherServlet
      </servlet-class>
      <load-on-startup>1</load-on-startup>
   </servlet>

   <servlet-mapping>
      <servlet-name>HelloWeb</servlet-name>
      <url-pattern>/</url-pattern>
   </servlet-mapping>

</web-app>
下面是另一个 Spring Web 配置文件 HelloWeb-servlet.xml 的内容
<beans xmlns="http://www.springframework.org/schema/beans"
   xmlns:context="http://www.springframework.org/schema/context"
   xmlns:xsi="http://www.w3.org/2001/XMLSchema-instance"
   xsi:schemaLocation="
   http://www.springframework.org/schema/beans
   http://www.springframework.org/schema/beans/spring-beans-3.0.xsd
   http://www.springframework.org/schema/context
   http://www.springframework.org/schema/context/spring-context-3.0.xsd">

   <context:component-scan base-package="com.tutorialspoint" />

   <bean class="org.springframework.web.servlet.view.InternalResourceViewResolver">
      <property name="prefix" value="/WEB-INF/jsp/" />
      <property name="suffix" value=".jsp" />
   </bean>

</beans>
下面是 Spring 视图文件 hello.jsp 的内容
<%@ page contentType="text/html; charset=UTF-8" %>
<html>
<head>
<title>Hello World</title>
</head>
<body>
   <h2>${message}</h2>
</body>
</html>
最后,下面是包含在你的 web 应用程序中的 Spring 和其他库。你仅仅需要将这些文件拖拽到 WebContent/WEB-INF/lib 文件夹中。
commons-logging-x.y.z.jar
org.springframework.asm-x.y.z.jar
org.springframework.beans-x.y.z.jar
org.springframework.context-x.y.z.jar
org.springframework.core-x.y.z.jar
org.springframework.expression-x.y.z.jar
org.springframework.web.servlet-x.y.z.jar
org.springframework.web-x.y.z.jar
spring-web.jar
一旦你完成了创建源代码和配置文件后,导出你的应用程序。右键单击你的应用程序,并且使用 Export > WAR File 选项,在 Tomcat 的 webapps 文件夹中保存你的 HelloWeb.war 文件。
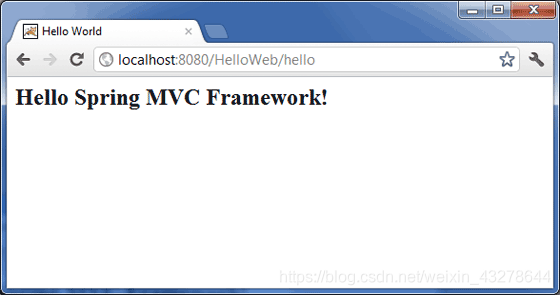
现在启动你的 Tomcat 服务器,并且确保你能够使用标准的浏览器访问 webapps 文件夹中的其他 web 页面。现在尝试访问该 URL http://localhost:8080/HelloWeb/hello
如果你的 Spring Web 应用程序一切都正常,你应该看到下面的结果:
Spring MVC 表单处理例子
这里是 Student.java 文件的内容:
package com.tutorialspoint;
public class Student {


   private Integer age;
   private String name;
   private Integer id;
   public void setAge(Integer age) {


      this.age = age;
   }
   public Integer getAge() {


      return age;
   }
   public void setName(String name) {


      this.name = name;
   }
   public String getName() {


      return name;
   }
   public void setId(Integer id) {


      this.id = id;
   }
   public Integer getId() {


      return id;
   }
}
下面是 StudentController.java 文件的内容:
package com.tutorialspoint;
import org.springframework.stereotype.Controller;
import org.springframework.web.bind.annotation.ModelAttribute;
import org.springframework.web.bind.annotation.RequestMapping;
import org.springframework.web.bind.annotation.RequestMethod;
import org.springframework.web.servlet.ModelAndView;
import org.springframework.ui.ModelMap;
@Controller
public class StudentController {


   @RequestMapping(value = "/student", method = RequestMethod.GET)
   public ModelAndView student() {


      return new ModelAndView("student", "command", new Student());
   }
   @RequestMapping(value = "/addStudent", method = RequestMethod.POST)
   public String addStudent(@ModelAttribute("SpringWeb")Student student,
   ModelMap model) {


      model.addAttribute("name", student.getName());
      model.addAttribute("age", student.getAge());
      model.addAttribute("id", student.getId());
      return "result";
   }
}
在这里,第一个 service 方法 student(),我们已经在名称为 “command” 的 ModelAndView 对象中传递一个空的 Student 对象,因为 spring 框架需要一个名称的 “command” 的对象,如果你在 JSP 文件中使用 form:form 标签。所以,当 student() 方法被调用时,它返回 student.jsp 视图。
第二个 service 方法 addStudent() 将调用 HelloWeb/addStudent URL 中的 POST 方法。你将根据提交的信息准备好你的模型对象。最后一个 “result” 视图会从 service 方法中返回,它将导致呈现 result.jsp。
下面是 Spring Web 配置文件 web.xml 的内容
<web-app id="WebApp_ID" version="2.4"
    xmlns="http://java.sun.com/xml/ns/j2ee"
    xmlns:xsi="http://www.w3.org/2001/XMLSchema-instance"
    xsi:schemaLocation="http://java.sun.com/xml/ns/j2ee
    http://java.sun.com/xml/ns/j2ee/web-app_2_4.xsd">

    <display-name>Spring MVC Form Handling</display-name>

    <servlet>
        <servlet-name>HelloWeb</servlet-name>
        <servlet-class>
           org.springframework.web.servlet.DispatcherServlet
        </servlet-class>
        <load-on-startup>1</load-on-startup>
    </servlet>

    <servlet-mapping>
        <servlet-name>HelloWeb</servlet-name>
        <url-pattern>/</url-pattern>
    </servlet-mapping>

</web-app>
下面是另一个 Spring Web 配置文件 HelloWeb-servlet.xml 的内容
<beans xmlns="http://www.springframework.org/schema/beans"
   xmlns:context="http://www.springframework.org/schema/context"
   xmlns:xsi="http://www.w3.org/2001/XMLSchema-instance"
   xsi:schemaLocation="
   http://www.springframework.org/schema/beans
   http://www.springframework.org/schema/beans/spring-beans-3.0.xsd
   http://www.springframework.org/schema/context
   http://www.springframework.org/schema/context/spring-context-3.0.xsd">

   <context:component-scan base-package="com.tutorialspoint" />

   <bean class="org.springframework.web.servlet.view.InternalResourceViewResolver">
      <property name="prefix" value="/WEB-INF/jsp/" />
      <property name="suffix" value=".jsp" />
   </bean>

</beans>
下面是 Spring 视图文件 student.jsp 的内容
<%@taglib uri="http://www.springframework.org/tags/form" prefix="form"%>
<html>
<head>
    <title>Spring MVC Form Handling</title>
</head>
<body>

<h2>Student Information</h2>
<form:form method="POST" action="/HelloWeb/addStudent">
   <table>
    <tr>
        <td><form:label path="name">Name</form:label></td>
        <td><form:input path="name" /></td>
    </tr>
    <tr>
        <td><form:label path="age">Age</form:label></td>
        <td><form:input path="age" /></td>
    </tr>
    <tr>
        <td><form:label path="id">id</form:label></td>
        <td><form:input path="id" /></td>
    </tr>
    <tr>
        <td colspan="2">
            <input type="submit" value="Submit"/>
        </td>
    </tr>
</table>
</form:form>
</body>
</html>
下面是 Spring 视图文件 result.jsp 的内容
<%@taglib uri="http://www.springframework.org/tags/form" prefix="form"%>
<html>
<head>
    <title>Spring MVC Form Handling</title>
</head>
<body>

<h2>Submitted Student Information</h2>
   <table>
    <tr>
        <td>Name</td>
        <td>${name}</td>
    </tr>
    <tr>
        <td>Age</td>
        <td>${age}</td>
    </tr>
    <tr>
        <td>ID</td>
        <td>${id}</td>
    </tr>
</table>
</body>
</html>
最后,下面是包含在你的 web 应用程序中的 Spring 和其他库的列表。你仅仅需要将这些文件拖拽到 WebContent/WEB-INF/lib 文件夹中。
commons-logging-x.y.z.jar
org.springframework.asm-x.y.z.jar
org.springframework.beans-x.y.z.jar
org.springframework.context-x.y.z.jar
org.springframework.core-x.y.z.jar
org.springframework.expression-x.y.z.jar
org.springframework.web.servlet-x.y.z.jar
org.springframework.web-x.y.z.jar
spring-web.jar
一旦你完成了创建源代码和配置文件后,导出你的应用程序。右键单击你的应用程序,并且使用 Export > WAR File 选项,并且在 Tomcat 的 webapps 文件夹中保存你的 HelloWeb.war 文件。
现在启动你的 Tomcat 服务器,并且确保你能够使用标准的浏览器访问 webapps 文件夹中的其他 web 页面。现在尝试访问该 URL http://localhost:8080/HelloWeb/student
如果你的 Spring Web 应用程序一切都正常,你应该看到下面的结果:

在提交必需的信息之后,单击提交按钮来提交这个表单。如果你的 Spring Web 应用程序一切都正常,你应该看到下面的结果:

Spring 页面重定向例子
这里是 WebController.java 文件的内容:
package com.tutorialspoint;
import org.springframework.stereotype.Controller;
import org.springframework.web.bind.annotation.RequestMapping;
import org.springframework.web.bind.annotation.RequestMethod;
@Controller
public class WebController {


   @RequestMapping(value = "/index", method = RequestMethod.GET)
   public String index() {


       return "index";
   }
   @RequestMapping(value = "/redirect", method = RequestMethod.GET)
   public String redirect() {


      return "redirect:finalPage";
   }
   @RequestMapping(value = "/finalPage", method = RequestMethod.GET)
   public String finalPage() {


      return "final";
   }
}
下面是 Spring Web 配置文件 web.xml 的内容
<web-app id="WebApp_ID" version="2.4"
    xmlns="http://java.sun.com/xml/ns/j2ee"
    xmlns:xsi="http://www.w3.org/2001/XMLSchema-instance"
    xsi:schemaLocation="http://java.sun.com/xml/ns/j2ee
    http://java.sun.com/xml/ns/j2ee/web-app_2_4.xsd">

    <display-name>Spring Page Redirection</display-name>

    <servlet>
        <servlet-name>HelloWeb</servlet-name>
        <servlet-class>
           org.springframework.web.servlet.DispatcherServlet
        </servlet-class>
        <load-on-startup>1</load-on-startup>
    </servlet>

    <servlet-mapping>
        <servlet-name>HelloWeb</servlet-name>
        <url-pattern>/</url-pattern>
    </servlet-mapping>

</web-app>
下面是另一个 Spring Web 配置文件 HelloWeb-servlet.xml 的内容
<?xml version="1.0" encoding="UTF-8"?>
<beans xmlns="http://www.springframework.org/schema/beans"
   xmlns:context="http://www.springframework.org/schema/context"
   xmlns:xsi="http://www.w3.org/2001/XMLSchema-instance"
   xsi:schemaLocation="
   http://www.springframework.org/schema/beans
   http://www.springframework.org/schema/beans/spring-beans-3.0.xsd
   http://www.springframework.org/schema/context
   http://www.springframework.org/schema/context/spring-context-3.0.xsd">

    <context:component-scan base-package="com.tutorialspoint" />

    <bean id="viewResolver" class="org.springframework.web.servlet.view.InternalResourceViewResolver">
    <property name="prefix" value="/WEB-INF/jsp/" />
    <property name="suffix" value=".jsp" />
    </bean>
</beans>
下面是 Spring 视图文件 index.jsp 文件的内容。这将是一个登陆页面,这个页面将发送一个请求来访问重定向 service 方法,该方法将把这个请求重定向到另一个 service 方法中,最后将显示 final.jsp 页面。
<%@taglib uri="http://www.springframework.org/tags/form" prefix="form"%>
<html>
<head>
    <title>Spring Page Redirection</title>
</head>
<body>
<h2>Spring Page Redirection</h2>
<p>Click below button to redirect the result to new page</p>
<form:form method="GET" action="/HelloWeb/redirect">
<table>
    <tr>
    <td>
    <input type="submit" value="Redirect Page"/>
    </td>
    </tr>
</table>
</form:form>
</body>
</html>
下面是 Spring 视图文件 final.jsp 的内容。这是最终的重定向页面。
<%@taglib uri="http://www.springframework.org/tags/form" prefix="form"%>
<html>
<head>
    <title>Spring Page Redirection</title>
</head>
<body>

<h2>Redirected Page</h2>

</body>
</html>
最后,下面是包含在你的 web 应用程序中的 Spring 和其他库的列表。你仅仅需要将这些文件拖拽到 WebContent/WEB-INF/lib 文件夹中。
commons-logging-x.y.z.jar
org.springframework.asm-x.y.z.jar
org.springframework.beans-x.y.z.jar
org.springframework.context-x.y.z.jar
org.springframework.core-x.y.z.jar
org.springframework.expression-x.y.z.jar
org.springframework.web.servlet-x.y.z.jar
org.springframework.web-x.y.z.jar
spring-web.jar
一旦你完成了创建源代码和配置文件后,导出你的应用程序。右键单击你的应用程序,并且使用 Export > WAR File 选项,并且在 Tomcat 的 webapps 文件夹中保存你的 HelloWeb.war 文件。
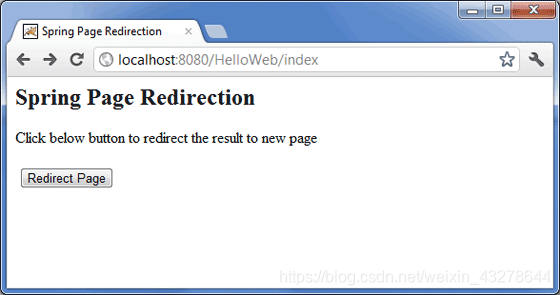
现在启动你的 Tomcat 服务器,并且确保你能够使用标准的浏览器访问 webapps 文件夹中的其他 web 页面。现在尝试访问该 URL http://localhost:8080/HelloWeb/index
如果你的 Spring Web 应用程序一切都正常,你应该看到下面的结果:
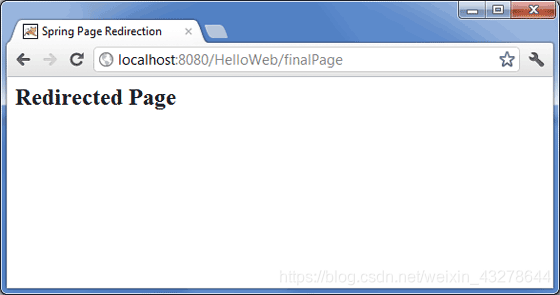
现在单击 “Redirect Page” 按钮来提交表单,并且得到最终的重定向页面。如果你的 Spring Web 应用程序一切都正常,你应该看到下面的结果: