1、高级参数绑定
1.1 绑定数组
需求:在商品列表页面选中多个商品,然后删除。
需求分析:功能要求商品列表页面中的每个商品前有一个checkbok,选中多个商品后点击删除按钮把商品id传递给Controller,根据商品id删除商品信息。
我们演示可以获取id的数组即可
Jsp修改
修改itemList.jsp页面,增加多选框,提交url是queryItem.action
<%@ page language="java" contentType="text/html; charset=UTF-8"
    pageEncoding="UTF-8"%>
<%@ taglib uri="http://java.sun.com/jsp/jstl/core" prefix="c" %>
<%@ taglib uri="http://java.sun.com/jsp/jstl/fmt"  prefix="fmt"%>
<!DOCTYPE html PUBLIC "-//W3C//DTD HTML 4.01 Transitional//EN" "http://www.w3.org/TR/html4/loose.dtd">
<html>
<head>
<meta http-equiv="Content-Type" content="text/html; charset=UTF-8">
<title>查询商品列表</title>
</head>
<body>
<form action="${pageContext.request.contextPath }/item/itemlist.action" method="post">
查询条件:
<table width="100%" border=1>
<tr>
<td><input type="submit" value="查询"/></td>
</tr>
</table>
</form>
商品列表:
<%-- <form action="${pageContext.request.contextPath }/deletes.action" method="post"> --%>
<form action="${pageContext.request.contextPath }/updates.action" method="post">
<table width="100%" border=1>
<tr>
    <td><input type="checkbox" name="ids" value=""/></td>
    <td>商品名称</td>
    <td>商品价格</td>
    <td>生产日期</td>
    <td>商品描述</td>
    <td>操作</td>
</tr>
<c:forEach items="${itemList }" var="item" varStatus="s">
<tr>
    <td><input type="checkbox" name="ids" value="${item.id}"/></td>
    <td><input type="text" name="itemsList[${s.index }].name" value="${item.name}"/></td>
    <td><input type="text" name="itemsList[${s.index }].price" value="${item.price}"/></td>
    <td><fmt:formatDate value="${item.createtime}" pattern="yyyy-MM-dd HH:mm:ss"/></td>
    <td>${item.detail }</td>

    <td><a href="${pageContext.request.contextPath }/itemEdit.action?id=${item.id}">修改</a></td>

</tr>
</c:forEach>

</table>
<input type="submit" value="删除"/>
<input type="submit" value="修改"/>
</form>
</body>

</html>
页面选中多个checkbox向controller方法传递
本身属于一个form表单,提交url是updates.action
Controller
Controller方法中可以用String[]接收,或者pojo的String[]属性接收。两种方式任选其一即可。
定义QueryVo,如下图:
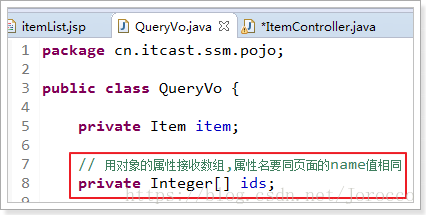
ItemController修改queryItem方法:
package cn.ctgu.springmvc.controller;
import java.io.File;
import java.io.IOException;
import java.util.List;
import java.util.UUID;
import javax.servlet.ServletException;
import javax.servlet.http.HttpServletRequest;
import javax.servlet.http.HttpServletResponse;
import javax.servlet.http.HttpSession;
import org.apache.commons.io.FilenameUtils;
import org.springframework.beans.factory.annotation.Autowired;
import org.springframework.stereotype.Controller;
import org.springframework.ui.Model;
import org.springframework.web.bind.annotation.RequestBody;
import org.springframework.web.bind.annotation.RequestMapping;
import org.springframework.web.bind.annotation.RequestMethod;
import org.springframework.web.bind.annotation.ResponseBody;
import org.springframework.web.multipart.MultipartFile;
import org.springframework.web.servlet.ModelAndView;
import cn.ctgu.springmvc.exception.MessageException;
import cn.ctgu.springmvc.pojo.Items;
import cn.ctgu.springmvc.pojo.QueryVo;
import cn.ctgu.springmvc.service.ItemService;
/*
* 商品管理
* 包装类型 绑定数组类型,可以使用两种方式,pojo的属性接收,和直接接收
* */
@Controller
public class ItemController {
@Autowired
private ItemService itemService;
/* //删除,绑定数组(删除多个商品),方式一
@RequestMapping(value="/deletes.action")
public ModelAndView deletes(Integer[] ids){
ModelAndView mav=new ModelAndView();
mav.setViewName("success");
return mav;
}*/
//删除,绑定数组(删除多个商品),方式二
@RequestMapping(value="/deletes.action")
public ModelAndView deletes2(QueryVo vo){
ModelAndView mav=new ModelAndView();
mav.setViewName("success");
return mav;
}
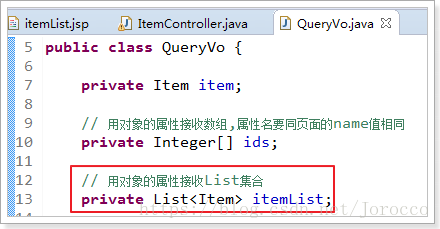
}1.2 将表单的数据绑定到List
需求:实现商品数据的批量修改。
需求分析:
1.在商品列表页面中可以对商品信息进行修改。
2.可以批量提交修改后的商品数据。
定义pojo如下图:
Jsp改造如上,下面的只做参考(条理比较清晰)
前端页面应该显示的html代码,如下图:
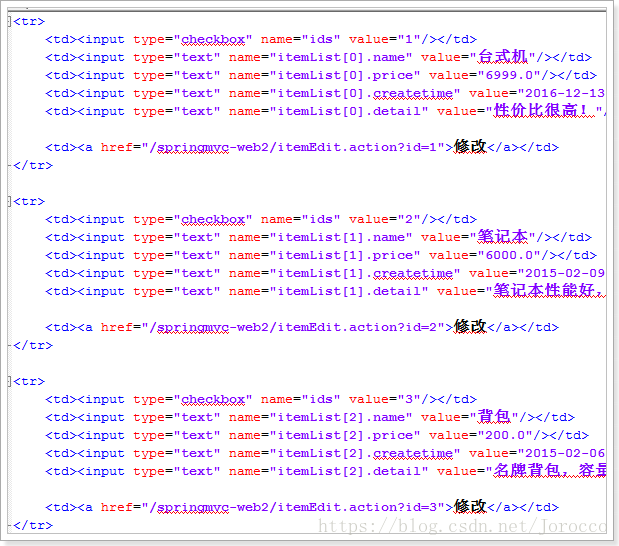
分析发现:name属性必须是list属性名+下标+元素属性。
Jsp做如下改造:
<c:forEach items="${itemList }" var="item" varStatus="s">
<tr>
    <td><input type="checkbox" name="ids" value="${item.id}"/></td>
    <td>
        <input type="hidden" name="itemList[${s.index}].id" value="${item.id }"/>
        <input type="text" name="itemList[${s.index}].name" value="${item.name }"/>
    </td>
    <td><input type="text" name="itemList[${s.index}].price" value="${item.price }"/></td>
    <td><input type="text" name="itemList[${s.index}].createtime" value="<fmt:formatDate value="${item.createtime}" pattern="yyyy-MM-dd HH:mm:ss"/>"/></td>
    <td><input type="text" name="itemList[${s.index}].detail" value="${item.detail }"/></td>

    <td><a href="${pageContext.request.contextPath }/itemEdit.action?id=${item.id}">修改</a></td>

</tr>
</c:forEach>
{status.first} 判断当前项是否为集合中的第一项,返回值为true或false
{status.index} 输出行号,从0开始。
{status.后一项,返回值为true或false
begin、end、step分别表示:起始序号,结束序号,跳跃步伐。
注意:接收List类型的数据必须是pojo的属性,如果方法的形参为ArrayList类型无法正确接收到数据。
2、@RequestMapping
通过@RequestMapping注解可以定义不同的处理器映射规则。
2.1 4.1.URL路径映射
@RequestMapping(value=”item”)或@RequestMapping(“/item”)
value的值是数组,可以将多个url映射到同一个方法
/**
* 查询商品列表
* @return
*/
@RequestMapping(value = { "itemList", "itemListAll" })
public ModelAndView queryItemList() {
// 查询商品数据
List<Item> list = this.itemService.queryItemList();
// 创建ModelAndView,设置逻辑视图名
ModelAndView mv = new ModelAndView("itemList");
// 把商品数据放到模型中
mv.addObject("itemList", list);
return mv;
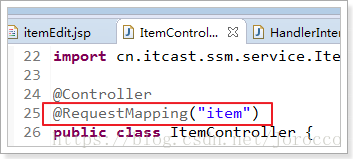
}2.2 添加再类上面
在class上添加@RequestMapping(url)指定通用请求前缀, 限制此类下的所有方法请求url必须以请求前缀开头
可以使用此方法对url进行分类管理,如下图:

此时需要进入queryItemList()方法的请求url为:
http://127.0.0.1:8080/springmvc-web2/item/itemList.action或者
http://127.0.0.1:8080/springmvc-web2/item/itemListAll.action2.3 请求方法限定
除了可以对url进行设置,还可以限定请求进来的方法。
1、限定GET方法
@RequestMapping(method = RequestMethod.GET)如果通过POST访问则报错:
HTTP Status 405 - Request method 'POST' not supported例如:
@RequestMapping(value = "itemList",method = RequestMethod.POST)2、限定POST方法
@RequestMapping(method = RequestMethod.POST)如果通过GET访问则报错:
HTTP Status 405 - Request method 'GET' not supported3、GET和POST都可以
@RequestMapping(method = {RequestMethod.GET,RequestMethod.POST})3、Controller方法返回值
3.1 返回ModelAndView
controller方法中定义ModelAndView对象并返回,对象中可添加model数据、指定view。(可参考Springmvc(一))
3.2 返回void
在Controller方法形参上可以定义request和response,使用request或response指定响应结果:
1、使用request转发页面,如下:
request.getRequestDispatcher(“页面路径”).forward(request, response);
request.getRequestDispatcher("/WEB-INF/jsp/success.jsp").forward(request, response);2、可以通过response页面重定向:
response.sendRedirect(“url”)
response.sendRedirect("/springmvc-web2/itemEdit.action");3、可以通过response指定响应结果,例如响应json数据如下:
response.getWriter().print("{\"abc\":123}");代码示例:
以下代码一次测试,演示上面的效果
/**
 * 返回void测试
 *
 * @param request
 * @param response
 * @throws Exception
 */
@RequestMapping("queryItem")
public void queryItem(HttpServletRequest request, HttpServletResponse response) throws Exception {
    // 1 使用request进行转发
    // request.getRequestDispatcher("/WEB-INF/jsp/success.jsp").forward(request,
    // response);

    // 2 使用response进行重定向到编辑页面
    // response.sendRedirect("/springmvc-web2/itemEdit.action");

    // 3 使用response直接显示
    response.getWriter().print("{\"abc\":123}");
}
3.3 返回字符串
逻辑视图名
controller方法返回字符串可以指定逻辑视图名,通过视图解析器解析为物理视图地址。
//指定逻辑视图名,经过视图解析器解析为jsp物理路径:/WEB-INF/jsp/itemList.jsp
return "itemList";
Redirect重定向
Contrller方法返回字符串可以重定向到一个url地址
如下商品修改提交后重定向到商品编辑页面。
/**
 * 更新商品
 *
 * @param item
 * @return
 */
@RequestMapping("updateItem")
public String updateItemById(Item item) {
    // 更新商品
    this.itemService.updateItemById(item);

    // 修改商品成功后,重定向到商品编辑页面
    // 重定向后浏览器地址栏变更为重定向的地址,
    // 重定向相当于执行了新的request和response,所以之前的请求参数都会丢失
    // 如果要指定请求参数,需要在重定向的url后面添加 ?itemId=1 这样的请求参数
    return "redirect:/itemEdit.action?itemId=" + item.getId();
}
forward转发
Controller方法执行后继续执行另一个Controller方法
如下商品修改提交后转向到商品修改页面,修改商品的id参数可以带到商品修改方法中。
/**
* 更新商品
*
* @param item
* @return
*/
@RequestMapping("updateItem")
public String updateItemById(Item item) {
// 更新商品
this.itemService.updateItemById(item);
// 修改商品成功后,重定向到商品编辑页面
// 重定向后浏览器地址栏变更为重定向的地址,
// 重定向相当于执行了新的request和response,所以之前的请求参数都会丢失
// 如果要指定请求参数,需要在重定向的url后面添加 ?itemId=1 这样的请求参数
// return "redirect:/itemEdit.action?itemId=" + item.getId();
// 修改商品成功后,继续执行另一个方法
// 使用转发的方式实现。转发后浏览器地址栏还是原来的请求地址,
// 转发并没有执行新的request和response,所以之前的请求参数都存在
return "forward:/itemEdit.action";
}
//结果转发到editItem.action,request可以带过去
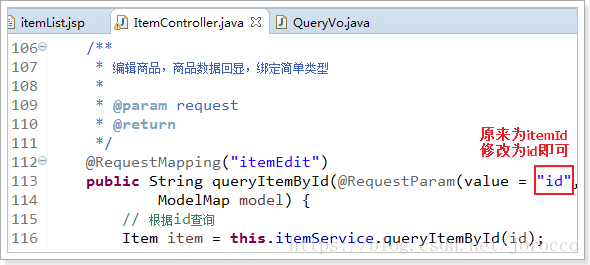
return "forward: /itemEdit.action";需要修改之前编写的根据id查询商品方法
因为请求进行修改商品时,请求参数里面只有id属性,没有itemId属性
修改,如下图:
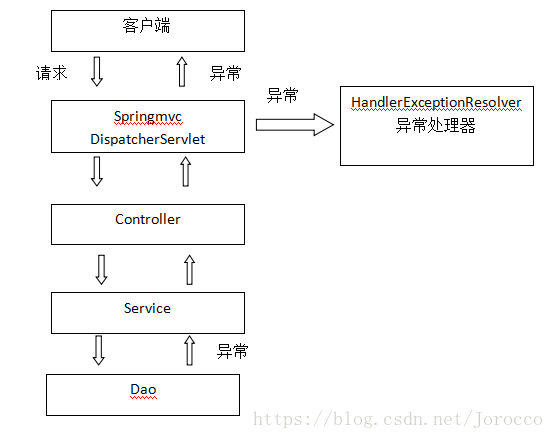
4、异常处理器
springmvc在处理请求过程中出现异常信息交由异常处理器进行处理,自定义异常处理器可以实现一个系统的异常处理逻辑。
4.1 异常处理思路
系统中异常包括两类:预期异常和运行时异常RuntimeException,前者通过捕获异常从而获取异常信息,后者主要通过规范代码开发、测试通过手段减少运行时异常的发生。
系统的dao、service、controller出现都通过throws Exception向上抛出,最后由springmvc前端控制器交由异常处理器进行异常处理,如下图:
4.2 自定义异常类
为了区别不同的异常,通常根据异常类型进行区分,这里我们创建一个自定义系统异常。
如果controller、service、dao抛出此类异常说明是系统预期处理的异常信息。
public class MyException extends Exception {
    // 异常信息
    private String message;

    public MyException() {
        super();
    }

    public MyException(String message) {
        super();
        this.message = message;
    }

    public String getMessage() {
        return message;
    }

    public void setMessage(String message) {
        this.message = message;
    }

}
4.3 自定义异常处理器
public class CustomHandleException implements HandlerExceptionResolver {

    @Override
    public ModelAndView resolveException(HttpServletRequest request, HttpServletResponse response, Object handler,
            Exception exception) {
        // 定义异常信息
        String msg;

        // 判断异常类型
        if (exception instanceof MyException) {
            // 如果是自定义异常,读取异常信息
            msg = exception.getMessage();
        } else {
            // 如果是运行时异常,则取错误堆栈,从堆栈中获取异常信息
            Writer out = new StringWriter();
            PrintWriter s = new PrintWriter(out);
            exception.printStackTrace(s);
            msg = out.toString();

        }

        // 把错误信息发给相关人员,邮件,短信等方式
        // TODO

        // 返回错误页面,给用户友好页面显示错误信息
        ModelAndView modelAndView = new ModelAndView();
        modelAndView.addObject("msg", msg);
        modelAndView.setViewName("error");

        return modelAndView;
    }
}
4.4 异常处理器配置
在springmvc.xml中添加:
<!-- 配置全局异常处理器 -->
<bean
id="customHandleException"  class="cn.itcast.ssm.exception.CustomHandleException"/>
4.5 错误页面
<%@ page language="java" contentType="text/html; charset=UTF-8"
    pageEncoding="UTF-8"%>
<!DOCTYPE html PUBLIC "-//W3C//DTD HTML 4.01 Transitional//EN" "http://www.w3.org/TR/html4/loose.dtd">
<html>
<head>
<meta http-equiv="Content-Type" content="text/html; charset=UTF-8">
<title>Insert title here</title>
</head>
<body>

    <h1>系统发生异常了!</h1>
    <br />
    <h1>异常信息</h1>
    <br />
    <h2>${msg }</h2>

</body>
</html>
4.6 异常测试
修改ItemController方法“queryItemList”,抛出异常:
/**
 * 查询商品列表
 *
 * @return
 * @throws Exception
 */
@RequestMapping(value = { "itemList", "itemListAll" })
public ModelAndView queryItemList() throws Exception {
    // 自定义异常
    if (true) {
        throw new MyException("自定义异常出现了~");
    }

    // 运行时异常
    int a = 1 / 0;

    // 查询商品数据
    List<Item> list = this.itemService.queryItemList();
    // 创建ModelAndView,设置逻辑视图名
    ModelAndView mv = new ModelAndView("itemList");
    // 把商品数据放到模型中
    mv.addObject("itemList", list);

    return mv;
}
5、上传图片
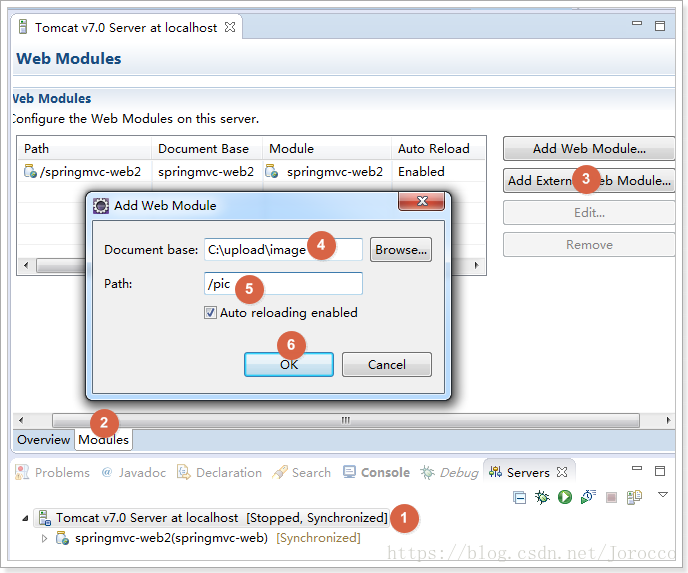
5.1 配置虚拟目录
在tomcat上配置图片虚拟目录,在tomcat下conf/server.xml中添加:
<Context docBase="D:\develop\upload\temp" path="/pic" reloadable="false"/>访问http://localhost:8080/pic即可访问D:\develop\upload\temp下的图片。
也可以通过eclipse配置,如下图:
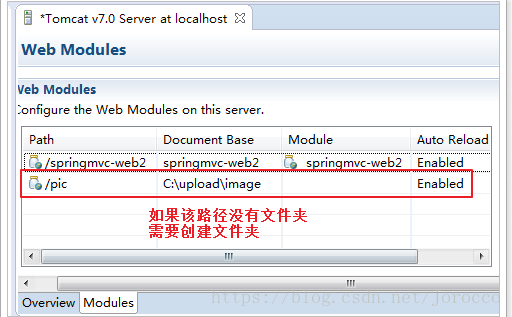
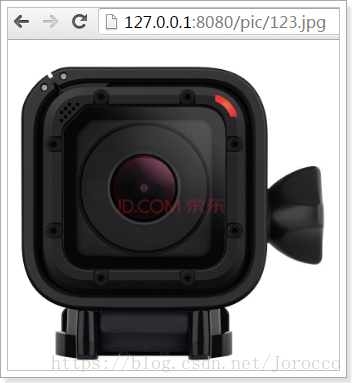
复制一张图片到存放图片的文件夹,使用浏览器访问
测试效果,如下图:
5.2 加入jar包
实现图片上传需要加入的jar包,如下图:
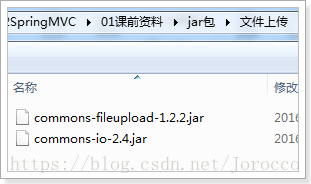
把两个jar包放到工程的lib文件夹中
5.3 配置上传解析器
在springmvc.xml中配置文件上传解析器
<!-- 文件上传,id必须设置为multipartResolver -->
<bean id="multipartResolver"
class="org.springframework.web.multipart.commons.CommonsMultipartResolver">
<!-- 设置文件上传大小 -->
<property name="maxUploadSize" value="5000000" />
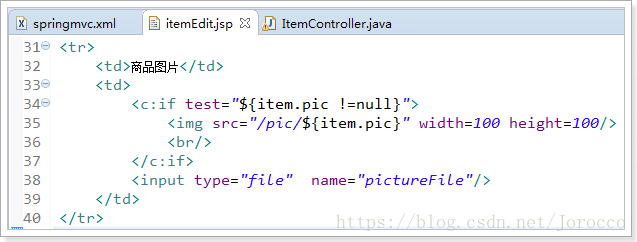
</bean>5.4 jsp页面修改
在商品修改页面,打开图片上传功能,如下图:
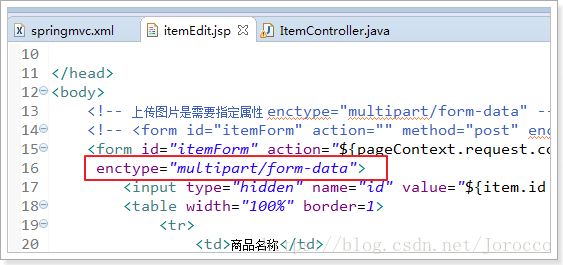
设置表单可以进行文件上传,如下图:
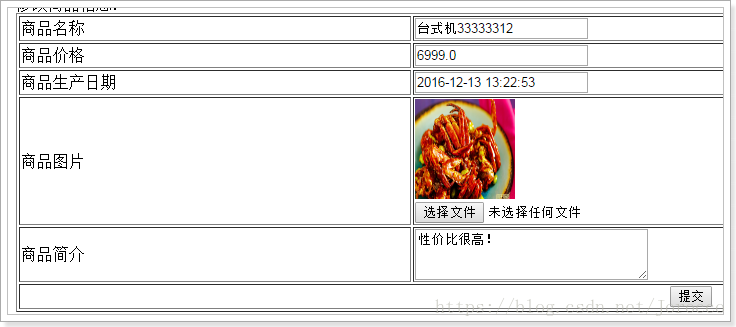
5.5 图片上传
在更新商品方法中添加图片上传逻辑
/**
 * 更新商品
 *
 * @param item
 * @return
 * @throws Exception
 */
@RequestMapping("updateItem")
public String updateItemById(Item item, MultipartFile pictureFile) throws Exception {
    // 图片上传
    // 设置图片名称,不能重复,可以使用uuid
    String picName = UUID.randomUUID().toString();

    // 获取文件名
    String oriName = pictureFile.getOriginalFilename();
    // 获取图片后缀
    String extName = oriName.substring(oriName.lastIndexOf("."));

    // 开始上传
    pictureFile.transferTo(new File("C:/upload/image/" + picName + extName));

    // 设置图片名到商品中
    item.setPic(picName + extName);
    // ---------------------------------------------
    // 更新商品
    this.itemService.updateItemById(item);

    return "forward:/itemEdit.action";
}
效果,如下图:
6、json数据交互
6.1 @RequestBody
作用:
@RequestBody注解用于读取http请求的内容(字符串),通过springmvc提供的HttpMessageConverter接口将读到的内容(json数据)转换为java对象并绑定到Controller方法的参数上。
传统的请求参数:
itemEdit.action?id=1&name=zhangsan&age=12
现在的请求参数:
使用POST请求,在请求体里面加入json数据
{
"id": 1,
"name": "测试商品",
"price": 99.9,
"detail": "测试商品描述",
"pic": "123456.jpg"
}
本例子应用:
@RequestBody注解实现接收http请求的json数据,将json数据转换为java对象进行绑定
6.2 @ResponseBody
作用:
@ResponseBody注解用于将Controller的方法返回的对象,通过springmvc提供的HttpMessageConverter接口转换为指定格式的数据如:json,xml等,通过Response响应给客户端
本例子应用:
@ResponseBody注解实现将Controller方法返回java对象转换为json响应给客户端。
6.3 请求json,响应json实现
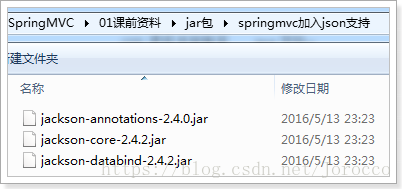
加入jar包
如果需要springMVC支持json,必须加入json的处理jar
我们使用Jackson这个jar,如下图:
ItemController编写
/**
 * 测试json的交互
 * @param item
 * @return
 */
@RequestMapping("testJson")
// @ResponseBody
public @ResponseBody Item testJson(@RequestBody Item item) {
    return item;
}
6.4 配置json转换器
如果不使用注解驱动<mvc:annotation-driven />,就需要给处理器适配器配置json转换器,参考之前学习的自定义参数绑定。
在springmvc.xml配置文件中,给处理器适配器加入json转换器:
<!--处理器适配器 -->
    <bean class="org.springframework.web.servlet.mvc.method.annotation.RequestMappingHandlerAdapter">
        <property name="messageConverters">
        <list>
        <bean class="org.springframework.http.converter.json.MappingJacksonHttpMessageConverter"></bean>
        </list>
        </property>
    </bean>
7、RESTful支持
7.1 什么是restful
Restful就是一个资源定位及资源操作的风格。不是标准也不是协议,只是一种风格。基于这个风格设计的软件可以更简洁,更有层次,更易于实现缓存等机制。
资源:互联网所有的事物都可以被抽象为资源
资源操作:使用POST、DELETE、PUT、GET,使用不同方法对资源进行操作。
分别对应 添加、 删除、修改、查询。
传统方式操作资源
http://127.0.0.1/item/queryItem.action?id=1 查询,GET
http://127.0.0.1/item/saveItem.action           新增,POST
http://127.0.0.1/item/updateItem.action     更新,POST
http://127.0.0.1/item/deleteItem.action?id=1    删除,GET或POST

使用RESTful操作资源
http://127.0.0.1/item/1     查询,GET
http://127.0.0.1/item       新增,POST
http://127.0.0.1/item       更新,PUT
http://127.0.0.1/item/1     删除,DELETE
7.2 需求
RESTful方式实现商品信息查询,返回json数据
7.3 从URL上获取参数
使用RESTful风格开发的接口,根据id查询商品,接口地址是:
http://127.0.0.1/item/1我们需要从url上获取商品id,步骤如下:
1.使用注解@RequestMapping("item/{id}")声明请求的url
{xxx}叫做占位符,请求的URL可以是“item /1”或“item/2”
2、使用(@PathVariable() Integer id)获取url上的数据
/**
 * 使用RESTful风格开发接口,实现根据id查询商品
 *
 * @param id
 * @return
 */
@RequestMapping("item/{id}")
@ResponseBody
public Item queryItemById(@PathVariable() Integer id) {
    Item item = this.itemService.queryItemById(id);
    return item;
}如果@RequestMapping中表示为"item/{id}",id和形参名称一致,@PathVariable不用指定名称。如果不一致,例如"item/{ItemId}"则需要指定名称@PathVariable("itemId")。
http://127.0.0.1/item/123?id=1注意两个区别
1.@PathVariable是获取url上数据的。@RequestParam获取请求参数的(包括post表单提交)
2.如果加上@ResponseBody注解,就不会走视图解析器,不会返回页面,目前返回的json数据。如果不加,就走视图解析器,返回页面。
8、拦截器
Spring Web MVC 的处理器拦截器类似于Servlet 开发中的过滤器Filter,用于对处理器进行预处理和后处理。
8.1 拦截器定义
实现HandlerInterceptor接口,如下:
public class HandlerInterceptor1 implements HandlerInterceptor {
    // controller执行后且视图返回后调用此方法
    // 这里可得到执行controller时的异常信息
    // 这里可记录操作日志
    @Override
    public void afterCompletion(HttpServletRequest arg0, HttpServletResponse arg1, Object arg2, Exception arg3)
            throws Exception {
        System.out.println("HandlerInterceptor1....afterCompletion");
    }

    // controller执行后但未返回视图前调用此方法
    // 这里可在返回用户前对模型数据进行加工处理,比如这里加入公用信息以便页面显示
    @Override
    public void postHandle(HttpServletRequest arg0, HttpServletResponse arg1, Object arg2, ModelAndView arg3)
            throws Exception {
        System.out.println("HandlerInterceptor1....postHandle");
    }

    // Controller执行前调用此方法
    // 返回true表示继续执行,返回false中止执行
    // 这里可以加入登录校验、权限拦截等
    @Override
    public boolean preHandle(HttpServletRequest arg0, HttpServletResponse arg1, Object arg2) throws Exception {
        System.out.println("HandlerInterceptor1....preHandle");
        // 设置为true,测试使用
        return true;
    }
}
8.2 拦截器配置
上面定义的拦截器再复制一份HandlerInterceptor2,注意新的拦截器修改代码:
System.out.println("HandlerInterceptor2....preHandle");在springmvc.xml中配置拦截器
<!-- 配置拦截器 -->
<mvc:interceptors>
    <mvc:interceptor>
        <!-- 所有的请求都进入拦截器 -->
        <mvc:mapping path="/**" />
        <!-- 配置具体的拦截器 -->
        <bean class="cn.itcast.ssm.interceptor.HandlerInterceptor1" />
    </mvc:interceptor>
    <mvc:interceptor>
        <!-- 所有的请求都进入拦截器 -->
        <mvc:mapping path="/**" />
        <!-- 配置具体的拦截器 -->
        <bean class="cn.itcast.ssm.interceptor.HandlerInterceptor2" />
    </mvc:interceptor>
</mvc:interceptors>
8.3 正常流程测试
浏览器访问地址
http://127.0.0.1:8080/springmvc-web2/itemList.action运行流程
控制台打印:
HandlerInterceptor1..preHandle..
HandlerInterceptor2..preHandle..

HandlerInterceptor2..postHandle..
HandlerInterceptor1..postHandle..

HandlerInterceptor2..afterCompletion..
HandlerInterceptor1..afterCompletion..
中断流程测试
浏览器访问地址
http://127.0.0.1:8080/springmvc-web2/itemList.action运行流程
HandlerInterceptor1的preHandler方法返回false,HandlerInterceptor2返回true,运行流程如下:
HandlerInterceptor1..preHandle..从日志看出第一个拦截器的preHandler方法返回false后第一个拦截器只执行了preHandler方法,其它两个方法没有执行,第二个拦截器的所有方法不执行,且Controller也不执行了。
HandlerInterceptor1的preHandler方法返回true,HandlerInterceptor2返回false,运行流程如下:
HandlerInterceptor1..preHandle..
HandlerInterceptor2..preHandle..
HandlerInterceptor1..afterCompletion..
从日志看出第二个拦截器的preHandler方法返回false后第一个拦截器的postHandler没有执行,第二个拦截器的postHandler和afterCompletion没有执行,且controller也不执行了。
总结:
preHandle按拦截器定义顺序调用
postHandler按拦截器定义逆序调用
afterCompletion按拦截器定义逆序调用
postHandler在拦截器链内所有拦截器返成功调用
afterCompletion只有preHandle返回true才调用
8.4 拦截器应用
处理流程
1、有一个登录页面,需要写一个Controller访问登录页面
2、登录页面有一提交表单的动作。需要在Controller中处理。
a)判断用户名密码是否正确(在控制台打印)
b)如果正确,向session中写入用户信息(写入用户名username)
c)跳转到商品列表
3、拦截器。
a)拦截用户请求,判断用户是否登录(登录请求不能拦截)
b)如果用户已经登录。放行
如果用户未登录,跳转到登录页面。
8.4.1 编写登陆jsp
<%@ page language="java" contentType="text/html; charset=UTF-8"
    pageEncoding="UTF-8"%>
<!DOCTYPE html PUBLIC "-//W3C//DTD HTML 4.01 Transitional//EN" "http://www.w3.org/TR/html4/loose.dtd">
<html>
<head>
<meta http-equiv="Content-Type" content="text/html; charset=UTF-8">
<title>Insert title here</title>
</head>
<body>

<form action="${pageContext.request.contextPath }/user/login.action">
<label>用户名:</label>
<br>
<input type="text" name="username">
<br>
<label>密码:</label>
<br>
<input type="password" name="password">
<br>
<input type="submit">

</form>

</body>
</html>
8.4.2 用户登陆Controller
@Controller
@RequestMapping("user")
public class UserController {

    /**
     * 跳转到登录页面
     *
     * @return
     */
    @RequestMapping("toLogin")
    public String toLogin() {
        return "login";
    }

    /**
     * 用户登录
     *
     * @param username
     * @param password
     * @param session
     * @return
     */
    @RequestMapping("login")
    public String login(String username, String password, HttpSession session) {
        // 校验用户登录
        System.out.println(username);
        System.out.println(password);

        // 把用户名放到session中
        session.setAttribute("username", username);

        return "redirect:/item/itemList.action";
    }

}
8.4.3 编写拦截器
@Override
public boolean preHandle(HttpServletRequest request, HttpServletResponse response, Object arg2) throws Exception {
    // 从request中获取session
    HttpSession session = request.getSession();
    // 从session中获取username
    Object username = session.getAttribute("username");
    // 判断username是否为null
    if (username != null) {
        // 如果不为空则放行
        return true;
    } else {
        // 如果为空则跳转到登录页面
        response.sendRedirect(request.getContextPath() + "/user/toLogin.action");
    }

    return false;
}
8.4.4 配置拦截器
只能拦截商品的url,所以需要修改ItemController,让所有的请求都必须以item开头,如下图:
在springmvc.xml配置拦截器
<mvc:interceptor>
    <!-- 配置商品被拦截器拦截 -->
    <mvc:mapping path="/item/**" />
    <!-- 配置具体的拦截器 -->
    <bean class="cn.itcast.ssm.interceptor.LoginHandlerInterceptor" />
</mvc:interceptor>