DOM事件

什么是事件?
事件就是文档或浏览器窗口中发生的一些特定的交互瞬间。主要有HTML事件和DOM事件。
HTML事件:直接在HTML元素标签内添加事件,执行脚本。

<!doctype html>
<html lang="en">
<head>
	<meta charset="UTF-8">
	<title>Document</title>
	<style>
       .btn{

     width:140px;height:30px;line-height: 30px;background:#00f;
       	color:#fff;font-size:14px;text-align:center;border-radius:5px;
       	cursor:pointer;margin-top:30px;}
	</style>
</head>
<body>
	<input type="button" value="弹 出" onclick="alert('我是按钮')">
	<!--鼠标划过按钮时调用mouseoverFn的函数-->
	<div class="btn" onmouseover="mouseoverFn(this,'#f00')" onmouseout="mouseoutFn(this,'#ff0')">开始</div>
	<div class="btn" onmouseover="mouseoverFn(this,'#0f0')" onmouseout="mouseoutFn(this,'#333')">结束</div>
	<script>
        function mouseoverFn(btn,bgColor){


        	// 鼠标划过按钮时,按钮的背景变为红色
            btn.style.background=bgColor;
        }
        function mouseoutFn(btn,bgColor){


            btn.style.background=bgColor;
        }
	</script>
</body>
</html>
这里获取变色按钮,可以不需要通过定位ID获取。这里用this。

<div class="btn" onmouseover="mouseoverFn(this,'#f00')" onmouseout="mouseoutFn(this,'#ff0')">开始</div>
我这个事件绑定在什么元素上,这里的this就代表谁。
DOM0级事件
1.通过DOM获取HTML元素
2.(获取HTML元素).事件=执行脚本
语法:ele.事件=执行脚本
功能:在DOM对象上绑定事件
说明︰执行脚本可以是一个匿名函数,也可以是一个函数的调用。
<!doctype html>
<html lang="en">
<head>
	<meta charset="UTF-8">
	<title>Document</title>
	<style>
       .lock{

     width:140px;height:30px;line-height: 30px;background:#00f;
       	color:#fff;font-size:14px;text-align:center;border-radius:5px;
       	cursor:pointer;margin-top:30px;}
       	.unlock{

     width:140px;height:30px;line-height: 30px;background:#666;
       		color:#ccc;font-size:14px;text-align:center;border-radius:5px;
       		cursor:pointer;margin-top:30px;}
	</style>
</head>
<body>
	<div class="lock" id="btn">锁定</div>
	<script>
        // 获取按钮
        var btn=document.getElementById("btn");
        function clickBtn(){


          console.log(this);//测试this是不是像之前说的一样
           alert("我是按钮");
        }
        // 点击按钮调用clickBtn这个函数
        btn.onclick=clickBtn;
        //btn.οnclick=clickBtn();假如我这样写不点击也会调用,知道原理吗

        // 给按钮绑定事件,this是对该DOM元素的引用
        btn.onclick=function(){


           // 判断如果按钮是锁定,则显示为解锁,变为灰色,否则显示为锁定,变为蓝色

           if(this.className=="lock"){


               this.className="unlock";
               this.innerHTML="解锁";
           }else{


               this.className="lock";
               this.innerHTML="锁定";
           }
    /*
        第2种:其实一样
           if(this.innerHTML=="锁定"){
               this.className="unlock";
               this.innerHTML="解锁";
           }else{
               this.className="lock";
               this.innerHTML="锁定";
           }
*/
        }
	</script>
</body>
</html>
不建议使用HTML事件原因:
1.多元素绑定相同事件时,效率低。
2.不建议在HTML元素中写JavaScript代码。
注意:js代码放的顺序不同,可能会出现报错,比如出现在定义之前。
是一行一行解释的。
此时可以加一个onload事件,页面全部加载时才执行。此时js放在任何处都可以执行了。
	window.onload=function(){


      	 // 获取box
      	 var box=document.getElementById("box");
      	 var clicked=function(){


      	 	  alert('我被点击了');
      	 }
      	 box.onclick=clicked;
      }
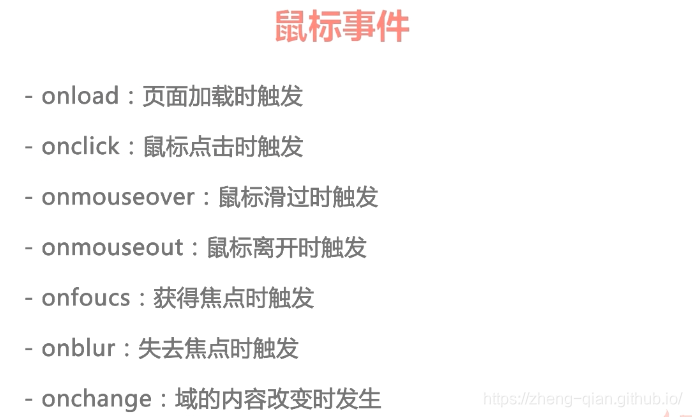
onfocus事件,获取焦点时触发
onblur事件,失去焦点时触发
<head>
	<meta charset="UTF-8">
	<title>Document</title>
	<style>
       .box{


       	  padding:50px;
       }
       .left,
       .tip{


       	  float:left;
       }
       .left{

     margin-right:10px;}
       .tip{

     display:none;font-size:14px;}
	</style>
	<script>
       window.onload=function(){


       	  // 获取文本框和提示框
       	  var phone=document.getElementById("phone"),
              tip=document.getElementById("tip");
          // 给文本框绑定激活的事件
          phone.onfocus=function(){


          	  // 让tip显示出来
          	  tip.style.display='block';
          }
          // 给文本框绑定失去焦点的事件
          phone.onblur=function(){


             // 获取文本框的值,value用于获取表单元素的值
             var phoneVal=this.value;
             // 判断手机号码是否是11位的数字
             // 如果输入正确,则显示对号图标,否则显示错号图标
             if(phoneVal.length==11 && isNaN(phoneVal)==false){


                tip.innerHTML='<img src="img/right.png">';
             }else{


             	tip.innerHTML='<img src="img/error.png">';
             }
          }
       }
	</script>
</head>
<body>
	<div class="box">
		<div class="left">
			<input type="text" id="phone" placeholder="请输入手机号码">
		</div>
		<div class="tip" id="tip">
           请输入有效的手机号码
		</div>
	</div>
</body>
onchange事件:域的内容改变时发生改变
做个改变网页背景颜色的小栗子
<head>
	<meta charset="UTF-8">
	<title>Document</title>
	<script>
       // 页面加载
       window.onload=init;

       // 初始化
       function init(){


          // 获取下拉菜单
          var menu=document.getElementById("menu");
          // 给菜单绑定change事件,一般作用域select或checkbox或radio
          menu.onchange=function(){


             // 获取当前选中的值
             //var bgcolor=this.value;
             var bgcolor=menu.options[menu.selectedIndex].value;
             // 如果bgcolor为空,则下面的脚本将不执行
             // if(bgcolor=="")return;
             // 设置body的背景色
             // 如果bgcolor为空,则将背景色设为白色,否则是选择的颜色
             if(bgcolor==""){


                document.body.style.background="#fff";
             }else{


             	document.body.style.background=bgcolor;
             }
          }
       }
	</script>
</head>
<body>
	<div class="box">
		请选择您喜欢的背景色:
		<select name="" id="menu">
			<option value="">请选择</option>
			<option value="#f00">红色</option>
			<option value="#0f0">绿色</option>
			<option value="#00f">蓝色</option>
			<option value="#ff0">黄色</option>
			<option value="#ccc">灰色</option>
		</select>
	</div>
</body>

onsubmit事件不是加在按钮上,而是表单上。
<!doctype html>
<html lang="en">
<head>
	<meta charset="UTF-8">
	<title>Document</title>
	<style>
	   body{

     height:2000px;}
       .box{

     width:200px;height:200px;background:#f00;overflow:auto;}
	</style>
</head>
<body>
	<div class="box" id="box">
		<p>拖动</p>
		<p>拖动</p>
		<p>拖动</p>
		<p>拖动</p>
		<p>拖动</p>
		<p>拖动</p>
		<p>拖动</p>
		<p>拖动</p>
		<p>拖动</p>
		<p>拖动</p>
	</div>
	<script>
       var box=document.getElementById("box");
       // 绑定按下的事件
       box.onmousedown=function(){


       	  console.log("我被按下了");
       }
       // 绑定移动的事件
       box.onmousemove=function(){


       	  console.log("我被移动了");
       }
       // 绑定松开的事件
       box.onmouseup=function(){


       	  console.log("我被松开了");
       }
       // 绑定点击的事件
       box.onclick=function(){


       	  console.log("我被点击了");
       }
       // 浏览器窗口尺寸发生改变时
       window.onresize=function(){


       	  console.log("我的尺寸被改变了");
       }
       // 拖动滚动条
       window.onscroll=function(){


       	  console.log("我被拖动了");
       }
       box.onscroll=function(){


       	  console.log("我是DIV的滚动条");
       }
	</script>
</body>
</html>
event代表事件的状态,如触发event对象的元素,鼠标的位置及状态等。
<!doctype html>
<html lang="en">
<head>
	<meta charset="UTF-8">
	<title>Document</title>
	<style>
       .text span{

     font-weight:bold;color:#f00;}
       em{

     font-style:normal;}
       b{

     font-weight:normal;}
	</style>
</head>
<body>
	<div>
		<p class="text">
			<b id="showcount">您还可以输入</b>
			<span id="totalbox"><em id="count">30</em>/30</span>
		</p>
		<div class="input">
			<textarea name="" id="text" cols="70" rows="4"></textarea>
		</div>
	</div>
	<script>
	   // 获取文本框及其他元素
       var text=document.getElementById("text");
       var total=30;
       var count=document.getElementById("count");
       var showcount=document.getElementById("showcount");
       var totalbox=document.getElementById("totalbox");
	   // 绑定键盘事件
	   document.onkeyup=function(){


	   	  // 获取文本框值的长度
	   	  var len=text.value.length;
	   	  // 计算可输入的剩余字符
	   	  var allow=total-len;
	   	  var overflow=len-total;
	   	  // 如果allow小于0
	   	  if(allow<0){


              showcount.innerHTML="您已超出"+overflow;
              totalbox.innerHTML='';
	   	  }else{


	   	  	  showcount.innerHTML='您还可以输入';
	   	  	  totalbox.innerHTML='<em id="count">'+allow+'</em>/30';
	   	  }
	   }
	</script>
</body>
</html>
NEXT:
接下来学浏览器对象模型BOM,提供了Window,Location,History,Screen,Navigator等对象,他们的方法和属性可以对浏览器窗口进行访问和操作,使js有能力与浏览器对话。
每日一词:
trigger/arouse 替换cause
