文章目录
有一句话说的好,只要精神不滑坡,办法总比困难多——阿俊(这句话可以形容我这三天学习知识的态度)
就在前天,我的一个项目进入到了省赛,想下定决心把自己的一部分未完成的功能完善起来(想爬取网页上的各种数据到自己的所对应的页面上显示),这个问题在我脑子里回旋许久,于是打开电脑就在网上查阅各种资料,而我第一次查就是如何使用Java代码从网页中爬取数据到数据库中,有了这一步我相信在显示到自己的界面上应该就是很简单的一件事了,那么到底如何使用Java代码从网页中爬取数据到数据库中呢?昨天我花了一天的时间学习这方面的内容,当然我觉得这学的只是片面知识有很多还得掌握,待以后在遇到继续解决,今天夜里,我决定总结昨天遇到的困难和学过的知识,以博客的形式记录下来分享给大家

1:网络爬虫介绍
- 在大数据时代,信息的采集是一项重要的工作,而互联网中的数据是海量的,如果单纯靠人力进行信息采集,不仅低效繁琐,搜集的成本也会提高。如何自动高效地获取互联网中我们感兴趣的信息并为我们]所用是一个重要的问题,而爬虫技术就是为了解决这些问题而生的。
网络爬虫(Web crawler)也叫做网络机器人,可以代替人们自动地在互联网中进行数据信息的采集与整理。它是一种按照一定的规则,自动地抓取万维网信息的程序或者脚木,可以自动采集所有其能够访问到的页而内容,以获取相关数据。
从功能上来讲,爬虫一般分为数据采集,处理,储存三个部分。爬虫从一个或若干初始网页的URL开始,获得初始网页上的URL,在抓取网页的过程中,不断从当前页而上抽取新的URL放入队列,直到满足系统的一定停止条件。
网络爬虫作用
1.可以实现搜索引擎。
我们学会了爬虫编写之后,就可以利用爬虫自动地采集互联网中的信息,采集回来后进行相应的存储或处理,在需要检索某些信息的时候,只需在采集回来的信息中进行检索,即实现了私人的搜索引擎。。
2.大数据时代,可以让我们获取更多的数据源。
在进行大数据分析或者进行数据挖掘的时候,需要有数据源进行分析。我们可以从某些提供数据统计的网站获得,也可以从某些文献或内部资料中获得,但是这些获得数据的方式,有时很难满足我们对数据的需求,而手动从互联网中去寻找这些数据,则耗费的精力过大。此时就可以利用爬虫技术,自动地从互联网中获取我们]感兴趣的数据内容,并将这些数据内容爬取回来,作为我们的数据源,再进行更深层次的数据分析,并获得更多有价值的信息。
3.可以更好地进行搜索引擎优化 (SEO)。
对于很多SEO从业者来说,为了更好的完成工作,那么就必须要对搜索引擎的工作原理非常清楚,同时也需要掌握搜索引擎爬虫的工作原理。而学习爬虫,可以更深层次地理解搜索引擎爬虫的工作原理,这样在进行搜索引擎优化时,才能知己知彼,百战不殆。(我还没掌握这么深(狗头))
4.有利于就业。
从就业来说,爬虫工程师方向是不错的选择之一,因为目前爬虫程师的需求越来越大,而能够胜任这方而岗位的人员较少,所以属于一个比较紧缺的职业方向,并且随着大数据时代和人工智能的来临,爬虫技术的应用将越来越广“泛,在未来会拥有很好的发展空间。(我是搞软件开发的(狗头))
2:HttpClients类介绍
为什么讲完爬虫介绍就直接讲这一个类呢?
网络爬虫就是用程序帮助我们访问网络上的资源,我们一 直以来都是使用HTTP协议访问互联网的网页,网络爬虫需要编写程序,在这里使用同样的HTTP协议访问网页。这里我们使用Java的HTTP协议客户端HttpClients 这个技术,来实现抓取网页数据。
如下代码我们有些类的信息要去如下API寻找(大家可以看它们分别引入类的的包就知道要怎么寻找API了)
org.apache.http (Apache HttpCore 4.2.5 API)
Apache HttpCore 4.2.5 API
这两个API不一样的
我们先上一个简单的例子,来看看怎么用Java代码成功爬取到网页上的数据到控制台
public class Crawler01 {
public static void main(String[] args) throws Exception{
//1.打开浏览器,创建对象
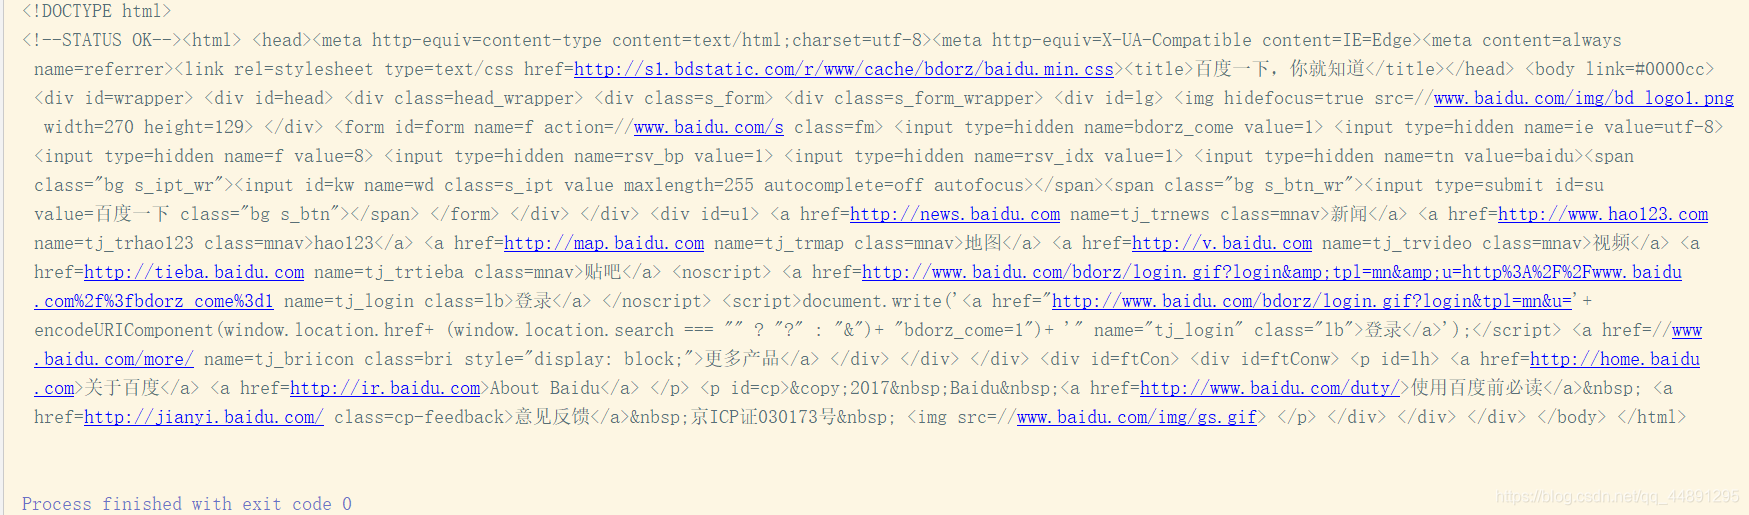
CloseableHttpClient httpClient = HttpClients.createDefault();
//2.网址
HttpGet httpGet = new HttpGet("http://www.baidu.com");
//3.发起请求
CloseableHttpResponse response = httpClient.execute(httpGet);
//4.解析响应,获取数据
if(response.getStatusLine().getStatusCode()==200){
HttpEntity entity = response.getEntity();
String content = EntityUtils.toString(entity, "utf8");
System.out.println(content);
}
}
}
相关如上类的信息如下,如下代码都是借鉴API中的内容
Interface HttpEntity:可以通过HTTP消息发送或接收的实体。可以在某些请求和响应中找到实体,这些实体是可选的。——Interface
Class EntityUtils:处理HttpEntitys的静态帮助程序。——Class
方法1:static String toString(HttpEntity entity)
读取实体的内容并将其作为字符串返回。
方法2:static String toString(HttpEntity entity, Charset defaultCharset)
以字符串形式获取实体内容,如果在实体中没有找到,则使用提供的默认字符集。(字符集很关键,我当时的实验代码就是该方法中的字符集和页面上的字符集不一一对应造成的)
Interface——CloseableHttpResponse:HttpResponse接口的扩展版本,它也扩展了Closeable。——Interface
Class HttpGet:HTTP GET method——GET方法意味着检索由请求uri标识的任何信息(以实体的形式)。如果请求uri指的是一个数据产生过程,它是被产生的数据,应该作为响应中的实体返回,而不是该过程的源文本,除非该文本恰好是该过程的输出。 ——Class
方法1:public HttpGet(String uri)
Class:HttpClients: CloseableHttpClient实例的工厂方法。 ——Class
方法1:static CloseableHttpClient createDefault()
使用默认配置创建CloseableHttpClient实例。
Class CloseableHttpClient:基于HttpClient的基本实现同时也实现了 Closeable ——Class
方法1: CloseableHttpResponse execute(HttpUriRequest request)
使用默认上下文执行HTTP请求。
Interface CloseableHttpResponse :Extended version of the HttpResponse interface that also extends Closeable.
Interface HttpResponse ——Interface
方法1:HttpEntity getEntity()
获取此响应的消息实体(如果有的话)
方法2:StatusLine getStatusLine()
获取此响应的状态行。
Interface StatusLine :响应消息的第一行是状态行,由协议版本、数字状态代码及其相关的文本短语组成,每个元素由SP字符分隔。除非在最后的CRLF序列中,否则不允许使用CR或LF。
状态行= http版本的SP状态码SP原因短语CRLF——Interface
方法1:int getStatusCode()
我们接下来就要讲到HttpGet,HttpPost两个类中解决无参数和带参数的问题,和连接池技术问题
看如下博客,知道Get,Post请求的区别(也就是为什么我们要将HttpGet,HttpPost两个类)
get请求和post请求的详细区别
2.1 HttpGet参数问题
访问传智官网,请求url地址(无参数)
http://www.itcast.cn
以下代码默认已经对这些类有所了解,这里不再记叙有关类的信息
代码演示
   public static void main(String[] args) throws Exception{


        //1.创建对象
        CloseableHttpClient httpClient = HttpClients.createDefault();
        //2.访问地址
        HttpGet httpGet = new HttpGet("http://www.itcast.cn");
        //3.发起请求
        CloseableHttpResponse response = httpClient.execute(httpGet);
        //4.解析响应
        if(response.getStatusLine().getStatusCode()==200){


            HttpEntity entity = response.getEntity();
            String content = EntityUtils.toString(entity, "utf8");
            System.out.println(content);
        }
        //5.关闭response
        response.close();
        httpClient.close();
  }
访问传智官网,搜索学习视频,请求url地址为(有参数)
http://yun.itheima.com/search?keys=java
有关API
org.apache.http (Apache HttpCore 4.2.5 API)
Apache HttpCore 4.2.5 API
public static void main(String[] args) throws Exception{


        //1.创建对象
        CloseableHttpClient httpClient = HttpClients.createDefault();

        //设置请求地址http://yun.itheima.com/search?keys=java
        URIBuilder uriBuilder = new URIBuilder("http://yun.itheima.com/search");
        uriBuilder.setParameter("keys","java");

        //2.访问地址
        HttpGet httpGet = new HttpGet(uriBuilder.build());
        //3.发起请求
        CloseableHttpResponse response = httpClient.execute(httpGet);
        //4.解析响应
        if(response.getStatusLine().getStatusCode()==200){


            HttpEntity entity = response.getEntity();
            String content = EntityUtils.toString(entity, "utf8");
            System.out.println(content);
        }
        //5.关闭response
        response.close();
        httpClient.close();
    }
有关类的信息
Class URIBuilder:URI实例的生成器。
方法1:URIBuilder(URI uri)
从提供的URI构造一个实例。
方法2: URIBuilder setParameter(String param, String value)
设置URI查询的参数,如果设置则重写现有值。
方法3: URI build()
构建一个URI实例。
大家观察如上两个代码,发现基本思路都没变
1.创建对象2.访问地址 3.发起请求4.解析响应变得只是访问地址时要考虑有关的参数问题
2.2 HttpPost参数问题
使用Post访问创智官网,请求url地址(无参数)
http://www.itcast.cn
 public static void main(String[] args) throws Exception{


        //1.创建对象
        CloseableHttpClient httpClient = HttpClients.createDefault();

        //2.访问地址
        HttpPost httpPost = new HttpPost("http://www.itcast.cn");

        //3.发起请求
        CloseableHttpResponse response = httpClient.execute(httpPost);

        //4.解析响应
        if(response.getStatusLine().getStatusCode()==200){


            HttpEntity entity = response.getEntity();
            String content = EntityUtils.toString(entity, "utf8");
            System.out.println(content);
        }
        //5.关闭response
        response.close();
        httpClient.close();
    }
带参数的Post请求
在创智中搜索学习视频,使用Post请求,url地址为
http://yun.itheima.com/search?keys=java
注意:url地址没有参数,参数keys=java,放到表单进行提交(和使用Get请求提交参数不一样,Get是url地址有参数,观察他们的代码就可以得出这个结论,前提要知道这些类有关的信息意思)
有关API
org.apache.http (Apache HttpCore 4.2.5 API)
Apache HttpCore 4.2.5 API
 public static void main(String[] args) throws Exception{


        //1.创建对象
        CloseableHttpClient httpClient = HttpClients.createDefault();

        //2.访问地址http://yun.itheima.com/search?keys=java
        HttpPost httpPost = new HttpPost("http://www.itcast.cn/search");

        //利用集合封装表单请求参数
        List<NameValuePair> params = new ArrayList<NameValuePair>();
        params.add(new BasicNameValuePair("keys","java"));
        UrlEncodedFormEntity formEntity = new UrlEncodedFormEntity(params,"utf8");
        httpPost.setEntity(formEntity);

        //3.发起请求
        CloseableHttpResponse response = httpClient.execute(httpPost);

        //4.解析响应
        if(response.getStatusLine().getStatusCode()==200){


            HttpEntity entity = response.getEntity();
            String content = EntityUtils.toString(entity, "utf8");
            System.out.println(content);
        }
        //5.关闭response
        response.close();
        httpClient.close();
    }
2.3 连接池技术问题
如果每次请求都要创建HttpClient,会有频繁创建和销毁的问题,可以使用连接池来解决这个问题。
代码演示
有关API
org.apache.http (Apache HttpCore 4.2.5 API)
Apache HttpCore 4.2.5 API
public class HttpClientPoolTest {


    public static void main(String[] args) throws Exception {


        //1.创建连接池管理器
        PoolingHttpClientConnectionManager cm = new PoolingHttpClientConnectionManager();
        //设置连接数
        cm.setMaxTotal(100);
        //设置每个主机的最大连接数
        cm.setDefaultMaxPerRoute(10);
        //2.管理器发起请求
        doGet(cm);
    }

    private static void doGet(PoolingHttpClientConnectionManager cm) throws Exception{


        //1.从连接池中获取HttpClient(这一步就是使用连接池来解决这个问题,而不是如上面代码使用创建HttpClient)
        CloseableHttpClient httpClient = HttpClients.custom().setConnectionManager(cm).build();
        //2.发请求
        HttpGet httpGet = new HttpGet("http://www.itcast.cn");
            //3.解析响应
        CloseableHttpResponse response = httpClient.execute(httpGet);
        if (response.getStatusLine().getStatusCode()==200){


            String content = EntityUtils.toString(response.getEntity(), "utf8");
            System.out.println(content.length());
        }

        //4.关闭
        response.close();
        //httpClient.close();  连接池管理 不必关闭
    }
}
有时候因为网络,或者目标服务器的原因,请求需要更长的时间才能完成,我们需要自定义相关时间。
代码演示
有关API
org.apache.http (Apache HttpCore 4.2.5 API)
Apache HttpCore 4.2.5 API
public static void main(String[] args) throws Exception{


        //1.创建对象
        CloseableHttpClient httpClient = HttpClients.createDefault();
        //2.访问地址
        HttpGet httpGet = new HttpGet("http://www.itcast.cn");
        //配置请求信息
        RequestConfig config = RequestConfig.custom().setConnectTimeout(1000) //创建连接的做大连接时间 一天
                    .setConnectionRequestTimeout(500) //获取连接的最长时间
                    .setSocketTimeout(10*1000) //设置数据传输的最长时间
                    .build();
        httpGet.setConfig(config);

        //3.发起请求
        CloseableHttpResponse response = httpClient.execute(httpGet);
        //4.解析响应
        if(response.getStatusLine().getStatusCode()==200){


            HttpEntity entity = response.getEntity();
            String content = EntityUtils.toString(entity, "utf8");
            System.out.println(content);
        }
        //5.关闭response
        response.close();
        httpClient.close();
    }
第二章,我们已经结束了,主要是讲了如何进行数据采集接下来我们要将如何处理,储存这些解析出来的数据,并存入到自己的数据库中(上面我们已经成功把网页上的前端代码采集到了,下一步就是处理前端的代码,爬取出有用的数据,然后进行保存)
3:Jsoup介绍
我们抓取到页面之后,还需要对页面进行解析。可以使用字符串处理工具解析页而,也可以使用正则表达式,但是这些方法都会带来很大的开发成本,所以我们需要使用一款专门解析html页而的技术——Jsoup技术。Jsoup是一款Java的HTML解析器,可直接解析某个URL地址、HTML文木内容。它提供了一套非常省力的API,可通过DOM, CSS 以及类似于jQuery的操作方法来取出和操作数据。
API文档如下
org.jsoup (jsoup Java HTML Parser 1.13.1 API)
我们看如下代码演示
public class JsoupFirstTest {


    @Test
    public void testUrl() throws Exception{


        //1.解析Url地址
        Document doc = Jsoup.parse(new URL("http://www.itcast.cn"), 1000);
        //2.使用标签选择器,获取title
        String title = doc.getElementsByTag("title").first().text();
        System.out.println(title);
    }

    @Test
    public void testString() throws Exception{


        //1.实用工具类获取文件的字符串
        String content = FileUtils.readFileToString(new File("f:\\......"), "utf8");
        //2.解析
        Document doc = Jsoup.parse(content);
        String title = doc.getElementsByTag("title").first().text();
        System.out.println(title);
    }

    @Test
    public void testFile() throws Exception{


        Document doc = Jsoup.parse(new File(""), "utf8");
        String title = doc.getElementsByTag("title").first().text();
        System.out.println(title);
    }

    @Test
    public void  testDOM() throws Exception{


        //1.解析文件,获取Document对象
        Document doc = Jsoup.parse(new File(""), "utf8");
        Element element = doc.getElementById("id1");
        Element element1 = doc.getElementsByTag("span").first();
        Element element2 = doc.getElementsByClass("class_a").first();
        System.out.println("根据ID获取元素内容是:"+element.text());
        System.out.println("根据span获取元素内容是:"+element1.text());
        System.out.println("根据class获取元素内容是:"+element2.text());
    }

    @Test
    public void testData() throws Exception{


        //1.解析文件,获取Document对象
        Document doc = Jsoup.parse(new File(""), "utf8");
        Element element = doc.getElementById("id1");
        String str = "";
        str = element.id();
        str = element.className();
        str = element.data();
        str = element.attr("id");
        str = element.attr("class");
        str = element.text();
        System.out.println();
    }

    @Test
    public void testSelector() throws Exception{


        //1.解析文件,获取Document对象
        Document doc = Jsoup.parse(new File(""), "utf8");
        Elements elements = doc.select("span");
        for (Element element : elements){


            System.out.println(element.text());
        }

        Element element1 = doc.select("#city_id").first();
        System.out.println(element1.text());

        Element el = doc.select(".class_a").first();

    }
}
4:动手实践如何抓取网页上数据并保存到自己数据库中
第一步:我们要创建service,serviceimple,entity,dao,utils,task这几个模块

我们要创建数据库我们拿上面的招聘信息实体类作讲解,RecruitmentInformation.java,对应的有关类也是该类开头的和utils中的HttpUtils(获取页面的功能)
CREATE TABLE recruitmentinformation(
id BIGINT(10) PRIMARY KEY auto_increment COMMENT '主键id',
recruitmenttopic VARCHAR(50) DEFAULT NULL COMMENT '招聘标题',
 recruitmentcompany VARCHAR(50) DEFAULT NULL COMMENT '招聘公司',
companylocation VARCHAR(50) DEFAULT NULL COMMENT '公司所在地',
url VARCHAR(200) DEFAULT NULL COMMENT '公司地址',
created datetime DEFAULT NULL COMMENT '创建时间'
)
第二步编写各个模块对应的代码
RecruitmentInformation .java
@Entity
@Table(name = "recruitmentinformation")
public class RecruitmentInformation {


    @Id
    @GeneratedValue(strategy = GenerationType.IDENTITY)
    private long id;
    private String recruitmenttopic;
    private String recruitmentcompany;
    private String companylocation;
    private String url;
    private Date created;
//getter and setter
}
RecruitmentInformationDao .interface
public interface RecruitmentInformationDao extends JpaRepository<RecruitmentInformation,Long> {


//使用了Spring Data简化Dao层开发,自行搜索这方面的知识,如下有一篇关于这方面知识的博客

}
Spring Data Jpa系列教程(一)--------入门
RecruitmentInformationServiceImpl.java
@Service
public class RecruitmentInformationServiceImpl implements RecruitmentInformationService{


    @Autowired

    private RecruitmentInformationDao recruitmentInformationDao;
    //保存招聘信息

    @Override
    @Transactional
    public void save(RecruitmentInformation item) {


        recruitmentInformationDao.save(item);
    }

}
RecruitmentInformationService .java
public interface RecruitmentInformationService {


    //保存招聘信息
    public void save(RecruitmentInformation item);
}
HttpUtils.java
@Component //实例才能使用工具类
public class HttpUtils {


    private PoolingHttpClientConnectionManager cm;

    public HttpUtils() {


        cm = new PoolingHttpClientConnectionManager();
        //设置最大连接数
        cm.setMaxTotal(100);
        cm.setDefaultMaxPerRoute(10);
    }
//获取html的网页前端代码
    public String doGetHtml(String url) throws Exception {


        //1.获取对象
        CloseableHttpClient httpClient = HttpClients.custom().setConnectionManager(cm).build();
        //2.地址
        HttpGet httpGet = new HttpGet(url);
        //设置请求信息
        httpGet.setConfig(getConfig());
        //3.请求数据
        CloseableHttpResponse response = httpClient.execute(httpGet);
        //4.解析
        if (response.getStatusLine().getStatusCode()==200){


            if (response.getEntity() != null){


                String content = EntityUtils.toString(response.getEntity(), "UTF-8");
                return content;
            }
        }
        if (response != null){


            response.close();
        }
        return ""; //没有数据时候返回空
    }
    }
RecruitmentInformationTask.java
@Component
public class RecruitmentInformationTask{
org.slf4j.Logger logger= LoggerFactory.getLogger(getClass());
@Autowired
private HttpUtils httpUtils;
@Autowired
private RecruitmentInformationService itemService;
private static final ObjectMapper MAPPER = new ObjectMapper();
//间隔100s执行一次任务//有了下面这个注解,启动运行类时才可以自动执行下面的方法
@Scheduled(fixedDelay = 100*1000)
public void itemTask() throws Exception{
// //1.声明地址=》校园招聘前程无忧网站
String url = "https://xy.51job.com/default-xs.php";
//2.解析页面
String html = httpUtils.doGetHtml(url );
//解析页面,获取商品数据并存储
parse(html);
System.out.println("数据抓取完成!");
}
/**
* //解析页面,获取商品数据并存储
*/
private void parse(String html) throws Exception{
//1.解析html
Document doc = Jsoup.parse(html);
logger.info(String.valueOf(doc));
//2.获取招聘信息
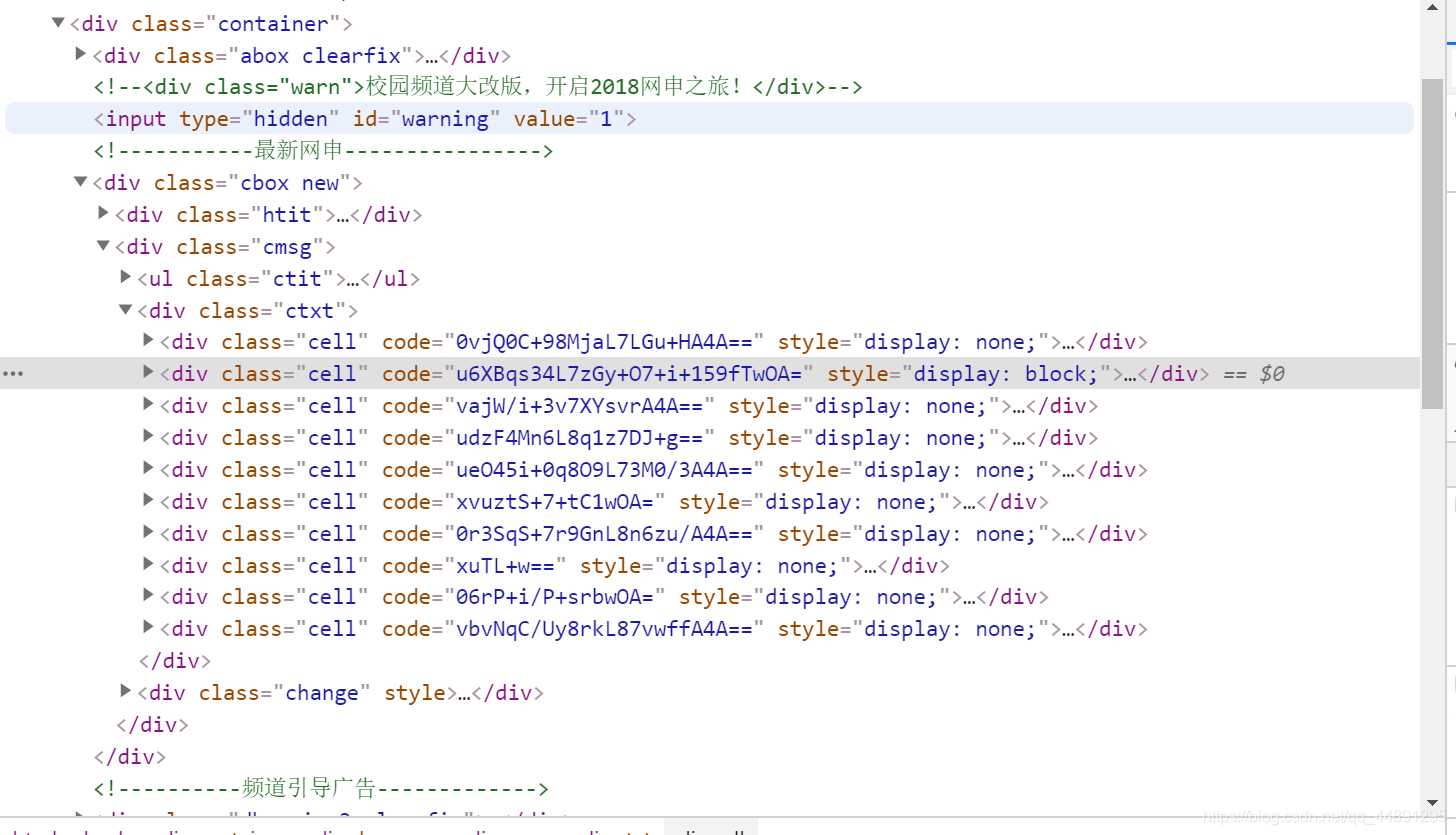
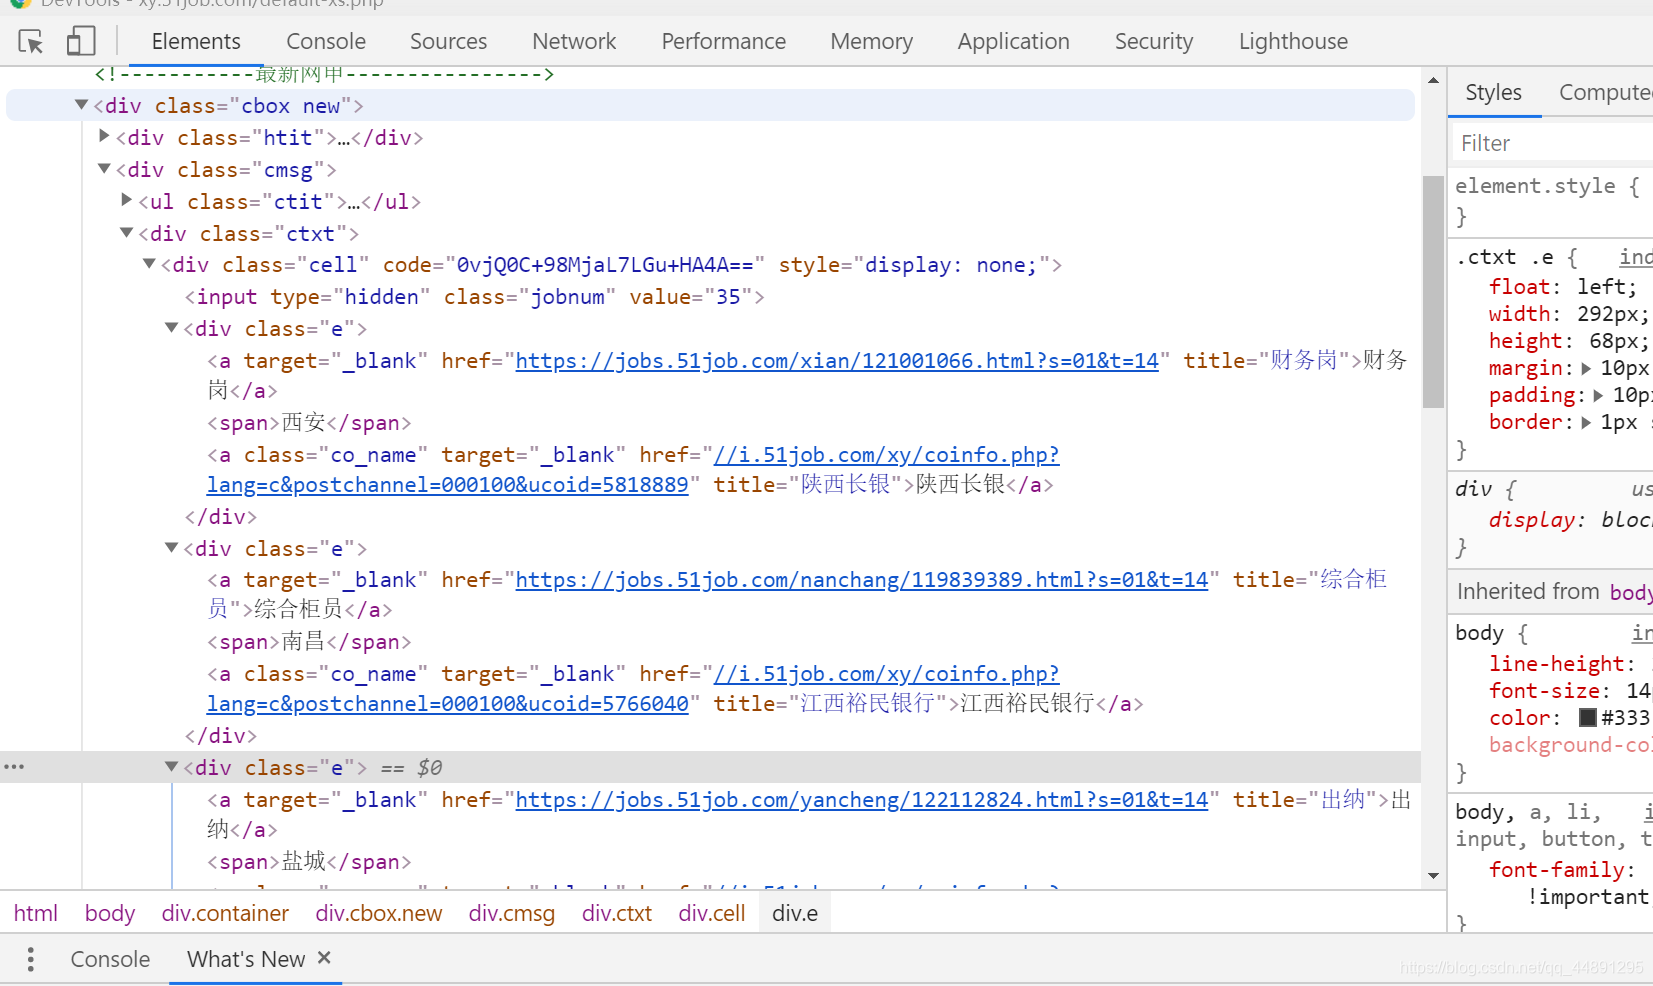
Elements spuEles = doc.select("div.ctxt > div.cell > div.e");
logger.info(String.valueOf(spuEles));
for (Element spuEle : spuEles){
//获取招聘标题
String topic = spuEle.select("[target]").attr("title");
//获取招聘公司url
String url = spuEle.select("[target]").attr("href");
//获取招聘公司名字
Elements names = spuEle.select("span");
String name=names.get(0).text();
//获取招聘公司所在的位置
String location = spuEle.select("[class]").attr("title");
logger.info(topic,name,url,location);
RecruitmentInformation recruitmentInformation=new RecruitmentInformation();
recruitmentInformation.setCreated(new Date());
recruitmentInformation.setCompanylocation(location);
recruitmentInformation.setUrl(url);
recruitmentInformation.setRecruitmenttopic(topic);
recruitmentInformation.setRecruitmentcompany(name);
//8.保存数据库
itemService.save(recruitmentInformation);
logger.info("成功保存");
}
}
}
我们来讲解一下RecruitmentInformationTask.java里面的内容
首先我们注入了HttpUtils,RecruitmentInformationService这两个类,原因就是HttpUtils类,我们可以调用里面的doGetHtml方法(自定义的)来获取我们指定网站上面的前端代码,RecruitmentInformationService类我们可以调用里面的save方法来保存从前端代码处理完的数据保存到数据库中
如下所示
接着我们定义一个url就是我们要爬取的网页地址https://xy.51job.com/default-xs.php,然后就调用doGet方法获取该地址的前端代码,在调用parse方法解析该前端代码,最后输出 System.out.println(“数据抓取完成!”);主程序内容讲完后,接下来我们继续看 private void parse(String html) throws Exception{方法里面的内容
调用下面代码进行解析html
Document doc = Jsoup.parse(html);
我们在用logger打印该解析后的html代码打印到控制台,检查是否出现乱码,如出现肯定就是前端界面的字符编码集和后端调用方法的编码集不一样造成的,接下来就是最重要的内容处理前端的数据(获取前端我们想要的数据)我们看RecruitmentInformation 类中的信息可以知道,我们想要 获取招聘信息,公司的地址,公司所在地,招聘公司的名字,怎么获取呢?我们写了如下代码,
//2.获取招聘信息
        Elements spuEles = doc.select("div.ctxt > div.cell > div.e");
        logger.info(String.valueOf(spuEles));

        for (Element spuEle : spuEles){


            //获取招聘标题
            String topic = spuEle.select("[target]").attr("title");
            //获取招聘公司url
            String url = spuEle.select("[target]").attr("href");

            //获取招聘公司名字
            Elements names = spuEle.select("span");
            String name=names.get(0).text();


            //获取招聘公司所在的位置
            String location = spuEle.select("[class]").attr("title");
           logger.info(topic,name,url,location);
这些代码我们必须要打开前端界面进行检查,找到对应的标签 元素的信息,然后通过查阅API文档中的Elements 类来查看怎么使用
API文档如下
org.jsoup (jsoup Java HTML Parser 1.13.1 API)
org.jsoup.nodes.Element;
最后在写如下代码进行保存
 RecruitmentInformation recruitmentInformation=new RecruitmentInformation();

            recruitmentInformation.setCreated(new Date());
            recruitmentInformation.setCompanylocation(location);
            recruitmentInformation.setUrl(url);
            recruitmentInformation.setRecruitmenttopic(topic);
            recruitmentInformation.setRecruitmentcompany(name);

            //8.保存数据库
            itemService.save(recruitmentInformation);
            logger.info("成功保存");
我们运行主程序类,自动会执行@Scheduled注解下的代码,然后看见控制台成功打印数据抓取成功,然后去查看数据库中的招聘信息表,你就会发现数据爬取成功啦
@SpringBootApplication
@EnableScheduling //开启定时任务
public class SpringbootCrawlerJdApplication {


    public static void main(String[] args) {


        SpringApplication.run(SpringbootCrawlerJdApplication.class, args);
    }

}
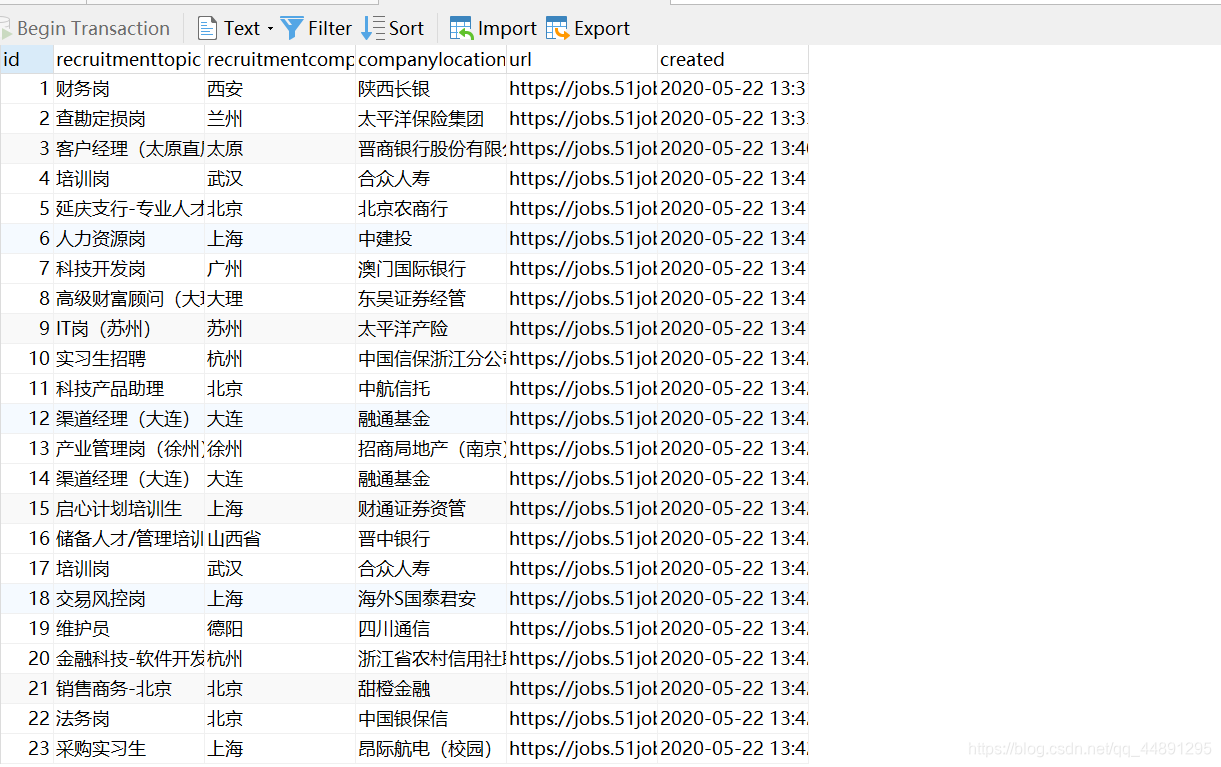
我获取到了八百多条数据,这里只展示一部分内容