参考:https://blog.csdn.net/guyuealian/article/details/80570120
参考:https://blog.csdn.net/qq_29462849/article/details/85262609
1、opencv3.4.4版本;opencv_contribut3.4.4 附加库版本
git下载或者axel下载;具体下载方法参考(TPU的opencv 编译)
链接:https://pan.baidu.com/s/1Lv8ekKtF8S_K8bjuQHk6CQ 密码:rq95
2 、python3的编译命令:(后续命令参考TPU的opencv 编译命令)
cmake -D BUILD_opencv_python3=YES -D BUILD_opencv_python2=NO -D CMAKE_BUILD_TYPE=RELEASE -D CMAKE_INSTALL_PREFIX=/usr/local -D INSTALL_C_EXAMPLES=ON -D INSTALL_PYTHON_EXAMPLES=ON -D BUILD_EXAMPLES=ON -D WITH_LIBV4L=ON -D WITH_GTK=ON -D PYTHON3_EXECUTABLE=/usr/bin/python3 -D PYTHON_INCLUDE_DIR=/usr/include/python3.5 -D PYTHON_LIBARARY=/usr/lib/python3.5/config-3.5m-x86_64-linux-gnu/libpython3.5m.so -D PYTHON3_NUMPY_INCLUDE_DIRS=/usr/local/lib/python3.5/dist-packages/numpy/core/include -D ENABLE_PRECOMPILED_HEADERS=ON -D OPENCV_ENABLE_NONFREE=ON -D OPENCV_EXTRA_MODULES_PATH=../../opencv_contrib-3.4.4/modules/ ..
python2的编译命令:
sudo cmake -D BUILD_opencv_python3=NO -D BUILD_opencv_python2=YES -D CMAKE_BUILD_TYPE=RELEASE -D CMAKE_INSTALL_PREFIX=/usr/local -D INSTALL_C_EXAMPLES=ON -D INSTALL_PYTHON_EXAMPLES=ON -D BUILD_EXAMPLES=ON -D WITH_LIBV4L=ON -D WITH_GTK=ON -D PYTHON2_EXECUTABLE=/usr/bin/python2 -D PYTHON_INCLUDE_DIR=/usr/include/python2.7 -D PYTHON_LIBARARY=/usr/lib/python2.7/config-x86_64-linux-gnu/libpython2.7m.so -D PYTHON2_NUMPY_INCLUDE_DIRS=/usr/local/lib/python2.7/dist-packages/numpy/core/include -D ENABLE_PRECOMPILED_HEADERS=ON -D OPENCV_ENABLE_NONFREE=ON -D OPENCV_EXTRA_MODULES_PATH=../../opencv_contrib-3.4.4/modules/ -D CUDA_GENERATION=Kepler ..
上述是编译成功的opencv ; (python2 和python3都可以使用cv2,虽然并未使用python)
project(object_tracker)
cmake_minimum_required(VERSION 2.8)
aux_source_directory(. SRC_LIST)

#添加OPENCV库
set(CMAKE_CXX_STANDARD 11)
find_package(OpenCV 3.4.4 REQUIRED)

#显示OpenCV_INCLUDE_DIRS的值
message(${OpenCV_INCLUDE_DIRS})

set(ignoreMe "${FOO}${BAZ}${BAR}")
add_executable(${PROJECT_NAME} ${SRC_LIST})
target_link_libraries(object_tracker ${OpenCV_LIBS})
Cmakefile.txt 的文件
#include<opencv2/opencv.hpp>
#include<opencv2/dnn.hpp>
#include <iostream>
#include<map>
#include<string>
#include<time.h>

using namespace std;
using namespace cv;

const size_t inWidth = 320;
const size_t inHeight = 300;
const float WHRatio = inWidth / (float)inHeight;
const char* classNames[]= {"background", "person", "bicycle", "car", "motorcycle", "airplane", "bus", "train", "truck", "boat", "traffic light",
"fire hydrant", "background", "stop sign", "parking meter", "bench", "bird", "cat", "dog", "horse", "sheep", "cow", "elephant", "bear", "zebra", "giraffe", "background", "backpack",
"umbrella", "background", "background", "handbag", "tie", "suitcase", "frisbee","skis", "snowboard", "sports ball", "kite", "baseball bat","baseball glove", "skateboard", "surfboard", "tennis racket",
"bottle", "background", "wine glass", "cup", "fork", "knife", "spoon","bowl", "banana",  "apple", "sandwich", "orange","broccoli", "carrot", "hot dog",  "pizza", "donut",
"cake", "chair", "couch", "potted plant", "bed", "background", "dining table", "background", "background", "toilet", "background","tv", "laptop", "mouse", "remote", "keyboard",
"cell phone", "microwave", "oven", "toaster", "sink", "refrigerator", "background","book", "clock", "vase", "scissors","teddy bear", "hair drier", "toothbrush"};

int main()
{
    clock_t start, finish;
    double totaltime;
    Mat frame;
    VideoCapture capture;
    capture.open("/home/ubuntu/Flying_pets/software/object_tracker/a.mp4");
    String weights = "/home/ubuntu/Flying_pets/software/object_tracker/ssd_mobilenet_v2_coco_2018_03_29.pb";
    String prototxt = "/home/ubuntu/Flying_pets/software/object_tracker/ssd_mobilenet_v2_coco_2018_03_29.pbtxt";
    dnn::Net net = cv::dnn::readNetFromTensorflow(weights, prototxt);
    double total_fps = capture.get(CV_CAP_PROP_FRAME_COUNT);
    while (capture.read(frame))
    {
        start = clock();
        Size frame_size = frame.size();

        Size cropSize;
        if (frame_size.width / (float)frame_size.height > WHRatio)
        {
            cropSize = Size(static_cast<int>(frame_size.height * WHRatio),
                frame_size.height);
        }
        else
        {
            cropSize = Size(frame_size.width,
                static_cast<int>(frame_size.width / WHRatio));
        }

        Rect crop(Point((frame_size.width - cropSize.width) / 2,
            (frame_size.height - cropSize.height) / 2),
            cropSize);


        cv::Mat blob = cv::dnn::blobFromImage(frame, 1 , Size(300, 300));
        //cout << "blob size: " << blob.size << endl;

        net.setInput(blob);
        Mat output = net.forward();
        //cout << "output size: " << output.size << endl;

        Mat detectionMat(output.size[2], output.size[3], CV_32F, output.ptr<float>());

        frame = frame(crop);
        float confidenceThreshold = 0.50;
        for (int i = 0; i < detectionMat.rows; i++)
        {
            float confidence = detectionMat.at<float>(i, 2);

            if (confidence > confidenceThreshold)
            {
                size_t objectClass = (size_t)(detectionMat.at<float>(i, 1));

                int xLeftBottom = static_cast<int>(detectionMat.at<float>(i, 3) * frame.cols);
                int yLeftBottom = static_cast<int>(detectionMat.at<float>(i, 4) * frame.rows);
                int xRightTop = static_cast<int>(detectionMat.at<float>(i, 5) * frame.cols);
                int yRightTop = static_cast<int>(detectionMat.at<float>(i, 6) * frame.rows);

                ostringstream ss;
                ss << confidence;
                String conf(ss.str());

                Rect object((int)xLeftBottom, (int)yLeftBottom,
                    (int)(xRightTop - xLeftBottom),
                    (int)(yRightTop - yLeftBottom));

                rectangle(frame, object, Scalar(0, 255, 0), 2);
                //cout << "objectClass:" << objectClass << endl;
                String label = String(classNames[objectClass]) + ": " + conf;
                //cout << "label"<<label << endl;
                int baseLine = 0;
                Size labelSize = getTextSize(label, FONT_HERSHEY_SIMPLEX, 0.5, 1, &baseLine);
                rectangle(frame, Rect(Point(xLeftBottom, yLeftBottom - labelSize.height),
                                    Size(labelSize.width, labelSize.height + baseLine)),
                                    Scalar(0, 255, 0), CV_FILLED);
                putText(frame, label, Point(xLeftBottom, yLeftBottom),FONT_HERSHEY_SIMPLEX, 0.5, Scalar(0, 0, 0));
            }
        }
        finish = clock();
        totaltime = finish - start;
        cout << "Frames per second   : " << totaltime/total_fps << endl;
        namedWindow("result", 0);
        imshow("result", frame);
        char c = waitKey(5);
        if (c == 27)
        { // ESC退出
            break;
        }
    }
    capture.release();
    waitKey(0);
    return 0;
}
main.cpp 主文件
opencv 调用tensorflow的模型进行目标识别;
链接:https://pan.baidu.com/s/1gk6rBeTEZG_oJ6wV6p92FQ 密码:dgfh
模型的生成暂时只支持两个,v3争取早早尝试出来;
模型的生成过程:
2 执行opencv3.4中的脚本文件+tensorflow社区的配置文件:
(frozen_inference_graph.pb被改名为ssd_mobilenet_v2_coco_2018_03_29.pb)
ubuntu@ubuntu:~/Downloads/opencv-3.4.4/samples/dnn$ python3 tf_text_graph_ssd.py --input ../../../ssd_mobilenet_v2_coco_2018_03_29/ssd_mobilenet_v2_coco_2018_03_29.pb --config ../../../ssd_mobilenet_v2_coco_2018_03_29/pipeline.config --output ../../../ssd_mobilenet_v2_coco_2018_03_29/ssd_mobilenet_v2_coco_2018_03_29.pbtxt
Number of classes: 90
Number of layers: 6
Scale: [0.200000-0.950000]
Aspect ratios: [1.0, 2.0, 0.5, 3.0, 0.333299994469]
Reduce boxes in the lowest layer: True
box predictor: convolutional
Input image size: 300x300
ubuntu@ubuntu:~/Downloads/opencv-3.4.4/samples/dnn$
然后在代码写入这两句:
String weights = "/home/ubuntu/Flying_pets/software/object_tracker/ssd_mobilenet_v2_coco_2018_03_29.pb";
String prototxt = "/home/ubuntu/Flying_pets/software/object_tracker/ssd_mobilenet_v2_coco_2018_03_29.pbtxt";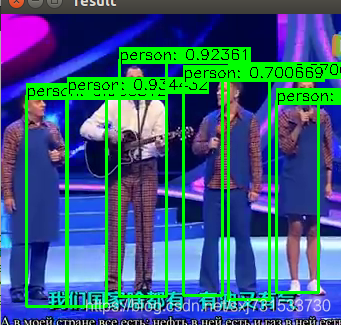
视频的识别效果还可以,完全可以实时运行
————————————————————————————————————
正在尝试转化ssd_mobilenet_v3_small_coco模型
相关博客提出,从pb模型转dnn模型不能存在三类节点:
# if pb include div,sub,argmax  ,the opencv can't using pb models
import tensorflow as tf
import os
import re
out_path='./'
model_dir = './'
model_name = 'ssd_mobilenet_v3_small_coco_2019_08_14.pb'

def create_graph():
    with tf.gfile.FastGFile(os.path.join(out_path+  model_name), 'rb') as f:
        graph_def = tf.GraphDef()
        graph_def.ParseFromString(f.read())
        tf.import_graph_def(graph_def, name='')

create_graph()
tensor_name_list = [tensor.name for tensor in tf.get_default_graph().as_graph_def().node]
for tensor_name in tensor_name_list:
    if re.search( r'div', tensor_name, re.M|re.I):
       print (tensor_name)
    elif re.search( r'sub', tensor_name, re.M|re.I):
       print (tensor_name)
    elif re.search( r'argmax', tensor_name, re.M|re.I):
       print (tensor_name)
check.py 测试通过,避免了一个博主提出的质疑坑;
模型生成pbtxt 虽然生成成功,仍然无法执行,还是存在问题,正在调查,已经向opencv提交了疑问~自己研究中~~~