这个问题我是看了网上好多博客,自己也踩了好多坑才搞定的,看我这一篇文章,可能不能完全解决你们的问题,但是希望对你们有所帮助!
python线上训练模型比较方便,有时候想要在C++环境下调用python训练好的模型,应该怎么做呢?折腾了好几天,终于搞定了!
一,第一步,训练保存模型
贴自己源代码太复杂,贴个简化版,表明主要意思就行,别人做的东西不可能和你的完全一样,需要在理解别人意思的基础上,对自己的代码加以更改。
注意看下面代码中的注释!
import tensorflow as tf
import os
from tensorflow.python.framework import graph_util

pb_file_path = os.getcwd()   #获取当前代码路径

with tf.Session(graph=tf.Graph()) as sess:  #代码结构一定要在with里面写,不能写在with上面
    x = tf.placeholder(tf.int32, name='x')   #输入名称,此处是成败的关键
    y = tf.placeholder(tf.int32, name='y')   #输入名称,此处是成败的关键
    b = tf.Variable(1, name='b')
    xy = tf.multiply(x, y)
    # 这里的输出需要加上name属性
    op = tf.add(xy, b, name='op_to_store')    #输出名称,此处是成败的关键

    sess.run(tf.global_variables_initializer())

    # convert_variables_to_constants 需要指定output_node_names,list(),可以多个
    constant_graph = graph_util.convert_variables_to_constants(sess, sess.graph_def, ['x','y','op_to_store'])  #此处务必和前面的输入输出对应上,其他的不用管

    # 测试 OP
    feed_dict = {x: 10, y: 3}
    print(sess.run(op, feed_dict))

    # 写入序列化的 PB 文件
    with tf.gfile.FastGFile(pb_file_path+'model.pb', mode='wb') as f: #模型的名字是model.pb
        f.write(constant_graph.SerializeToString())

    # 输出
    # INFO:tensorflow:Froze 1 variables.
    # Converted 1 variables to const ops.
    # 31
二,第二步,加载复现模型
注意看下面代码中的注释!
import tensorflow as tf
import os
from tensorflow.python.platform import gfile

pb_file_path = os.getcwd() #获取当前代码路径
sess = tf.Session()
with gfile.FastGFile(pb_file_path + 'model.pb', 'rb') as f: #加载模型
    graph_def = tf.GraphDef()
    graph_def.ParseFromString(f.read())
    sess.graph.as_default()
    tf.import_graph_def(graph_def, name='')  # 导入计算图

# 需要有一个初始化的过程
sess.run(tf.global_variables_initializer())

# 需要先复原变量
print(sess.run('b:0'))
# 1

#下面三句,是能否复现模型的关键
# 输入
input_x = sess.graph.get_tensor_by_name('x:0')  #此处的x一定要和之前保存时输入的名称一致!
input_y = sess.graph.get_tensor_by_name('y:0')  #此处的y一定要和之前保存时输入的名称一致!
op = sess.graph.get_tensor_by_name('op_to_store:0')  #此处的op_to_store一定要和之前保存时输出的名称一致!

ret = sess.run(op, feed_dict={input_x: 5, input_y: 5})
print(ret)
# 输出 26
按上面第一第二步就可以实现保存和加载模型了。
注:上面的代码只是简化版的例子,只是为了演示保存和加载模型,第三步开始,我并没有用上面的代码
三,第三步,C++调用
a)新建MFC或者控制台程序,省略
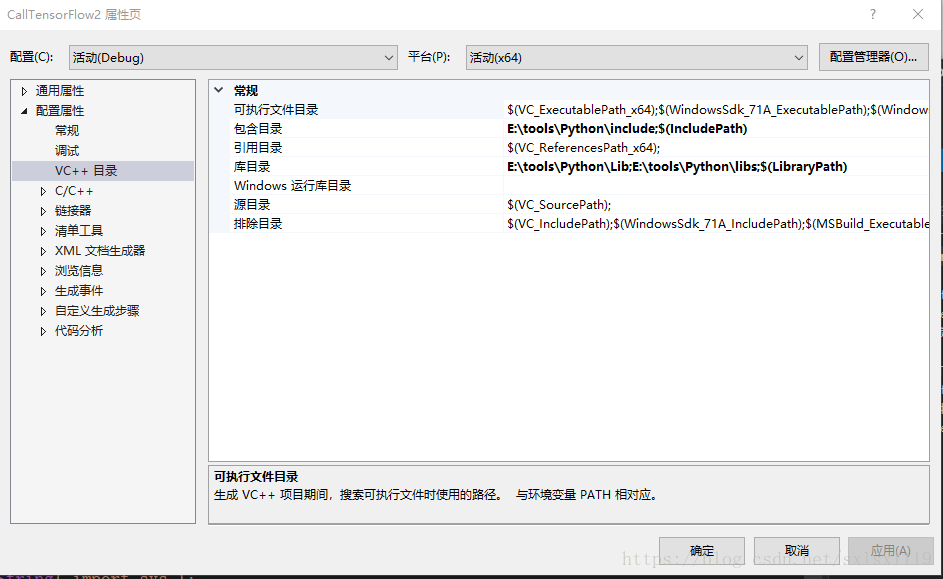
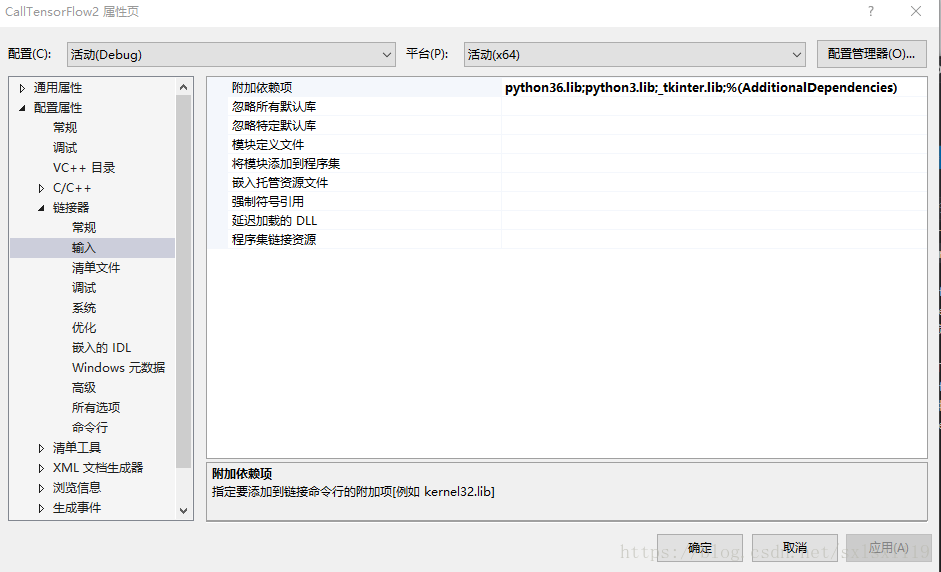
b)配置环境,如下,主要是include,lib,链接器处的配置等
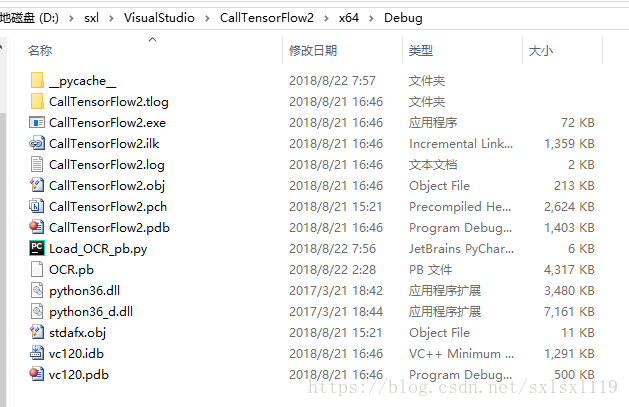
c)将python36_d.dll,python36.dll,保存的pb模型和调用模型的xx.py文件都放到debug文件夹内
d)下面是Load_OCR_pb.py里面的源代码,只需要关注def test_one_image(jpg_path)函数就行,其他的都是辅助函数,你们不需要用,注意看代码注释
import tensorflow as tf
import  numpy as np
import PIL.Image as Image
import cv2
# from skimage import transform
W = 64
H = 64

#可以读取带中文路径的图
def cv_imread(file_path,type=0):
    cv_img=cv2.imdecode(np.fromfile(file_path,dtype=np.uint8),-1)
    # print(file_path)
    # print(cv_img.shape)
    # print(len(cv_img.shape))
    if(type==0):
        if(len(cv_img.shape)==3):
            cv_img = cv2.cvtColor(cv_img, cv2.COLOR_BGR2GRAY)
    return cv_img

#叠加两张图片,输入皆是黑白图,img1是底层图片,img2是上层图片,返回叠加后的图片
def ImageOverlay(img1,img2):
    # 把logo放在左上角,所以我们只关心这一块区域
    h = img1.shape[0]
    w = img1.shape[1]
    rows = img2.shape[0]
    cols = img2.shape[1]
    roi = img1[int((h - rows) / 2):rows + int((h - rows) / 2), int((w - cols) / 2):cols + int((w - cols) / 2)]
    # 创建掩膜
    img2gray = img2.copy()
    ret, mask = cv2.threshold(img2gray, 0, 255, cv2.THRESH_OTSU)
    mask_inv = cv2.bitwise_not(mask)
    # 保留除logo外的背景
    img1_bg = cv2.bitwise_and(roi, roi, mask=mask)
    dst = cv2.add(img1_bg, img2)  # 进行融合
    img1[int((h - rows) / 2):rows + int((h - rows) / 2),int((w - cols) / 2):cols + int((w - cols) / 2)] = dst  # 融合后放在原图上
    return img1

# 处理白边
#找到上下左右的白边位置
#剪切掉白边
#二值化
#将图像放到64*64的白底图像中心
def HandWhiteEdges(img):
    ret, thresh1 = cv2.threshold(img, 249, 255, cv2.THRESH_BINARY)
    # OpenCV定义的结构元素
    kernel = cv2.getStructuringElement(cv2.MORPH_RECT, (2, 2))
    # 膨胀图像
    thresh1 = cv2.dilate(thresh1, kernel)
    row= img.shape[0]
    col = img.shape[1]
    tempr0 = 0    #横上
    tempr1 = 0    #横下
    tempc0 = 0    #竖左
    tempc1 = 0    #竖右
    # 765 是255+255+255,如果是黑色背景就是0+0+0,彩色的背景,将765替换成其他颜色的RGB之和,这个会有一点问题,因为三个和相同但颜色不一定同
    for r in range(0, row):
        if thresh1.sum(axis=1)[r] != 255 * col:
            tempr0 = r
            break

    for r in range(row - 1, 0, -1):
        if thresh1.sum(axis=1)[r] != 255 * col:
            tempr1 = r
            break

    for c in range(0, col):
        if thresh1.sum(axis=0)[c] != 255 * row:
            tempc0 = c
            break

    for c in range(col - 1, 0, -1):
        if thresh1.sum(axis=0)[c] != 255 * row:
            tempc1 = c
            break

    # 创建全白图片
    imageTemp = np.zeros((64, 64, 3), dtype=np.uint8)
    imageTemp = cv2.cvtColor(imageTemp, cv2.COLOR_BGR2GRAY)
    imageTemp.fill(255)

    if(tempr1-tempr0==0 or tempc1-tempc0==0):   #空图
        return imageTemp    #返回全白图

    new_img = img[tempr0:tempr1, tempc0:tempc1]
    #二值化
    retval,binary = cv2.threshold(new_img,0,255,cv2.THRESH_OTSU)

    #叠加两幅图像
    rstImg=ImageOverlay(imageTemp, binary)
    return rstImg

#字符图像的特征提取方法
#要求:1.无关图像大小;2.输入图像默认为灰度图;3.参数只有输入图像
def SimpleGridFeature(image):
    '''
    @description:提取字符图像的简单网格特征
    @image:灰度字符图像
    @return:长度为64字符图像的特征向量feature
    @author:
    '''
    new_img = HandWhiteEdges(image)  # 白边处理
    #图像大小归一化
    image = cv2.resize(new_img,(64,64))
    img_h = image.shape[0]
    img_w = image.shape[1]

    #二值化
    retval,binary = cv2.threshold(image,0,255,cv2.THRESH_OTSU)
    #计算网格大小
    grid_size=16
    grid_h = binary.shape[0]/grid_size
    grid_w = binary.shape[1]/grid_size
    #定义特征向量
    feature = np.zeros(grid_size*grid_size)
    for j in range(grid_size):
        for i in range(grid_size):
            grid = binary[int(j*grid_h):int((j+1)*grid_h),int(i*grid_w):int((i+1)*grid_w)]
            feature[j*grid_size+i] = grid[grid==0].size
    return feature


def test_one_image(jpg_path):
    print("进入模型")
    with tf.Graph().as_default():  #
        output_graph_def = tf.GraphDef()  #
        pb_file_path = r"D:\\sxl\\VisualStudio\\CallTensorFlow2\\x64\Debug\\OCR.pb"  #模型路径
        with open(pb_file_path, "rb") as f:   #读取模型
            output_graph_def.ParseFromString(f.read())  # rb
            _ = tf.import_graph_def(output_graph_def, name="")
        with tf.Session() as sess:
            tf.global_variables_initializer().run()

            #我保存OCR模型时,将输入的名称命名为inputs,将输出命名为outputs,这个需要根据自己的代码更改!
            #也是成败的关键!
            input_x = sess.graph.get_tensor_by_name("inputs:0")  ####这个和之前保存模型时说的一样
            print(input_x)
            out_label = sess.graph.get_tensor_by_name("outputs:0")####这个和之前保存模型时说的一样
            print(out_label)
            print("开始读图")
            #这个npy文件,我是为了读取我需要的字符数组,可以不管它
            char_set = np.load(r"E:/sxl_Programs/Python/ANN/npy/ImgHanZiName653.npy")
            char_set = char_set.tolist()  #将读取的字符数组转化成列表
            # print(char_set)

            img = cv_imread(jpg_path, 0) #读图
            feature = SimpleGridFeature(img).reshape(-1, 256) #将图片转换成256*1的列表(提取特征用的)

            # plt.figure("fig1")
            # plt.imshow(img)
            img = img * (1.0 / 255)
            img_out_softmax = sess.run(out_label, feed_dict={input_x: feature}) #预测,返回的是x维的float数据,x是你保存模型时定义的输出维度

            # print ("img_out_softmax:",img_out_softmax)
            prediction_labels = np.argmax(img_out_softmax, axis=1) #返回该列表中最大值的下标
            print("prediction_labels:", prediction_labels)
            print("prediction_char:", char_set[prediction_labels[0]])#根据下标,输出该下标对应的字符
            # plt.show()

    print("结束!")
e) 下面是C++中 CallTensorFlow2.cpp的代码,还是注意看注释。
// CallTensorFlow2.cpp : 定义控制台应用程序的入口点。
//

#include "stdafx.h"
#include<iostream>
#include <Python.h>
#include<windows.h>
using namespace std;
void testImage(char * path) //执行函数
{
    try{
        Py_Initialize();
        PyEval_InitThreads();
        PyObject*pFunc = NULL;
        PyObject*pArg = NULL;
        PyObject* module = NULL;
        //下面两句PyRun_SimpleString是为了防止C++的exe文件和python的py文件路径不一致而写的绝对路径。
        PyRun_SimpleString("import sys");
        PyRun_SimpleString("sys.path.append(r'D:\sxl\VisualStudio\CallTensorFlow2\x64\Debug\')");

        //下面这句可能是个坑,你可能会纠结它的返回值为什么总是空的?我在最后列一下可能的原因。
        module = PyImport_ImportModule("Load_OCR_pb");//myModel:Python文件名
        if (!module) {
            printf("cannot open module!");
            Py_Finalize();
            return;
        }
        pFunc = PyObject_GetAttrString(module, "test_one_image");//test_one_image:Python文件中的函数名,这里的"test_one_image",一定要和读取pb模型的Load_OCR_pb.py里面的函数名称一致,重要!
        if (!pFunc) {
            printf("cannot open FUNC!");
            Py_Finalize();
            return;
        }
        //开始调用model
        pArg = Py_BuildValue("(s)", path);
        if (module != NULL) {
            PyGILState_STATE gstate;
            gstate = PyGILState_Ensure();
            PyEval_CallObject(pFunc, pArg);
            PyGILState_Release(gstate);
        }
    }
    catch (exception& e)
    {
        cout << "Standard exception: " << e.what() << endl;
    }
}


int main()
{
    char * path = "D:\\1.jpg"; //图片路径
    testImage(path); //调用函数
    system("pause");
    return 0;
}
四,按上面三步操作完,大部分情况还是得不到正确结果。因为里面有好多坑,错一个都不行,总结一下可能的坑。
1)第一步中,你的“流程”代码写在with tf.Session(graph=tf.Graph()) as sess:里面了吗?
with tf.Session(graph=tf.Graph()) as sess:  #代码结构一定要在with里面写,不能写在with上面
    x = tf.placeholder(tf.int32, name='x')   #输入名称,此处是成败的关键
    y = tf.placeholder(tf.int32, name='y')   #输入名称,此处是成败的关键
    b = tf.Variable(1, name='b')
    xy = tf.multiply(x, y)
    # 这里的输出需要加上name属性
    op = tf.add(xy, b, name='op_to_store')    #输出名称,此处是成败的关键
2)输入输出名称保存和加载是否一致?
保存模型中代码
    x = tf.placeholder(tf.int32, name='x')   #输入名称,此处是成败的关键
    y = tf.placeholder(tf.int32, name='y')   #输入名称,此处是成败的关键
    b = tf.Variable(1, name='b')
    xy = tf.multiply(x, y)
    # 这里的输出需要加上name属性
    op = tf.add(xy, b, name='op_to_store')    #输出名称,此处是成败的关键
加载模型中代码
#下面三句,是能否复现模型的关键
# 输入
input_x = sess.graph.get_tensor_by_name('x:0')  #此处的x一定要和之前保存时输入的名称一致!
input_y = sess.graph.get_tensor_by_name('y:0')  #此处的y一定要和之前保存时输入的名称一致!
op = sess.graph.get_tensor_by_name('op_to_store:0')  #此处的op_to_store一定要和之前保存时输出的名称一致!
3)C++中路径配置是否正确?include, lib ,链接器处
4)cpp文件中函数名称和py中的函数名称是否一致
5)加载模型的py文件,xx.pb,dll文件是否放在了debug或者release路径下?
6)最后一个,如果上面的你都检查了,而且没问题,但是加载模型时总是提示”cannot open module!”
那么恭喜你,兄弟,你跟我犯的错误是一样的!
怎么解决?
检查加载模型py文件里你import了哪些模块,我import的模块如下:
import tensorflow as tf
import  numpy as np
import PIL.Image as Image
import cv2
# from skimage import transform
进入cmd,用pip install xxx,把上面的模块都装一遍(之前装了就算了,主要是检查没装的),我装了TensorFlow模块后,问题解决了,不知道你们能不能解决!