源码链接:https://github.com/smzhldr/AGLFramework
一、前言
在安卓端提到OpenGL,那一定得提到GLSurfaceView,应为GLSurfaceView内部分封装好了OpenGL(EGL)环境,只需要实现几个接口就可以了,比起我们自己搭建EGL环境要简单方便的多。
我们先预习、复习一下OpenGL的简单使用,详细教程推荐 《OpenGL ES 3.0编程指南》,此处我们只做简单复习,为下一步工作做好铺垫。
一、初探GLSurfaceView
顾名思义,GLSurfaceView也是用来显示内容的,所以使用上基本与普通View一致,区别在于渲染工作需要手动完成。
- GLSurfaceView初始化:
在xml布局文件中使用:
 <android.opengl.GLSurfaceView
        android:layout_width="match_parent"
        android:layout_height="match_parent" />
也可以在代码中动态创建:
//参数为Context类型
GLSurfaceView glSurfaceView = new GLSurfaceView(this)
有了GLSurfaceView对象之后就好办了,初始化如下:
/*
*设置OpenGL ES 版本,一般设备都支持OpenGL ES 2.0
*设置之前检查一下(百度)更保险
*/
glSurfaceView.setEGLContextClientVersion(2);

/*
*此处的renderer对象实现了GLSurfaceView.Renderer接口
*/
glSurfaceView.setRenderer(renderer);

/*
*设置GLSurfaceView的渲染方式
*/
glSurfaceView.setRenderMode(GLSurfaceView.RENDERMODE_WHEN_DIRTY);
- GLSurfaceView.Renderer渲染接口初探:
class MyRender implements GLSurfaceView.Renderer {

    @Override
    public void onSurfaceCreated(GL10 gl, EGLConfig config) {

    }

    @Override
    public void onSurfaceChanged(GL10 gl, int width, int height) {

    }

    @Override
    public void onDrawFrame(GL10 gl) {

    }
}
几乎所有的工作都是在这三个接口中完成的,根据名字判断,分别为创建,视口调整,渲染。
以后的大部分工作也都是要在这三个接口中完成的。
二、渲染内容到屏幕
我们如果有一定的OpenGL基础,能够更好的理解渲染工作,而在相机类开发中,我们只需要理解将纹理渲染到屏幕的过程就可以了,二维纹理可以理解为一张图片,将图片时时贴到屏幕上就可以预览摄像头输入内容了。
下面以渲染一张图片到屏幕为例:
Renderer的内容为:
 @Override
    public void onSurfaceCreated(GL10 gl, EGLConfig config) {
  		//初始化OpenGL程序
        glPosition = GLES20.glGetAttribLocation(mProgram, "vPosition");
        glTextCoordinate = GLES20.glGetAttribLocation(mProgram, "atextureCoordinate");
        glTexture = GLES20.glGetUniformLocation(mProgram, "uTexture");
    }

    @Override
    public void onSurfaceChanged(GL10 gl, int width, int height) {
    	//调整视口
        GLES20.glViewport(0, 0, width, height);
    }

    @Override
    public void onDrawFrame(GL10 gl) {

		//绑定图片生成的纹理
     	GLES20.glBindTexture(GL_TEXTURE_2D, textureId);
		//将纹理地址传给OpenGL程序
        GLES20.glUniform1i(glTexture, 0);

        //将顶点坐标传给OpenGL程序
        vertexBuffer.clear();
        vertexBuffer.put(cube).position(0);
   		GLES20.glEnableVertexAttribArray(glPosition);
        GLES20.glVertexAttribPointer(glPosition, 2, GLES20.GL_FLOAT, false, 0, vertexBuffer);

 		//将纹理坐标传给OpenGL程序
        textureBuffer.clear();
        textureBuffer.put(textureCoord).position(0);
        GLES20.glEnableVertexAttribArray(glTextCoordinate);
        GLES20.glVertexAttribPointer(glTextCoordinate, 2, GLES20.GL_FLOAT, false, 0, textureBuffer);

		//开始绘制
        glDrawArrays(GL_TRIANGLE_STRIP, 0, 4);
    }
可以说绘制流程还是比较清晰的,执行这段代码,就能将图片通过OpenGL渲染到屏幕了
三、视口变换与方向转化
至此为止,加载显示出来的图片是反向倒立,因为OpenGL的坐标要求图片的坐标起始点在下面,这就刚好与图片本身的像素排列上下相反,这就要求主动的进行方向转化,可以用矩阵转换,也可以用坐标点进行转换,我们的例子中我们用选装坐标点来进行旋转图像的。
因为屏幕的坐标类似于1080*1920之类的,而OpenGL顶点坐标位于-1,1,纹理坐标位于0,1,这就要求我们进一步转化,这个过程称为归一化,也就是我们要将现有的坐标转化为OpenGL能识别的坐标,这个过程称为归一化,可以通过视口变化,也就是矩阵运算完成,也可以自行计算。在本例中,我们用视口变化的方法完成的,关于视口变化我们可以查阅资料加深巩固,本例中操作如下。
在onSurfaceChanged中生成视口变换矩阵
    final float aspectRatio = width > height ? (float) width / (float) height : (float) height / (float) width;
            if (width > height) {
                orthoM(projectionMatrix, 0, -aspectRatio, aspectRatio, -1f, 1f, -1f, 1f);
            } else {
                orthoM(projectionMatrix, 0, -1f, 1f, -aspectRatio, aspectRatio, -1f, 1f);
            }
将视口变换矩阵传入shader中
GLES20.glUniformMatrix4fv(glUniformMatrix, 1, false, projectionMatrix, 0);
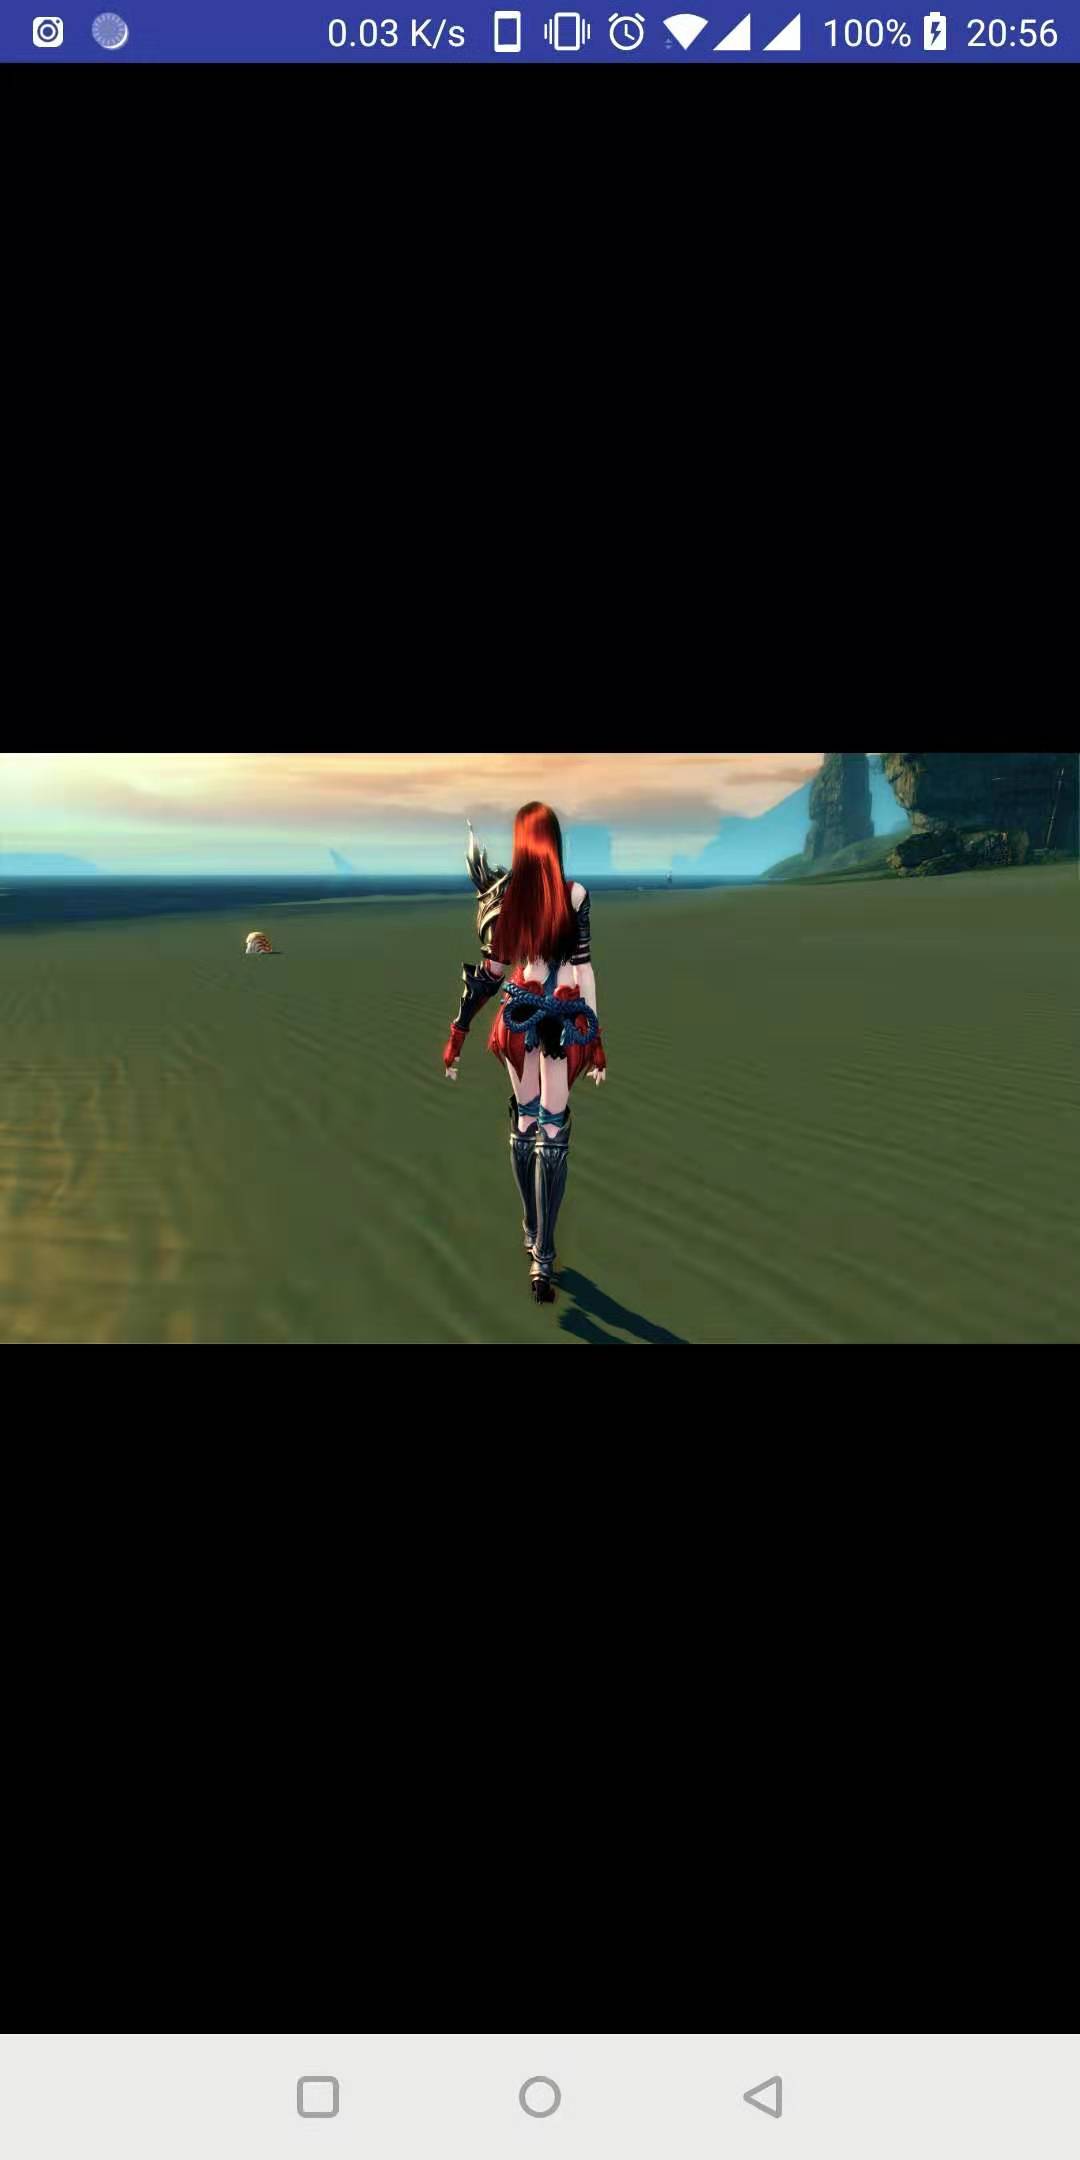
完成上述步骤后就可以看到相应的渲染结果了,本例中的显示结果如下:
四、示例完整代码
下面是程序完成代码,复制粘贴之后就可以运行:
public class RendererPicActivity extends Activity {

    GLSurfaceView glSurfaceView;

    @Override
    protected void onCreate(@Nullable Bundle savedInstanceState) {
        super.onCreate(savedInstanceState);
        glSurfaceView = new GLSurfaceView(this);
        glSurfaceView.setEGLContextClientVersion(2);
        glSurfaceView.setRenderer(new MyRenderer());
        glSurfaceView.setRenderMode(GLSurfaceView.RENDERMODE_WHEN_DIRTY);
        setContentView(glSurfaceView);

    }

    @Override
    protected void onPause() {
        super.onPause();
        glSurfaceView.onPause();
    }


    @Override
    protected void onResume() {
        super.onResume();
        glSurfaceView.onResume();
    }

    private class MyRenderer implements GLSurfaceView.Renderer {

        static final String NO_FILTER_VERTEX_SHADER = "" +
                "attribute vec4 position;\n" +
                "attribute vec4 inputTextureCoordinate;\n" +
                "uniform mat4 u_Matrix;" +
                " \n" +
                "varying vec2 textureCoordinate;\n" +
                " \n" +
                "void main()\n" +
                "{\n" +
                "    gl_Position = u_Matrix*vec4(position.x,position.y,position.z,1.0f);\n" +
                "    textureCoordinate = inputTextureCoordinate.xy;\n" +
                "}";

        static final String NO_FILTER_FRAGMENT_SHADER = "" +
                "precision mediump float;"+
                "varying highp vec2 textureCoordinate;\n" +
                " \n" +
                "uniform sampler2D inputImageTexture;\n" +
                " \n" +
                "void main()\n" +
                "{\n" +
                "     gl_FragColor = vec4(texture2D(inputImageTexture, textureCoordinate).rgb, 1.0);\n" +
                "}";

        private final float cube[] = {
                -1.0f, -1.0f,
                1.0f, -1.0f,
                -1.0f, 1.0f,
                1.0f, 1.0f,
        };
        private float[] textureCords = {
                0.0f, 1.0f,
                1.0f, 1.0f,
                0.0f, 0.0f,
                1.0f, 0.0f
        };

        private int programId;
        private FloatBuffer cubeBuffer = ByteBuffer.allocateDirect(8 * 4).order(ByteOrder.nativeOrder()).asFloatBuffer();
        private FloatBuffer textureBuffer = ByteBuffer.allocateDirect(8 * 4).order(ByteOrder.nativeOrder()).asFloatBuffer();
        private int glAttrPosition;
        private int glAttrTextureCoordinate;
        private int glUniformTexture;
        private int textureId;
        private int glUniformMatrix;

        private float[] projectionMatrix = new float[16];

        @Override
        public void onSurfaceCreated(GL10 gl, EGLConfig config) {
            programId = OpengGlUtils.loadProgram(NO_FILTER_VERTEX_SHADER, NO_FILTER_FRAGMENT_SHADER);
            glAttrPosition = GLES20.glGetAttribLocation(programId, "position");
            glAttrTextureCoordinate = GLES20.glGetAttribLocation(programId, "inputTextureCoordinate");
            glUniformTexture = GLES20.glGetUniformLocation(programId, "inputImageTexture");
            glUniformMatrix = glGetUniformLocation(programId, "u_Matrix");

            final BitmapFactory.Options options = new BitmapFactory.Options();
            options.inScaled = false;
            final Bitmap bitmap = BitmapFactory.decodeResource(RendererPicActivity.this.getResources(), R.drawable.beauty, options);
            textureId = OpengGlUtils.loadTexture(bitmap, GlUtils.NO_TEXTURE);
        }


        @Override
        public void onSurfaceChanged(GL10 gl, int width, int height) {
            GLES20.glViewport(0, 0, width, height);
            final float aspectRatio = width > height ? (float) width / (float) height : (float) height / (float) width;
            if (width > height) {
                orthoM(projectionMatrix, 0, -aspectRatio, aspectRatio, -1f, 1f, -1f, 1f);
            } else {
                orthoM(projectionMatrix, 0, -1f, 1f, -aspectRatio, aspectRatio, -1f, 1f);
            }
        }

        @Override
        public void onDrawFrame(GL10 gl) {
            GLES20.glUseProgram(programId);
            GLES20.glBindTexture(GL_TEXTURE_2D, textureId);

            GLES20.glUniform1i(glUniformTexture, 0);
            GLES20.glUniformMatrix4fv(glUniformMatrix, 1, false, projectionMatrix, 0);

            cubeBuffer.clear();
            cubeBuffer.put(cube).position(0);
            GLES20.glEnableVertexAttribArray(glAttrPosition);
            GLES20.glVertexAttribPointer(glAttrPosition, 2, GLES20.GL_FLOAT, false, 0, cubeBuffer);

            textureBuffer.clear();
            textureBuffer.put(textureCords).position(0);
            GLES20.glEnableVertexAttribArray(glAttrTextureCoordinate);
            GLES20.glVertexAttribPointer(glAttrTextureCoordinate, 2, GLES20.GL_FLOAT, false, 0, textureBuffer);

            GLES20.glDrawArrays(GL_TRIANGLE_STRIP, 0, 4);
        }
    }
}
还涉及到两个问题,OpengGlUtils.loadProgram() 和OpengGlUtils.loadTexture(),这两个方法属于封装方法,就是编译shader和加载纹理,作用分别是编译链接OpenGL程序和将bitmap转换成纹理,百度就可以完成,在源码链接https://github.com/smzhldr/AGLFramework 里有具体的实现。
好了,我们已经具备将一张图片渲染到屏幕的能力了,相机的渲染只不过是时时渲染罢了,看到此处,是不是对相机的渲染已经胸有成竹了呢?