文章目录
- 12 Redis
- 12.1 spring-data-redis项目简介
- 12.1.1 spring-data-redis项目的设计
- 12.1.2
RedisTemplate - 12.1.3 设置RedisTemplate的序列化器属性
- 12.1.4 Spring对Redis数据类型操作的封装
- 12.1.5
SessionCallback和RedisCallback接口 - 12.2 在Spring Boot中配置和使用Redis
- 12.2.1 在Spring Boot中配置Redis
- 12.2.2 操作Redis数据类型——字符串和散列数据结构
- 12.2.3 操作Redis数据类型——链表(链表)
- 12.2.4 操作Redis数据类型——集合
- 12.2.5 操作Redis数据类型——有序集合
- 12.3 Redis事务
- 12.4 Redis管道
- 12.5 使用Redis发布订阅
- 12.6 使用Lua脚本
- 12.7 使用Spring缓存注解操作Redis
12 Redis
我们来看一下Redis官方中文网站的介绍:
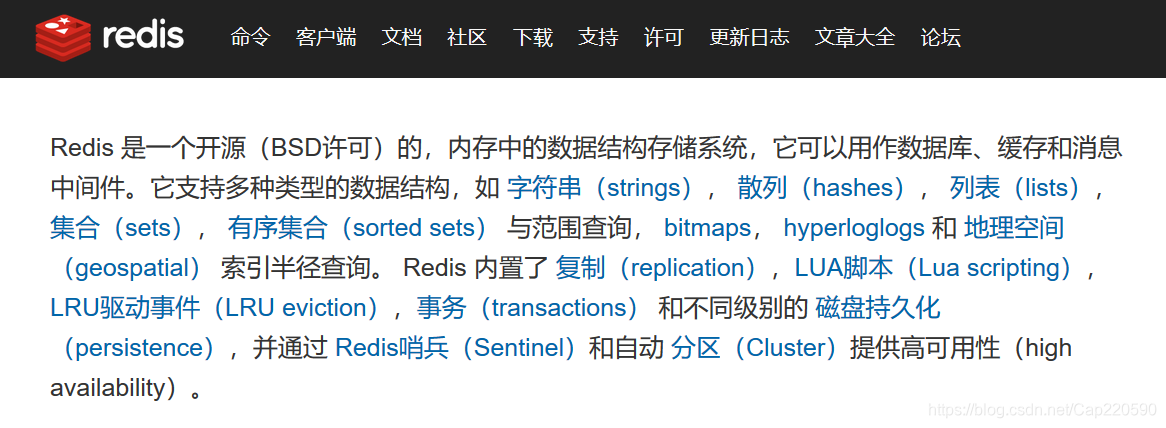
简要来说,Redis是NoSQL非关系型数据库的一种,它是以键值对的方式存储的,比如“key1:value1”这样的形式。
另外需要注意的是,MySQL这类关系型数据库的存储介质是基于磁盘的,而Redis数据库是基于内存的,基于内存也就有这么两个特性,一是速度快,二是断电易失性。
说到Redis的使用场景,就不得不提到现实生活中人们对数据的操作方式,一般来说,一个正常的网页查询数据的操作占到七成,而更新数据只占到三成。那么使用Redis,将存储在磁盘数据库上的常用数据存放到内存中的Redis,就能够极快响应网页的大部分的查询操作,进而提高网页的性能。
12.1 spring-data-redis项目简介
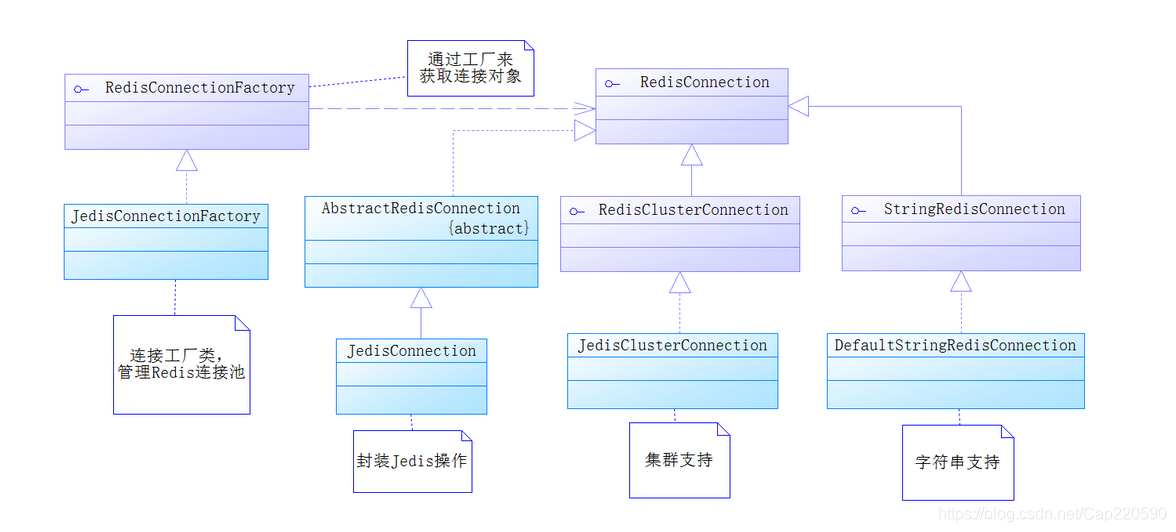
12.1.1 spring-data-redis项目的设计
Java和MySQL连接需要驱动,而Java和Redis连接同样也需要驱动。Java和Redis连接驱动有很多,目前广泛使用的Jedis。
实例
- 导入springweb、Redis、Lombok依赖
    <dependencies>
        <dependency>
            <groupId>org.springframework.boot</groupId>
            <artifactId>spring-boot-starter-web</artifactId>
        </dependency>

        <!-- Redis启动器 -->
        <dependency>
            <groupId>org.springframework.boot</groupId>
            <artifactId>spring-boot-starter-data-redis</artifactId>
            <!-- 不依赖Redis的异步客户端lettuce-->
            <exclusions>
                <exclusion>
                    <groupId>io.lettuce</groupId>
                    <artifactId>lettuce-core</artifactId>
                </exclusion>
            </exclusions>
        </dependency>
        <!-- 引入Redis的客户端依赖 -->
        <dependency>
            <groupId>redis.clients</groupId>
            <artifactId>jedis</artifactId>
        </dependency>

        <dependency>
            <groupId>org.projectlombok</groupId>
            <artifactId>lombok</artifactId>
            <optional>true</optional>
        </dependency>
        <dependency>
            <groupId>org.springframework.boot</groupId>
            <artifactId>spring-boot-starter-test</artifactId>
            <scope>test</scope>
        </dependency>
    </dependencies>
- 创建
RedisConnectionFactory
package com.cap.config;

import org.springframework.context.annotation.Bean;
import org.springframework.context.annotation.Configuration;
import org.springframework.data.redis.connection.RedisConnectionFactory;
import org.springframework.data.redis.connection.RedisStandaloneConfiguration;
import org.springframework.data.redis.connection.jedis.JedisConnectionFactory;
import redis.clients.jedis.JedisPoolConfig;

/**
 * @author cap
 * @create 2020.07.28.7:20
 */
@Configuration
public class RedisConfig {
    private RedisConnectionFactory connectionFactory = null;

    @Bean(name = "RedisConnectionFactory")
    public RedisConnectionFactory initRedisConnectionFactory(){
        if(this.connectionFactory != null)
            return this.connectionFactory;
        //创建Jedis连接池
        JedisPoolConfig poolConfig = new JedisPoolConfig();
        {
            //设置最大空闲数
            poolConfig.setMaxIdle(30);
            //设置最大连接总数
            poolConfig.setMaxTotal(50);
            //设置最大等待毫秒数
            poolConfig.setMaxWaitMillis(2000);
        }
        //创建Jedis连接工厂
        JedisConnectionFactory connectionFactory = new JedisConnectionFactory(poolConfig);
        //创建Redis脱机配置
        RedisStandaloneConfiguration rscg = connectionFactory.getStandaloneConfiguration();
        {
            //设置主机
            rscg.setHostName("localhost");
            //设置端口
            rscg.setPort(6379);
            //设置密码
            rscg.setPassword("redis");
        }
        this.connectionFactory = connectionFactory;
        return connectionFactory;
    }
}
- 测试
@SpringBootTest
class RedisdemoApplicationTests {

    @Autowired
    @Qualifier("RedisConnectionFactory")
    private RedisConnectionFactory connectionFactory;

    @Test
    void contextLoads() {
        System.out.println(connectionFactory);
        RedisConnection redisConnection = connectionFactory.getConnection();
        System.out.println(redisConnection);
        redisConnection.close();
    }

}
结果
org.springframework.data.redis.connection.jedis.JedisConnectionFactory@3bc20984
org.springframework.data.redis.connection.jedis.JedisConnection@2c99c8d
12.1.2 RedisTemplate
上一节实例中,我们创建了一个RedisConnectionFactory并给他配置了一个连接池,通过RedisConnectionFactory就能够创建RedisConnection。但是在使用一条连接的时候,要先从RedisConnectionFactory工厂获取,然后再使用完成后还要自己关闭它。Spring为了进一步简化开发,提供了RedisTemplate。
RedisTemplate会自动从RedisConnectionFactory工厂获取连接,然后执行对象的Redis命令,在最后还会关闭Redis的连接。由于RedisTemplate很好的封装了Redis的闭合问题,所以开发者只需要专注于Redis的命令即可。
- 创建RedisTemplate
    @Bean
    @Bean(name = "redisTemplate")
    public RedisTemplate<Object,Object> initRedisTemplate(){
        RedisTemplate<Object, Object> redisTemplate = new RedisTemplate<>();
        redisTemplate.setConnectionFactory(initRedisConnectionFactory());
        return redisTemplate;
    }
- 测试
@SpringBootTest
class RedisdemoApplicationTests {
    @Autowired
    @Qualifier("redisTemplate")
    private RedisTemplate<Object,Object> redisTemplate;

    @Test
    void contextLoads() {
    }

    @Test
    public void test(){
        redisTemplate.opsForValue().set("小米电视",799);
        System.out.println(redisTemplate.opsForValue().get("小米电视"));
        redisTemplate.opsForHash().put("user","username","antirez");
        redisTemplate.opsForHash().put("user","birthyear","1977");
        System.out.println(redisTemplate.opsForHash().get("user","username"));
        System.out.println(redisTemplate.opsForHash().get("user","birthyear"));
    }

}
输出
799
antirez
1977
12.1.3 设置RedisTemplate的序列化器属性
在RedisDesktopManager中查看在上一节我们存储的字符串和hashes,可以看到他们在Redis的形式是一组奇怪的字符串。
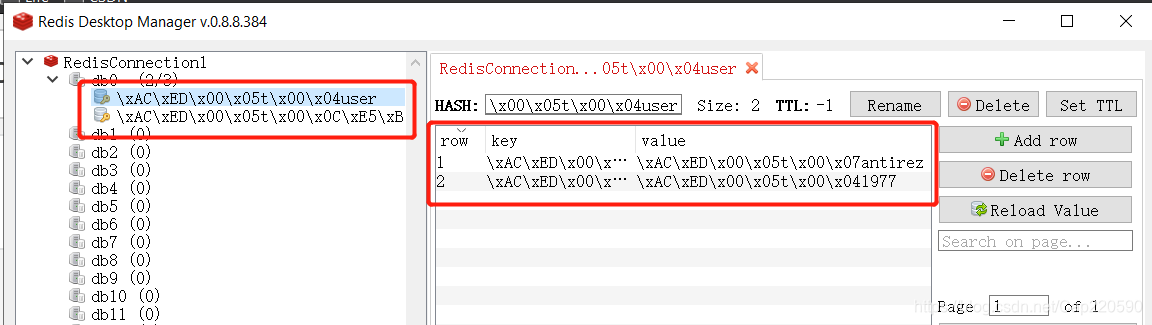
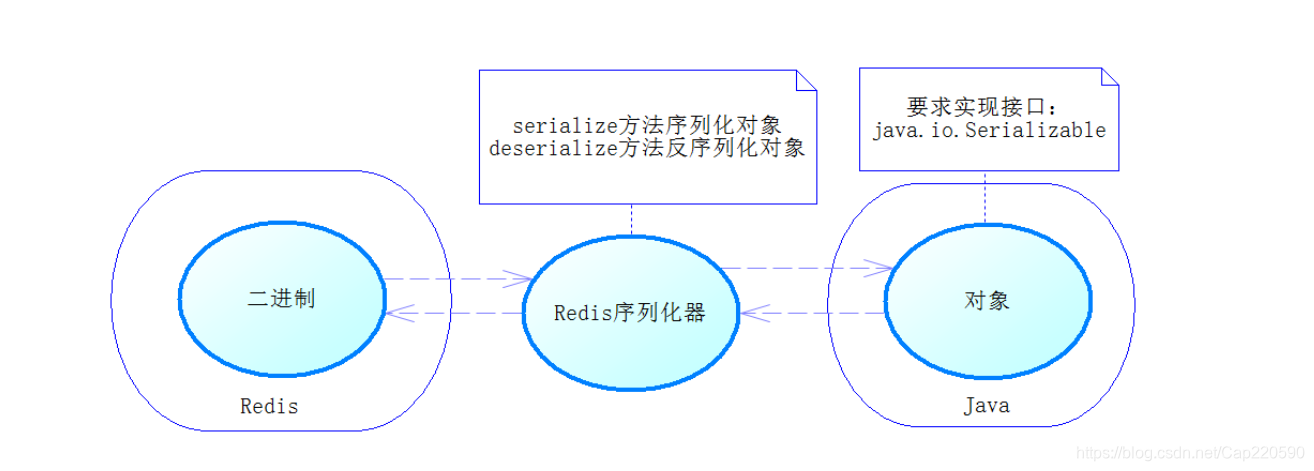
Redis是一种基于字符串存储的NoSQL,而Java是基于对象的语言,对象是无法存储到Redis中的。不过Java提供了序列化机制,这样对象就能够通过序列化得到二进制字符串,Redis就能够存储这些二进制字符串了,取出的时候只需要通过反序列化就能够得到Java对象。
Spring提供了序列化器机制,并且实现了几个序列化器,其设计如下图所示:
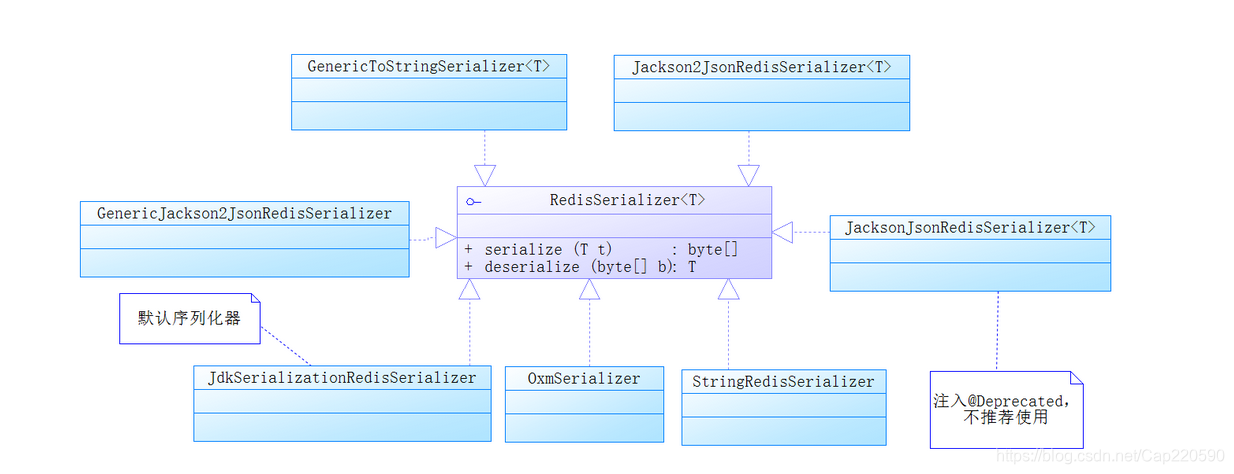
JdkSerializationRedisSerializer是RedisTemplate默认的序列化器,其原理如下:
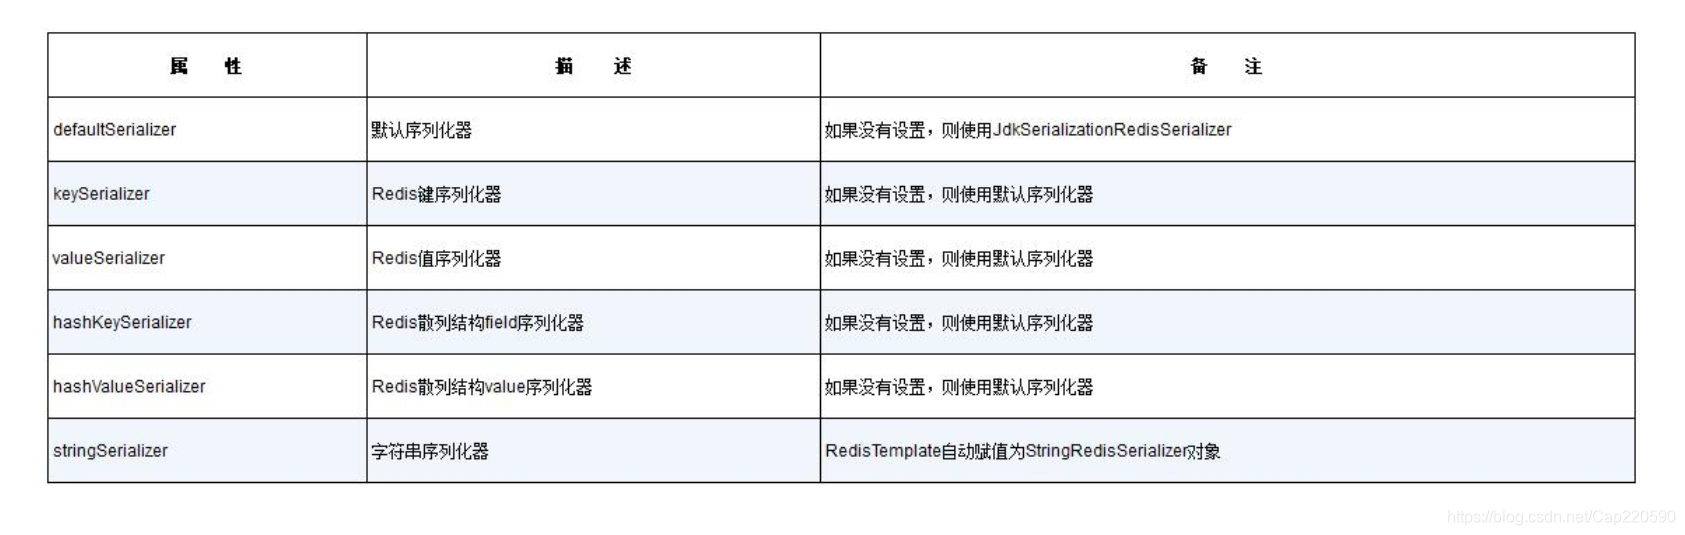
RedisTemplate提供了如下所示几个可以配置的属性:
	private @Nullable RedisSerializer<?> defaultSerializer;

	@SuppressWarnings("rawtypes") private @Nullable RedisSerializer keySerializer = null;
	@SuppressWarnings("rawtypes") private @Nullable RedisSerializer valueSerializer = null;
	@SuppressWarnings("rawtypes") private @Nullable RedisSerializer hashKeySerializer = null;
	@SuppressWarnings("rawtypes") private @Nullable RedisSerializer hashValueSerializer = null;
	private RedisSerializer<String> stringSerializer = RedisSerializer.string();
上一节的代码中由于我们什么都没有配置,因此会默认使用JdkSerializationRedisSerializer对对象进行序列化和反序列化,但这样对于我们查询Redis数据带来了很大的不便,因此我们需要配置一下这些序列化器,使得RedisTemplate可以将Redis的键以普通字符串保存。
    @Bean(name = "redisTemplate")
    public RedisTemplate<Object,Object> initRedisTemplate(){
        RedisTemplate<Object, Object> redisTemplate = new RedisTemplate<>();
        //RedisTemplate会自动初始化StringRedisSerializer,所以这里直接获取
        RedisSerializer stringSerializer = redisTemplate.getStringSerializer();
        redisTemplate.setKeySerializer(stringSerializer);
        redisTemplate.setHashKeySerializer(stringSerializer);
        redisTemplate.setHashValueSerializer(stringSerializer);
        redisTemplate.setConnectionFactory(initRedisConnectionFactory());
        return redisTemplate;
    }
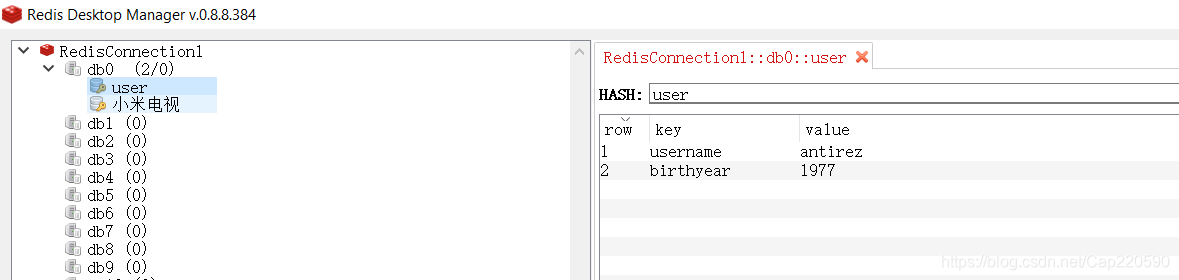
重新运行得到:
12.1.4 Spring对Redis数据类型操作的封装
Redis能够支持7中类型的数据结构
- 字符串
- 散列(哈希表)
- 列表(链表)
- 集合
- 有序集合
- 基数
- 地理位置
Spring针对每一种数据结构的操作都提供了对应的操作接口:
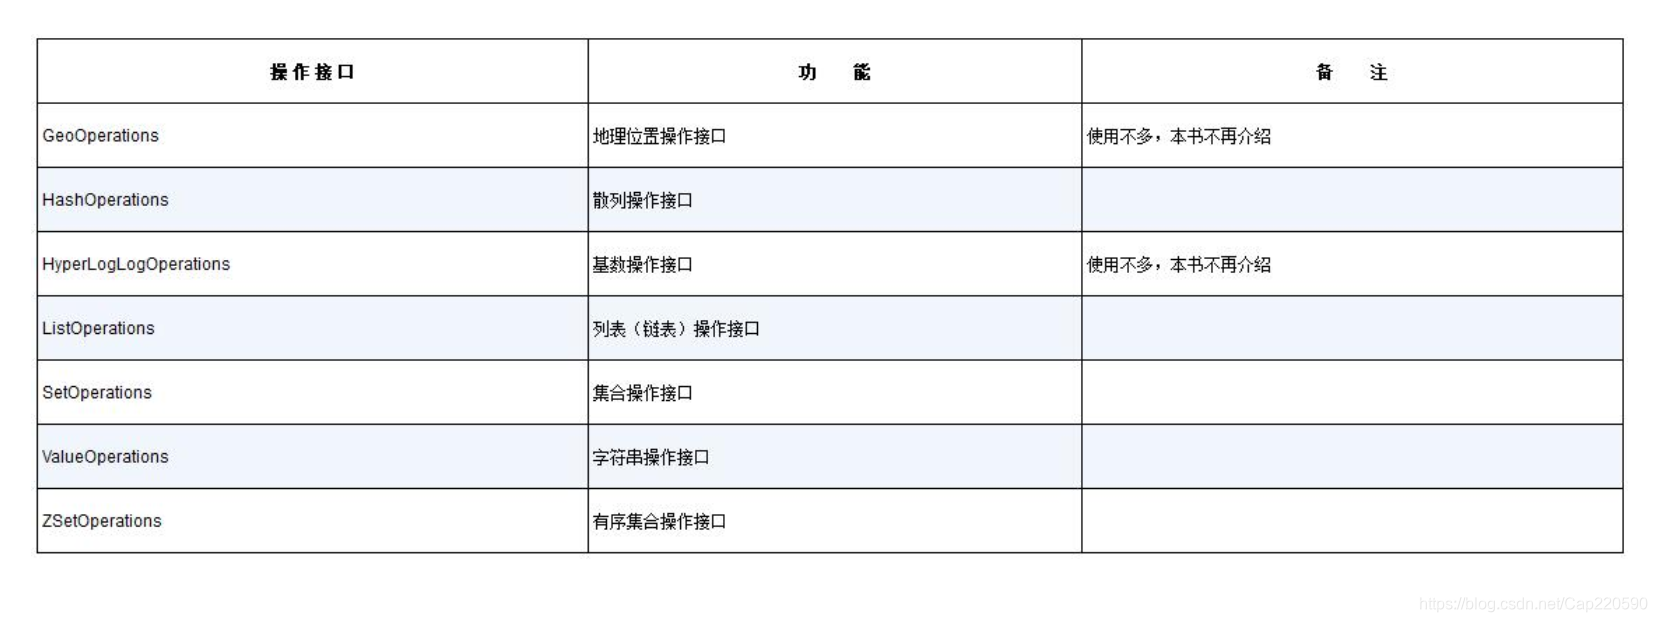 它们都可以通过RedisTemplate得到,得到的方法很简单。
获取Redis数据类型操作接口的方法:
		// 获取地理位置操作接口
        redisTemplate.opsForGeo();
        // 获取散列操作接口
        redisTemplate.opsForHash();
        // 获取基数操作接口
        redisTemplate.opsForHyperLogLog();
        // 获取列表操作接口
        redisTemplate.opsForList();
        // 获取集合操作接口
        redisTemplate.opsForSet();
        // 获取字符串操作接口
        redisTemplate.opsForValue();
        // 获取有序集合操作接口
        redisTemplate.opsForZSet();
Spring还支持对某一键值对做连续操作,比如要连续操作一个散列数据类型或者列表多次,Spring对此提供了BoundXXXOperation接口,如下图:
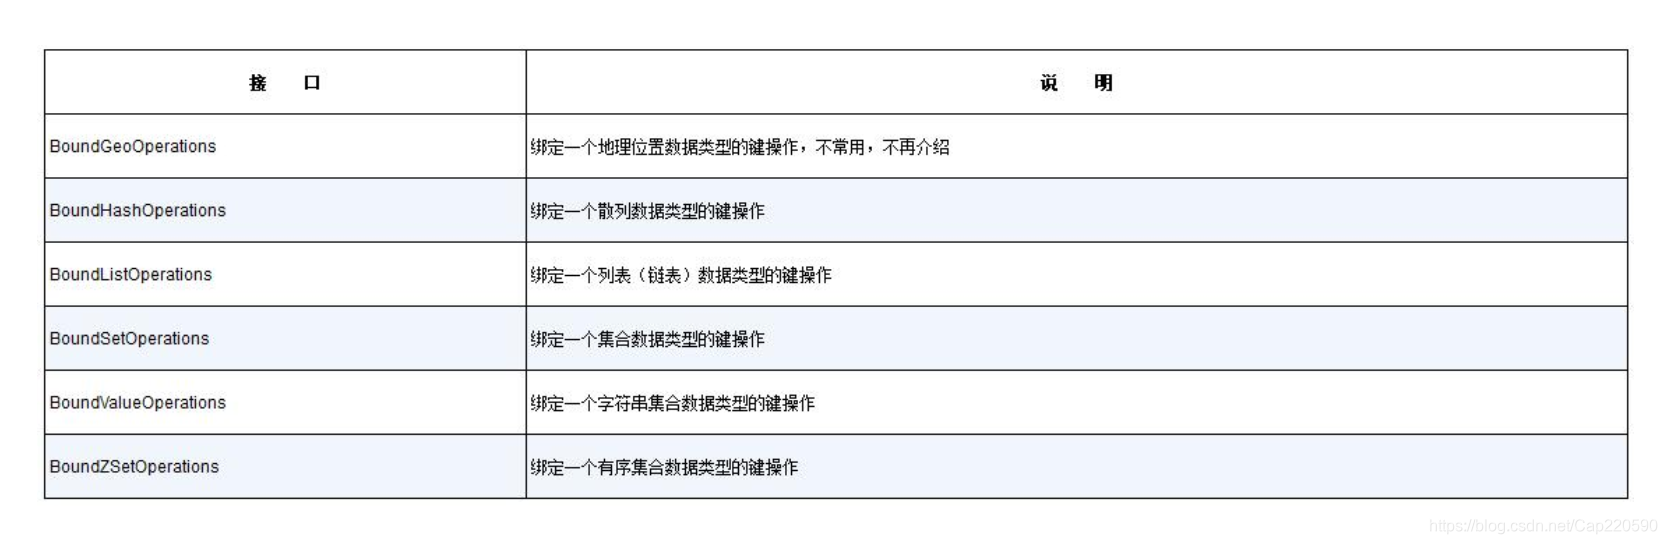 同样的,RedisTemplate也对获取他们提供了对应的方法:
        // 获取地理位置绑定键操作接口
        redisTemplate.boundGeoOps("geo");
        // 获取散列绑定键接口
        redisTemplate.boundHashOps("hash");
        // 获取列表(链表)绑定键操作接口
        redisTemplate.boundListOps("list");
        // 获取集合绑定键操作接口
        redisTemplate.boundSetOps("set");
        // 获取字符串绑定键操作接口
        redisTemplate.boundValueOps("string");
        // 获取有序集合绑定键操作接口
        redisTemplate.boundZSetOps("zset");
获取其中的操作接口后,我们就可以对某个键的数据进行多次操作。
12.1.5 SessionCallback和RedisCallback接口
RedisTemplate可以通过回调SessionCallback和RedisCallback接口,就可以在同一连接下执行多个Redis命令。其中SessionCallback提供了良好的封装,对于开发者比较友好,而RedisCallback接口比较接近底层,它能够改写一些如序列化的底层东西,但它需要处理的内容比较繁杂,可读性差,实际开发过程中应该优先选择它。
    //使用RedisCallback
    public void useRedisCallback(RedisTemplate redisTemplate){
        redisTemplate.execute(new RedisCallback() {
            @Override
            public Object doInRedis(RedisConnection connection) throws DataAccessException {
                connection.set("k1".getBytes(),"v1".getBytes());
                connection.hSet("hash".getBytes(),"field".getBytes(),"hvalue".getBytes());
                return null;
            }
        });
    }

    //使用SessionCallback
    public void useSessionCallback(RedisTemplate redisTemplate){
        redisTemplate.execute(new SessionCallback() {
            @Override
            public Object execute(RedisOperations operations) throws DataAccessException {
                operations.opsForValue().set("k2","v2");
                operations.opsForHash().put("hash","field2","hvalue2");
                return null;
            }
        });
    }
12.2 在Spring Boot中配置和使用Redis
12.2.1 在Spring Boot中配置Redis
在application.yaml中配置Redis相关信息
# 配置连接池属性
spring:
  redis:
    jedis:
      pool:
        max-active: 10
        min-idle: 5
        max-idle: 10
        max-wait: 2000
    # 配置Redis服务器属性
    port: 6379
    host: localhost
    password: redis
    # Redis连接超时时间,单位毫秒
    timeout: 1000
测试一下
@SpringBootTest
class Redisdemo2ApplicationTests {
    @Autowired
    private RedisConnectionFactory redisConnectionFactory;

    @Autowired
    private RedisTemplate redisTemplate;

    public void initRedisTemplate(){
        RedisSerializer stringSerializer = redisTemplate.getStringSerializer();
        redisTemplate.setKeySerializer(stringSerializer);
        redisTemplate.setHashKeySerializer(stringSerializer);
    }


    @Test
    void contextLoads() {
        initRedisTemplate();
        System.out.println(redisTemplate);
    }

}
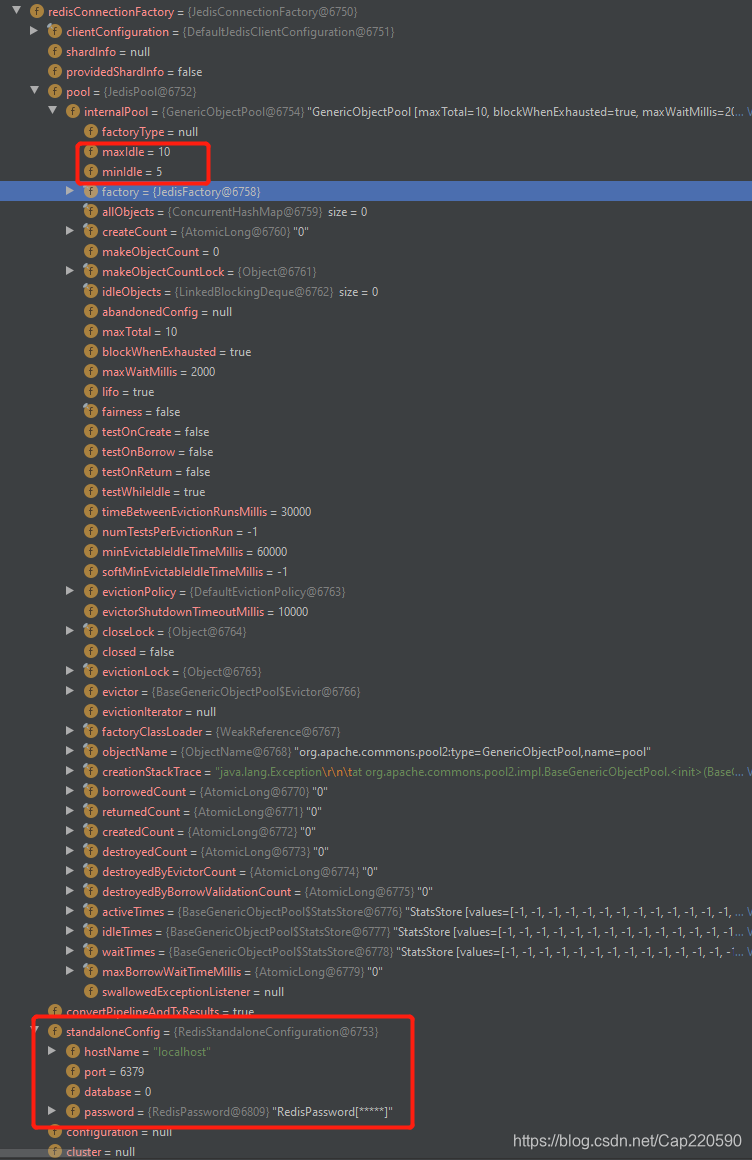
我们在System.out.println(redisTemplate);这里打个断点,打开Debug模式:
首先我们看到RedisConnectionFactory,可以看到这里我们已经配置成功了
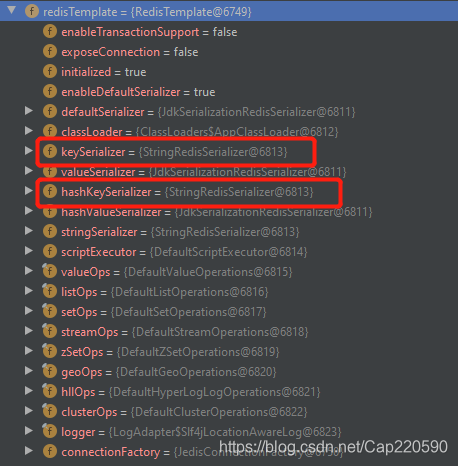
接着看到RedisTemplate,这里的KeySerializer和hashKeySerializer两个序列化器已经赋值为StringRedisSerializer了
12.2.2 操作Redis数据类型——字符串和散列数据结构
package com.cap.controller;

import org.springframework.beans.factory.annotation.Autowired;
import org.springframework.data.redis.core.BoundHashOperations;
import org.springframework.data.redis.core.RedisTemplate;
import org.springframework.data.redis.core.StringRedisTemplate;
import org.springframework.stereotype.Controller;
import org.springframework.web.bind.annotation.RequestMapping;
import org.springframework.web.bind.annotation.ResponseBody;
import redis.clients.jedis.Jedis;

import java.util.HashMap;
import java.util.Map;

/**
 * @author cap
 * @create 2020.08.02.20:03
 */
@Controller
@RequestMapping("/redis")
public class RedisController {
    @Autowired
    private RedisTemplate redisTemplate = null;

    @Autowired
    private StringRedisTemplate stringRedisTemplate = null;

    @RequestMapping("/stringAndHash")
    @ResponseBody
    public Map<String, Object> testStringAndHash(){
        redisTemplate.opsForValue().set("key1","value1");
        // 注意这里使用的是JdkSerializatioinRedisSerializer
        // 所以Redis保存时不是整数,不能运算
        redisTemplate.opsForValue().set("int_key","1");
        stringRedisTemplate.opsForValue().set("int","1");
        stringRedisTemplate.opsForValue().increment("int",1);
        // 获取底层Jedis连接
        Jedis jedis = (Jedis) stringRedisTemplate.getConnectionFactory()
                .getConnection().getNativeConnection();
        // 减一操作,这个命令RedisTemplate不支持,所以先获取底层的连接再操作
        jedis.decr("int");
        Map<String, String> hash = new HashMap<>();
        hash.put("field1","value1");
        hash.put("field2","value2");
        // 存入一个散列数据类型
        stringRedisTemplate.opsForHash().putAll("hash",hash);
        // 新增一个字段
        stringRedisTemplate.opsForHash().put("hash","field3","value3");
        // 绑定散列操作的key,这样可以连续对同一个散列数据类型进行操作
        BoundHashOperations<String, Object, Object> hashOps = stringRedisTemplate.boundHashOps("hash");
        // 删除两个字段
        hashOps.delete("field1","field2");
        // 新增加一个字段
        hashOps.put("field4","value5");
        Map<String, Object> map = new HashMap<>();
        map.put("success", true);
        return map;


    }
}
12.2.3 操作Redis数据类型——链表(链表)
    @RequestMapping("/list")
    @ResponseBody
    public Map<String, Object> testList(){
        // 插入两个列表, 注意它们在链表的顺序
        // 链表从左到右顺序为"v10","v8","v6","v4","v2"
        stringRedisTemplate.opsForList().leftPushAll("list1","v2","v4","v6","v8","v10");
        // 链表从右到左顺序为"v1","v2","v3","v4","v5","v6"
        stringRedisTemplate.opsForList().rightPushAll("list2","v1","v2","v3","v4","v5","v6");
        // 绑定list2链表操作
        BoundListOperations listOps = stringRedisTemplate.boundListOps("list2");
        // 从右边弹出一个成员
        Object result1 = listOps.rightPop();
        // 获取定位元素,Redis从0开始计算,这里值为v2
        Object result2 = listOps.index(1);
        // 从左边插入链表
        listOps.leftPush("v0");
        // 求链表长度
        Long size = listOps.size();
        // 求链表下标区间成员,整个链表下标范围为0到size-1,这里不去最后一个元素
        List elements = listOps.range(0, size - 2);
        Map<String, Object> map = new HashMap<>();
        map.put("success",true);
        return map;
    }
12.2.4 操作Redis数据类型——集合
    @RequestMapping("/set")
    @ResponseBody
    public Map<String, Object> testSet(){
        // 请注意:这里v1重复两次,因为集合不允许重复,所以只是插入5个成员到集合中
        stringRedisTemplate.opsForSet().add("set1","v1","v1","v2","v3","v4","v5","v6");
        stringRedisTemplate.opsForSet().add("set2","v2","v4","v6","v8");
        // 绑定set1集合操作
        BoundSetOperations<String, String> setOps = stringRedisTemplate.boundSetOps("set1");
        // 增加两个元素
        setOps.add("v6","v7");
        // 删除两个元素
        setOps.remove("v1","v7");
        // 返回所有元素
        Set<String> set1 = setOps.members();
        // 求成员数
        Long size = setOps.size();
        // 求交集
        Set<String> inter = setOps.intersect("set2");
        // 求交集,并且用新集合inter保存
        setOps.intersectAndStore("set2","inter");
        // 求差集
        Set<String> diff = setOps.diff("set2");
        // 求差集,并且用新集合diff保存
        setOps.diffAndStore("set2","diff");
        // 求并集
        Set<String> union = setOps.union("set2");
        // 求并集,并且用新集合union保存
        setOps.unionAndStore("set2","union");
        Map<String, Object> map = new HashMap<>();
        map.put("success",true);
        return map;
    }
12.2.5 操作Redis数据类型——有序集合
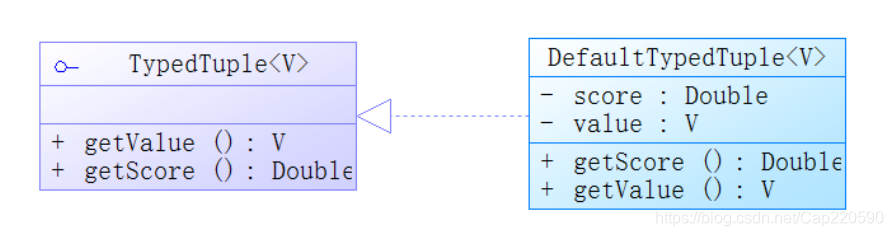
有序集合和集合差异不大,有序集合的数据结构多了一个score属性来支持他的有序性。为了支持这个变化,Spring提供了TypedTuple接口,它定义了两个方法
V getValue()Double getScore
Spring提供了默认的实现类DefaultTypedTuple
@RequestMapping("/zset")
@ResponseBody
public Map<String, Object> testZSet() {
Set<ZSetOperations.TypedTuple<String>> typedTupleSet
= new HashSet<>();
for (int i = 1; i <= 9; i++) {
// 分数
double score = i * 0.1;
// 创建一个TypedTuple对象,存入值和分数
ZSetOperations.TypedTuple<String> typedTuple
= new DefaultTypedTuple<>("value"+i, score);
typedTupleSet.add(typedTuple);
}
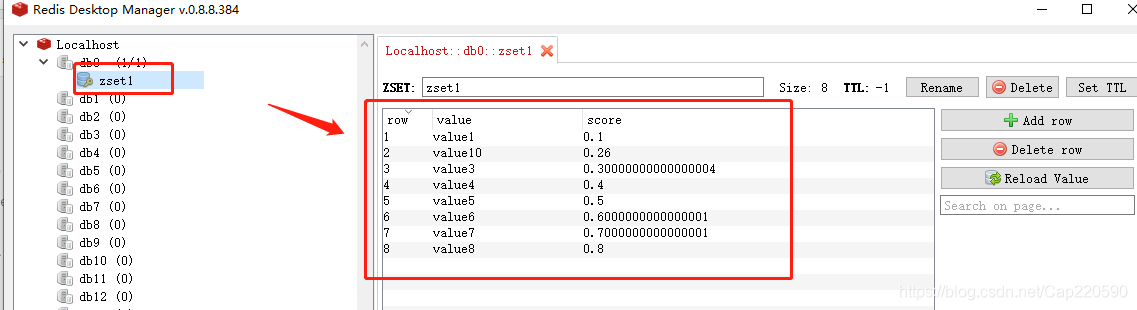
// 往有序集合插入元素
stringRedisTemplate.opsForZSet().add("zset1", typedTupleSet);
// 绑定zset1有序集合操作
BoundZSetOperations<String, String> zsetOps
= stringRedisTemplate.boundZSetOps("zset1");
// 增加一个元素
zsetOps.add("value10",0.26);
Set<String> setRange = zsetOps.range(1, 6);
// 定义值范围
RedisZSetCommands.Range range = new RedisZSetCommands.Range();
range.gt("value3");
range.lt("value8");
// 按值排序,请注意这个排序是按字符串排序
Set<String> setLex = zsetOps.rangeByLex(range);
// 删除
zsetOps.remove("value9","value2");
// 求分数
Double score = zsetOps.score("value8");
// 在下标区间下,按分数排序,同时返回value和score
Set<ZSetOperations.TypedTuple<String>> rangeSet =
zsetOps.rangeWithScores(1, 6);
// 在分数区间下,按分数排序,同时返回value和score
Set<ZSetOperations.TypedTuple<String>> scoreSet =
zsetOps.rangeByScoreWithScores(1,6);
// 按从大到小排序
Set<String> reverseSet = zsetOps.reverseRange(2, 8);
Map<String, Object> map = new HashMap<>();
map.put("success", true);
return map;
}
12.3 Redis事务
Redis执行事务的过程
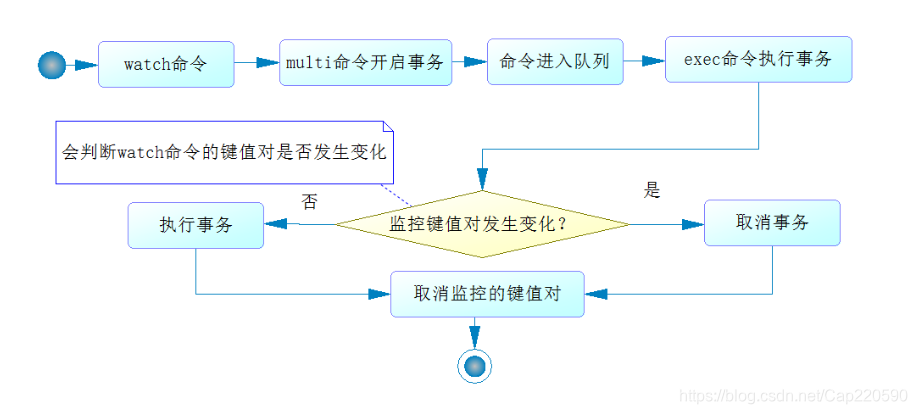 在Redis中使用事务,通常的命令组合是
watch... multi... exec
watch命令可以监控Redis的一些键multi命令开始事务,它将客户端的命令都存放在一个队列里面。这里需要注意,在这里我们执行一些返回数据的命令,Redis是不会马上执行的,而是把命令放到一个队列里,所以此时调用Redis命令,结果都是返回null。exe命令执行事务,它会在执行命令队列前会判断呗watch监控的Redis的键的数据是否发生过变化(即使被赋予过相同的值也会被认为是变化过),如果它认为发生了变化,那么Redis就会取消事务,否则就会执行事务,Redis在执行事务时,也是具有原子性的,要么全部执行,要么全部不执行,而且不会被其他客户端打断,这样就保证了Redis事务下数据的一致性。
    @RequestMapping("/multi")
    @ResponseBody
    public Map<String, Object> testMulti(){
        redisTemplate.opsForValue().set("key1","value1");;
        List list = redisTemplate.execute(new SessionCallback<List>() {
            public <K, V> List execute(RedisOperations<K, V> operations) throws DataAccessException {
                // 设置要监控key1
                operations.watch((K) "key1");
                // 开启事务,在exec命令执行前的全部命令都会进入队列
                operations.multi();
                operations.opsForValue().set((K) "key2", (V) "value2");
                operations.opsForValue().set((K) "key3", (V) "value3");
                //operations.opsForValue().increment((K) "key1",1); //---1
                // operations.opsForValue().increment((K) "key1", 1)
                // 获取值为null,因为redis只是把命令放入队列
                Object value2 = operations.opsForValue().get("key2");
                System.out.println("命令在队列,所以value为null【"+ value2 + "】");
                Object value3 = operations.opsForValue().get("key3");
                System.out.println("命令在队列,所以value为null【"+ value3 + "】");
                // 执行exec命令,将先判别key1是否在监控后被修改过
                // 如果是则不执行事务,否则就执行事务
                return operations.exec();
            }
        });

        System.out.println(list);

        Map<String, Object> map = new HashMap<>();
        map.put("success", true);
        return map;

    }
这里需要注意的是,在
multi命令执行之后和exec执行之前,如果key1的值被修改的话,那么整个事务就会回滚,但是如果我们将1处注释掉的话,那么在执行的过程中服务器虽然会报出ERR value is not an integer or out of range的错误,但是在key2和key3还是会成功插入到Redis数据库中。这就是Redis事务和数据库事务的不同了,Redis 是先让命令进入队列,所以一开始它并没有监测这个加一命令是否能够成功,只有在exec命令执行的时候,才能发现错误,对于出错的命令Redis知识报出错误,而错误后面的命令仍旧被执行,所以key2和key3都存在数据,这就是Redis事务的特点。所以平时执行Redis事务前,需要严格检查数据,以避免这样的情况发生。
12.4 Redis管道
默认情况下,Redis客户端是一条命令一条命令发送给Redis服务器的,要想提高Redis性能,可以通过管道(pipelining)技术,将多个命令一次性发给Redis服务器,在最后一个步骤中读取答复即可。
下面我们使用Redis管道技术测试10万次读写的功能:
    @RequestMapping("/pipeline")
    @ResponseBody
    public Map<String, Object> testPipeline(){
        Long start = System.currentTimeMillis();

        List list = redisTemplate.executePipelined(new SessionCallback<List>() {
            @Override
            public <K, V> List execute(RedisOperations<K, V> operations) throws DataAccessException {
                for (int i = 1; i <= 100000 ; i++) {
                    operations.opsForValue().set((K) ("pipe_"+i), (V) ("value_"+i));
                    String value = (String) operations.opsForValue().get("pipeline_"+i);
                    if(i == 100000) {
                        System.out.println("命令只是进入队列,所以值为空【" + value +"】");
                    }
                }
                return null;
            }
        });

        long end = System.currentTimeMillis();
        System.out.println("耗时:"+(end-start)+"毫秒");
        Map<String, Object> map = new HashMap<>();
        map.put("success", true);
        return map;
    }
整个耗时大概300~600ms,非常的快,如果不是管道技术,将executePipeline()方法改为execute()方法,那么每次大约需要花费6、7秒,管道技术速度提高了10倍之多,非常适合大数据量的执行。
这里需要注意两点
- 和事务一样,使用管道技术的过程中,所有的命令也只是进入队列而没有执行,所以执行的读取命令返回值是
null - 上述代码只是测试使用,实际上运行如此多的命令需要考虑内存空间的消耗,因为对于程序而言,它最终会返回一个List对象,如果过多的命令执行返回的结果都保存在这个List中,显然会造成内存消耗过大,尤其在那些高并发的网站中就很容易造成JVM内存异常的异常,这个时候应该考虑使用迭代的方式执行Redis命令。
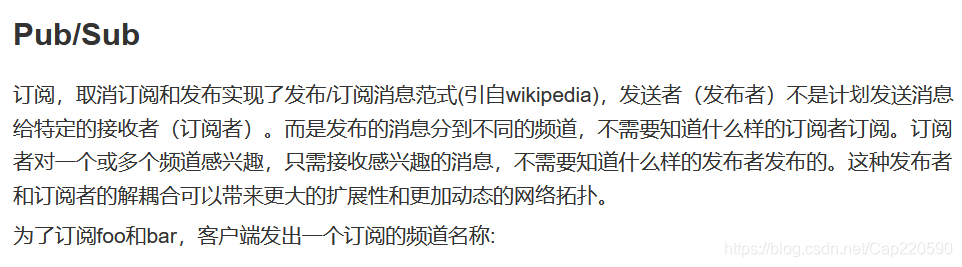
12.5 使用Redis发布订阅
我们来看一下Redis官网对于发布订阅的讲解
 我们先定义一个消息监听器(MessageListener):
package com.cap.listener;

import org.springframework.data.redis.connection.Message;
import org.springframework.data.redis.connection.MessageListener;
import org.springframework.stereotype.Component;

/**
 * @author cap
 * @create 2020.08.04.20:17
 */
@Component
public class RedisMessageListener implements MessageListener {
    @Override
    public void onMessage(Message message, byte[] pattern) {
        // 消息体
        String body = new String(message.getBody());
        // 渠道名称
        String topic = new String(pattern);
        System.out.println(body);
        System.out.println(topic);
    }
}
我们在SpringBoot启动文件中配置其他信息,让系统能够监控Redis的消息:
package com.cap;

import org.junit.Test;
import org.springframework.beans.factory.annotation.Autowired;
import org.springframework.boot.SpringApplication;
import org.springframework.boot.autoconfigure.SpringBootApplication;
import org.springframework.context.annotation.Bean;
import org.springframework.data.redis.connection.MessageListener;
import org.springframework.data.redis.connection.RedisConnectionFactory;
import org.springframework.data.redis.core.RedisTemplate;
import org.springframework.data.redis.listener.ChannelTopic;
import org.springframework.data.redis.listener.RedisMessageListenerContainer;
import org.springframework.data.redis.listener.Topic;
import org.springframework.data.redis.serializer.RedisSerializer;
import org.springframework.scheduling.concurrent.ThreadPoolTaskScheduler;

@SpringBootApplication
public class Redisdemo2Application {

    public static void main(String[] args) {
        SpringApplication.run(Redisdemo2Application.class, args);
    }

    @Autowired
    private RedisConnectionFactory redisConnectionFactory;

    @Autowired
    private RedisTemplate redisTemplate;

    // 消息监听器
    @Autowired
    private MessageListener redisMsgListener;

    // 任务池
    private ThreadPoolTaskScheduler taskScheduler;

    /**
     * 创建线程池,运行线程等待Redis消息
     * @return
     */
    @Bean
    public ThreadPoolTaskScheduler initTaskScheduler() {
        if (taskScheduler != null) {
            return taskScheduler;
        }

        taskScheduler = new ThreadPoolTaskScheduler();
        taskScheduler.setPoolSize(20);
        return taskScheduler;
    }

    /**
     * 定义Redis的监听容器
     * @return 监听容器
     */
    @Bean
    public RedisMessageListenerContainer initRedisContainer(){
        RedisMessageListenerContainer container =
                new RedisMessageListenerContainer();
        // Redis连接工厂
        container.setConnectionFactory(redisConnectionFactory);
        // 设置运行任务池
        container.setTaskExecutor(taskScheduler);
        // 定义监听频道,名称为WeChatChanel
        Topic topic = new ChannelTopic("WeChatMsg");
        // 使用监听器监听Redis的消息
        container.addMessageListener(redisMsgListener, topic);
        return container;
    }
}
在启动SpringBoot项目后,我们在Redis客户端输入命令
publish WeChatMsg "There's a special offer today!"
SpringBoot控制台输出:
There's a special offer today!
WeChatMsg
在Spring中,我们也可以使用RedisTemplate来发送消息,如:
redisTemplate.convertAndSend("WeChatMsg","There's a special offer today");
12.6 使用Lua脚本
对于Lua可先看一下Redis的官方文档http://www.redis.cn/commands/eval.html
Redis2.6版本后提供了Lua脚本的支持,在Redis中使用Lua脚本的优点有:
- Lua有强大的运算功能,弥补了Redis运算能力的不足
- 执行Lua脚本在Redis中还具有原子性,可以用在需要保证数据一致的高并发环境中
- Lua脚本方案比使用Redis自身的事务要更好
在Redis中运行Lua的两种方法
- 直接发送Lua脚本到Redis服务器执行
- 先把Lua脚本发给Redis服务器进行缓存,然后发挥一个SHA1的32位编码回来,之后需要执行的话只需要返回该编码和相关参数即可。
为了支持Redis的Lua脚本,Spring提供了RedisScript接口以及它的一个实现类DefaultRedisScript
public interface RedisScript<T> {

	/**
	 * @return The SHA1 of the script, used for executing Redis evalsha command.
	 */
	String getSha1();

	/**
	 * @return The script result type. Should be one of Long, Boolean, List, or deserialized value type. {@literal null}
	 *         if the script returns a throw-away status (i.e "OK").
	 */
	@Nullable
	Class<T> getResultType();

	/**
	 * @return The script contents.
	 */
	String getScriptAsString();
getSha1():获取脚本的Sha1getResultType():获取脚本返回值getScriptAsString():获取脚本的字符串表达
    @RequestMapping("/lua")
    @ResponseBody
    public Map<String, Object> testLua() {
        DefaultRedisScript<String> rs = new DefaultRedisScript<>();
        // 设置脚本
        rs.setScriptText("return 'Hello Lua'");
        // 定义返回类型,注意:如果没有这个定义,Spring不会返回结果
        rs.setResultType(String.class);
        RedisSerializer stringSerializer = redisTemplate.getStringSerializer();
        // 执行Lua脚本
        String str = (String) redisTemplate.execute(rs, stringSerializer, stringSerializer, null);
        Map<String, Object> map = new HashMap<>();
        map.put("str",str);
        return map;
    }
    @RequestMapping("/lua2")
    @ResponseBody
    public Map<String, Object> testLua2(String key1,String key2,String value1, String value2){
        // 定义Lua脚本
        String luaScript =
                "redis.call('set',KEYS[1],ARGV[1])\n" +
                "redis.call('set',KEYS[2],ARGV[2]) \n" +
                "local str1 = redis.call('get',KEYS[1]) \n" +
                "local str2 = redis.call('get',KEYS[2]) \n" +
                "if str1 == str2 then \n" +
                "return 1 \n" +
                "end \n" +
                "return 0 \n";
        System.out.println(luaScript);
        // 结果返回为Long
        DefaultRedisScript<Long> rs = new DefaultRedisScript<>();
        rs.setScriptText(luaScript);
        rs.setResultType(Long.class);
        // 采用字符串序列化器
        RedisSerializer<String> stringSerializer = redisTemplate.getStringSerializer();
        // 定义key参数
        ArrayList<String> keyList = new ArrayList<>();
        keyList.add(key1);
        keyList.add(key2);
        Long result = (Long) redisTemplate.execute(
                rs, stringSerializer, stringSerializer, keyList, value1, value2);
        Map<String, Object> map = new HashMap<>();
        map.put("result",result);
        return map;
    }
http://localhost:8080/redis/lua2?key1=key1&key2=key2&value1=vlaue1&value2=value2
显示
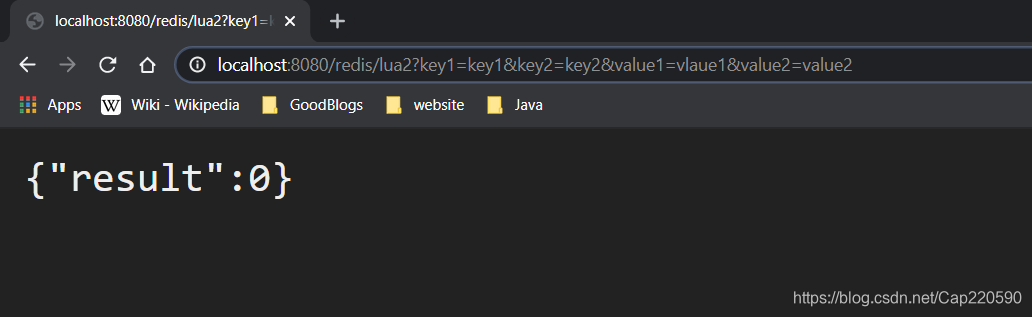
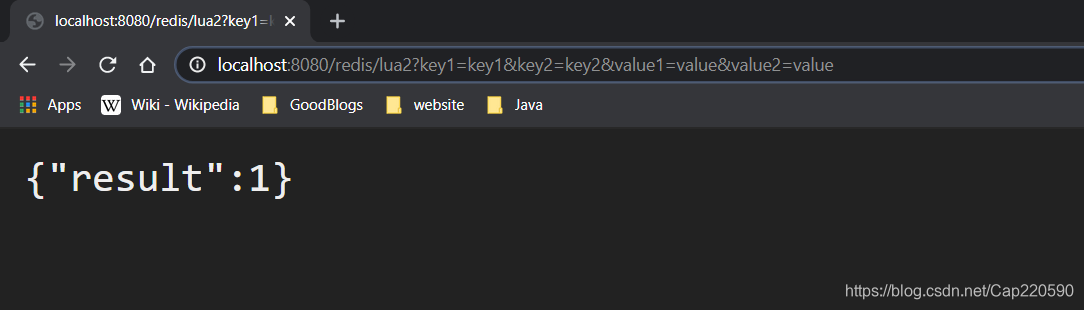
http://localhost:8080/redis/lua2?key1=key1&key2=key2&value1=value&value2=value
显示
12.7 使用Spring缓存注解操作Redis
@Cacheable可以标记在一个方法上,也可以标记在一个类上。当标记在一个方法上时表示该方法是支持缓存的,当标记在一个类上时则表示该类所有的方法都是支持缓存的。
对于一个支持缓存的方法,Spring会在其被调用后将其返回值缓存起来,以保证下次利用同样的参数来执行该方法时可以直接从缓存中获取结果,而不需要再次执行该方法。
Spring在缓存方法的返回值时是以键值对进行缓存的,值就是方法的返回结果,至于键的话,Spring又支持两种策略,默认策略和自定义策略
12.7.1 创建测试环境
- 创建数据库
cachedb和表user
mysql> USE cachedb;
Database changed
mysql> SHOW TABLES;
Empty set (0.02 sec)

mysql> CREATE TABLE user(
    -> id INT PRIMARY KEY NOT NULL AUTO_INCREMENT,
    -> user_name VARCHAR(20),
    -> note VARCHAR(100)
    -> )ENGINE=InnoDB,CHARSET=UTF8;
Query OK, 0 rows affected, 1 warning (0.18 sec)

mysql> INSERT INTO user(user_name,note)
    -> VALUES("张三","Java工程师");
Query OK, 1 row affected (0.02 sec)
- 导入依赖
    <dependencies>
        <dependency>
            <groupId>org.springframework.boot</groupId>
            <artifactId>spring-boot-starter-data-jdbc</artifactId>
        </dependency>
        <dependency>
            <groupId>org.springframework.boot</groupId>
            <artifactId>spring-boot-starter-data-redis</artifactId>
        </dependency>
        <dependency>
            <groupId>org.springframework.boot</groupId>
            <artifactId>spring-boot-starter-jdbc</artifactId>
        </dependency>
        <dependency>
            <groupId>org.springframework.boot</groupId>
            <artifactId>spring-boot-starter-web</artifactId>
        </dependency>

        <!-- mybatis-plus-boot-starter -->
        <dependency>
            <groupId>com.baomidou</groupId>
            <artifactId>mybatis-plus-boot-starter</artifactId>
            <version>3.3.2</version>
        </dependency>

        <dependency>
            <groupId>mysql</groupId>
            <artifactId>mysql-connector-java</artifactId>
            <scope>runtime</scope>
        </dependency>
        <dependency>
            <groupId>org.projectlombok</groupId>
            <artifactId>lombok</artifactId>
            <optional>true</optional>
        </dependency>
        <dependency>
            <groupId>org.springframework.boot</groupId>
            <artifactId>spring-boot-starter-test</artifactId>
            <scope>test</scope>
            <exclusions>
                <exclusion>
                    <groupId>org.junit.vintage</groupId>
                    <artifactId>junit-vintage-engine</artifactId>
                </exclusion>
            </exclusions>
        </dependency>
    </dependencies>
- 配置数据源
spring:
  datasource:
    url: jdbc:mysql://localhost:3306/cachedb?serverTimezone=Asia/Shanghai
    username: root
    driver-class-name: com.mysql.cj.jdbc.Driver
    password: mysql
- 创建实体类
User
package com.cap.pojo;

import lombok.AllArgsConstructor;
import lombok.Data;
import lombok.NoArgsConstructor;
import org.apache.ibatis.type.Alias;

import java.io.Serializable;

/**
 * @author cap
 * @create 2020.08.06.19:13
 */
@Alias("user")
@Data
@AllArgsConstructor
@NoArgsConstructor
public class User implements Serializable {
    private static final long serialVersionUID = -3382145918437133028L;

    private Long id;
    private String userName;
    private String note;
}
- 创建持久层接口
@Repository
@Mapper
public interface UserDao extends BaseMapper<User> {

}
- 创建业务层接口
IUserService
public interface IUserService {
    User getUser(long id);
}
- 创建业务层实现类
UserServiceImpl
@Service
public class UserServiceImpl implements IUserService {
    @Autowired
    private UserDao userDao;

    @Override
    public User getUser(long id) {
        return userDao.selectById(id);
    }
}
- 创建控制层
UserController
@Controller
public class UserController {
    @Autowired
    private IUserService userService = null;

    @RequestMapping("/get")
    @ResponseBody
    public ResponseEntity<User> getUser(long id){
        User user = userService.getUser(id);
        return new ResponseEntity<User>(user, HttpStatus.OK);
    }

}
- 测试

12.7.2 添加缓存
- 添加缓存配置,并且开启日志
server:
  port: 8080
spring:
  datasource:
    url: jdbc:mysql://localhost:3306/cachedb?serverTimezone=Asia/Shanghai
    username: root
    driver-class-name: com.mysql.cj.jdbc.Driver
    password: mysql
  # 缓存配置
  cache:
    type: redis
    cache-names: redisCache

# 日志配置为DEBUG级别,这样日志最为详细
logging:
  level:
    root: DEBUG
    org:
      springframework: DEBUG
      org:
        mybatis: DEBUG
- 在方法中添加
Cacheable注解
    @Transactional
    @Cacheable(value = "redisCache", key = "'redis_user_'+#id")
    // 这里使用SpEL表达式,也可以使用#p[0]或者#a[0],但可读性比较差不建议
    @Override
    public User getUser(long id) {
        return userDao.selectById(id);
    }
- 使用
@EnableCaching开启缓存
@SpringBootApplication
@EnableCaching
public class CachedemoApplication {

    public static void main(String[] args) {
        SpringApplication.run(CachedemoApplication.class, args);
    }

}
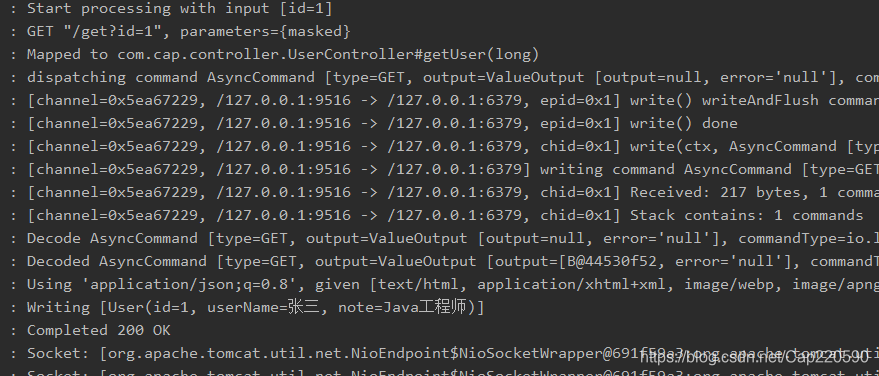
- 测试
第一次测试
 第二次测试,已经开启缓存了