目录
一、前言
网上 SpringBoot 集成 Elasticsearch 的文章很多,但随着 SpringBoot 和 Elasticsearch 版本的不断升级,绝大多数文章使用的集成方式和调用的方法已经过时,几乎找不到能真正适用最新 SpringBoot 版本和最新 Elasticsearch 版本的文章。
本文正是基于最新 SpringBoot 版本和最新 Elasticsearch 版本实现了集成。
二、Elasticsearch 是什么?
Elasticsearch(ES) 是一个基于 Lucene 的搜索服务器。它提供了一个分布式多用户能力的全文搜索引擎,基于 RESTful web 接口。Elasticsearch 是用 Java 语言开发的,并作为 Apache 许可条款下的开放源码发布,是一种流行的企业级搜索引擎。Elasticsearch 用于云计算中,能够达到实时搜索、稳定、可靠、快速、安装使用方便。官方客户端在Java、.NET(C#)、PHP、Python、Apache Groovy、Ruby 和许多其他语言中都是可用的。根据 DB-Engines 的排名显示,Elasticsearch 是最受欢迎的企业搜索引擎,其次是 Apache Solr,也是基于 Lucene。
三、Elasticsearch 安装
见 CentOS7和8下安装Elasticsearch 和 ElasticSearch ik分词器的安装使用。
四、SpringBoot 集成 Elasticsearch 的方式
1.TransportClient
TransportClient 在 Elasticsearch 7.0.0 中已被弃用,取而代之的是 Java High Level REST Client,并将在 Elasticsearch 8.0中删除。在项目中不再建议使用,详见
官方链接:https://www.elastic.co/guide/en/elasticsearch/client/java-api/current/java-api.html#java-api

2.Java REST Client
Java REST Client 在 Elasticsearch 7.15.0 中已弃用,取而代之的是 Java API Client。在项目中不再建议使用,详见
官方链接:https://www.elastic.co/guide/en/elasticsearch/client/java-rest/current/index.html

3.Java API Client
官方推荐使用的方式。详见
官方链接:https://www.elastic.co/guide/en/elasticsearch/client/java-api-client/current/index.html
4.Spring Data Elasticsearch
Spring Data Elasticsearch 项目提供了与 Elasticsearch 搜索引擎的集成。Spring Data Elasticsearch 的关键功能领域是一个以 POJO 为中心的模型,用于与 Elastichsearch 文档进行交互,并轻松编写存储库数据访问层。
本文正是基于 Spring Data Elasticsearch 方式实现 SpringBoot 集成 Elasticsearch。
五、创建项目集成 Elasticsearch
1.项目说明
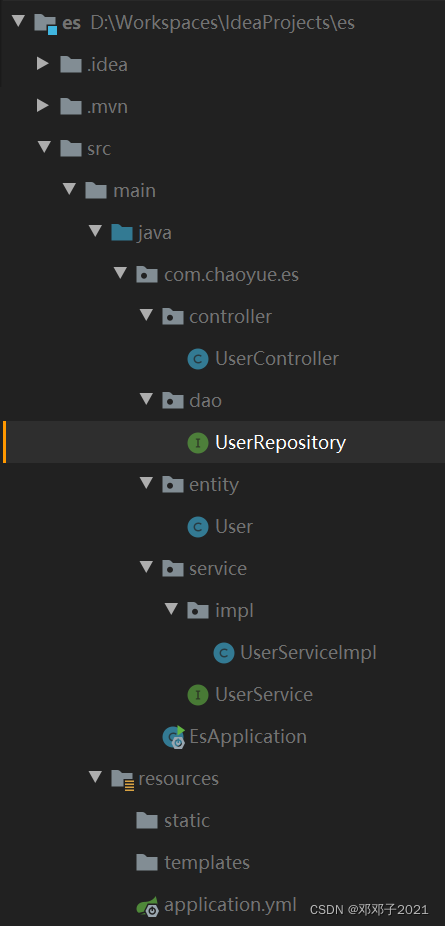
新建 Spring Initializr 项目 es,项目下新建 controller、entity、dao、service、impl 类,实现对 Elasticsearch 的 CRUD 操作。
项目目录结构:
2.创建 Spring Initializr 项目 es
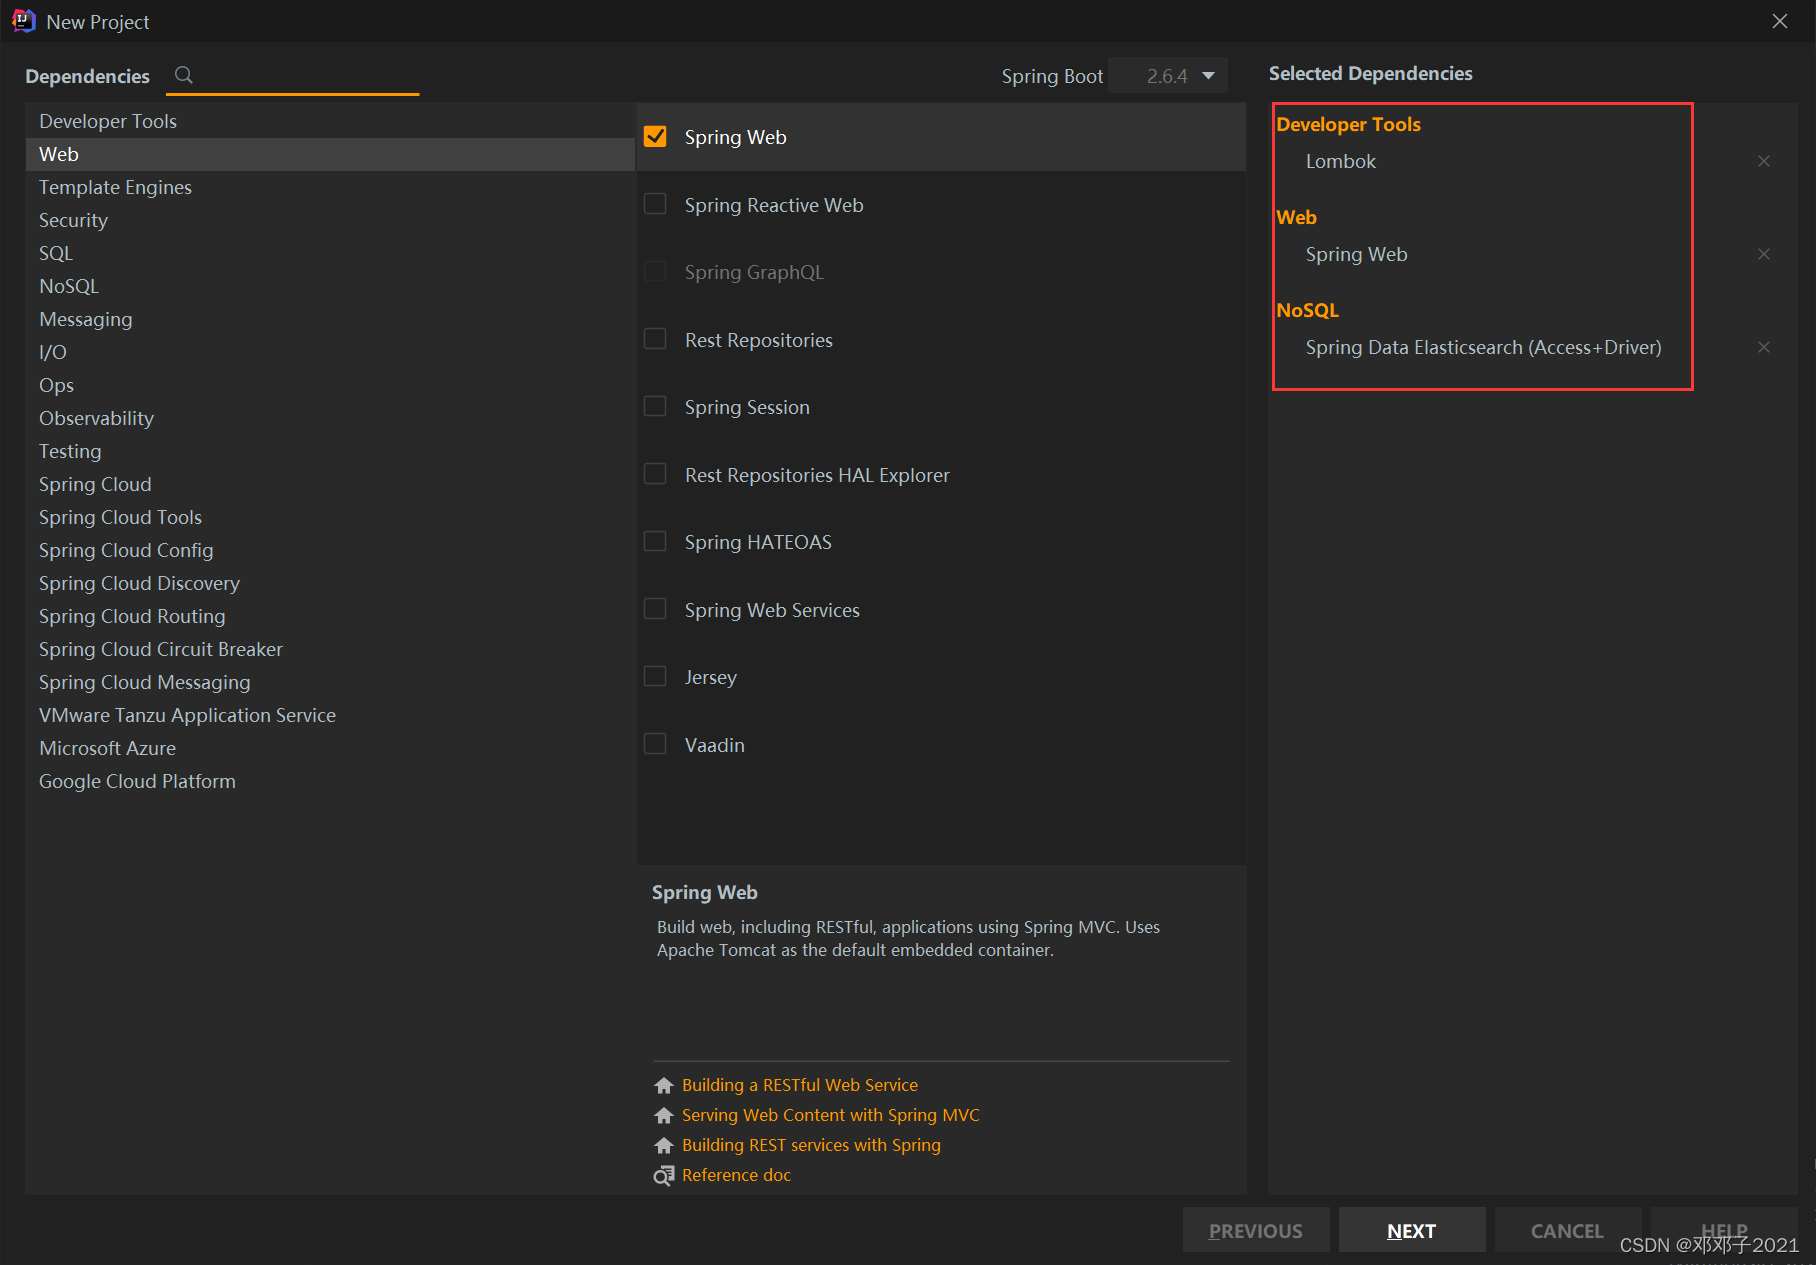
(1).添加依赖
添加依赖,如果已按截图操作,pom.xml 的内容会自动生成:
<?xml version="1.0" encoding="UTF-8"?>
<project xmlns="http://maven.apache.org/POM/4.0.0" xmlns:xsi="http://www.w3.org/2001/XMLSchema-instance"
         xsi:schemaLocation="http://maven.apache.org/POM/4.0.0 https://maven.apache.org/xsd/maven-4.0.0.xsd">
    <modelVersion>4.0.0</modelVersion>
    <parent>
        <groupId>org.springframework.boot</groupId>
        <artifactId>spring-boot-starter-parent</artifactId>
        <version>2.6.4</version>
        <relativePath/> <!-- lookup parent from repository -->
    </parent>
    <groupId>com.chaoyue</groupId>
    <artifactId>es</artifactId>
    <version>0.0.1-SNAPSHOT</version>
    <name>es</name>
    <description>Demo project for Spring Boot</description>
    <properties>
        <java.version>1.8</java.version>
    </properties>
    <dependencies>
        <dependency>
            <groupId>org.springframework.boot</groupId>
            <artifactId>spring-boot-starter-data-elasticsearch</artifactId>
        </dependency>
        <dependency>
            <groupId>org.springframework.boot</groupId>
            <artifactId>spring-boot-starter-web</artifactId>
        </dependency>

        <dependency>
            <groupId>org.projectlombok</groupId>
            <artifactId>lombok</artifactId>
            <optional>true</optional>
        </dependency>
        <dependency>
            <groupId>org.springframework.boot</groupId>
            <artifactId>spring-boot-starter-test</artifactId>
            <scope>test</scope>
        </dependency>
    </dependencies>

    <build>
        <plugins>
            <plugin>
                <groupId>org.springframework.boot</groupId>
                <artifactId>spring-boot-maven-plugin</artifactId>
                <configuration>
                    <excludes>
                        <exclude>
                            <groupId>org.projectlombok</groupId>
                            <artifactId>lombok</artifactId>
                        </exclude>
                    </excludes>
                </configuration>
            </plugin>
        </plugins>
    </build>

</project>
(2).添加配置
application.yml 文件中添加如下配置:
server:
  port: 8080
spring:
  elasticsearch:
    uris: 192.168.1.38:9200
(3).新建实体类 User
为减少不必要的代码,引入 lombok 依赖:
<dependency>
    <groupId>org.projectlombok</groupId>
    <artifactId>lombok</artifactId>
    <version>1.18.22</version>
</dependency>
实体类代码如下:
package com.chaoyue.es.entity;

import lombok.Data;
import org.springframework.data.annotation.Id;
import org.springframework.data.elasticsearch.annotations.Document;

import java.io.Serializable;

@Data
@Document(indexName = "user")
public class User implements Serializable {


    @Id
    private String id; // id
    private String username; // 用户名
    private String password; // 密码
}
(4).新建 dao 接口类 UserRepository
package com.chaoyue.es.dao;

import com.chaoyue.es.entity.User;
import org.springframework.data.elasticsearch.repository.ElasticsearchRepository;
import org.springframework.stereotype.Repository;

@Repository
public interface UserRepository extends ElasticsearchRepository<User, String> {


}
(5).新建服务接口类 UserService
package com.chaoyue.es.service;

import com.chaoyue.es.entity.User;

public interface UserService {


    User save(User user);
    void delete(User user);
    Iterable<User> getAll();
}
(6).新建服务实现类 UserServiceImpl
package com.chaoyue.es.service.impl;

import com.chaoyue.es.dao.UserRepository;
import com.chaoyue.es.entity.User;
import com.chaoyue.es.service.UserService;
import org.springframework.beans.factory.annotation.Autowired;
import org.springframework.stereotype.Service;

@Service
public class UserServiceImpl implements UserService {


    @Autowired
    private UserRepository userRepository;

    @Override
    public User save(User user) {


        return userRepository.save(user);
    }

    @Override
    public void delete(User user) {


        userRepository.delete(user);
    }

    @Override
    public Iterable<User> getAll() {


        return userRepository.findAll();
    }

}
(7).新建控制类 UserController
package com.chaoyue.es.controller;

import com.chaoyue.es.entity.User;
import com.chaoyue.es.service.UserService;
import org.springframework.beans.factory.annotation.Autowired;
import org.springframework.web.bind.annotation.RequestMapping;
import org.springframework.web.bind.annotation.RestController;

import java.util.ArrayList;
import java.util.List;

@RestController
@RequestMapping("/user")
public class UserController {


    @Autowired
    private UserService userService;

    @RequestMapping("/insert")
    public String insert() {


        User user = new User();
        user.setId("1");
        user.setUsername("张三");
        user.setPassword("zhangsan");
        userService.save(user);
        return getAll();
    }

    @RequestMapping("/delete")
    public String delete() {


        User user = new User();
        user.setId("1");
        userService.delete(user);
        return getAll();
    }

    @RequestMapping("/getAll")
    public String getAll() {


        List<User> list = new ArrayList<>();
        Iterable<User> iterable = userService.getAll();
        iterable.forEach(e->list.add((User) e));
        return list.toString();
    }
}
3.启动服务并测试
启动服务后,浏览器输入:http://localhost:8080/user/insert,会新增一条 id 为 “1” 的记录:

浏览器输入:http://localhost:8080/user/delete,会删除一条 id 为 “1” 的记录:

浏览器输入:http://localhost:8080/user/getAll,会显示所有记录:
