文章目录
监控端口数据官方案例
1)案例需求:
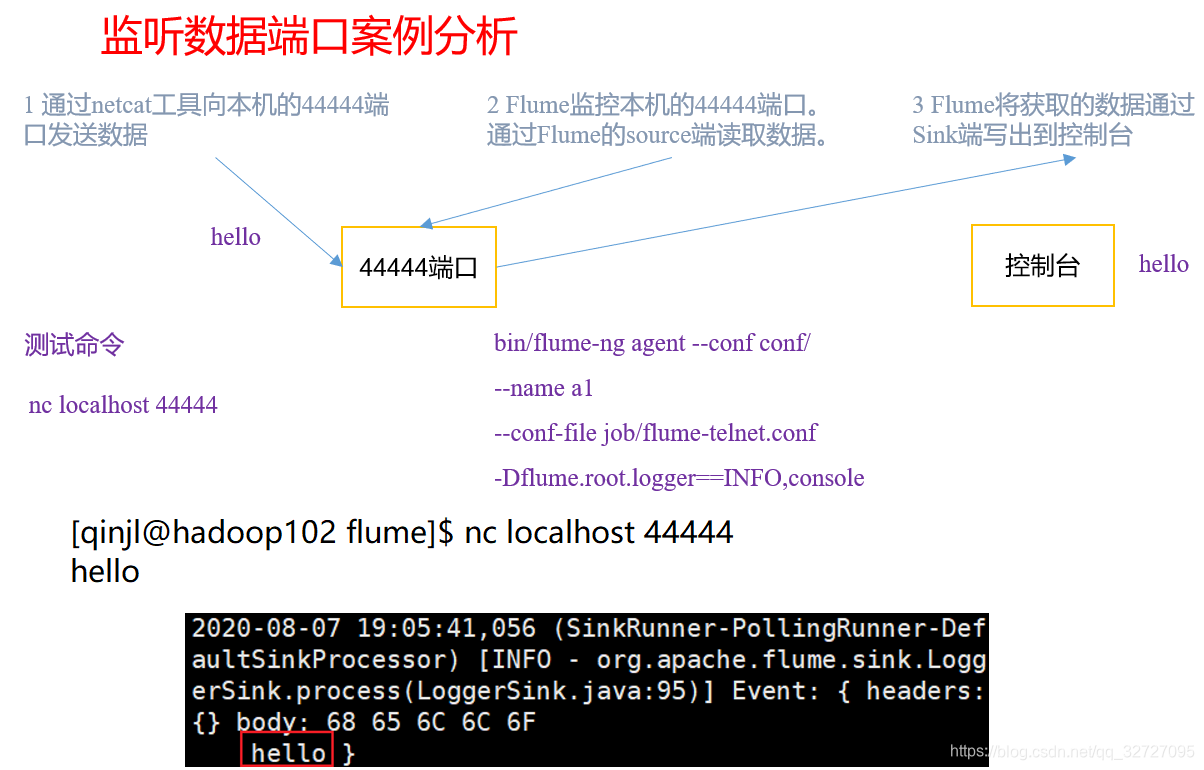
使用Flume监听一个端口,收集该端口数据,并打印到控制台。
2)需求分析:
3)实现步骤:
(1)安装netcat工具
[qinjl@hadoop102 software]$ sudo yum install -y nc
(3)创建Flume Agent配置文件netcat-flume-logger.conf
- 在flume目录下创建job文件夹并进入job文件夹。
[qinjl@hadoop102 flume]$ mkdir job
- 在job文件夹下创建Flume Agent配置文件netcat-flume-logger.conf。
[qinjl@hadoop102 job]$ vim netcat-flume-logger.conf
- 在netcat-flume-logger.conf文件中添加如下内容。
- 配置文件来源于官方手册http://flume.apache.org/FlumeUserGuide.html
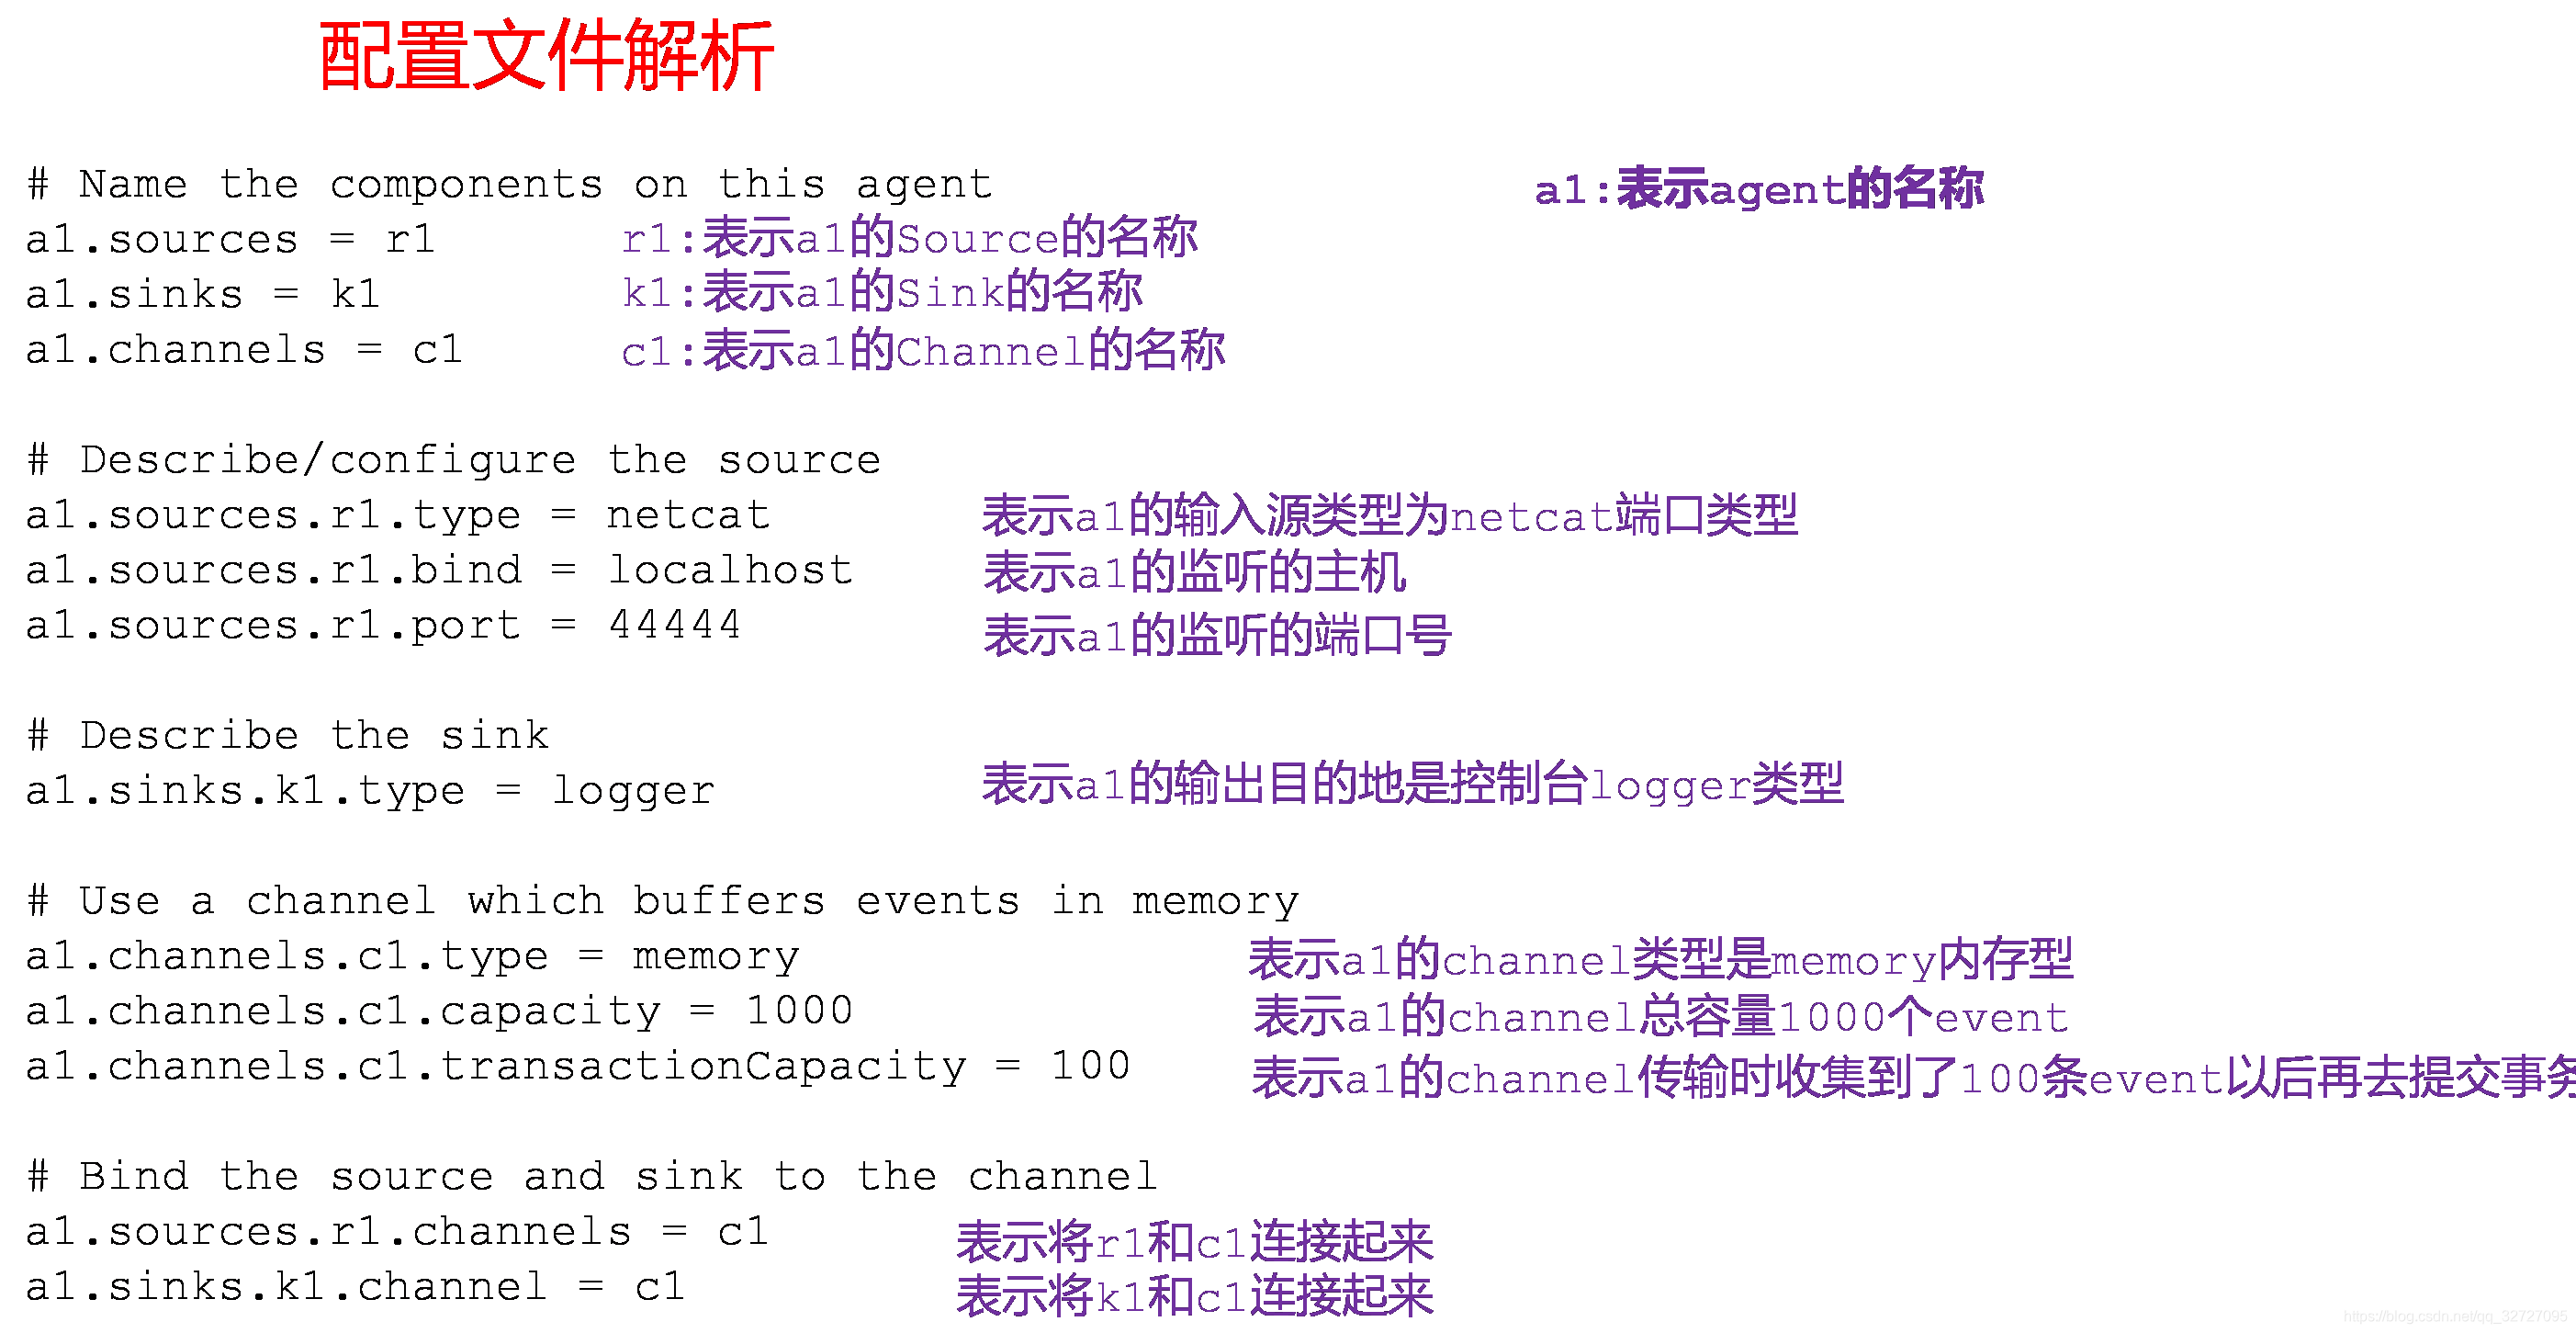
添加内容如下:

# Name the components on this agent
a1.sources = r1
a1.sinks = k1
a1.channels = c1

# Describe/configure the source
a1.sources.r1.type = netcat
a1.sources.r1.bind = localhost
a1.sources.r1.port = 44444

# Describe the sink
a1.sinks.k1.type = logger

# Use a channel which buffers events in memory
a1.channels.c1.type = memory
a1.channels.c1.capacity = 1000
a1.channels.c1.transactionCapacity = 100

# Bind the source and sink to the channel
a1.sources.r1.channels = c1
a1.sinks.k1.channel = c1
(4)先开启flume监听端口
第一种写法:
[qinjl@hadoop102 flume]$ bin/flume-ng agent --conf conf/ --conf-file job/netcat-flume-logger.conf --name a1 -Dflume.root.logger=INFO,console
第二种写法:
[qinjl@hadoop102 flume]$ bin/flume-ng agent -c conf/ -f job/netcat-flume-logger.conf -n a1 -Dflume.root.logger=INFO,console
参数说明:
–conf 或 -c:表示配置文件存储在conf/目录
–name 或 -n:表示给agent起名为a1
–conf-file 或 -f:flume本次启动读取的配置文件是在 job 文件夹下的 flume-telnet.conf 文件。
-Dflume.root.logger=INFO,console:-D表示flume运行时动态修改flume.root.logger参数属性值,并将控制台日志打印级别设置为INFO级别。日志级别包括:log、info、warn、error。
(5)使用netcat工具向本机的44444端口发送内容
[qinjl@hadoop102 ~]$ nc localhost 44444
hello
(6)在Flume监听页面观察接收数据情况

实时监控单个追加文件
1)案例需求:
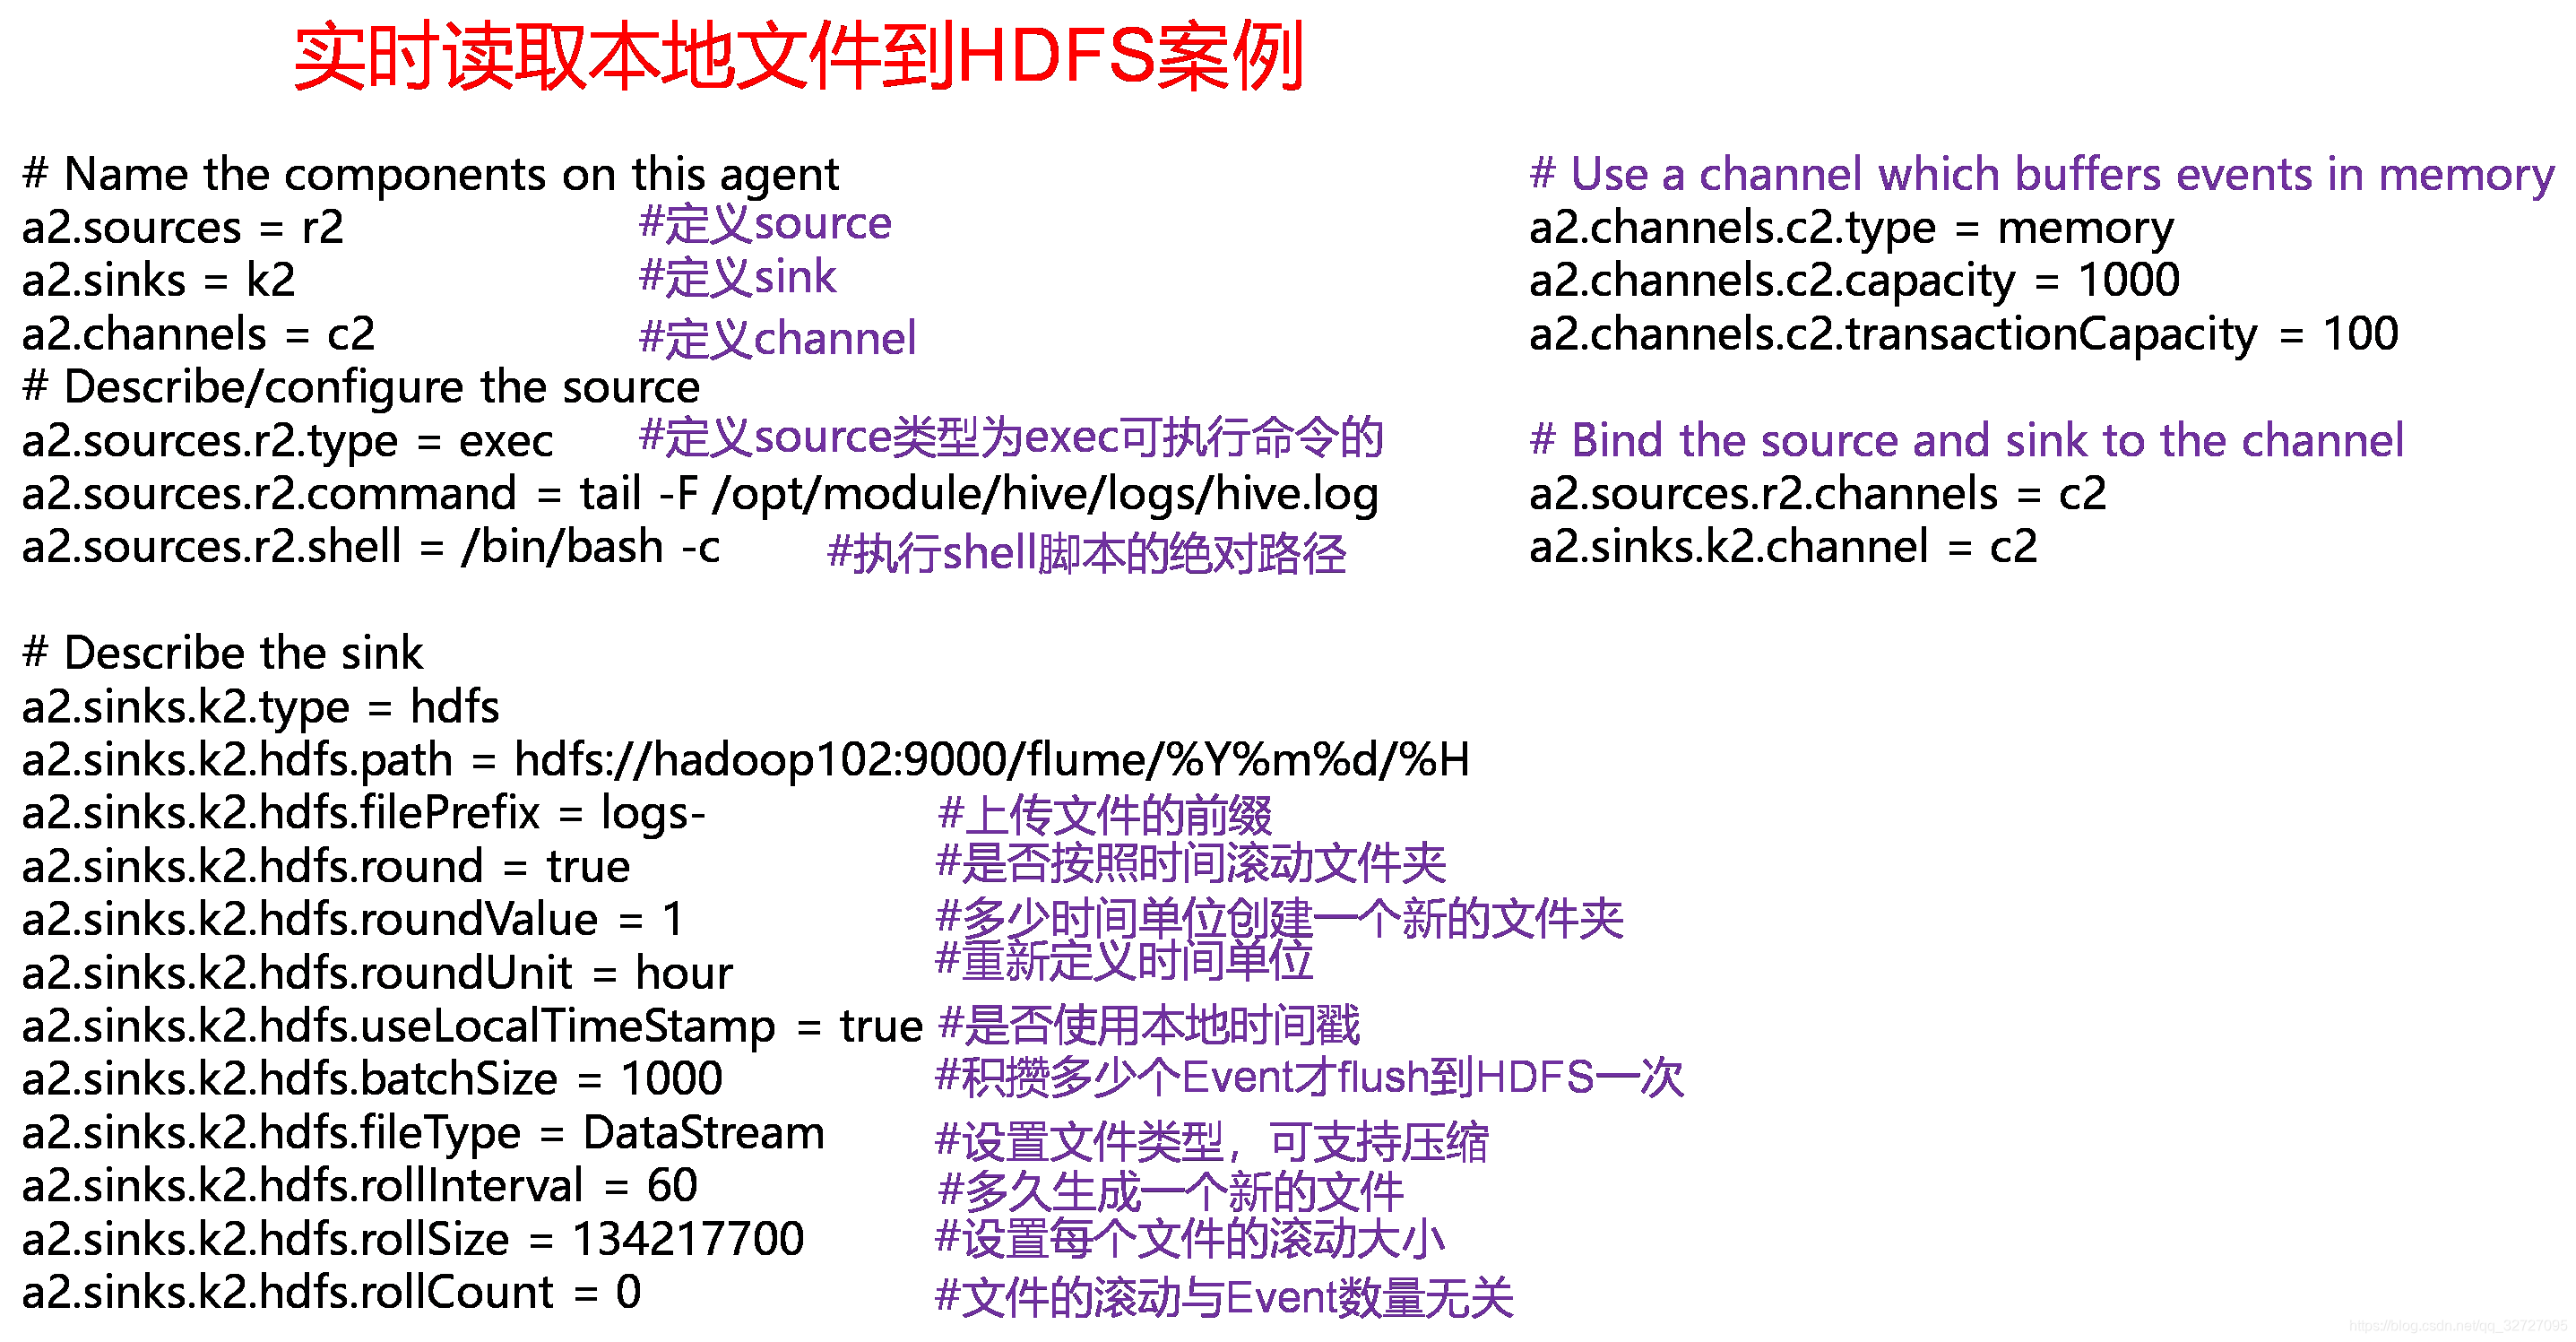
使用flume实时监控读取系统本地一个日志文件中动态追加的日志数据并实时写入到hdfs上的某个目录下
2)需求分析:
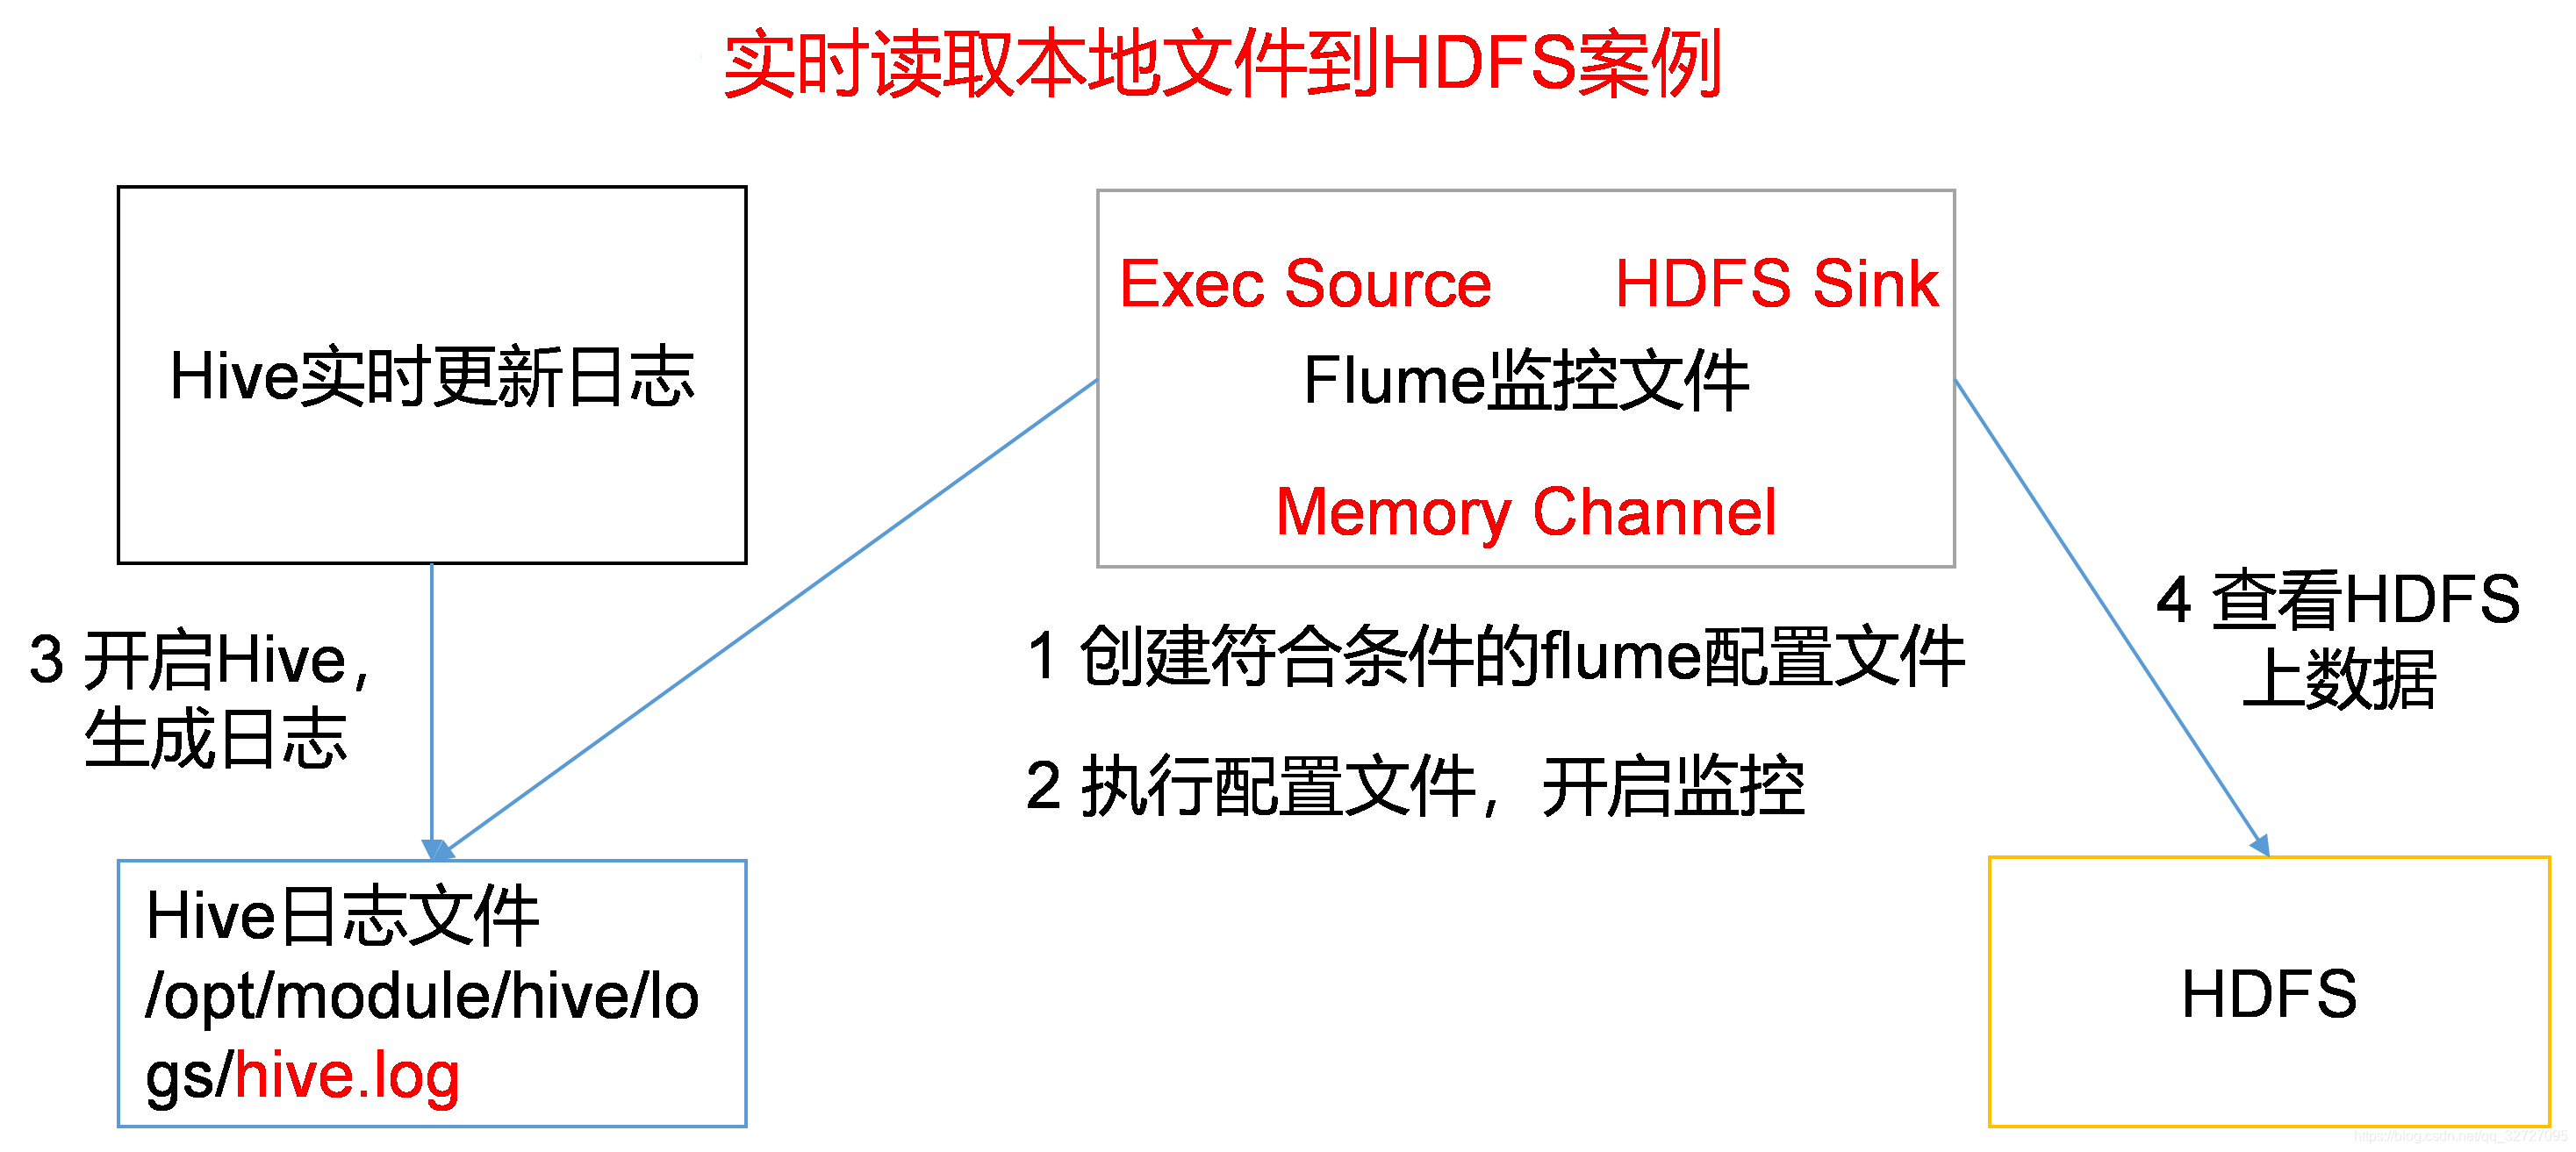
3)实现步骤:
(1)创建flume-file-logger.conf,flume-file-hdfs.conf,flume-file-hdfs2.conf文件
[qinjl@hadoop102 job]$ vim file-flume-logger.conf
- 注:要想读取Linux系统中的文件,就得按照Linux命令的规则执行命令。由于Hive日志在Linux系统中所以读取文件的类型选择:exec 即execute执行的意思。表示执行Linux命令来读取文件。tail -F(失败时,会重试,默认三次)tail -f(不会重试)都默认打印后10行。
添加如下内容:
一号版本
第二个案例:一号版本

# Name the components on this agent
a1.sources = r1
a1.sinks = k1
a1.channels = c1

# Describe/configure the source
a1.sources.r1.type = exec
a1.sources.r1.command = tail -F /opt/module/hive/logs/hive.log


# Describe the sink
a1.sinks.k1.type = logger

# Use a channel which buffers events in memory
a1.channels.c1.type = memory
a1.channels.c1.capacity = 1000
a1.channels.c1.transactionCapacity = 100

# Bind the source and sink to the channel
a1.sources.r1.channels = c1
a1.sinks.k1.channel = c1
因为/opt/module/hive/logs/hive.log本身日志太长,选择自己创建在/opt/module/datas/hive.log 自己通过echo 命令追加到至文件中。
二号版本
[qinjl@hadoop102 job]$ vim file-flume-hdfs.conf
第二个案例:二号版本
# Name the components on this agent
a1.sources = r1
a1.sinks = k1
a1.channels = c1
# Describe/configure the source
a1.sources.r1.type = exec
a1.sources.r1.command = tail -F /opt/module/datas/hive.log
# Describe the sink
a1.sinks.k1.type = hdfs
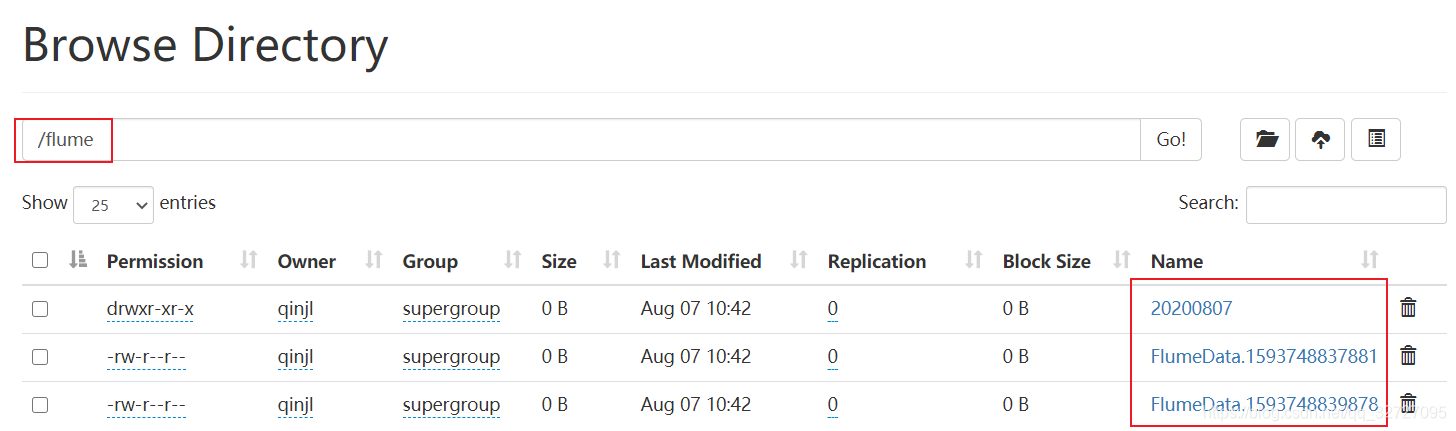
a1.sinks.k1.hdfs.path = /flume
a1.sinks.k1.hdfs.fileType = DataStream
# Use a channel which buffers events in memory
a1.channels.c1.type = memory
a1.channels.c1.capacity = 1000
a1.channels.c1.transactionCapacity = 100
# Bind the source and sink to the channel
a1.sources.r1.channels = c1
a1.sinks.k1.channel = c1
三号版本
[qinjl@hadoop102 job]$ vim file-flume-hdfs2.conf

第二个案例:三号版本
# Name the components on this agent
a1.sources = r1
a1.sinks = k1
a1.channels = c1


# Describe/configure the source
# exec类型的source可以借助执行一条linux shell命令实现读取linux系统上某个文件中的日志数据,tail可以实现实时读取新增加的数据
a1.sources.r1.type = exec
a1.sources.r1.command = tail -F /opt/module/datas/hive.log


# Describe the sink
a1.sinks.k1.type = hdfs
a1.sinks.k1.hdfs.path =/flume/%Y%m%d/%H
#上传文件的前缀
a1.sinks.k1.hdfs.filePrefix = logs-
#是否对时间戳取整
#启用根据时间生成路径中的转义字符的具体的时间值
a1.sinks.k1.hdfs.round = true
#多少时间单位创建一个新的文件夹
a1.sinks.k1.hdfs.roundValue = 1
#重新定义时间单位
a1.sinks.k1.hdfs.roundUnit = hour
#是否使用本地时间戳
#表示使用本地linux系统时间戳作为时间基准,否则会自动参考事件的header中的时间戳
a1.sinks.k1.hdfs.useLocalTimeStamp = true
#积攒多少个Event才flush到HDFS一次
a1.sinks.k1.hdfs.batchSize = 100
#设置文件类型,可支持压缩
a1.sinks.k1.hdfs.fileType = DataStream
#多久生成一个新的文件
a1.sinks.k1.hdfs.rollInterval = 10
#设置每个文件的滚动大小(要比block略小一点,因为是先追加数据,再滚动)
a1.sinks.k1.hdfs.rollSize = 134217000
#文件的滚动与Event数量无关
a1.sinks.k1.hdfs.rollCount = 0

# Use a channel which buffers events in memory
a1.channels.c1.type = memory
a1.channels.c1.capacity = 1000
a1.channels.c1.transactionCapacity = 100

# Bind the source and sink to the channel
a1.sources.r1.channels = c1
a1.sinks.k1.channel = c1
注意:对于所有与时间相关的转义序列,Event Header中必须存在以 “timestamp” 的key(除非hdfs.useLocalTimeStamp设置为true,此方法会使用TimestampInterceptor自动添加timestamp)。
a3.sinks.k3.hdfs.useLocalTimeStamp = true
(3)运行Flume
[qinjl@hadoop102 flume]$ bin/flume-ng agent --conf conf/ --name a1 --conf-file job/file-flume-logger.conf  -Dflume.root.logger=INFO,console

[qinjl@hadoop102 flume]$ bin/flume-ng agent --conf conf/ --name a1 --conf-file job/flume-file-hdfs.conf

[qinjl@hadoop102 flume]$ bin/flume-ng agent --conf conf/ --name a1 --conf-file job/flume-file-hdfs1.conf
(4)开启Hadoop和Hive并操作Hive产生日志
[qinjl@hadoop102 hadoop-2.7.2]$ sbin/start-dfs.sh
[qinjl@hadoop103 hadoop-2.7.2]$ sbin/start-yarn.sh

[qinjl@hadoop102 hive]$ bin/hive
hive (default)>
(5)在HDFS上查看文件。