一、默认配置详解[nginx.conf]
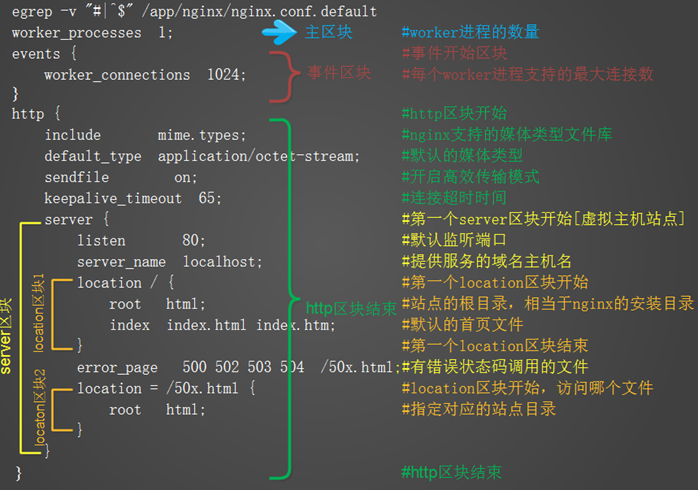
nginx默认会生成一个主配置的备份,以便主配置文件误修改后可以作为参考,将其过滤掉注释文件和空格后,进行讲解
egrep -v "#|^$" /app/nginx/nginx.conf.default
二、 虚拟主机详解
1.概念
所谓虚拟主机,在web服务里就是一个单独的网站站点,这个站点有独立的域名(或ip或端口),具有独立的程序及资源目录,可以独立地对外提供服务供用户访问
在nginx中,每个server{ }标签就对应一个虚拟主机,在apache中,每对标签对应一个虚拟主机
虚拟主机的三种类型:
基于域名的虚拟主机[重点]
基于端口的虚拟主机
基于IP的虚拟主机
重点掌握第一种基于域名的虚拟主机
2.Nginx配置虚拟主机步骤
1.增加一个完整的server标签到结尾处,注意要在http标签内
2.更改server_name及对应网页的root根目录等参数
3.创建server_name域名对应的网页的根目录,并建立测试的index.html首页文件
4.检查Nginx配置文件语法(-t),平滑重启(reload)
5.在客户端对server_name处配置的域名或host解析
6.在windows浏览器中输入地址访问,或在linux中用curl访问
说明:实际企业环境中,需要在nginx重启后立即检查结果,一般不采用敲命令检查,而采用编写检查脚本手工执行或修改nginx启动脚本自动执行的方式
3.基于域名的虚拟主机实战
1)修改nginx.conf文件为如下内容
worker_processes 1;
events {
worker_connections 1024;
}
http {
include mime.types;
default_type application/octet-stream;
sendfile on;
keepalive_timeout 65;
server {
listen 80;
server_name www.etiantian.omg;
location / {
root html/www;
index index.html index.htm;
}
}
server {
listen 80;
server_name blog.etiantian.omg;
location / {
root html/blog;
index index.html index.htm;
}
}
}
省略其他参数后配置了2个域名到server标签模块中
2)在nginx目录下创建html/www和html/blog文件夹,并创建文件index.html,输入任意内容
mkdir -p html/www html/blog
echo "the pag is my www test" >html/www/index.html
echo "the pag is my blog test" >html/blog/index.html
./sbin/nginx -t
./sbin/nginx -s reload
需要检查语法并重启nginx服务
3) 然后分别修改本机和windows客户端的host文件后访问本域名,查看结果
[root@xxx ~]# curl www.etiantian.omg
the pag is my www test
[root@xxx ~]# curl blog.etiantian.omg
the pag is my blog test
以上方法就创建了两个域名虚拟主机,基于端口和基于ip的虚拟主机只需要更改server_name即可
4.nginx虚拟主机的别名
虚拟主机别名,就是例如访问www.baidu.com和访问baidu.com这两个域名,都能访问到www.baidu.com这个域名,注意和301跳转是不一样的
设置方法很简单,就是在server标签中,第一个域名后面,接空格后再输入第二个域名,如下:
server {
listen 80;
server_name blog.etiantian.omg etiantian.omg;
在生产场景中,一种应用就是上面写的多个域名指向同一个页面,另一种应用是再集群环境下,给每一台服务器在主域名后配置不同