一、游戏场景的转换并持久化数据
在上一篇文章中,开始界面的脚本基本完成,那么接下来就是开始游戏,进入游戏场景。
1、游戏场景转换
场景的切换我们需要用到以下代码
SceneManager.LoadScene(string sceneName);
提示:如果场景切换失败,请点击File->Build Setting… 检查Scenes In Build窗口中是否有你需要转换的场景。
在OGUI的布局上,我们再添加一个按钮StartGame,此按钮的作用就是用来进行场景的转换,事件如何添加就不再进行叙述了。
2、持久化数据
不明白持久化数据(PlayerPrefs)如何使用的,建议了解一下,链接如下
接下来就是持久化数据(PlayerPrefs),将开始界面所选择的人物、武器、衣服,做上标记,然后在游戏场景当中进行创建。
具体步骤: 在武器选择、人物选择、服装选择的脚本上,分别添加一个静态属性用于存储当前是选择了何种类型的武器、人物、服装(在上一篇的角色脚本中已经添加了),然后在StartName的按钮上添加一个脚本,在点击此按钮时,脚本将另三个脚本中的静态属性取出,进行持久化存储,并进入到下一个游戏场景当中。
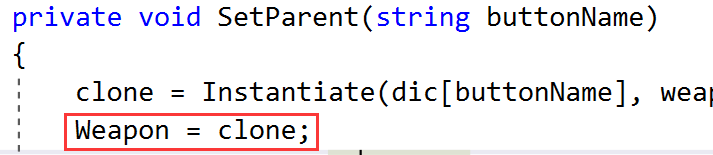
- 在选择武器的脚本上,添加weapon静态属性,用于记录选择的武器
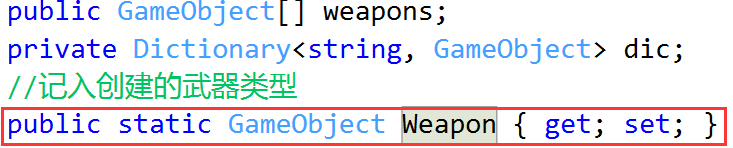
- 如何记录:在创建游戏物体时,给静态属性进行赋值
- 在按钮StartGame的脚本上进行持久化数据,注意:只有当点击脚本的时候才进行持久化存储,所以在点击事件当中进行。
using System.Collections;
using System.Collections.Generic;
using UnityEngine;
using UnityEngine.Events;
using UnityEngine.SceneManagement;
using UnityEngine.UI;

public class StartGame : MonoBehaviour
{
    private void Start()
    {
        GetComponent<Button>().onClick.AddListener(new UnityAction(ToPlay));
    }
    private void ToPlay()
    {
        if (GenerateRole.Role!=null&& WeaponChose.Weapon!=null&& ChoseCloth.Cloth!=null)
        {
            PlayerPrefs.SetString("Role", GenerateRole.Role.name);
            PlayerPrefs.SetString("Weapon", WeaponChose.Weapon.name);
            PlayerPrefs.SetString("Cloth", ChoseCloth.Cloth.name);
            SceneManager.LoadScene("UCP Demo Scene");
        }
        else
        {
            Debug.Log("请先选择角色、武器、服装");
        }
    }
}
二、角色创建与移动
1、角色创建
- 角色的创建需要根据PlayerPrefs类获取的字符串来获取资源,我们使用Resourse类的Load(string path)方法来获取资源(使用此方法获取资源,资源文件的路径必须在Resourse文件夹下);在得到资源后,我们使用Instantiate在游戏场景中进行创建,代码如下(仅供参考):
using System.Collections;
using System.Collections.Generic;
using System.IO;
using UnityEngine;

public class CreateRole : MonoBehaviour
{
    private GameObject role;
    private GameObject weapon;
    private Texture cloth;
    private Transform weaponLocal;
    //角色物体创建的位置
    public Transform roleLocal;
    private void Start()
    {

        //Debug.Log("角色名:"+PlayerPrefs.GetString("Role"));
        //Debug.Log("武器名:"+PlayerPrefs.GetString("Weapon"));
        //Debug.Log("服装名:"+PlayerPrefs.GetString("Cloth"));
        //获取的角色名字和武器名字是带有(Clone)的,所以进行字符串切割.

        //role = Resources.Load<GameObject>("GameRole/MonsterBaseTeam/3D/mon_goblinWizard/mon_goblinWizard");
        GenerateRole();
    }
    //切割字符串
    private string SplitName(string name)
    {
        return name.Substring(0, name.IndexOf("("));
    }
    private string path = @"GameRole\MonsterBaseTeam";
    /// <summary>
    /// 加载武器资源
    /// </summary>
    /// <param name="name"></param>
    private void LoadResourse(string name)
    {
        string newPath;
        newPath = Path.Combine(path, "3D\\weapons", SplitName(name));
        weapon=Resources.Load<GameObject>(newPath);
        Debug.Log("武器路径"+newPath);
    }
    //这里之所以要将资源加载区分开来,是因为我的资源路径有点复杂(代码仅供参考哦)
    /// <summary>
    /// 加载人物和武器资源
    /// </summary>
    /// <param name="roleName">角色名字</param>
    /// <param name="clothName">服装名字</param>
    private void LoadResourse(string roleName,string clothName)
    {
        string rolePath;
        string clothPath;
        rolePath = Path.Combine(path, "Prefabs");
        clothPath = Path.Combine(path, "3D",SplitName(roleName), clothName);
        rolePath = Path.Combine(rolePath, SplitName(roleName));
        role=Resources.Load<GameObject>(rolePath);
        cloth=Resources.Load<Texture>(clothPath);
        Debug.Log("服装路径:"+clothPath);
    }
    /// <summary>
    /// 创建角色物体
    /// </summary>
    private void GenerateRole()
    {
        //加载资源
        LoadResourse(PlayerPrefs.GetString("Weapon"));
        LoadResourse(PlayerPrefs.GetString("Role"), PlayerPrefs.GetString("Cloth"));
        GameObject ro = Instantiate(role, roleLocal.position, Quaternion.Euler(0,180,0));
        //设置武器创建的位置
        weaponLocal = GameObject.Find("wphand").transform;
        GameObject wea=Instantiate(weapon,weaponLocal.position, Quaternion.Euler(0, -105, 150));
        wea.transform.SetParent(weaponLocal);
        ro.GetComponentInChildren<Renderer>().material.mainTexture = cloth;
        ro.transform.SetParent(GameObject.Find("BirthPlace").transform);
        //给创建的角色添加碰撞器组件,刚体组件
        ro.AddComponent<BoxCollider>();
        ro.GetComponent<BoxCollider>().size =new Vector3(2,5,1);
    }
}
2、角色移动
- 可创建一个空物体,给物体添加一个组件character controller,角色控制器按钮,并创建一个相机作为这个空物体的子类。编写一个移动脚本挂载到空物体上,物体就能移动跳跃了,通过控制组件character controller的属性可以调整跳跃高度等,脚本如下(此脚本要和组件character controller一起):
using System.Collections;
using System.Collections.Generic;
using UnityEngine;

public class RoleMove : MonoBehaviour
{
    public float speed = 6.0F;
    public float jumpSpeed = 8.0F;
    public float gravity = 20.0F;
    private Vector3 moveDirection = Vector3.zero;
    void Update()
    {
        CharacterController controller = GetComponent<CharacterController>();
        if (controller.isGrounded)
        {
            moveDirection = new Vector3(Input.GetAxis("Horizontal"), 0, Input.GetAxis("Vertical"));
            moveDirection = transform.TransformDirection(moveDirection);
            moveDirection *= speed;
            if (Input.GetButton("Jump"))
                moveDirection.y = jumpSpeed;
        }
        moveDirection.y -= gravity * Time.deltaTime;
        controller.Move(moveDirection * Time.deltaTime);
    }
}
三、角色动画添加
- 需要添加的动画有走、跑、死亡、攻击、待机。
因为要设置播放动画,那么就需要获取Animation组件(我这里使用的是animation组件,你们可以尝试使用Animator组件,即Mecanim动画系统)
在角色物体还未创建时,我们是找不到动画组件的,所以我们需要先让寻找组件的方法等待一会再进行查找,而在Update方法中调用的方法需要使用到此组件,所以我们使用协程来进行等待一会,两个等待时间是有关联的,必须先找到组件再执行Update中的方法。
- 代码如下(仅供参考):
using System.Collections;
using System.Collections.Generic;
using UnityEngine;
public class PlayAction : MonoBehaviour
{
    private Animation ani;
    //存储wsad输入的值
    private float x;
    private float y;
    private void Start()
    {
        //三秒后调用查找组件方法,是确保创建游戏角色的脚本在此之前运行了
        Invoke("FindComponent", 0.8f);
    }
    private void Update()
    {
        StartCoroutine(ControllAction());
    }
    /// <summary>
    /// 查找子类中Animation的组件
    /// </summary>
    private void FindComponent()
    {
        ani = transform.GetComponentInChildren<Animation>();
    }
    /// <summary>
    /// 控制动画播放
    /// </summary>
    private IEnumerator ControllAction()
    {
        //协程进行等待,确保ani已经找到组件
        yield return new WaitForSeconds(1);
        if (ani != null)
        {
            x = Input.GetAxis("Horizontal");
            y = Input.GetAxis("Vertical");
            if (x != 0 || y != 0)
            {
                ani.Play("Run");
            }
            else if (ani.IsPlaying("Run"))
                ani.CrossFade("Idle");
            else ani.CrossFadeQueued("Idle");
            if (Input.GetMouseButtonDown(0))
            {
                ani.Play("Attack01");
            }
            else if (Input.GetMouseButtonDown(1))
            {
                ani.Play("Attack02");
            }
        }
        else Debug.Log("Animation组件为空!");
    }
}

- 到此为止,我们的角色终于是诞生能跑能跳了,接下来就是打怪了。
打怪功能的实现请见 Unity3D-----简易游戏项目开发03