五.复现代码过程
由于官网上的程序是在Liunx系统上的实现,我们要在windows系统需要改一下程序。
1.安装软件:Anaconda3-2019.10-Windows-x86_64,pycharm-professional-2019.3.2,qt-opensource-windows-x86-5.12.0
安装包链接:https://pan.baidu.com/s/1BhGMsln6ZIGkw-XHp0yFdA
提取码:9yjx
2.安装GPU加速器:Cuda10.0+Cudnn7.4.2
安装包链接:https://pan.baidu.com/s/1eS5D6NV2jddcjj5tvaibeg
提取码:1zor
3.安装pytorch1.1.0:
以管理员身份运行Anconda Prompt,加入清华网:
conda config --add channels https://mirrors.tuna.tsinghua.edu.cn/anaconda/pkgs/free/
conda config --add channels https://mirrors.tuna.tsinghua.edu.cn/anaconda/pkgs/main/
conda config --set show_channel_urls yes
conda config --add channels https://mirrors.tuna.tsinghua.edu.cn/anaconda/cloud/pytorch/
创建名为pytorch的虚拟环境:
conda create -n pytorch python=3.6
激活 进入新环境:activate pytorch
然后安装pytorch:conda install pytorch=1.1.0 torchvision=0.3.0 cudatoolkit=10.0
4.安装Pyqt5:直接使用pip安装,但是需要SIP的支持,所以先安装SIP,再安装pyqt5
pip install sip
pip install PyQt5
安装qt designer:pip install PyQt5-tools
安装完成后,在安装目录下可以看到下面标出的文件夹:

5. 配置pycharm:新建工程名为faster-rcnn的工程,点击File/Settings/Project Interpreter,设置python解释器为我们新建的pytorch虚拟环境的python3.6。
配置Qt Designer:点击File/Settings/Tools/External Tools,新建一个工具“Qt Designer”,可以用来设计GUI界面,生成UI文件(也可以直接用Qt Creator中带有的UI Designer设计)
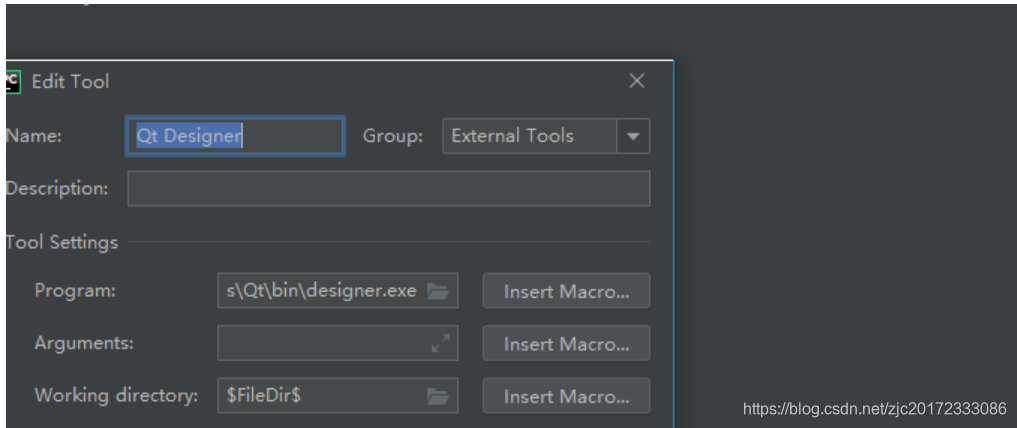 Name:可自己定义
Program:指向上述安装PyQt5-tools里面的designer.exe或者Qt Creater中的designer.exe
Work directory:使用变量
配置PyUIC:点击File/Settings/Tools/External Tools,再新建一个工具“PyUIC”,这个主要是用来将上述的UI文件 转换成 py文件的。
 Name:可自己定义
Program:使用虚拟环境pytorch中的python.exe
Arguments的值为:-m PyQt5.uic.pyuic
-o
.py
Work directory:使用变量
6.在github官网上下载源码:解压到pycharm工程目录(工程名为faster-rcnn)下,这样打开pycharm,在工程目录下就有该文件了。
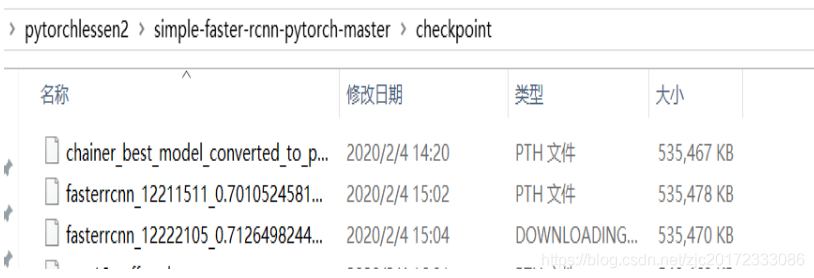
7.下载预训练模型:https://pan.baidu.com/share/init?surl=o87RuXW
提取码为:scxn
有3个文件:chainer_best_model_converted_to_pytorch_0.7053.pth
fasterrcnn_12211511_0.701052458187_torchvision_pretrain.pth
fasterrcnn_12222105_0.712649824453_caffe_pretrain.pth.baiduyun.p.downloading
在源码文件夹内创建checkpoint文件夹,将预训练模型放入
8.下载 vgg16 模型:
https://pan.baidu.com/share/init?surl=DFxRkVBRjbDBDKKXdND47A
提取码为u0xf
放在C:\Users\jincheng.cache\torch\checkpoints\vgg16-397923af.pth
9.下载培训,验证,测试数据和VOCdevkit(复制地址到迅雷下载会快点)
http://host.robots.ox.ac.uk/pascal/VOC/voc2007/VOCtrainval_06-Nov-2007.tar http://host.robots.ox.ac.uk/pascal/VOC/voc2007/VOCtest_06-Nov-2007.tar
http://host.robots.ox.ac.uk/pascal/VOC/voc2007/VOCdevkit_08-Jun-2007.tar
将所有这些tar解压缩到一个目录中 VOCdevkit
10.安装其他依赖项:
激活虚拟环境pytorch之后,路径是指requirements.txt所在的路径,提前将requirements.txt中最后一句去掉,否则import resource会报错
pip install -r 路径\requirements.txt(要先将最后一句去掉)-i https://pypi.tuna.tsinghua.edu.cn/simple
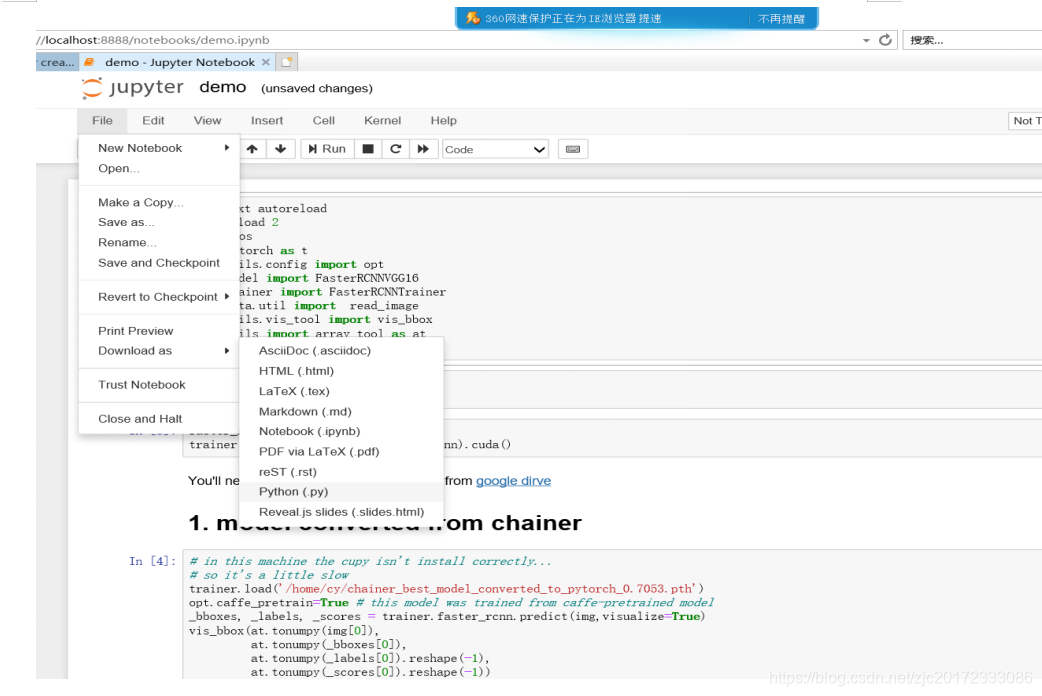
11.把源码上的demo.ipynb文件转化为py文件:
运行Anconda Prompt,执行cd /d D:
转到D盘,接着执行cd D:\faster-rcnn\simple-faster-rcnn-pytorch-master转到含有demo.ipynb的目录下,接着执行jupyter notebook,打开jupyter,点击demo.ipynb,接着File—>Download as—>python(.py),就可以得到demo.py文件了
打开demo.py:

跟官网上的demo.ipynb对比demo.py多了3行get_ipython().run_line_magic,这是 由jupyter notebook 文件转换为 .py 文件之后生成的,可以看到这是注释语句,我们可以将其注释掉,否则会报错NameError: name ‘get_ipython’ is not defined,然后继续看demo.py
img = read_image(‘misc/demo.jpg’)
img = t.from_numpy(img)[None]
读取测试图片到img里,在将图像的numpy转为tensor
faster_rcnn = FasterRCNNVGG16()
trainer = FasterRCNNTrainer(faster_rcnn).cuda()
下载Vgg16模型到faster_rcnn,送到FasterRCNNTrainer中并设置GPU加速
接下来你会看到3段相似的代码,只不过用的预训练模型不同,这3个预训练模型,我们都下载到checkpoint文件夹,我们只选用其中一段测试即可,这里用第一段:
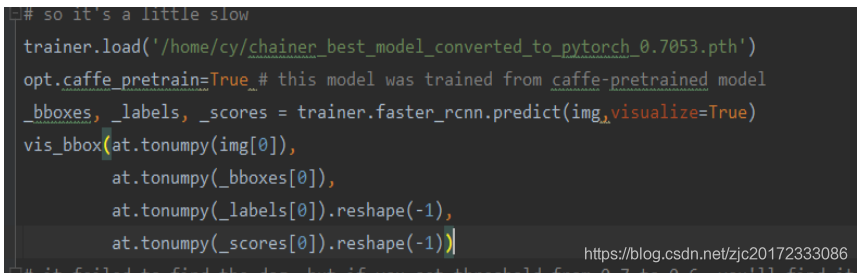 采用的是chainer_best_model_converted_to_pytorch_0.7053.pth文件,则将上路径改为:
trainer.load(‘checkpoint/chainer_best_model_converted_to_pytorch_0.7053.pth’)
opt.caffe_pretrain=True
表示这个预训练模型是采用caffe-pretrained模型,如果采用fasterrcnn_12211511_0.701052458187_torchvision_pretrain.pth
则这里填False
_bboxes, _labels, _scores = trainer.faster_rcnn.predict(img,visualize=True)
将图片的框框,标签和分数检测出来,将其转为numpy的数据形式传到vis_bbox()中
ax = vis_bbox(at.tonumpy(img[0]),
at.tonumpy(_bboxes[0]),
at.tonumpy(_labels[0]).reshape(-1),
at.tonumpy(_scores[0]).reshape(-1))
这个ax是什么呢,让我们转到vis_bbox(),方法:在pycharm中选中vis_bbox(该函数的功能为显示检测图),点ctrl+B就可以找到函数内容了
def vis_bbox(img, bbox, label=None, score=None, ax=None):
label_names = list(VOC_BBOX_LABEL_NAMES) + ['bg']
VOC_BBOX_LABEL_NAMES为数据库的类别名
if label is not None and not len(bbox) == len(label):
raise ValueError(‘The length of label must be same as that of bbox’)
if score is not None and not len(bbox) == len(score):
raise ValueError(‘The length of score must be same as that of bbox’)
#一些判断出错的语句
ax = vis_image(img, ax=ax)
#调用了vis_image函数,下面会解释到这个函数
if len(bbox) == 0:
    return ax

for i, bb in enumerate(bbox):
    xy = (bb[1], bb[0])
    height = bb[2] - bb[0]
    width = bb[3] - bb[1]
    ax.add_patch(plot.Rectangle(
        xy, width, height, fill=False, edgecolor='red', linewidth=2))

    caption = list()

    if label is not None and label_names is not None:
        lb = label[i]
        if not (-1 <= lb < len(label_names)):  # modfy here to add backgroud
            raise ValueError('No corresponding name is given')
        caption.append(label_names[lb])
    if score is not None:
        sc = score[i]
        caption.append('{:.2f}'.format(sc))

    if len(caption) > 0:
        ax.text(bb[1], bb[0],
                ': '.join(caption),
                style='italic',
                bbox={'facecolor': 'white', 'alpha': 0.5, 'pad': 0})
return ax
#这个for循环就是画检测框框的函数了
下面开始讲函数vis_image(),我们来看看该函数代码:(该函数功能为显示原图)
def vis_image(img, ax=None):
if ax is None:
    fig = plot.figure()#可以看出代码使用了matplotlib.pyplot的指令绘图方法
    ax = fig.add_subplot(1, 1, 1)#创建一个子图,Axes对象被创建时就自动创建x轴和y轴
# CHW -> HWC
img = img.transpose((1, 2, 0))#因为matplotlib读取图片为RGB,所以先将图片转化
ax.imshow(img.astype(np.uint8))#Axes.imshow()显示一张图片,图片数据为二维数组,此时的图片为原图
return ax
这样由官网转化的demo.py就解释完,但运行没有图片显示,是因为我们还没有添加matplotlib画图的环境呢
导入部分加入
import matplotlib
import matplotlib.pyplot as plt
matplotlib.use(‘TkAgg’)
matplotlib的绘图结果可以有各种输出形式,这些不同的输出功能就称为后端(backend)对于用户界面后端,matplotlib还将渲染器和画布分离开来,以实现更灵活的定制功能,所有的用户界面都使用Agg渲染器,有QT5Agg,TkAgg等
Axes.imshow()显示图片还要搭配plt.show()才可以显示,所以在代码后面加上plt.show(),这样整个demo.py就完成啦。
12.在源码simple-faster-rcnn-pytorch-master所在目录下输入cmd,进去命令行:
激活虚拟环境:activate pytorch
pip install torchnet -i https://pypi.tuna.tsinghua.edu.cn/simple
pip install -i https://pypi.tuna.tsinghua.edu.cn/simple cupy-cuda90(cuda9.0执行此命令)
pip install -i https://pypi.tuna.tsinghua.edu.cn/simple cupy-cuda100(cuda10。0执行此命令)
13.执行python demo.py,如果报错ImportError: cannot import name ‘PILLOW_VERSION’,说明Pillow的版本过高,方法:pip install Pillow==6.2.2 --user,之后执行python demo.py就可以得到测试结果。下图是直接在pycharm运行demo.py文件的结果:
在运行demo.py之前需要激活visdom环境,在命令行激活虚拟环境,输入python -m visdom.server,得到以下结果:
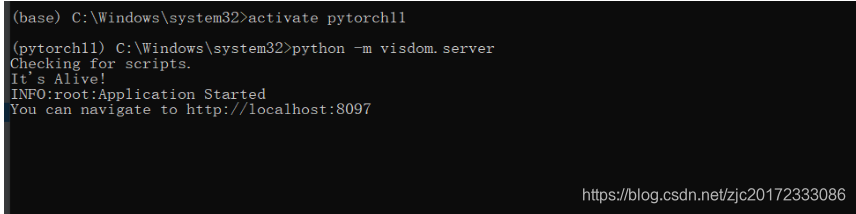 复制http://localhost:8097到浏览器即可,否则会报错crequests.exceptions.ConnectionError: HTTPConnectionPool(host=‘localhost’, port=8097): Max retries exceeded with url: /events (Caused by NewConnectionError(’: Failed to establish a new connection: [WinError 10061] 由于目标计算机积极拒绝,无法连接。’,))
整个faster-rcnn实现过程就解释完了。
