一、基础知识:
1. 简介
ansible基于python开发,集合了众多运维工具的优点,实现了批量系统配置、批量程序部署、批量运行命令等功能。ansible是基于模块工作的,本身没有批量部署的能力。
真正具有批量部署的是ansible运行的模块,ansible只是一个框架
(1) 连接插件connection plugins: 负责和被监控端实现通信;
(2) host inventory: 指定操作的主机,是一个配置文件里面定义监控的主机
(3) 各种模块核心模块、command模块、自定义模块;
(4) 借助于插件完成记录日志邮件等功能;
(5) playbook: 剧本执行多个任务时,非必须可以让节点一次性运行多个任务。
2、特性:
    (1) no agents: 不需要在被管理主机上安装任务agent
    (2) no server: 无服务器端,使用时,直接运行命令即可
    (3) modules in any languages: 基于模块工作,可使用任意语言开发模块
    (4) yaml not code:使用yaml语言定制剧本playbook
    (5) ssh by default:基于SSH工作
    (6) strong multi-tier solution: 可实现多级指挥

3、优点:
    (1) 轻量级,无需在客户端安装agent,更新时,只需要在操作机上进行一次更新即可;
    (2) 批量任务可以写成脚本,而且不用分发到远程就可以执行
    (3) 使用python编写,维护简单
    (4) 支持sudo
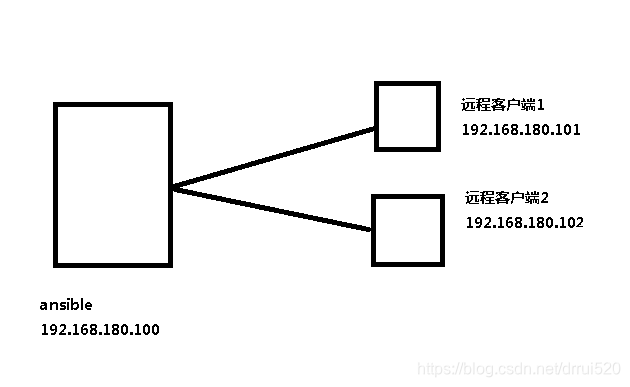
二、实验环境
所需软件包在百度云盘——linux——ansible自动化运维
三、安装ansible
1、定义域名仓库源
将ansiblerepo文件夹复制到Linux根目录下
cd /etc/yum.repo.d
rm -rf *
vim ansible.repo
[ansible]
name=ansible
baseurl=file:///ansiblerepo
enabled=1
gpgcheck=0
yum clean all
2、yum安装ansible
yum install -y ansible
3、验证安装结果
ansible --version
4、创建ssh免交互式登录
ssh-keygen -t rsa
在生成私钥是设置密码保护
ssh-copy-id [email protected]
ssh-copy-id [email protected]
5、验证免密登录
ssh 192.168.180.101
ssh 192.168.180.102
四、配置ansible——定义ansible主机管理清单
vim /etc/ansible/hosts
[web]
192.168.180.101
192.168.180.102
五、ansible命令
1、ansible [options]
ansible -i /etc/ansible/hosts web -m ping
2、ansible-doc 查询ansible模块文档
ansible-doc ping
3、ansible-playbook通过剧本来执行对远程主机的更改
ansible-playbook 剧本名称.yml
4、ansible-console交互工具
ansible-console
cd web //通过cd命令切换主机或分组
list //列出当前的设备
六、模块
command模块:在远程主机执行命令,不支持管道符、重定向等shell命令
ansible all -m command -a “chdir=/home ls ./”
在所有主机上先切换到/home下,再运行ls ./命令
shell模块:在远程主机执行shell命令
ansible web -m shell -a ‘echo “hello” >> /hello.txt’
在web分组所有主机上执行shell命令echo “hello” >> /hello.txt
copy模块:复制指定主机文件到远程主机指定位置
ansible web -m copy -a “src=/etc/hosts dest=/tmp mode=777 owner=nobody group=root”
hostname模块:管理远程主机上的主机名
ansible 192.168.180.101 -m hostname -a “name=demo”
将192.168.180.101的主机名称改为demo
yum模块:在远程主机上调用yum机制实现软件包管理
ansible web -m yum -a “name=httpd state=present”
在web分组的主机中通过yum安装httpd
service模块:在远程主机上管理服务状态
ansible web -m service -a “name=httpd state=restart enabled=yes”
在web分组的主机中重启httpd服务
user模块:管理远程主机上的用户账户
ansible web -m user -a ‘name=user1 system=yes password=user1 comment=“test user”’
在web分组的主机中分别创建user1用户
ansible web -m user -a “name=user1 remove=yes state=absent”
删除user1用户及家目录
七、playbook配置文件
vim /etc/ansible/a.yml
- hosts: web
remote_user: root
tasks: - name: adduser
user: name=user2 state=present
tags:- aaa
- name: addgroup
group: name=root system=yes
tags:- bbb
…
- bbb
剧本语法检查:ansible-playbook --sybtax-check /etc/ansible/a.yml
预测试:ansible-playbook -C /etc/ansible/a.yml
列出主机:ansible-playbook --list-hosts /etc/ansible/a.yml
列出任务:ansible-playbook --list-tasks /etc/ansible/a.yml
列出标签:ansible-playbook --list-tags /etc/ansible/a.yml
执行任务:ansible-playbook /etc/ansible/a.yml
八、案例
1、创建本地yum源
- hosts: webserver
remote_user: root
tasks:
- name: yuminstall
shell: rm -rf /etc/yum.repos.d/Cent* && echo -e “[local]\nname=local\nenabled=1\nbaseurl=file:///mnt\ngpgcheck=0” > /etc/yum.repos.d/local.repo && mount /dev/cdrom /mnt && yum clean all && yum repolist
tags:
- yum
…
2、yum安装httpd
- hosts: webserver
remote_user: root
tasks:
- name: azhttpd
yum: name=httpd state=present
tags:
- azhttpd
…
3、更改httpd默认端口并重启服务
- hosts: webserver
remote_user: root
tasks:
- name: change port
command: sed -i ‘s/Listen\ 80/Listen\ 8080/g’ /etc/httpd/conf/httpd.conf
notify:
- cqhttpd
handlers:- name: cqhttpd
service: name=httpd state=restarted
…
- name: cqhttpd
