Ansible简介
Ansible 是什么?
Ansible 简单的说是一个配置管理系统(configuration management system)。你只需要可以使用 ssh 访问你的服务器或设备就行。它也不同于其他工具,因为它使用推送的方式,而不是像 puppet 等 那样使用拉取安装agent的方式。你可以将代码部署到任意数量的服务器上!
Ansible能做什么?
ansible可以帮助我们完成一些批量任务,或者完成一些需要经常重复的工作,这些场景中我们都可以使用到ansible。
- 同时在100台服务器上安装nginx服务,并在安装后启动它们
- 将某个文件一次性拷贝到100台服务器上。
- 每当有新服务器加入工作环境时,你都要为新服务器部署某个服务,也就是说你需要经常重复的完成相同的工作。
Ansible特性
- 模块化:调用特定的模块,完成特定的任务。
- 有Paramiko, PyYAMl, Jinja2(模板语言) 三个关键模块
- 支持自定义模块
- 基于Python语言实现
- 部署简单,基于python和SSH(默认已安装), agentless
- 安全,基于OpenSSH
- 支持playbook任务编排
- 幂等性:一次任务执行一遍和执行n遍效果一样,不会重复执行带来意外情况
- 无需代理不依赖PKI(无需ssl)
- 可使用任何编程语言写模块
- YAML格式,编排任务,丰富的数据结构
- 较强大的多层解决方案
Ansible架构
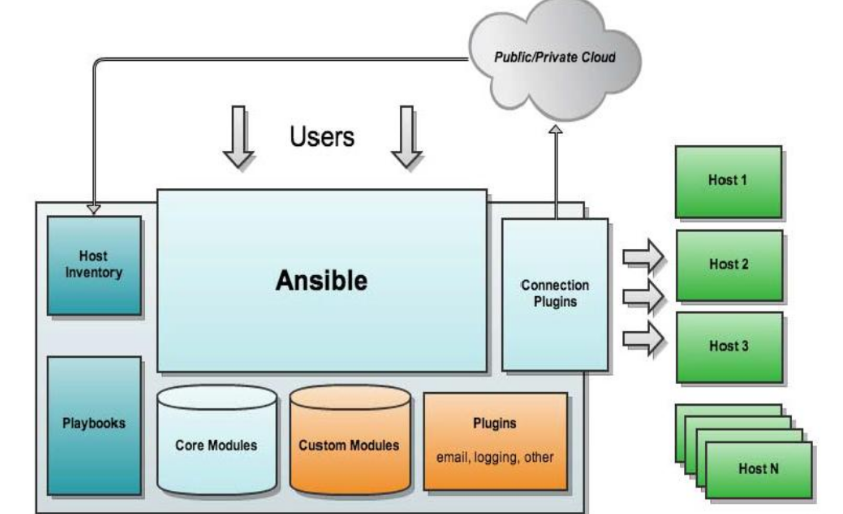
Ansible主要组成部分功能说明
- PLAYBOOKS:任务剧本(任务集),编排定义Ansible任务集的配置文件,由Ansible顺序依次执行,通常是JSON格式的YAML文件。
- INVENTORY: Ansible管理主机的清单/etc/anaible/hosts。
- MODULES: Ansible执行命令的功能模块,多数为内置的核心模块,也可自定义,ansible-doc –l 可查看模块。
- PLUGINS: 模块功能的补充,如连接类型插件、循环插件、变量插件、过滤插件等,该功能不常用。
- API:供第三方程序调用的应用程序编程接口。
- ANSIBLE:组合INVENTORY、 API、 MODULES、PLUGINS的绿框,可以理解为是ansible命令工具,其为核心执行工具。
注意事项 :
|
|
安装与配置Ansible
安装Ansible
安装方法有很多 , 这里仅仅以Centos yum安装为例 , Ansible默认不在标准仓库中,需要用到EPEL源。
|
|
免秘钥登录
|
|
Ansible 配置文件
Ansible 配置文件/etc/ansible/ansible.cfg (一般保持默认)
|
|

Inventory 主机清单
Ansible必须通过Inventory 来管理主机。Ansible 可同时操作属于一个组的多台主机,组和主机之间的关系通过 inventory 文件配置。
语法格式:
|
|
Ansible使用
Ansible常用命令语法
通用语法: ansible <host-pattern> [-m module_name] [options]
指令 匹配规则的主机清单 -m 模块名 选项
|
|
查看模块帮助: ansible-doc [options][module...]
|
|
Ansible 主机 匹配列表
使用通配符
|
|
使用正则表达式
~表示后面是正则匹配,注意~后面不能有空格
|
|
Ansible 的命令执行过程
以 ansible test-node01 -m command -a 'ls -l /' -vvv 这条命令为例,根据显示的信息时行解读
|
|
执行结果状态
- 绿色:执行成功并且不需要做改变的操作
- ×××:执行成功并且对目标主机做变更
- 红色:执行失败
|
|
Ansible常用模块的使用
Ansible的模板非常的重要,这里要非常详细的学习
ping
功能:尝试连接到主机,验证并返回pong成功。
|
|
command
功能:在远程节点上执行命令 。
- 变量 和操作符号 “<”, “>”, “|”, “;” and “&” 不能正常工作。如果需要使用,请使用shell模块。
- Ansible默认不指定模块时,将使用此模块。
|
|
shell
功能:在远程节点上执行命令。与command模快使用一致,但是,变量 和操作符号 “<”, “>”, “|”, “;” and “&” 能正常工作。
|
|
script
功能:把脚本复制到远程节点后,在远程节点本地运行脚本 ,给定的脚本将通过远程节点上的shell环境进行处理。这个模块在远程系统上不需要python,就像原始脚本一样。
|
|
copy
功能:复制文件或目录到远程节点。默认会覆盖目标文件 。
参数详解:
|
|
实例说明:
|
|
file
功能:文件操作及属性设置
参数详解:
|
|
实例说明:
|
|
cron
功能:管理计划任务
参数详解:
|
|
实例说明:
|
|