ansible自动化运维工具
ansible定义
基于python开发,集合了众多运维工具,比如puppet、chef、func、fabric的优点,实现批量系统配置、批量程序部署、批量运行命令
ansible特点
1.部署简单,只需在主空端部署ansible环境,被控端无需做任何操作;
2.默认使用ssh协议对设备进行管理;
3.有大量常规运维操作模块,可实现日常绝大部分操作;
4.配置简单,功能强大,扩展性强;
5.支持API及自定义模块,可通过python轻松扩展
6.通过playbooks来定制强大的配置、状态管理;
7.轻量级,无需在客户端安装agent,更新时,只需在操作机上进行一次更新即可;
8.提供一个功能强大、操作性强的web管理界面和REST API接口—-AWX平台。
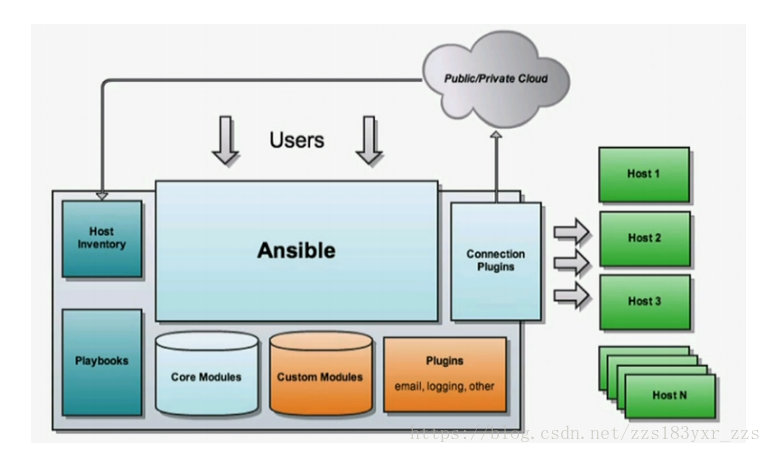
架构图
ansible安装
配置yum源
[root@arongya ~]# cd /etc/yum.repos.d/
[root@arongya yum.repos.d]# curl -o CentOS7-Base-163.repo http://mirrors.163.com/.help/CentOS7-Base-163.repo
  % Total    % Received % Xferd  Average Speed   Time    Time     Time  Current
                                 Dload  Upload   Total   Spent    Left  Speed
100  1572  100  1572    0     0   3301      0 --:--:-- --:--:-- --:--:--  3316
[root@arongya yum.repos.d]# ls
CentOS7-Base-163.repo  CentOS-Debuginfo.repo  CentOS-Sources.repo
CentOS-Base.repo       CentOS-fasttrack.repo  CentOS-Vault.repo
CentOS-CR.repo         CentOS-Media.repo
[root@arongya yum.repos.d]# rm -rf CentOS-*
[root@arongya yum.repos.d]# sed -i 's/\$releasever/7/g' /etc/yum.repos.d//CentOS7-Base-163.repo
[root@arongya yum.repos.d]# sed -i 's/^enabled=.*/enabled=1/g' /etc/yum.repos.d/CentOS7-Base-163.repo

[root@arongya yum.repos.d]# yum -y install epel-release
安装ansible
[root@arongya ~]# yum -y install ansible ansible-doc
查看ansible的版本
[root@arongya ~]# ansible --version
ansible 2.6.3
  config file = /etc/ansible/ansible.cfg
  configured module search path = [u'/root/.ansible/plugins/modules', u'/usr/share/ansible/plugins/modules']
  ansible python module location = /usr/lib/python2.7/site-packages/ansible
  executable location = /usr/bin/ansible
  python version = 2.7.5 (default, Aug  4 2017, 00:39:18) [GCC 4.8.5 20150623 (Red Hat 4.8.5-16)]
ansible配置
/etc/ansible/ansible.cfg主配置文件
#inventory      = /etc/ansible/hosts   //这个参数表示资源清单inventory文件的位置
#library        = /usr/share/my_modules/
//指向存放ansible模块的目录,支持多个目录方式,只要用冒号(:)隔开就可以
#module_utils   = /usr/share/my_module_utils/
#remote_tmp     = ~/.ansible/tmp
#local_tmp      = ~/.ansible/tmp
#plugin_filters_cfg = /etc/ansible/plugin_filters.yml
#forks          = 5   //并发连接数,默认为5
#poll_interval  = 15
#sudo_user      = root  //设置默认执行命令的用户
#ask_sudo_pass = True
#ask_pass      = True
#transport      = smart
#remote_port    = 22  //指定连接被关节点的管理端口,默认为22端口,建议修改,能够更加安全
#module_lang    = C
#module_set_locale = False
ansible主机清单(/etc/ansible/hosts)
这里是配置文件中,要直接指明主机地址或主机名
[root@arongya ~]# vim /etc/ansible/hosts
...
## green.example.com
## blue.example.com
## 192.168.100.1
## 192.168.100.10
...
定义一个主机组[组名]把地址或主机名加进去
     [mysql_test]
    192.168.228.20
    192.168.228.21
    192.168.228.23
这里根据实际情况来配置我们的主机列表,具体操作如下:
[root@arongya ~]# vim /etc/ansible/hosts
[root@arongya ~]# tail -3 /etc/ansible/hosts
## db-[99:101]-node.example.com
[web]   //添加此行内容
192.168.228.23   //添加此行内容
ansible常用模块使用详解
常见模块:ping、yum、template、copy、user、group、service、raw、command、shell、script
raw\command\shell模块的区别:
shell模块调用的/bin/sh智联执行
command模块不是调用的shell的指令,所以没有bash的环境变量
raw很多地方和shell类似,更多的地方建议使用shell和command模块。但是如果是使用老版本python,需要用到raw,又或者是客户端是路由器,因为没有安装python模块,那就需要使用raw模块了
ansible常见模块之ping
ping模块用于检查指定节点机器是否连接,用法很简单,不涉及参数,主机如果在线,则回复pong
[root@arongya ~]# ansible all -m ping
192.168.228.23 | SUCCESS => {
    "changed": false,
    "ping": "pong"
}
ansible常见模块之command
command模块用于在远程主机上执行命令,ansible默认就是使用command模块
缺陷:就是不能使用管道符和重定向功能
查看受控主机的/tmp目录内容
[root@arongya ~]# ansible 192.168.228.23 -a 'ls /tmp'
192.168.228.23 | SUCCESS | rc=0 >>
ansible_N2uPE1
systemd-private-5b2a1b5629764caaa5d6e55b3d251d66-vgauthd.service-yAg40O
systemd-private-5b2a1b5629764caaa5d6e55b3d251d66-vmtoolsd.service-hPMIPC
在受控主机的/tmp目录下新建一个文件test
[root@arongya ~]# ansible 192.168.228.23 -a 'touch /tmp/test'
 [WARNING]: Consider using the file module with state=touch rather than running
touch.  If you need to use command because file is insufficient you can add
warn=False to this command task or set command_warnings=False in ansible.cfg to
get rid of this message.

192.168.228.23 | SUCCESS | rc=0 >>
[root@arongya ~]# ansible 192.168.228.23 -a 'ls /tmp'
192.168.228.23 | SUCCESS | rc=0 >>
ansible_8BAFaW
systemd-private-5b2a1b5629764caaa5d6e55b3d251d66-vgauthd.service-yAg40O
systemd-private-5b2a1b5629764caaa5d6e55b3d251d66-vmtoolsd.service-hPMIPC
test
command模块不支持管道符,不支持重定向
[root@arongya ~]# ansible 192.168.228.23 -a "echo 'hello world' > /tmp/test"
192.168.228.23 | SUCCESS | rc=0 >>
hello world > /tmp/test

[root@arongya ~]# ansible 192.168.228.23 -a 'cat /tmp/test'
192.168.228.23 | SUCCESS | rc=0 >>


[root@arongya ~]# ansible 192.168.228.23 -a 'ps -ef | grep vsftpd'
192.168.228.23 | FAILED | rc=1 >>
error: garbage option

Usage:
 ps [options]

 Try 'ps --help <simple|list|output|threads|misc|all>'
  or 'ps --help <s|l|o|t|m|a>'
 for additional help text.

For more details see ps(1).non-zero return code
ansible常用模块之raw
raw模块用于在远程主机上执行命令,其支持管道符与重定向
支持重定向
[root@arongya ~]# ansible 192.168.228.23 -m raw -a 'echo "hello world" > /tmp/test'
192.168.228.23 | SUCCESS | rc=0 >>
Shared connection to 192.168.228.23 closed.


[root@arongya ~]# ansible 192.168.228.23 -a 'cat /tmp/test'
192.168.228.23 | SUCCESS | rc=0 >>
hello world
支持管道符
[root@arongya ~]# ansible 192.168.228.23 -m raw -a 'cat /tmp/test|grep -Eo hello'
192.168.228.23 | SUCCESS | rc=0 >>
hello
Shared connection to 192.168.228.23 closed.
ansible常用模块之shell
shell模块用于在受控机上执行受控机上的脚本,亦可直接在受控机上执行命令。
shell模块亦支持管道与重定向。
查看受控机上的脚本
[root@yxr tmp]# mkdir /scripts/
[root@yxr tmp]# mv test.sh /scripts/   需要自己创建一个脚本
[root@yxr scripts]# ll
total 4
-rwxr-xr-x. 1 root root 110 Sep  9 14:05 test.sh


使用shell模块在受控机上执行受控机上的脚本
[root@arongya ~]# ansible 192.168.228.23 -m shell -a '/bin/bash /scripts/test.sh &> /tmp/test'
192.168.228.23 | SUCCESS | rc=0 >>
[root@arongya ~]# ansible 192.168.228.23 -m shell -a 'cat /tmp/test'
192.168.228.23 | SUCCESS | rc=0 >>
Adding user user_1 to group jacks
Adding user user_2 to group jacks
Adding user user_3 to group jacks
Adding user user_4 to group jacks
....略,执行的过程
ansible常见模块之script
script模块用于在受控机上执行主控机上的脚本
[root@arongya ansible]# mkdir scripts
[root@arongya ansible]# mv a.sh scripts/   需要自己创建一个脚本,这里我是将原来的脚本移动过来
[root@arongya scripts]# chmod +x a.sh

[root@arongya scripts]# ansible 192.168.228.23 -m script -a ' /etc/ansible/scripts/a.sh &>/tmp/a'
192.168.228.23 | SUCCESS => {
    "changed": true,
    "rc": 0,
    "stderr": "Shared connection to 192.168.228.23 closed.\r\n",
    "stderr_lines": [
        "Shared connection to 192.168.228.23 closed."
    ],
    "stdout": "",
    "stdout_lines": []
}

查看受控机上的/tmp/a文件内容
[root@arongya scripts]# ansible 192.168.228.23 -m shell -a 'cat /tmp/a'
192.168.228.23 | SUCCESS | rc=0 >>


由此可见确实在受控机上执行了主控机上的脚本,且输出记录到了受控机上。
ansible常见模块之template
template模块用于生成一个模板,并可将其传输至远程主机上
下载一个163的yum源文件并开启此源
[root@arongya ~]# cd /etc/yum.repos.d/
[root@arongya yum.repos.d]# curl -o CentOS7-Base-163.repo http://mirrors.163.com/.help/CentOS7-Base-163.repo
  % Total    % Received % Xferd  Average Speed   Time    Time     Time  Current
                                 Dload  Upload   Total   Spent    Left  Speed
100  1572  100  1572    0     0   3301      0 --:--:-- --:--:-- --:--:--  3316
[root@arongya yum.repos.d]# ls
CentOS7-Base-163.repo  CentOS-Debuginfo.repo  CentOS-Sources.repo
CentOS-Base.repo       CentOS-fasttrack.repo  CentOS-Vault.repo
CentOS-CR.repo         CentOS-Media.repo
[root@arongya yum.repos.d]# rm -rf CentOS-*
[root@arongya yum.repos.d]# sed -i 's/\$releasever/7/g' /etc/yum.repos.d//CentOS7-Base-163.repo
[root@arongya yum.repos.d]# sed -i 's/^enabled=.*/enabled=1/g' /etc/yum.repos.d/CentOS7-Base-163.repo

将设置好的163源传给受控主机
[root@arongya ~]# ansible 192.168.228.23 -m template -a 'src=/etc/yum.repos.d/CentOS7-Base-163.repo dest=/etc/yum.repos.d/163.repo'
192.168.228.23 | SUCCESS => {
    "changed": false,
    "checksum": "60b8868e0599489038710c45025fc11cbccf35f2",
    "dest": "/etc/yum.repos.d/163.repo",
    "gid": 0,
    "group": "root",
    "mode": "0644",
    "owner": "root",
    "path": "/etc/yum.repos.d/163.repo",
    "secontext": "unconfined_u:object_r:system_conf_t:s0",
    "size": 1462,
    "state": "file",
    "uid": 0
}

查看受控机上是否有163源
[root@yxr tmp]# ls /etc/yum.repos.d/
163.repo
ansible常见模块之yum
yum模块用于在指定节点机器上通过yum管理软件,其支持的参数主要有两个:
name:要管理的包名
state:要进行的操作
state常用的值:
latest:安装软件
installed:安装软件
present:安装软件
removed:卸载软件
absent:卸载软件
(注意:若想使用yum来管理软件,请确保受控机上的yum源无异常)
在受控机上查询看vsftpd软件是否安装
[root@yxr ~]# rpm -qa | grep vsftpd

在ansible主机上使用yum模块在受控机上安装vsftpd
[root@arongya ~]# ansible 192.168.228.23 -m yum -a 'name=vsftpd state=present'
192.168.228.23 | SUCCESS => {
    "changed": true,
    "msg": "",
    "rc": 0,
    "results": [
        "Loaded plugins: fastestmirror\nLoading mirror speeds from cached hostfile\nResolving Dependencies\n--> Running transaction check\n---> Package vsftpd.x86_64 0:3.0.2-22.el7 will be installed\n--> Finished Dependency Resolution\n\nDependencies Resolved\n\n================================================================================\n Package          Arch             Version                 Repository      Size\n================================================================================\nInstalling:\n vsftpd           x86_64           3.0.2-22.el7            base           169 k\n\nTransaction Summary\n================================================================================\nInstall  1 Package\n\nTotal download size: 169 k\nInstalled size: 348 k\nDownloading packages:\nRunning transaction check\nRunning transaction test\nTransaction test succeeded\nRunning transaction\n  Installing : vsftpd-3.0.2-22.el7.x86_64                                   1/1 \n  Verifying  : vsftpd-3.0.2-22.el7.x86_64                                   1/1 \n\nInstalled:\n  vsftpd.x86_64 0:3.0.2-22.el7                                                  \n\nComplete!\n"
    ]
}


查看受控机上是否安装了vsftpd
[root@yxr ~]# rpm -qa | grep vsftpd
vsftpd-3.0.2-22.el7.x86_64
ansible常见模块之copy
copy模块用于复制文件至远程受控机
[root@arongya ~]# ls /etc/ansible/scripts/
a.sh
[root@arongya ~]# ansible 192.168.228.23 -m copy -a 'src=/etc/ansible/scripts/a.sh dest=/scripts/'
192.168.228.23 | SUCCESS => {
    "changed": true,
    "checksum": "0b3941c2ab750424a8718e84a915c8fe15a75797",
    "dest": "/scripts/a.sh",
    "gid": 0,
    "group": "root",
    "md5sum": "1668299f2b63e1466863f49bedcf8a8f",
    "mode": "0644",
    "owner": "root",
    "secontext": "system_u:object_r:default_t:s0",
    "size": 135,
    "src": "/root/.ansible/tmp/ansible-tmp-1536475749.13-62730804370340/source",
    "state": "file",
    "uid": 0
}
[root@arongya ~]# ansible 192.168.228.23 -m shell -a 'ls /scripts/'
192.168.228.23 | SUCCESS | rc=0 >>
a.sh
test.sh
ansible常用模块之user
user模块用于管理受控机的用户账号
在受控机上添加一个系统用户,用户名为mysql,uid为306,设置其shell为/sbin/nologin,无家目录
[root@arongya ~]# ansible 192.168.228.23 -m user -a 'name=mysql uid=306 system=yes create_home=no shell=/sbin/nologin state=present'
192.168.228.23 | SUCCESS => {
    "changed": true,
    "comment": "",
    "create_home": false,
    "group": 306,
    "home": "/home/mysql",
    "name": "mysql",
    "shell": "/sbin/nologin",
    "state": "present",
    "system": true,
    "uid": 306
}
[root@arongya ~]# ansible 192.168.228.23 -m shell -a 'grep mysql /etc/passwd'
192.168.228.23 | SUCCESS | rc=0 >>
mysql:x:306:306::/home/mysql:/sbin/nologin

[root@arongya ~]# ansible 192.168.228.23 -m shell -a 'ls /home'
192.168.228.23 | SUCCESS | rc=0 >>
redhat
user_1
...

修改mysql用户的uid为366
[root@arongya ~]# ansible 192.168.228.23 -m user -a 'name=mysql uid=366'
192.168.228.23 | SUCCESS => {
    "append": false,
    "changed": true,
    "comment": "",
    "group": 306,
    "home": "/home/mysql",
    "move_home": false,
    "name": "mysql",
    "shell": "/sbin/nologin",
    "state": "present",
    "uid": 366
}
[root@arongya ~]# ansible 192.168.228.23 -m shell -a 'grep mysql /etc/passwd'
192.168.228.23 | SUCCESS | rc=0 >>
mysql:x:366:306::/home/mysql:/sbin/nologin


删除受控机上的mysql用户
[root@arongya ~]# ansible 192.168.228.23 -m user -a 'name=mysql state=absent'
192.168.228.23 | SUCCESS => {
    "changed": true,
    "force": false,
    "name": "mysql",
    "remove": false,
    "state": "absent"
}
[root@arongya ~]# ansible 192.168.228.23 -m shell -a 'grep mysql /etc/passwd'
192.168.228.23 | FAILED | rc=1 >>
non-zero return code
ansible常见模块之group
group模块用于在受控机上添加或删除组
在受控机上添加一个系统组,其gid为306,组名为mysql
[root@arongya ~]# ansible 192.168.228.23 -m group -a 'name=mysql gid=306 state=present'
192.168.228.23 | SUCCESS => {
    "changed": false,
    "gid": 306,
    "name": "mysql",
    "state": "present",
    "system": false
}
[root@arongya ~]# ansible 192.168.228.23 -m shell -a 'grep mysql /etc/group'
192.168.228.23 | SUCCESS | rc=0 >>
mysql:x:306:


在受控机上去查看是否创建成功
[root@yxr ~]# id mysql
uid=306(mysql) gid=306(mysql) groups=306(mysql)


删除受控机上的nginx组
[root@arongya ~]# ansible 192.168.228.23 -m group -a 'name=mysql state=absent'
192.168.228.23 | SUCCESS => {
    "changed": false,
    "name": "mysql",
    "state": "absent"
}
[root@arongya ~]# ansible 192.168.228.23 -m shell -a 'grep mysql /etc/passwd'
192.168.228.23 | FAILED | rc=1 >>
non-zero return code

(注意:一定要先删除用户,才能删除组,否则将删除失败)
ansible常用模块之service
service模块用于管理受控机上的服务
查看受控机上的vsftpd服务是否启动
[root@arongya ~]# ansible 192.168.228.23 -m shell -a 'systemctl is-active vsftpd'
192.168.228.23 | FAILED | rc=3 >>
unknownnon-zero return code

启动受控机上的vsftpd服务
[root@arongya ~]# ansible 192.168.228.23 -m service -a 'name=vsftpd state=started'192.168.228.23 | SUCCESS => {
    "changed": true,
    "name": "vsftpd",
    "state": "started",
    "status": {
        "ActiveEnterTimestampMonotonic": "0",
        "ActiveExitTimestampMonotonic": "0",
        "ActiveState": "inactive",
        "After": "system.slice network.target basic.target systemd-journald.socket",
...以下内容略

查看受控机上的vsftpd服务是否启动
[root@arongya ~]# ansible 192.168.228.23 -m shell -a 'systemctl is-active vsftpd'
192.168.228.23 | SUCCESS | rc=0 >>
active

查看受控机上的vsftpd服务开机自动启动
root@arongya ~]# ansible 192.168.228.23 -m service -a 'name=vsftpd enabled=yes'
192.168.228.23 | SUCCESS => {
    "changed": true,
    "enabled": true,
    "name": "vsftpd",
    "status": {
...以下内容略

查看受控机上的vsftpd服务是否开机自动启动
[root@arongya ~]# ansible 192.168.228.23 -m shell -a 'systemctl is-enabled vsftpd'192.168.228.23 | SUCCESS | rc=0 >>
enabled

停止受控机上的vsftpd服务
[root@arongya ~]# ansible 192.168.228.23 -m service -a 'name=vsftpd state=stopped'192.168.228.23 | SUCCESS => {
    "changed": true,
    "name": "vsftpd",
    "state": "stopped",
    "status": {
...以下内容略

[root@arongya ~]# ansible 192.168.228.23 -m shell -a 'systemctl is-active vsftpd'
192.168.228.23 | FAILED | rc=3 >>
inactivenon-zero return code

[root@arongya ~]# ansible 192.168.228.23 -m shell -a 'ss -antl'
192.168.228.23 | SUCCESS | rc=0 >>
State      Recv-Q Send-Q Local Address:Port               Peer Address:Port
LISTEN     0      128          *:80                       *:*
LISTEN     0      128          *:22                       *:*
LISTEN     0      100    127.0.0.1:25                       *:*
LISTEN     0      128         :::22                      :::*
LISTEN     0      100        ::1:25                      :::*
ansible如何获取帮助
ansible-doc -s 获取指定模块的帮助信息
ansible-doc -l #获取全部模块的信息
查询ping模块的帮助文档
[root@arongya ~]# ansible-doc -s ping
- name: Try to connect to host, verify a usable python and return `pong' on succes
  ping:
      data:                  # Data to return for the `ping' return value. If
                               this parameter is
                               set to `crash', the
                               module will cause
                               an exception.
(END)
ansible命令详解
| ansible | 命令参数 | 作用 |
|---|---|---|
| -a | 模块的参数,如果执行默认command的模块,即是命令参数 | |
| -k ,–ask-pass | ask for SSH password。登录密码,提示输入ssh密码而不是假设基于密码的验证 | |
| -s | 用sudo命令 | |
| -m | 执行模块的名字,默认使用command模块,所以如果是只执行单一命令可以不用-m参数 | |
| -v | 查看详细信息,同时支持-vvv,-vvvv可查看更详细信息 |