Thymeleaf模板
⾯向Web和独⽴环境的现代服务器端Java模板引擎,能够处 理HTML,XML,JavaScript,CSS甚⾄纯⽂本。
1.引入thymeleaf
<dependency>
    <groupId>org.springframework.boot</groupId>
    <artifactId>spring-boot-starter-thymeleaf</artifactId>
</dependency>
2.Thymeleaf使用&语法
把HTML页面放在classpath:/templates/下,thyemeleaf就能自动渲染
使用:
1.导入Thymeleaf的名称空间
-
<html lang="en" xmlns:th="http://www.thymeleaf.org">
2.使用thymeleaf语法
-
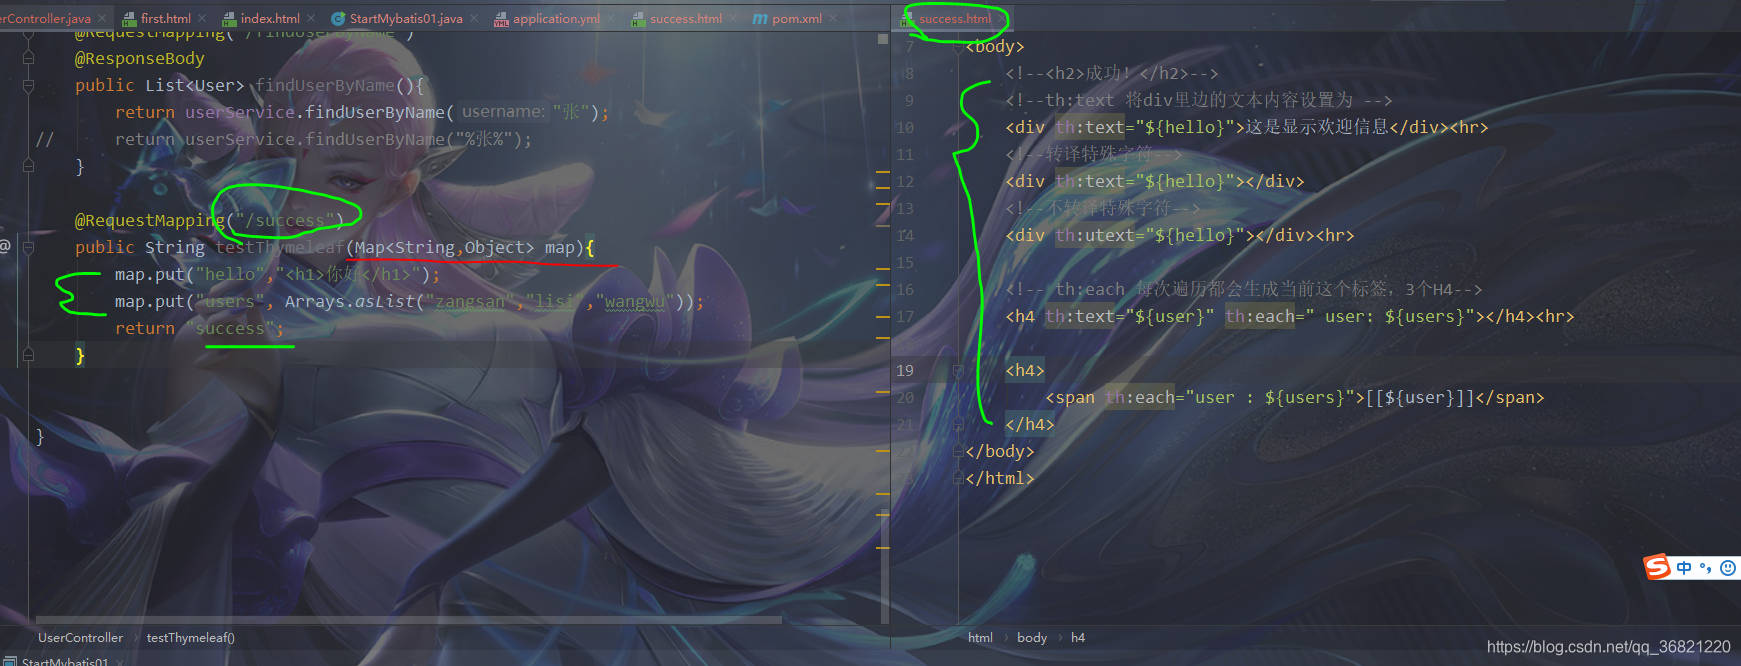
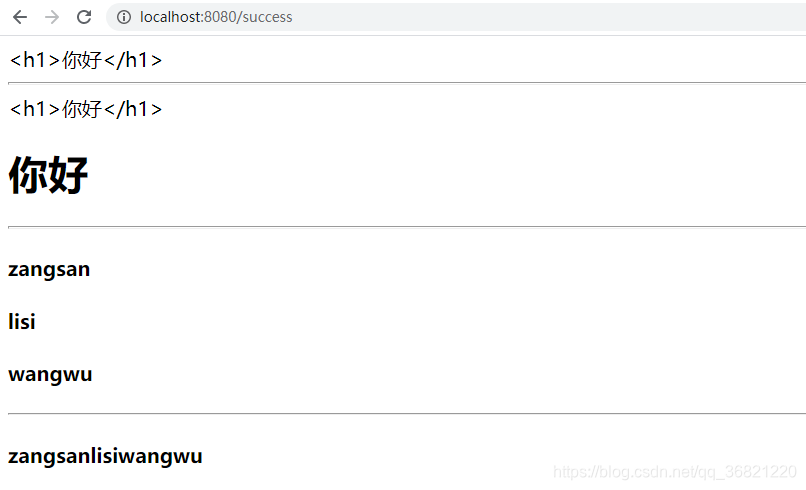
  <!DOCTYPE html>
  <html lang="en" xmlns:th="http://www.thymeleaf.org">
  <head>
      <meta charset="UTF-8">
      <title>Title</title>
  </head>
  <body>
      <!--<h2>你好</h2>-->
      <!--th:text 将div里边的文本内容设置为 -->
      <div th:text="${hello}">这是显示欢迎信息</div>
  </body>
  </html>
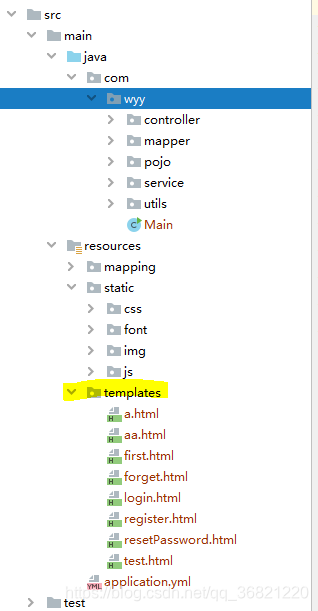
3.在springBoot中使用thymeleaf模板时需建立这样的包结构
- 这里需新建一个thymeleaf文件夹,将你所需要的html文件放在这个文件夹下(springboot将自动扫描到)(啰嗦一句springboot不支持jsp文件)
4.前后端数据交互
(1)前端–>后端
表单提交, 这里后端是根据表单中input标签内的name去匹配javeBean,根据需求可封装成对象传入Controller层。
login.html
-
  <body>
  <div class="all_wrap">
      <form action="goLogin" method="POST" class="form-login">
          <h2>Login</h2>
          <input class="input" type="text" name="username" placeholder="Username"><br>
          <input class="input" type="password" name="password" placeholder="Password"><br>
          <input class="btn btn-info" type="submit" value="submit">
      </form>
  </div>
  </body>
IndexController
-
  @RequestMapping("login")
      public String login(){
          return "login";
      }

 @RequestMapping("goLogin")
  public String goLogin(User user){
      boolean flag = iLoginService.isUser(user);

      if(flag){
          //登录成功,跳转首页
          return "first";
      }else{
          //登录失败,重新输入密码
          return "login";
      }
  }
(2)后端–>前端
有3种方式吧,不知道,反正这两个够我用,不够我再学,model那个看起来好像也更简单些,项目经验少,等我撸完几个项目,再来多填几句。
TestModelController
-
  @GetMapping("/testModel")
  public String testModel(Model model) {
      System.out.println("*********testModel方法一**********");
      TestModel uu = new TestModel();
      uu.setAge(1);
      uu.setPassword("22");
      uu.setUsername("33");
      model.addAttribute("model",uu);
      return "aa";
  }

  @GetMapping("/testModel2")
  public ModelAndView testModel2() {
      System.out.println("*********testModel方法二**********");
      ModelAndView mv = new ModelAndView();
      TestModel uu = new TestModel();
      uu.setAge(1);
      uu.setPassword("22");
      uu.setUsername("33");
      mv.addObject("model",uu);
      mv.setViewName("aa");

      return mv;
  }
aa.html
-
<!DOCTYPE html> <html lang="en" xmlns:th="http://www.thymeleaf.org"> <head> <meta charset="UTF-8"> <title>Title</title> </head> <body> <div> <span th:text="${model.username}"></span> <span th:text="${model.age}"></span> <span th:text="${model.password}"></span> </div> </body> </html> - 这样前台就能拿到你处理过的数据啦。
- 关于这个模板我也就了解这一点,欢迎补充~
多添一笔
- 这里只有数据模型放在形参里有效,具体原理不知道,忘记了,应该用不到(感觉不是很规范的样子,当时只是用来测试thymeleaf的叭)