跟很多学生聊过,很多学生不是不努力,只是找不到感觉。有一点不可否认,同样在一个教室上课,同样是一个老师讲授,学习效果迥然不同。关键的问题在于,带入感,我能给出的建议,就是咬咬牙,坚持住,没有学不会的知识。会陆续分享图形化编程的经验,希望能够做成一个专题。如果您觉得有用,就给点个赞吧。涉及的软件包括Kittenblock、arduino。
程序解读:蜂鸣器演奏音乐
知识点: 蜂鸣器,arduino,音乐,执行器,控制
重点:蜂鸣器
涉及的软件:Kittenblock、arduino。

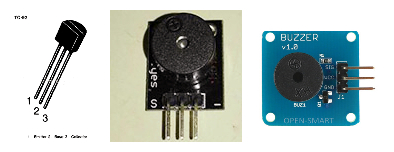
无源蜂鸣器模块:有三个管脚,其中 管脚接地(GND), 中间的管脚接 5V , 标注"S"的管脚接信号(数字I/O)
有源蜂鸣器是一通电就响的,两个脚分别是正负极, 两个脚一长一短, 短脚为负极, 长脚为正极接VCC,有源蜂鸣器,要注意正负极。
而无源蜂鸣器的是需要波形信号驱动的,两个脚没有正负极。
#include <Arduino.h>
int my_variable;
const int noteMap[] = {440, 494, 262, 294, 330, 349, 392};
void buzzMusic(int pin, const char * notes){
int freq;
int len = strlen(notes);
int octave = 4;
int duration = 500;
for(int i=0;i < len;i++){
if(notes[i]>='a' && notes[i]<='g'){
freq = noteMap[notes[i]-'a'];
}else if(notes[i]=='r'){
freq = 0;
}else if(notes[i]>='2' && notes[i]<='6'){
octave = notes[i] - '0';
}else if(notes[i]==':'){
i++;
duration = (notes[i] - '0')*125;
}else if(notes[i]==' '){ // play until we meet a space
freq *= pow(2, octave-4);
tone(pin, freq, duration);
delay(duration);
}
}
}
void setup(){
}
void loop(){
tone(5, 300, 500);
delay(1*1000);
buzzMusic(5, "g5:1 d c g4:2 b:1 c5:3 ");
delay(2*1000);
}