使用 IDEA 新建一个 Spring Boot 项目,初始依赖选择 Cache、JPA 和 Web,并手动添加 Oracle 数据库的驱动包 ojdbc6.jar,POM 文件如下:
<?xml version="1.0" encoding="UTF-8"?><projectxmlns="http://maven.apache.org/POM/4.0.0"xmlns:xsi="http://www.w3.org/2001/XMLSchema-instance"xsi:schemaLocation="http://maven.apache.org/POM/4.0.0 https://maven.apache.org/xsd/maven-4.0.0.xsd"><modelVersion>4.0.0</modelVersion><parent><groupId>org.springframework.boot</groupId><artifactId>spring-boot-starter-parent</artifactId><version>1.3.0.M2</version><relativePath/><!-- lookup parent from repository --></parent><groupId>com.pyc</groupId><artifactId>mycache</artifactId><version>0.0.1-SNAPSHOT</version><name>mycache</name><packaging>jar</packaging><description>Demo project for Spring Boot</description><properties><java.version>1.8</java.version></properties><dependencies><dependency><groupId>com.oracle</groupId><artifactId>ojdbc6</artifactId><version>11.2.0.2.0</version></dependency><dependency><groupId>org.springframework.boot</groupId><artifactId>spring-boot-starter-cache</artifactId></dependency><dependency><groupId>org.springframework.boot</groupId><artifactId>spring-boot-starter-data-jpa</artifactId></dependency><dependency><groupId>org.springframework.boot</groupId><artifactId>spring-boot-starter-web</artifactId></dependency><dependency><groupId>org.springframework.boot</groupId><artifactId>spring-boot-starter-test</artifactId><scope>test</scope><exclusions><exclusion><groupId>org.junit.vintage</groupId><artifactId>junit-vintage-engine</artifactId></exclusion></exclusions></dependency></dependencies><build><plugins><plugin><groupId>org.springframework.boot</groupId><artifactId>spring-boot-maven-plugin</artifactId></plugin></plugins></build></project>
application.properties 中的内容先保持和上一篇的一样。
2、Entity 和 Repository
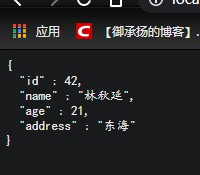
仍旧用 Person 这个数据表,因此实体类和实体类的 Repository 和上一篇的一样。
3、Business Service
在这一项目中,同样要用业务服务的逻辑,一个服务接口和接口实现类。
3.1、Service Interface
首先是一个服务接口,是一个虚类,代码如下:
package com.pyc.mycache.service;import com.pyc.mycache.domain.Person;publicinterfaceDemoService{public Person save(Person person);publicvoidremove(Long id);public Person findOne(Person person);}
定义了三个方法,分别对应将数据写入缓存、从缓存中删除数据和从缓存中查找某个数据三种操作。
3.2、Service Implements
对上面的服务接口进行具体实现,代码如下:
package com.pyc.mycache.service.impl;import com.pyc.mycache.dao.PersonRepository;import com.pyc.mycache.domain.Person;import com.pyc.mycache.service.DemoService;import org.springframework.beans.factory.annotation.Autowired;import org.springframework.cache.annotation.CacheEvict;import org.springframework.cache.annotation.CachePut;import org.springframework.cache.annotation.Cacheable;import org.springframework.stereotype.Service;@ServicepublicclassDemoServiceImplimplementsDemoService{@Autowired
PersonRepository personRepository;@Override// 缓存新增的或更新的数据到缓存,缓存名称为 people,数据的 key 时 person 的 id// Caching new or updated data to the cache,//the cache name is people, and the key of the data is the person's id@CachePut(value ="people", key ="#person.id")public Person save(Person person){
Person p = personRepository.save(person);
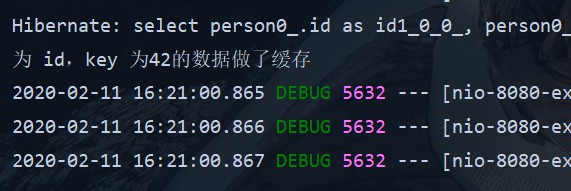
System.out.println("为id,key 为:"+ p.getId()+"的数据做了缓存");return p;}@Override// 从缓存 people 中删除 key 为 id 的数据// delete the data from cache called people where key value equal of the parameter id@CacheEvict(value ="people")publicvoidremove(Long id){
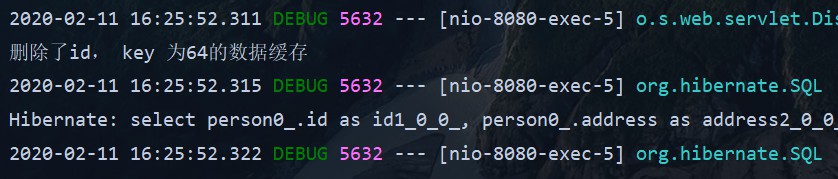
System.out.println("删除了id, key 为"+ id +"的数据缓存");
personRepository.delete(id);}@Override// 缓存 key 为 person.id 的数据到缓存 people 中// Caching the data that key is parameter person's id into cache called people@Cacheable(value ="people", key ="#person.id")public Person findOne(Person person){
Person p = personRepository.findOne(person.getId());
System.out.println("为 id,key 为"+ p.getId()+"的数据做了缓存");return p;}}