Javaweb——Spring Boot 系列(9)Bootstrap+AngularJS 尝试
其他
2020-02-08 18:22:45
阅读次数: 0
去官网下载 Bootstrap 和 AngularJS。
Bootstrap是美国Twitter公司的设计师Mark Otto和Jacob Thornton合作基于HTML、CSS、JavaScript 开发的简洁、直观、强悍的前端开发框架,使得 Web 开发更加快捷。——百度百科·Bootstrap
AngularJS,是一款优秀的前端JS框架,已经被用于Google的多款产品当中。AngularJS有着诸多特性,最为核心的是:MVC(Model–view–controller)、模块化、自动化双向数据绑定、语义化标签、依赖注入等等。——百度百科·AngularJS
jQuery UI , 是以 jQuery 为基础的开源 JavaScript 网页用户界面代码库。包含底层用户交互、动画、特效和可更换主题的可视控件。我们可以直接用它来构建具有很好交互性的web应用程序。
jQuery是一个快速、简洁的JavaScript框架,是继Prototype之后又一个优秀的JavaScript代码库(或JavaScript框架)。
在 IDEA 中用项目引导新建一个 Spring Boot 项目,其 Pom 文件如下:<?xml version="1.0" encoding="UTF-8"?>
< projectxmlns = " http://maven.apache.org/POM/4.0.0" xmlns: xsi= " http://www.w3.org/2001/XMLSchema-instance" xsi: schemaLocation= " http://maven.apache.org/POM/4.0.0 https://maven.apache.org/xsd/maven-4.0.0.xsd" > < modelVersion> </ modelVersion> < parent> < groupId> </ groupId> < artifactId> </ artifactId> < version> </ version> < relativePath/> </ parent> < groupId> </ groupId> < artifactId> </ artifactId> < packaging> </ packaging> < version> </ version> < name> </ name> < description> </ description> < properties> < java.version> </ java.version> </ properties> < dependencies> < dependency> < groupId> </ groupId> < artifactId> </ artifactId> </ dependency> < dependency> < groupId> </ groupId> < artifactId> </ artifactId> </ dependency> < dependency> < groupId> </ groupId> < artifactId> </ artifactId> < scope> </ scope> < exclusions> < exclusion> < groupId> </ groupId> < artifactId> </ artifactId> </ exclusion> </ exclusions> </ dependency> </ dependencies> < build> < plugins> < plugin> < groupId> </ groupId> < artifactId> </ artifactId> </ plugin> </ plugins> </ build> </ project>
在 application.properties 配置日志,如下:logging.file=log.log
logging.level.org.springframework.web=DEBUG
将刚刚准备好的 Bootstrap、AngularJS、jQueryUI 和 jQuery 等框架复制到项目的适当位置。
首先,在 resources 目录下新建一个 static 文件夹,用于存放静态文件;在 static 目录下新建一个 bootstrap 目录用于存放 bootstrap 框架的 css 、js 和 fonts,在 static 目录中新建一个 js 目录,将 AngularJS 和 jQuery 放置其中,再在 static 目录中新建一个 jQueryUI 放置 jQueryUI 框架。
为了 IE 浏览器版本过低,需要两个兼容文件:html5shiv.min.js 和 respond.min.js 文件,这两个文件都可以在互联网上进行下载。
这一步主要是编写一个 angular 模块以及访问该模块的路由设置。
在 static 目录中新建一个 js-action 文件夹,再新建一个 JavaScript 文件,取名为 app,用于定义项目要用到的模块,代码如下:var actionApp = angular. module ( 'actionApp' , [ 'ngRoute' ] ) ;
actionApp. config ( [ '$routeProvider' , function ( $routeProvider) {
$routeProvider. when ( '/oper' , {
controller: 'View1Controller' ,
templateUrl: 'views/view1.html' ,
} ) . when ( '/directive' , {
controller: 'View2Controller' ,
templateUrl: 'views/view2.html' ,
} ) ;
} ] ) ;
文件第一句定义模块名为:actionApp,依赖路由模块 ngRout;接下来的为模块 actionAPP 的具体定义。
$routeProvider 是 AngularJS 中用于负责页面加载和页面路由转向的对象;“/oper” 是第一个页面的路由名称,“/directive” 是第二个页面的路由名称。
controller 指定路由的控制器名称,templateUrl 指出视图的地址。
这里用到了两个路由控制器,因此需要定义相应的控制器。
在 js-action 文件夹中,新建一个 JavaScript 文件,取名为 controller,用于定义页面路由需要的路由控制器,代码如下: actionApp. controller ( 'View1Controller' , [ '$rootScope' , '$scope' , '$http' , function ( $rootScope, $scope, $http) {
$scope. $on ( '$viewContentLoaded' , function ( ) {
console. log ( '页面加载完成' ) ;
} ) ;
$scope. search = function ( ) {
personName = $scope. personName;
$http. get ( 'search' , {
params: { personName: personName}
} ) . success ( function ( data) {
$scope. person= data;
} ) ;
} ;
} ] ) ;
actionApp. controller ( 'View2Controller' , [ '$rootScope' , '$scope' , function ( $rootScope, $scope) {
$scope. $on ( '$viewContentLoaded' , function ( ) {
console. log ( '页面加载完成' ) ;
} ) ;
} ] ) ;
上面定义了两个页面路由控制器,分别命名为模块中用到的路由控制器名。
控制名后面的三个带美元符号的英文单词,用于获取 AngularJS 中的相应对象;在第一个路由控制器中,定义了两个函数,一个用于在页面加载成功时在控制台输出信息,一个是用于获取后台数据。
AngularJS 内置了许多指令,如 ng-repeat 等,功能是用一个简短的指令实现一个前端组件。
使用指令的方式如下:元素形式:<指令></指令>
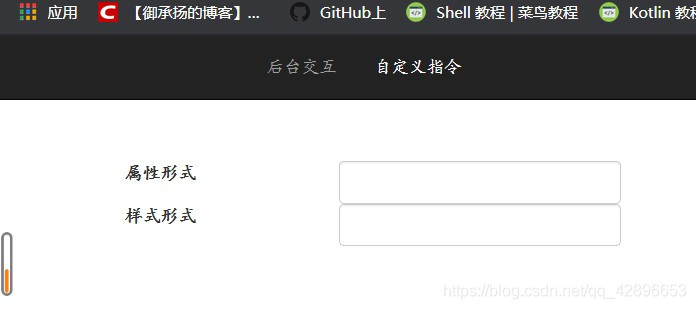
属性形式:<input type="text" 指令/>
样式形式:<input type="text" class="指令"/>
注释形式:<!--directive:指令-->
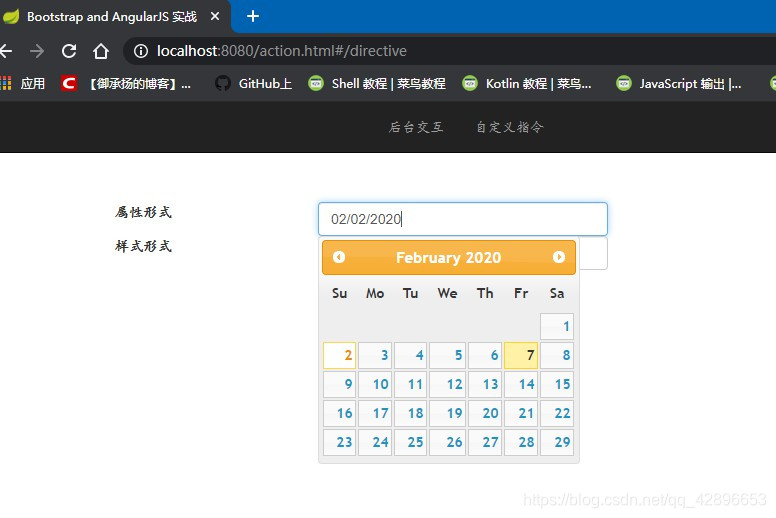
同时 AngularJS 支持自定义指令,例: actionApp. directive ( 'datePicker' , function ( ) {
return {
restrict: 'AC' ,
link: function ( scope, elem, attrs) {
elem. datepicker ( ) ;
}
} ;
} ) ;
定义指令名称为:”datePicker“,该指令要完成的操作在函数体中定义。
restrict 用于指定使用指令的形式,上面的例子中指定使用指令的形式为属性和样式。
link 定义指令,调用 jQueryUI 的 datePicker。
在桌面应用中,往往有一个菜单栏,而 Web 应用中的也有类似菜单栏的东西,只不过称之为导航栏。
在 static 目录中新建一个 html5 文件,文件名可以取为 action,代码如下:<!DOCTYPE html>
< htmllang = " zh-cn" ng-app = " actionApp" > < head> < metacharset = " UTF-8" > < metahttp-equiv = " X-UA-Compatible" content = " IE=edge" > < metaname = " viewport" content = " width=device-width, initial-scale=1" > < title> </ title> < linkhref = " bootstrap/css/bootstrap.min.css" rel = " stylesheet" > < linkhref = " jqueryui/jquery-ui.min.css" rel = " stylesheet" > < styletype = " text/css" >
.content {
padding : 100px 15px;
text-align : center;
}
</ style> </ head> < body> < navclass = " navbar navbar-inverse navbar-fixed-top" > < divclass = " container" > < divid = " navbar" class = " collapse navbar-collapse" > < ulclass = " nav navbar-nav" > < li> < ahref = " #/oper" > </ a> </ li> < li> < ahref = " #/directive" > </ a> </ li> </ ul> </ div> </ div> </ nav> < divclass = " content" > < ng-view> </ ng-view> </ div> < scriptsrc = " js/jquery.min.js" > </ script> < scriptsrc = " jqueryui/jquery-ui.min.js" > </ script> < scriptsrc = " bootstrap/js/bootstrap.min.js" > </ script> < scriptsrc = " js/angular.min.js" > </ script> < scriptsrc = " js/angular-route.min.js" > </ script> < scriptsrc = " js-action/app.js" > </ script> < scriptsrc = " js-action/directives.js" > </ script> < scriptsrc = " js-action/controllers.js" > </ script> </ body> </ html>
根据导航栏一共有两个内容,因此需要新建两个 HTML5 文件写两份内容,分别如下,
view1: < divclass = " row" > < labelfor = " attr" class = " col-md-2 control-label" > </ label> < divclass = " col-md-2" > < inputtype = " text" class = " form-control" ng-model = " personName" > </ div> < divclass = " col-md-1" > < buttonclass = " btn btn-primary" ng-click = " search()" > </ button> </ div> </ div> < divclass = " row" > < divclass = " col-md-4" > < ulclass = " list-group" > < liclass = " list-group-item" > </ li> < liclass = " list-group-item" > </ li> < liclass = " list-group-item" > </ li> </ ul> </ div> </ div>
view2:< divclass = " row" > < labelfor = " attr" class = " col-md-2 control-label" > </ label> < divclass = " col-md-2" > < inputtype = " text" class = " form-control" date-picker > </ div> </ div> < divclass = " row" > < labelfor = " style" class = " col-md-2 control-label" > </ label> < divclass = " col-md-2" > < inputtype = " text" class = " form-control date-picker" > </ div> </ div>
上面两份文件是用于作为网页内容的,因此不需要网页头等标签了, AngularJS 会将内容视图放置在 导航栏文件中的 <ng-view></ng-view> 处。
以上这些可以说是前端的工作,接下来就是后台的逻辑实现。
后台用的语言是 Java,版本为 1.8,框架为 Spring Boot 1.3.0.M1.
针对 view1 的内容,编写一个 JavaBean,命名为 Person,代码如下:public class Person {
private String name;
private Integer age;
private String address;
public Person ( ) {
super ( ) ;
}
public Person ( String name, Integer age, String address) {
super ( ) ;
this . name = name;
this . age = age;
this . address = address;
}
public String getName ( ) {
return name;
}
public void setName ( String name) {
this . name = name;
}
public void setAge ( Integer age) {
this . age = age;
}
public Integer getAge ( ) {
return age;
}
public void setAddress ( String address) {
this . address = address;
}
public String getAddress ( ) {
return address;
}
}
放置在 java 目录写的 com.pyc.ch7_4_4 目录下,因为我在 POM 文件中:< groupId> </ groupId> < artifactId> </ artifactId> < packaging> </ packaging>
在入口类中增加如下内容:@RequestMapping ( value = "/search" , produces = { MediaType. APPLICATION_JSON_VALUE} )
public Person search ( String personName) {
return new Person ( personName, 32 , "guangdong" ) ;
}
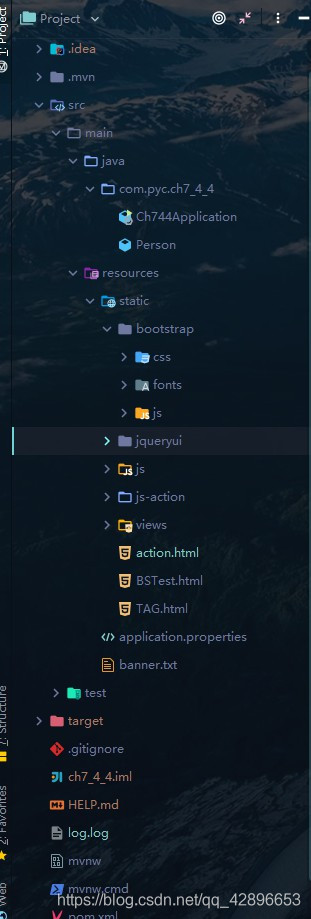
整个项目的项目树如下:
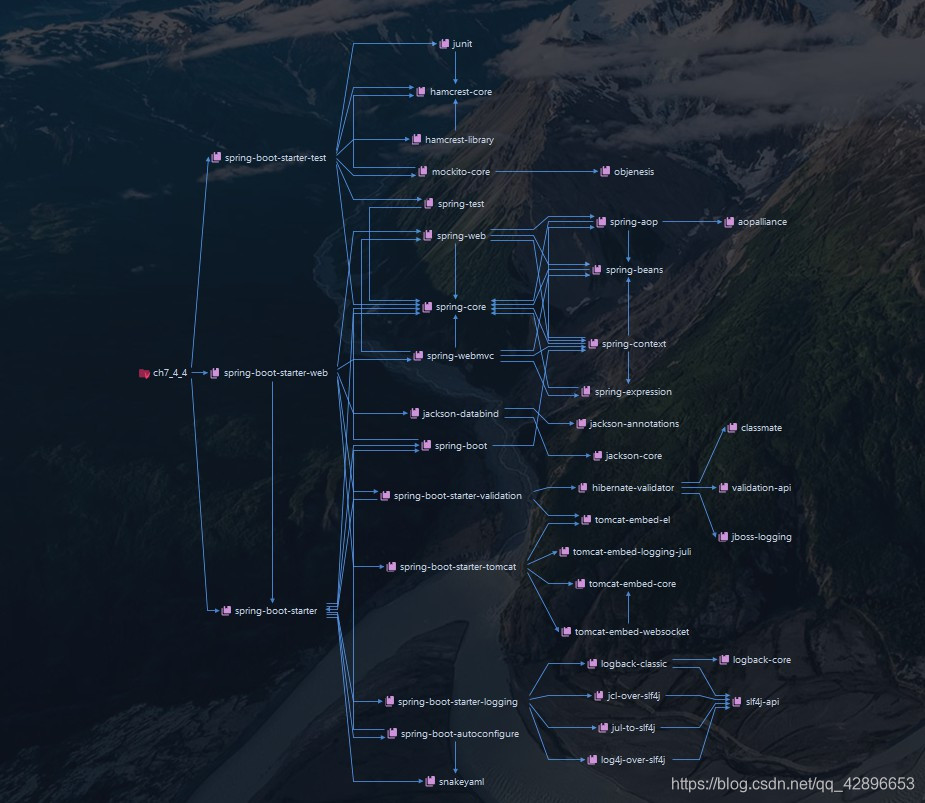
Maven 依赖图如下:
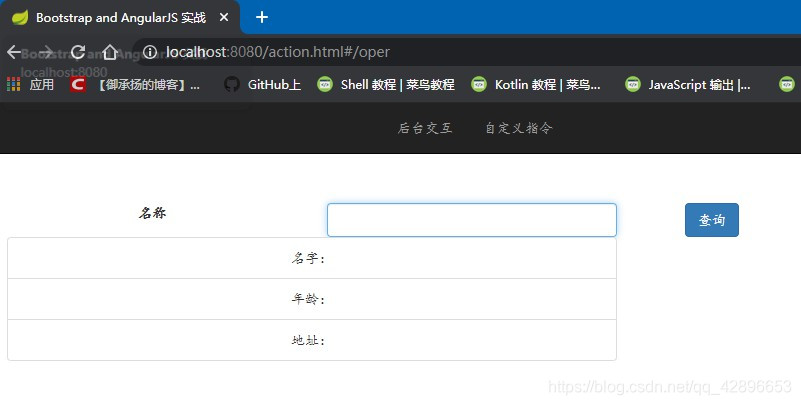
运行入口类,启动项目,打开浏览器,访问地址:localhost:8080/action.html#/oper,页面初始渲染效果如下:
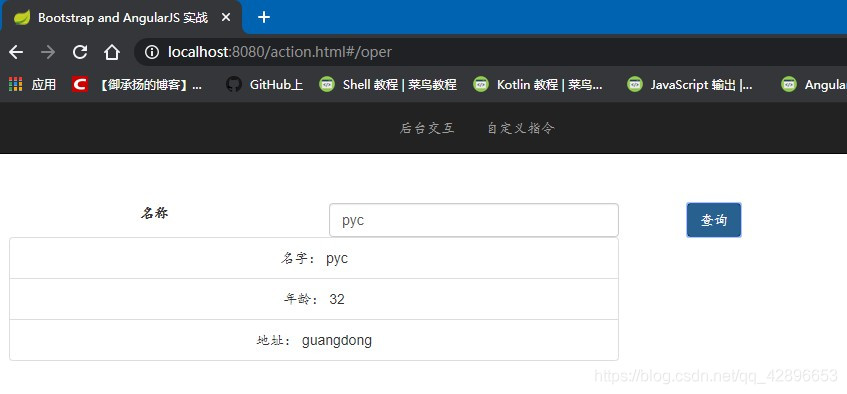
在名称输入框输入数据后点击查询
点击导航栏中的自定义指令,跳转到页面2
将光标放到输入框,页面自动弹出一个日历视图
上一篇 下一篇
发布了146 篇原创文章 ·
获赞 15 ·
访问量 1万+
转载自 blog.csdn.net/qq_42896653/article/details/104209430