SpringMVC概述
SpringMVC是优秀的MVC框架之一,通过一套MVC注解,让POJO成为处理请求的控制器,无须实现任何借口。
SpringMVC支持REST风格的URL请求,采用了松散耦合可插拔组件结构,比其他MVC框架更具扩展性和灵活性。
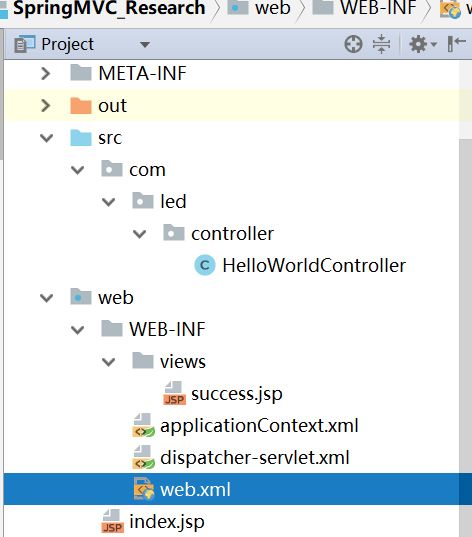
下面使用IDEA创建一个SpringMVC项目,项目结构如下:
HelloWorldController是一个控制器,用于处理请求:
package com.led.controller;
import org.springframework.stereotype.Controller;
import org.springframework.web.bind.annotation.RequestMapping;
/**
 * @author Alan
 * @date 2018/5/23 22:07
 * @Controller:表明这个是一个控制器
 * @RequestMapping:映射请求的路径
 * 返回值会通过视图解析器解析为实际的物理视图,对于InternalResourceViewResolver 视图解析器,会做如下解析:
 * 通过 prefix + returnval + 后缀的方式得到实际的物理视图,然后做转发操作
 * /WEB-INF/views/success.jsp
 */
@Controller
public class HelloWorldController {
    @RequestMapping("/helloWorld")
    public String helloWorld(){
        System.out.println("hello world");
        return "success";
    }
}
web.xml(项目的整体配置文件):
<?xml version="1.0" encoding="UTF-8"?>
<web-app xmlns="http://xmlns.jcp.org/xml/ns/javaee"
         xmlns:xsi="http://www.w3.org/2001/XMLSchema-instance"
         xsi:schemaLocation="http://xmlns.jcp.org/xml/ns/javaee http://xmlns.jcp.org/xml/ns/javaee/web-app_3_1.xsd"
         version="3.1">
    <context-param>
        <param-name>contextConfigLocation</param-name>
        <param-value>/WEB-INF/applicationContext.xml</param-value>
    </context-param>
    <listener>
        <listener-class>org.springframework.web.context.ContextLoaderListener</listener-class>
    </listener>
    <!--配置DispatcherServlet-->
    <servlet>
        <servlet-name>dispatcher</servlet-name>
        <servlet-class>org.springframework.web.servlet.DispatcherServlet</servlet-class>
        <load-on-startup>1</load-on-startup>
    </servlet>
    <servlet-mapping>
        <servlet-name>dispatcher</servlet-name>
        <url-pattern>/</url-pattern>
    </servlet-mapping>
</web-app>
dispatcher-servlet.xml(SprimgMVC相关的配置文件):
<?xml version="1.0" encoding="UTF-8"?>
<beans xmlns="http://www.springframework.org/schema/beans"
       xmlns:xsi="http://www.w3.org/2001/XMLSchema-instance"
       xmlns:context="http://www.springframework.org/schema/context"
       xsi:schemaLocation="http://www.springframework.org/schema/beans http://www.springframework.org/schema/beans/spring-beans.xsd http://www.springframework.org/schema/context http://www.springframework.org/schema/context/spring-context.xsd">
    <!--配置自动扫描的包-->
    <context:component-scan base-package="com.led.controller"/>
    <!--配置视图解析器,把handler方法返回值解析为实际的视图-->
    <bean class="org.springframework.web.servlet.view.InternalResourceViewResolver">
        <property name="prefix" value="/WEB-INF/views/"/>
        <property name="suffix" value=".jsp"/>
    </bean>
</beans>
applicationContext.xml(Spring的整体配置文件):
<?xml version="1.0" encoding="UTF-8"?>
<beans xmlns="http://www.springframework.org/schema/beans"
       xmlns:xsi="http://www.w3.org/2001/XMLSchema-instance"
       xsi:schemaLocation="http://www.springframework.org/schema/beans http://www.springframework.org/schema/beans/spring-beans.xsd">

</beans>
success.jsp(视图呈现页面):
<%@ page contentType="text/html;charset=UTF-8" language="java" %>
<html>
<head>
    <title>Title</title>
</head>
<body>
    <h4>Success page</h4>
</body>
</html>
运行项目,浏览器输入http://localhost:8080/springmvc/,点击超链接,会显示
Success page
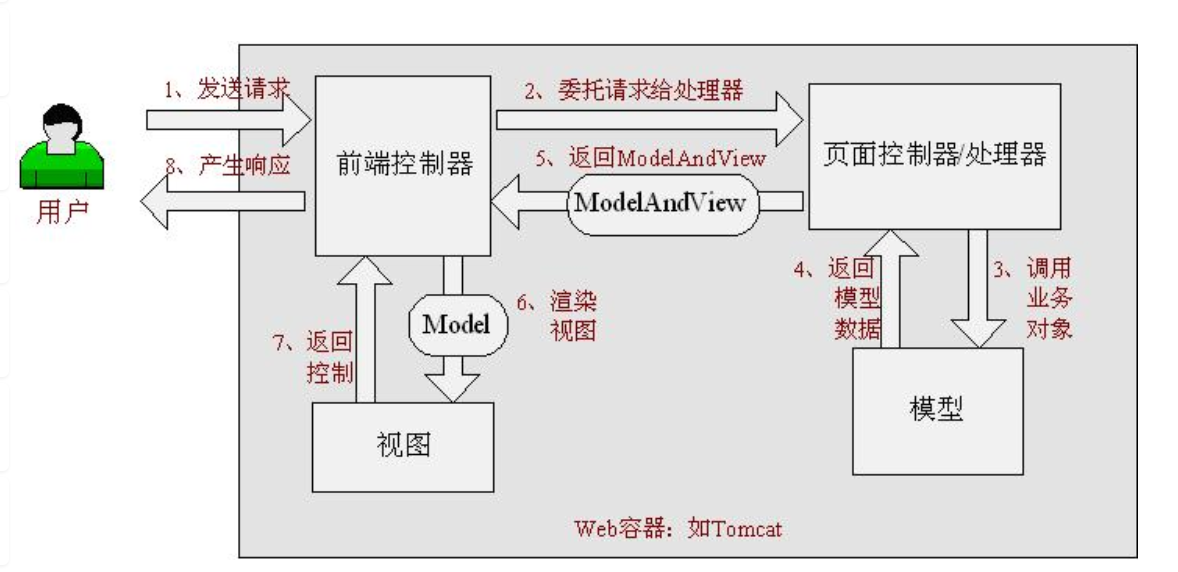
SpringMVC运行原理图: