In this article, I am going to share how to build the first simple HelloWorld Example using SpringMVC framework.
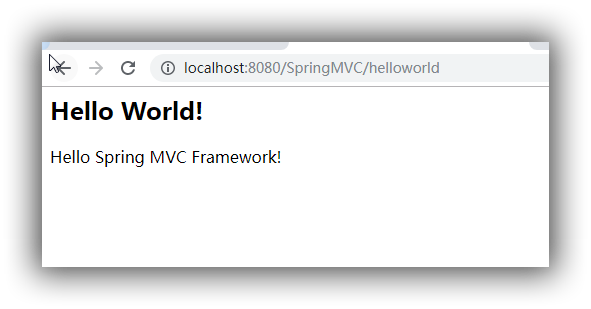
Execution result:
Step1. Create a Dynamic Web Project.
The structure of the Project is shown as below.

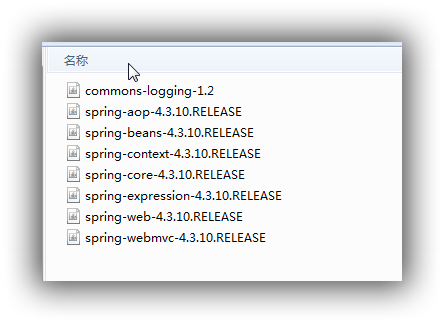
Step2. Import the needed jars
Step 3. Configue web.xml . This means, that we are letting SPRING MVC to handle all the request.
Through:
org.springframework.web.servlet.DispatcherServlet
<web-app id = "WebApp_ID" version = "2.4"
   xmlns = "http://java.sun.com/xml/ns/j2ee"
   xmlns:xsi = "http://www.w3.org/2001/XMLSchema-instance"
   xsi:schemaLocation = "http://java.sun.com/xml/ns/j2ee
   http://java.sun.com/xml/ns/j2ee/web-app_2_4.xsd">


  <display-name>Archetype Created Web Application</display-name>

    <servlet>
      <servlet-name>HelloWeb</servlet-name>
      <servlet-class>   org.springframework.web.servlet.DispatcherServlet
      </servlet-class>
      <load-on-startup>1</load-on-startup>
   </servlet>

   <servlet-mapping>
      <servlet-name>HelloWeb</servlet-name>
      <url-pattern>/</url-pattern>
   </servlet-mapping>


</web-app>
Step 4. config {servlet-name}-servlet.xml.
in our case it is HelloWeb-servlet.xml.
This file is letting the SPRINGMVC know which requests is for which Controller.
SpringMVC will search in the package "com.yang" for controllers, and it each controller will be mapped to certain requests.
<beans xmlns = "http://www.springframework.org/schema/beans"
   xmlns:context = "http://www.springframework.org/schema/context"
   xmlns:xsi = "http://www.w3.org/2001/XMLSchema-instance"
   xsi:schemaLocation = "
   http://www.springframework.org/schema/beans
   http://www.springframework.org/schema/beans/spring-beans-3.0.xsd
   http://www.springframework.org/schema/context
   http://www.springframework.org/schema/context/spring-context-3.0.xsd">

   <context:component-scan base-package = "com.yang" />

   <bean id ="viewresolver" class = "org.springframework.web.servlet.view.InternalResourceViewResolver">
      <property name = "prefix" value = "/WEB-INF/jsp/" />
      <property name = "suffix" value = ".jsp" />
   </bean>

</beans>
Step 5. definine our controller.
It is mapped to “”/helloworld“”
package com.yang;

import org.springframework.stereotype.Controller;
import org.springframework.web.bind.annotation.RequestMapping;
import org.springframework.web.bind.annotation.RequestMethod;
import org.springframework.ui.ModelMap;

@Controller
public class HelloController{

@RequestMapping("/helloworld")
   public String printHello(ModelMap model) {
      model.addAttribute("message", "Hello Spring MVC Framework!");

      return "success";
   }

}
Success.jsp
<html>
<body>
<h2>Hello World!</h2>
    ${message}
</body>
</html>