MinGW (full name, Minimalist GNU for Windows), it actually ported the classic open source C language compiler GCC to the Windows platform, and includes Win32API, so the source code can be compiled into an executable that can run on Windows program. Moreover, some development tools and API functions that are not available on the Windows platform but available on the Linux platform can also be used. To sum it up in one sentence: MinGW is the Windows version of GCC.
MinGW-w64 was originally a branch of the MinGW project, and later became an independent development project. Since only MinGW-w64 is officially supported by GCC, and MinGW has stopped updating, it is recommended to use MinGW-w64.
The difference between MinGW-w64 and MinGW is that MinGW can only compile and generate 32-bit executable programs, while MinGW-w64 can compile and generate 64-bit or 32-bit executable programs
The previous 32-bit computer installation caused an error, so reinstall the 64-bit

Generally, there are two situations for installing MinGw:
The first method: online download: http://mingw-w64.org/doku.php/start Download through the official website. After downloading, it will be a file of hundreds of kilobytes. After running, it will be opened as follows.


Version: It means you choose the GCC compiler version, currently choose the latest version 8.1.0, generally it is recommended to choose the latest version
Architecture: Refers to the computer type. If it is 32-bit, select the i686 version, and if it is 64-bit, select the x86_64 version (it was wrong before and caused reinstallation)
Threads: thread mode: if it is a Linux system, choose posix
If it is a Windows system, choose Win32 (Win64 bit can be selected according to my choice)
Exception:
Exception option: refers to the exception handling model. There are two options for the i686 system architecture: dwarf and sjlj. There are also two options for the x86_64 system architecture: seh and sjlj. Since I chose a 64-bit system architecture, the available exception handling modes are: seh and sjlj. The following explains the differences between sjlj, seh, and dwarf:
There is try..throw..catch in C++, when it executes this structure, it needs to save the scene and restore the scene, and sjlj, seh, dwarf are the three ways to realize this kind of process.
The full name of sjlj is SetJump / LongJump, the former sets the restore point, and the latter jumps to the restore point. Available for 32-bit or 64-bit systems.
seh (Structured Exception Handling, Structured Exception Handling) belongs to Borland Corporation, and Microsoft bought the right to use its patent. It uses the FS segment register, pushes the restore point onto the stack, and pops it up when an exception is received. In comparison, sjlj is something that exists in the C standard library, and seh was patented before 2014. In terms of performance, seh is faster than sjlj. Only for 64-bit systems.
dwarf only supports 32-bit systems - no permanent runtime overhead - requires the entire call stack to be enabled, which means exceptions cannot be thrown, e.g. Windows system DLLs.
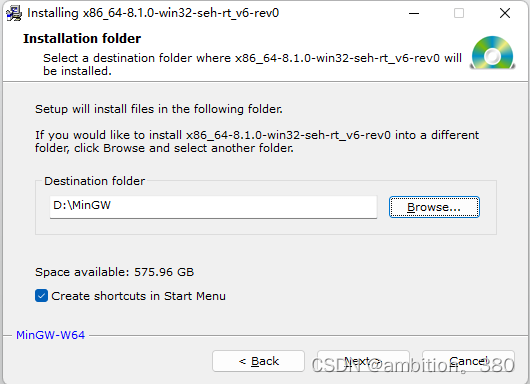
The third step is to specify the folder directory: the original software was set under the C drive, but I changed it to the D drive and created a separate folder.


The next step is to wait for the installation. However, because the network speed of the laboratory is too fast, there are errors, so I personally use the second method to install. Steal a picture below, this is installed by someone else.

The second method: offline installation
The first method is relatively simple, but the requirements for network speed are relatively high, so I choose the second installation method. Download the package file directly, unzip and install it.
The download link is here: MinGW-w64 - for 32 and 64 bit Windows - Browse Files at SourceForge.net . Next, select the installation package that suits your system situation in it.


The download process is slow. I personally use the Sogou high-speed browser to download, and the download is over in a few minutes.

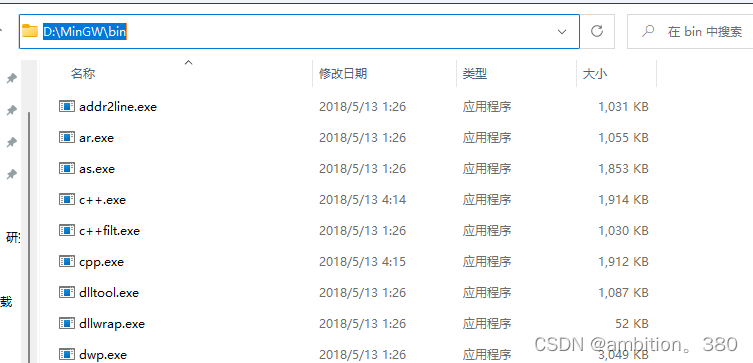
After downloading and decompressing, move all the files to the folder you created as shown above

Then you can configure the environment variables
Enter the bin folder, copy the address above, and then open the system environment variables, right-click properties of this computer, search in the search bar

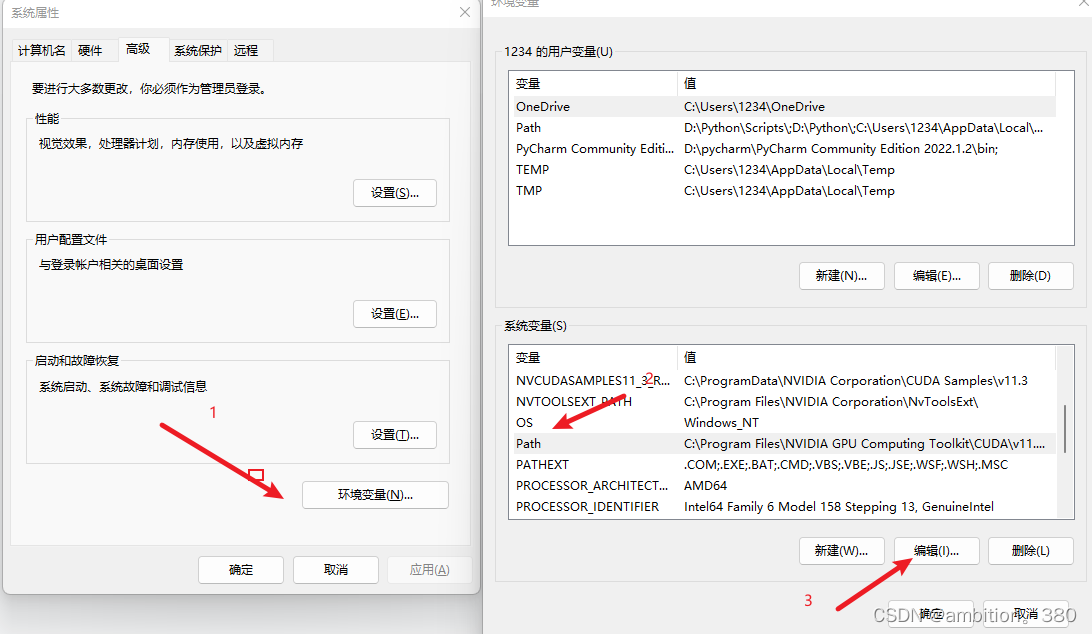
Click the buttons in sequence as shown in the above picture, enter Path and edit, and add the address you just copied into it. Then click OK. close the window.

Test: window key (win) + R shortcut key to call out

Then enter cmd, enter the command "gcc -v" and press Enter (Enter) to output the following content and it will be ok

After a large list of information is displayed, the last column displays the gcc version number, 8.1.0. So far the installation is complete.
Reference article: Original link: https://blog.csdn.net/u010429831/article/details/106766165/