Summary
This article uses IIC and SPI to display the name, student ID, temperature and humidity, and scrolling effects on the OLED.
Introduction
The IIC was introduced in the previous blog , so I won’t introduce it too much here. As another communication method, SPI is also widely used. This article will introduce the content displayed on OLED in two ways.
1. Introduction to SPI
The SPI (Serial Peripheral Interface-Serial Peripheral Interface) bus system is a synchronous serial peripheral interface, which enables the MCU to communicate with various peripheral devices in a serial manner to exchange information. SPI has three registers: control register SPCR , status register SPSR , data register SPDR . Peripheral equipment includes FLASHRAN, network controller, LCD display driver, A/D converter and MCU. The SPI bus system can directly interface with a variety of standard peripheral devices produced by various manufacturers. The interface generally uses 4 lines:Serial clock line (SCLK), master input/slave output data line MISO, master output/slave input data line MOS, and low-level active slave select line NSS(Some SP interface chips have an interrupt signal line NT, and some SPI interface chips do not have a host output/slave input data line MOSI).
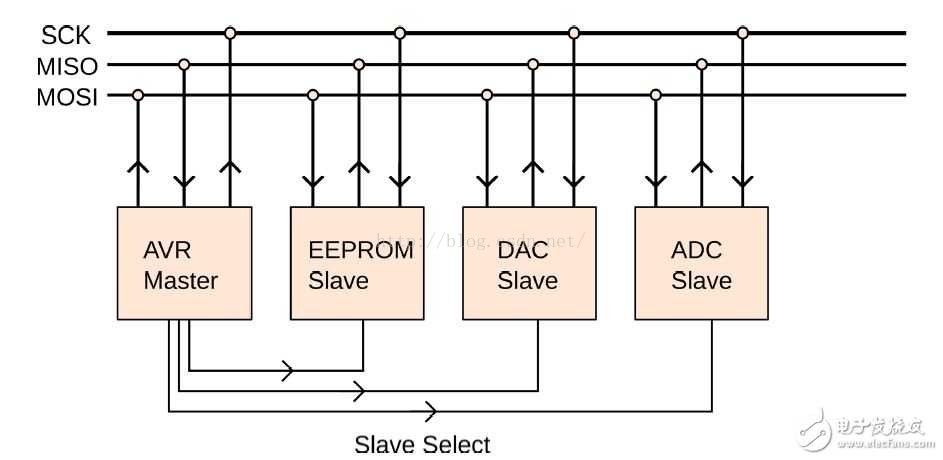
Interface signal
- (1) MOSI -master device data output, slave device data input
- (2) MISO -Master device data input, slave device data output
- (3) SCLK -clock signal, generated by the master device, the maximum is fPCLK2, and the maximum slave mode frequency is fCPU/2
- (4) NSS -slave device enable signal, controlled by the master device, some ICs will be marked as CS (Chip select)
- In point-to-point communication, the SPI interface does not require addressing operations and is full-duplex communication, which is simple and efficient.
Compared with IIC
-
In point-to-point communication, the SPI interface does not require addressing operations and is full-duplex communication, which is simple and efficient.
-
In a system with multiple slave devices, each slave device needs an independent enable signal, which is slightly more complicated in hardware than an I2C system.
SPI has four working modes
Rising edge, falling edge, leading edge, and trailing edge trigger. There are also MSB and LSB transmission methods

2. Information acquisition
Store information is available, download the corresponding information, choose your favorite OLED, you can, here I do is 0.96 inch SPI 7 pin and 0.96 inch SPI 4 pin.

Three, SPI interface experiment
1) Preparation
step0: Open the project file

This is what I have already done.
setp1: View the files under the project (1)
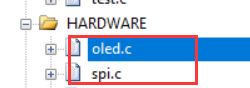
These two files correspond to the corresponding SPI-related operations to achieve the reading and writing functions of the OLED.
The following functions are defined in spi.c

These three functions are usedWrite function, initialization function, and set SPI rate
The oled.c function contains the following control functions

There are more important OLED_WR_Byte, OLED_Set_Pixelfunction. The former is defined as follows

SPI_WriteByteWrite something to the SPI function through the function.
setp2: View the files under the project (2)
In the USER folder, the gui.c function gives some real functions that have been defined by the manufacturer, including functions for displaying different sizes, and functions for displaying strings, Chinese characters, and characters. In test.c, some test functions are written
The test function of test.c is ignored. We can add our own functions to it, by calling the functions in gui.c, or directly operating the OLED to achieve our functions.

step3: Generate Chinese dot matrix font, and modify oledfont.c
Before officially doing it, the necessary step is to generate the font
If you want to display Chinese characters on OLED, you must generate fonts. Most of the Chinese characters displayed on OLED belong to dot matrix Chinese characters. You need to generate fonts and call pointers according to your needs. Similarly, you can download the modulo software for store information, and use it in the character mold. Select the PCtoLCD2002.exefile, set the corresponding options according to the requirements, enter the Chinese characters, and you can get the desired text
The operation interface is as follows:

Then open the oledfont.c file, here because the size of 16*16 is to be displayed, the font is generated 宋体、16乘16、逐行式、顺向, and the corresponding option is selected:

It is necessary to introduce here, the font library in the routine, the font library in the routine defines the structure to create an index for the font
typedef struct
{


	unsigned char Index[2];
	char Msk[32];
}typFNT_GB16;
Then through the font function, the number of fonts in the font library, loop search for comparison one by one, and return when you find it. This allows you to directly pass the Chinese characters you want to display when calling, (provided that all the required Chinese characters are taken from the font, add Go in).
num = sizeof(cfont16)/sizeof(typFNT_GB16);
  for(i=0;i<num;i++)
	{


		if((cfont16[i].Index[0]==*s)&&(cfont16[i].Index[1]==*(s+1)))
Here I add to the array of size 16, because I consider displaying as much content as possible, so I use small fonts

In this way, you are done and you can write the function.
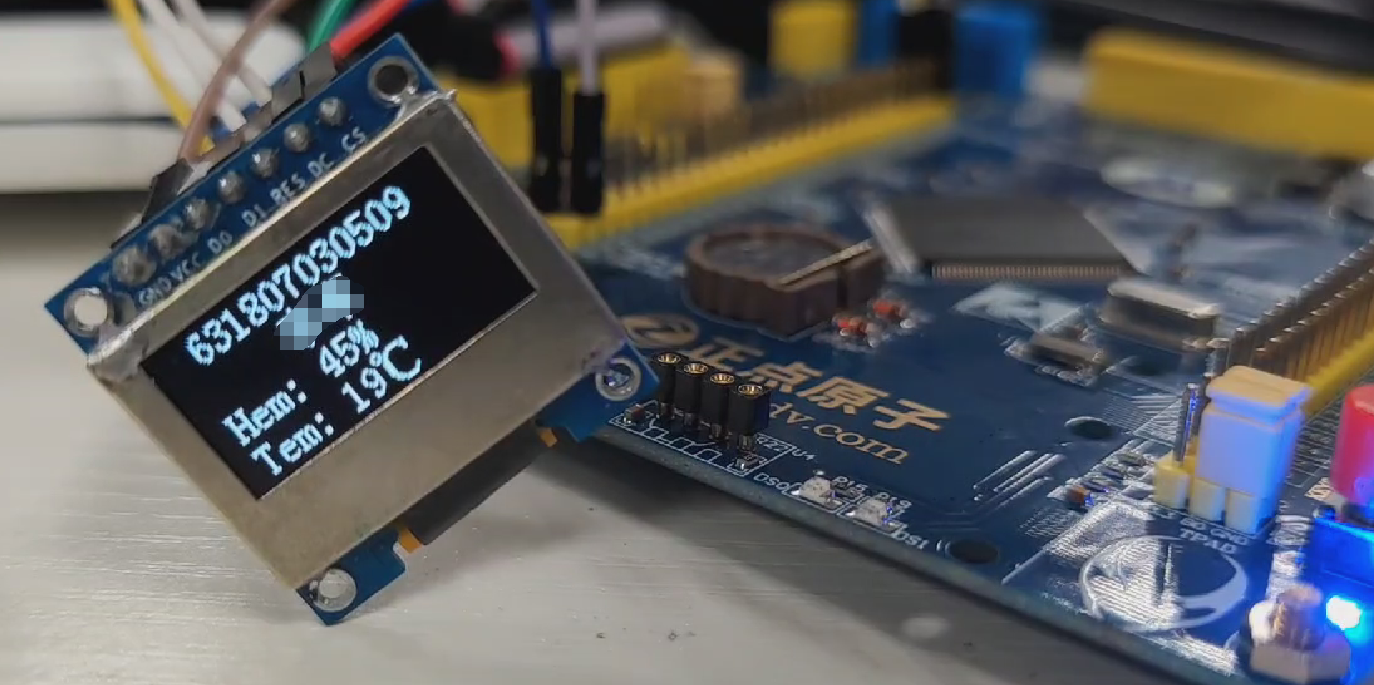
2) Display student ID name
Define the show_my_numfunction, here show_stringis written directly according to the function in the GUI function , you need to pay attention to the8 lines per page, 128 pixels per line
gui.cThe first two parameters of GUI_ShowString and GUI_ShowCHinese are the values of the horizontal and vertical coordinates respectively. The third parameter of GUI_ShowString and the fourth parameter of GUI_ShowCHinese are the display content respectively. The last parameter is the color, 1 white, 0 black. The remaining one parameter corresponds to the size and calls different font functions. The final code is as follows.
/*显示学号代码*/
void show_my_num(void)
{


	//GUI_Fill(0,0,WIDTH-1,HEIGHT/2-1,0);
	GUI_ShowString(15,0,"631807030509",16,1);//显示学号
}

/*显示姓名*/
void show_my_name(void)
{


	GUI_ShowCHinese(45,16,16,"李卓",1);
}
Then make a statement in the test.h file, and that's it.
3) Display temperature and humidity
Following the project in the previous article, copy the corresponding files in, add them, and get the following:

Construct the following function under test.c, the parameter is the passed temperature and humidity.
void show_tem(int c1,int t1)
{


	GUI_ShowString(8,32,"Hem: ",16,1);
	GUI_ShowNum(48,32,c1,2,16,1);
	GUI_ShowString(64,32,"%",16,1);
	GUI_ShowString(8,48,"Tem: ",16,1);
	GUI_ShowNum(48,48,t1,2,16,1);
	GUI_ShowCHinese(64,48,16,"℃",1);
}
Join the statement.
The temperature is calculated in the main function and passed to this function. For specific temperature collection, please refer to the previous blog .
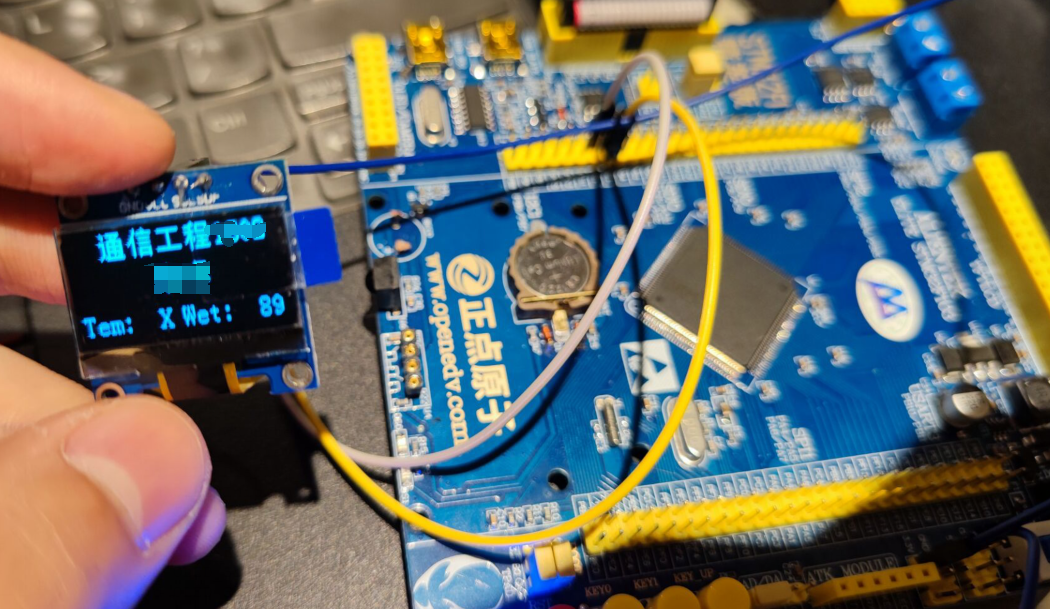
4) Scrolling display
To scroll the word reality, I used two methods, the first is to directly control the hardware refresh effect, and the second is to implement it by calling a function algorithm.
1. Directly control the hardware refresh effect
Principle : The realization of scrolling left and right is to use a separate 1KB memory to process the image after the picture is spliced. And because of the special refreshing method, the left and right splicing method is the memory shift, and it is the shift between Byte and Byte, which is more convenient.
Generally there are the following scrolling methods:
0x2F:激活滚动        				0x2E:关闭滚动
0x26:水平滚动右向	   				0x27:水平滚动左向
0x29:水平和垂直滚动右向				0x2A:水平和垂直滚动左向
0xA3:垂直滚动
Because the following function definitions already exist in the function, of course you can also write directlySPI_WriteByte(SPI2,dat)

In test.cthe definition of the function and the following statement:
//硬件滚动
void roll(void)
{


	OLED_WR_Byte(0x2F, OLED_CMD);
	OLED_WR_Byte(0x27, OLED_CMD);
	OLED_WR_Byte(0x00,OLED_CMD);
  	OLED_WR_Byte(0x00,OLED_CMD);
  	OLED_WR_Byte(0x07,OLED_CMD);
  	OLED_WR_Byte(0x2E,OLED_CMD);
  	while(1);
}
This will enable scrolling.
This scrolling method is smoother and relatively simple to implement. This method is mostly used at present.
2. Change the coordinates through programming to achieve scrolling
Maybe I didn’t know the first method right after I got started. I just thought of the coordinates to achieve scrolling. This method is also feasible. I GUI_ShowFont16(u8 x,u8 y,u8 *s,u8 mode)realized this method through operation . But relatively speaking, it is not so smooth.
The specific code is as follows:
void Roll_display(void)
{


	int i,j;
	for(j=0;j<=1;j++)
		for(i=120;i>=-176;i-=8)
		{


			if(i<120&&i>0)
				GUI_ShowFont16(i,22,"信",1);
			if(i+16<120&&i+16>0)
				GUI_ShowFont16(i+16,22,"息",1);
			if(i+32<120&&i+32>0)
				GUI_ShowFont16(i+32,22,"科",1);
			if(i+48<120&&i+48>0)
				GUI_ShowFont16(i+48,22,"学",1);
			if(i+64<120&&i+64>0)
				GUI_ShowFont16(i+64,22,"与",1);
			if(i+80<120&&i+80>0)
				GUI_ShowFont16(i+80,22,"工",1);
			if(i+96<120&&i+96>0)
				GUI_ShowFont16(i+96,22,"程",1);
			if(i+112<120&&i+112>0)
				GUI_ShowFont16(i+112,22,"学",1);
			if(i+128<120&&i+128>0)
				GUI_ShowFont16(i+128,22,"院",1);
			if(i+144<120&&i+144>0)
				GUI_ShowFont16(i+144,22,"通",1);
			if(i+160<120&&i+160>0)
				GUI_ShowFont16(i+160,22,"信",1);
			if(i+176<120&&i+176>0)
				GUI_ShowFont16(i+176,22,"工",1);
			if(i+192<120&&i+192>0)
				GUI_ShowFont16(i+192,22,"程",1);
			delay_ms(200);
			OLED_Clear(0); //清屏
		}
}
5) Main function
Display name, student number, temperature and humidity, cut screen display scroll effect
Notes on hardware
Roll_display(); addingroll()to
#include "delay.h"
#include "sys.h"
#include "oled.h"
#include "gui.h"
#include "test.h"
#include "24cxx.h"
#include "AHT20.h"
struct m_AHT20 AHT20;
int main(void)
{


	int c1,t1;
	delay_init();	    	       //延时函数初始化
	NVIC_PriorityGroupConfig(NVIC_PriorityGroup_2);	 //设置NVIC中断分组2:2位抢占优先级,2位响应优先级
	IIC_Init();							//IIC初始化
	AHT20.alive=!AHT20_Init();	        //AHT20初始化
	OLED_Init();			         //初始化OLED
	OLED_Clear(0);             //清屏(全黑)
	while(1)
	{


		show_my_num(); //显示学号

		show_my_name();//显示姓名

		/*读取测量温湿度数据*/
		if(AHT20.alive)//是否存活
		{


			//读取其原始数据
			AHT20.flag = AHT20_ReadHT(AHT20.HT);
			c1 = AHT20.HT[0]*100*10/1024/1024/10;  //湿度
			t1 = (AHT20.HT[1]*200*10/1024/1024-500)/10;//温度计算公式
		}

		show_tem(c1,t1);//显示温湿度

		delay_ms(9000);//延时切屏
		delay_ms(9000);//延时切屏

		OLED_Clear(0); //清屏

		Roll_display();//滚动显示

		delay_ms(100);
	}
}
6) Wiring and demonstration effect (software and hardware)
Follow the prompts to connect:

Demo picture:
Overall effect animation (hardware):

Overall effect animation (software):

3. Additional: IIC interface experiment
Difference :
IIC introduction, mentioned in the previous blog , I won’t talk about it here
IIC is actually the same as the experimental procedure of SPI, but the difference is that the font is no longer indexed, a two-dimensional array is defined, and the value is read according to the order. Also pour the font as follows:

Index according to the array label
		OLED_Clear();
		OLED_ShowCHinese(18,0,0);//通
		OLED_ShowCHinese(36,0,1);//信
		OLED_ShowCHinese(54,0,2);//工
		OLED_ShowCHinese(72,0,3);//程
interface:

The final display (there is no temperature collection here, so no display is given)
Four, summary
The OLED display experiments of SPI and IIC were done respectively, and the name, student number, scrolling, etc. were displayed. Familiar with taking fonts to display Chinese, etc. Have a better understanding of SPI writing, etc. The harvest is great and very interesting.