Spring版本:
<version>5.2.1.RELEASE</version>
上一篇:16-Spring源码解析之Bean的生命周期(1)——doGetBean
上一篇我们介绍了doGetBean包含的功能,在【功能八】中,doGetBean会根据Bean的scope类型进行Bean的加载。因为当前是Spring容器的创建,因此程序走到这一步的时候,创建的Bean是singleton类型的。我再贴一下doGetBean中【功能八】的代码:
	if (mbd.isSingleton()) {
		sharedInstance = getSingleton(beanName, () -> {
			try {
				return createBean(beanName, mbd, args);
			}
			catch (BeansException ex) {
				// Explicitly remove instance from singleton cache: It might have been put there
				// eagerly by the creation process, to allow for circular reference resolution.
				// Also remove any beans that received a temporary reference to the bean.
				destroySingleton(beanName);
				throw ex;
			}
		});
		bean = getObjectForBeanInstance(sharedInstance, name, beanName, mbd);
	}
那么我们就进入getSingleton方法中一探究竟吧。
一、getSingleton获取单例
在上一篇文章的2.3.2节也调用了getSingleton方法,只是那时候是从缓存中获取单例,那么如果缓存中不存在当前的Bean,我们就需要从头开始加载Bean了,而Spring就是使用了getSingleton方法实现Bean的加载的。记得上一篇文章2.3.2节中提到的getSingleton的几种重载方法吗?忘记了不要紧,我再在这里贴一下:
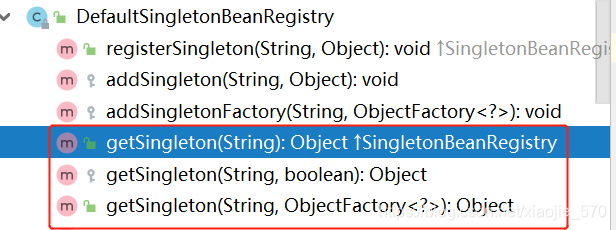
上一篇在缓存中获取单例的时候,调用的两个getSingleton方法分别是:
public Object getSingleton(String beanName)方法protected Object getSingleton(String beanName, boolean allowEarlyReference)方法
而我们从头开始加载Bean调用的getSingleton为:
public Object getSingleton(String beanName, ObjectFactory<?> singletonFactory)
接下来,我们就要看一下Spring是如何通过getSingleton来创建Bean的了,我们进入getSingleton方法
	public Object getSingleton(String beanName, ObjectFactory<?> singletonFactory) {
		Assert.notNull(beanName, "Bean name must not be null");
		synchronized (this.singletonObjects) {
//-----------------------------------【功能一】-----------------------------------
			// 又检查了一次缓存中是否已经加载过名字为beanName的Bean
			// 如果没有加载过,下面开始加载
			// 如果加载过,就直接返回缓存中该的Bean
			Object singletonObject = this.singletonObjects.get(beanName);


			if (singletonObject == null) {
				// 如果这个Bean正在被销毁,就抛异常
				if (this.singletonsCurrentlyInDestruction) {
					throw new BeanCreationNotAllowedException(beanName,
							"Singleton bean creation not allowed while singletons of this factory are in destruction " +
							"(Do not request a bean from a BeanFactory in a destroy method implementation!)");
				}
				if (logger.isDebugEnabled()) {
					logger.debug("Creating shared instance of singleton bean '" + beanName + "'");
				}


//-----------------------------------【功能二】--1.1 详细分析---------------------------------
				// 加载单例bean之前记录加载状态
				beforeSingletonCreation(beanName);
				boolean newSingleton = false;
				// 记录异常的异常链
				boolean recordSuppressedExceptions = (this.suppressedExceptions == null);
				if (recordSuppressedExceptions) {
					this.suppressedExceptions = new LinkedHashSet<>();
				}
//-----------------------------------【功能三】--1.4 详细分析---------------------------------
				try {
					// 创建Bean
					singletonObject = singletonFactory.getObject();
					// 设置标志位
					newSingleton = true;
				}
				catch (IllegalStateException ex) {
					// 进入这个异常的原因是:在同时beanName的Bean已经创建了
					singletonObject = this.singletonObjects.get(beanName);
					if (singletonObject == null) {
						throw ex;
					}
				}
				catch (BeanCreationException ex) {
					if (recordSuppressedExceptions) {
						// 这里把异常拼接起来了,异常问题我们之后有精力再讨论。
						for (Exception suppressedException : this.suppressedExceptions) {
							ex.addRelatedCause(suppressedException);
						}
					}
					throw ex;
				}
				finally {
					if (recordSuppressedExceptions) {
						this.suppressedExceptions = null;
					}
//-----------------------------------【功能四】--1.2 详细分析---------------------------------
					// 移除缓存中对该Bean正在加载状态的记录
					// 与【功能二】beforeSingletonCreation 对应
					afterSingletonCreation(beanName);
				}
//-----------------------------------【功能五】--1.3 详细分析---------------------------------
				if (newSingleton) {
					// 将结果记录到缓存,并删除加载Bean过程中所记录的各种辅助状态
					addSingleton(beanName, singletonObject);
				}
			}
			return singletonObject;
		}
	}
从上面源码可以看出,getSingleton加载单例的实现很纯粹,总结起来就做了两个事情:
- 处理与缓存就有关的事情(处理缓存是为了依赖)
- 创建
Bean
而创建Bean是调用了create()方法,具体是如何调用的在本篇文章的1.4节详细介绍。我们先来看看getSingleton是如何处理缓存的。
1.1 【功能二】beforeSingletonCreation方法
这个方法的功能是:记录加载状态。
	protected void beforeSingletonCreation(String beanName) {
		if (!this.inCreationCheckExclusions.contains(beanName)
				&& !this.singletonsCurrentlyInCreation.add(beanName)) {
			throw new BeanCurrentlyInCreationException(beanName);
		}
	}
代码中只有一个if语句,而判断的条件有两个:
- 首先判断
this.inCreationCheckExclusions.contains(beanName),即判断当前Bean的创建是否需要跳过创建检查,只有返回false,不能跳过检查后才能进行下面的操作。 - 其次,调用
this.singletonsCurrentlyInCreation.add(beanName),就是将当前正在创建的Bean记录到singletonsCurrentlyInCreation中,这么做也是为了对循环依赖进行检测。
1.2 【功能四】afterSingletonCreation方法
这个方法的功能是:移除缓存中对该Bean正在加载状态的记录,正好与1.1节的过程相反。
	protected void afterSingletonCreation(String beanName) {
		if (!this.inCreationCheckExclusions.contains(beanName)
				&& !this.singletonsCurrentlyInCreation.remove(beanName)) {
			throw new IllegalStateException("Singleton '" + beanName + "' isn't currently in creation");
		}
	}
1.3 【功能五】addSingleton方法
这个方法的功能是:将结果记录到缓存并删除加载Bean过程中所记录的各种辅助状态。
	protected void addSingleton(String beanName, Object singletonObject) {
		synchronized (this.singletonObjects) {
			this.singletonObjects.put(beanName, singletonObject);
			this.singletonFactories.remove(beanName);
			this.earlySingletonObjects.remove(beanName);
			this.registeredSingletons.add(beanName);
		}
	}
singletonObjects:用于保存beanName和bean实例之间的关系singletonFactories:用于保存beanName和创建bean工厂之间的关系earlySingletonObjects:用于保存beanName和bean实例之间的关系,与singletonObjects不同之处在于:当一个单例bean被放到这里面之后,那么当bean还在创建过程种,就可以通过getBean方法获取到了,目的是用来检查循环依赖。registeredSingletons:用于保存当前所有已经创建的bean。
1.4 【功能三】singletonFactory.getObject() 获取单例
在getSingleton方法的【功能三】中通过调用singletonFactory的getObject方法来获取单例。
我们反推参数的获取,得到本篇文章最开始的代码:
	if (mbd.isSingleton()) {
		sharedInstance = getSingleton(beanName, () -> {
			try {
				return createBean(beanName, mbd, args);
			}
			catch (BeansException ex) {
				// Explicitly remove instance from singleton cache: It might have been put there
				// eagerly by the creation process, to allow for circular reference resolution.
				// Also remove any beans that received a temporary reference to the bean.
				destroySingleton(beanName);
				throw ex;
			}
		});
		bean = getObjectForBeanInstance(sharedInstance, name, beanName, mbd);
	}
ObjectFactory的核心部分就是要开始调用createBean方法了。因此,我们接下来看一下createBean是如何创建Bean实例的。
二、createBean准备创建Bean
啥也不说,直接上源码吧。
	protected Object createBean(String beanName, RootBeanDefinition mbd, @Nullable Object[] args)
			throws BeanCreationException {

		if (logger.isTraceEnabled()) {
			logger.trace("Creating instance of bean '" + beanName + "'");
		}
		RootBeanDefinition mbdToUse = mbd;
//-----------------------------------【功能一】-----------------------------------
		// 确保到达这一步的时候,Bean的Class已经被解析完
		// 实际上是在refresh->invokeBeanFactoryPostProcessor的解析配置类的时候
		//        将配置类中所有的类都转变为BeanDefinition时就将Bean的信息存储起来了
		// 这一步就是根据beanDefintion来锁定class,或者将没有解析的bean解析成class
		Class<?> resolvedClass = resolveBeanClass(mbd, beanName);
		if (resolvedClass != null && !mbd.hasBeanClass() && mbd.getBeanClassName() != null) {
			mbdToUse = new RootBeanDefinition(mbd);
			mbdToUse.setBeanClass(resolvedClass);
		}
//-----------------------------------【功能二】-----------------------------------
		// 处理ovverride属性,这里主要是处理程序中 两个功能:
		// <lookup-method name="xxx" bean="xxx"/>
		// <replace-method name="xxx" bean="xxx"/>
		// 如果检测到存在ovverride属性,就将配置统一放在BeenDefinition的methodOverrides属性中
		// 项目中很少使用,这里就不具体看它的源码了,有兴趣的同学可以自行debug~
		try {
			mbdToUse.prepareMethodOverrides();
		}
		catch (BeanDefinitionValidationException ex) {
			throw new BeanDefinitionStoreException(mbdToUse.getResourceDescription(),
					beanName, "Validation of method overrides failed", ex);
		}
//-----------------------------------【功能三】--2.1 详细介绍---------------------------------
		try {
			// 后置处理器,这是我们遇到的普通Bean创建过程中的第一个后置处理器哦,很重要在2.1分析
			Object bean = resolveBeforeInstantiation(beanName, mbdToUse);
			if (bean != null) {
				return bean;
			}
		}
		catch (Throwable ex) {
			throw new BeanCreationException(mbdToUse.getResourceDescription(), beanName,
					"BeanPostProcessor before instantiation of bean failed", ex);
		}
//-----------------------------------【功能四】--真正的创建Bean---------------------------------
		try {
			Object beanInstance = doCreateBean(beanName, mbdToUse, args);
			if (logger.isTraceEnabled()) {
				logger.trace("Finished creating instance of bean '" + beanName + "'");
			}
			return beanInstance;
		}
		catch (BeanCreationException | ImplicitlyAppearedSingletonException ex) {
			// A previously detected exception with proper bean creation context already,
			// or illegal singleton state to be communicated up to DefaultSingletonBeanRegistry.
			throw ex;
		}
		catch (Throwable ex) {
			throw new BeanCreationException(
					mbdToUse.getResourceDescription(), beanName, "Unexpected exception during bean creation", ex);
		}
	}
以上给出了createBean的具体实现,我们可以看到,它有4个功能,其中比较重要的是【功能三】和【功能四】。我们先来分析一下【功能三】。
2.1 【功能三】resolveBeforeInstantiation方法
提前说一下:
AOP的功能就是基于这里判断的。
这一步非常重要,为什么这么说呢?这是我们在创建Bean的过程中第一次用到应用BeanPostProcessor的地方。我再把createBean调用这个方法的地方再贴一次!
		try {
			Object bean = resolveBeforeInstantiation(beanName, mbdToUse);
			if (bean != null) {
				return bean;
			}
		}
		catch (Throwable ex) {
			throw new BeanCreationException(mbdToUse.getResourceDescription(), beanName,
					"BeanPostProcessor before instantiation of bean failed", ex);
		}
看在调用完resolveBeforeInstantiation方法后,如果返回的bean不为空,则直接返回了!返回了!返回了!不继续执行创建Bean的操作doCreateBean了,而是直接返回了!所以,我们有必要看看resolveBeforeInstantiation到底做了什么。
	protected Object resolveBeforeInstantiation(String beanName, RootBeanDefinition mbd) {
		Object bean = null;
		// BeanDefinition的属性beforeInstantiationResolved值如果是false,就不需要被前置处理了
		if (!Boolean.FALSE.equals(mbd.beforeInstantiationResolved)) {
			// hasInstantiationAwareBeanPostProcessors的作用:
			//			判断容器中是否有InstantiationAware类型的BeanPostProcessor
			if (!mbd.isSynthetic() && hasInstantiationAwareBeanPostProcessors()) {
				// 拿到当前类的最终类型,即当前类所在的包+类名
				Class<?> targetType = determineTargetType(beanName, mbd);
// ----------------------------------------核心----------------------------------------
				if (targetType != null) {
// ----------------------------------------2.1.1 详细介绍----------------------------------------
					bean = applyBeanPostProcessorsBeforeInstantiation(targetType, beanName);
					if (bean != null) {
// ----------------------------------------2.1.2 详细介绍----------------------------------------
						bean = applyBeanPostProcessorsAfterInitialization(bean, beanName);
					}
				}
			}
			mbd.beforeInstantiationResolved = (bean != null);
		}
		return bean;
	}
resolveBeforeInstantiation方法主要工作:
- 判断当前
beanFactory是否有InstantiationAwareBeanPostProcessor类型的后置处理器,如果有往下走 - 执行
bean = applyBeanPostProcessorsBeforeInstantiation(...)方法bean不为null才继续执行applyBeanPostProcessorsAfterInitialization方法,注意这个方法是XXX【Initialization】方法,即bean的初始化后处理方法,即使后面的创建Bean方法(doCreateBean)不能执行了,但Spring还是让我们执行了初始化后处理的方法。bean为空则直接返回bean
2.1.1 applyBeanPostProcessorsBeforeInstantiation方法
	protected Object applyBeanPostProcessorsBeforeInstantiation(Class<?> beanClass, String beanName) {
		for (BeanPostProcessor bp : getBeanPostProcessors()) {
			if (bp instanceof InstantiationAwareBeanPostProcessor) {
				InstantiationAwareBeanPostProcessor ibp = (InstantiationAwareBeanPostProcessor) bp;
				Object result = ibp.postProcessBeforeInstantiation(beanClass, beanName);
				if (result != null) {
					return result;
				}
			}
		}
		return null;
	}
AbstractBeanFactory类的getBeanPostProcessors方法
	private final List<BeanPostProcessor> beanPostProcessors = new CopyOnWriteArrayList<>();
	public List<BeanPostProcessor> getBeanPostProcessors() {
		return this.beanPostProcessors;
	}
首先获取beanFactory中所有的后置处理器,然后依次执行每个BeanPostProcessor的postProcessBeforeInstantiation方法,若方法返回非null则直接返回,不会执行后面的BeanPostProcessor。
我们现在看一下,当前程序中的BeanPostProcessor都有哪些。例子还是上一篇文章中的例子。
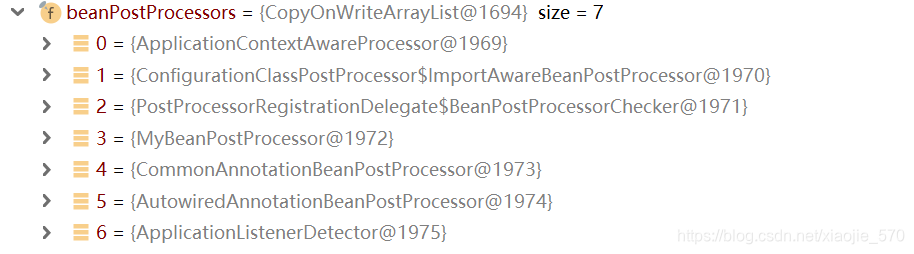
其中beanPostProcessors[3]是我们自定义的实现BeanPostProcessor接口的类。但是MyBeanPostProcessor类是BeanPostProcessor的实现类,不是InstantiationAwareBeanPostProcessor的实现类,所以postProcessBeforeInstantiation不会执行。
那么到这里就一定要看看哪些BeanPostProcessor的类型是InstantiationAwareBeanPostProcessor类型了!
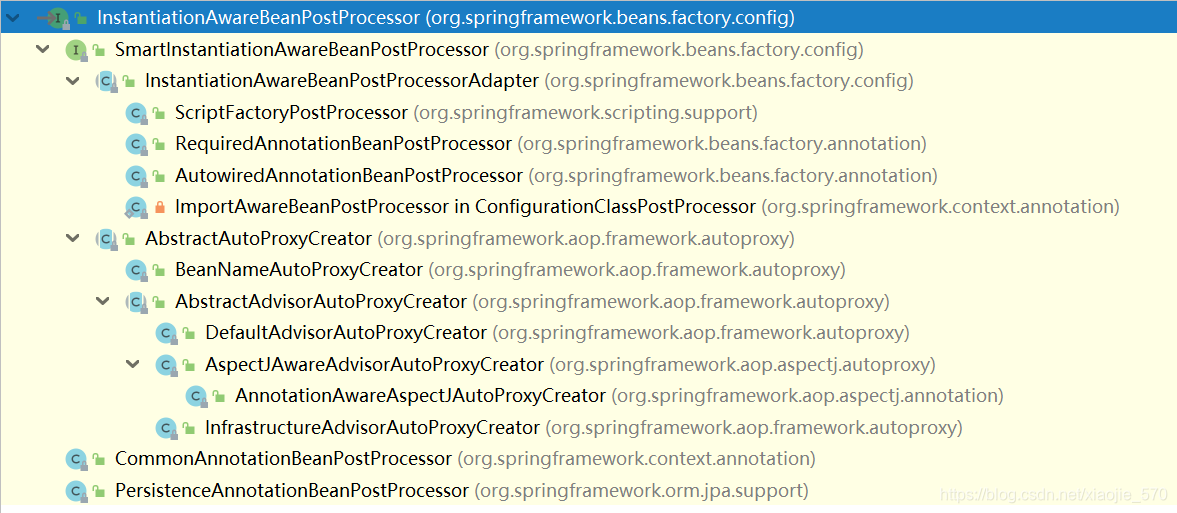
这里我就挑几个比较常见的说一下吧:
AutowiredAnnotationBeanPostProcessor:在这里不执行(在createBeanInstance之后执行)- 解析
@Autowire和@Value注解 - 解析
@Inject注解
- 解析
AnnotationAwareAspectJAutoProxyCreator:实现AOP功能,在这里执行@Aspect注解- 在拥有
AOP功能的类中,这里做了一个非常重要的操作! 后面的文章会具体讲!!
CommonAnnotationBeanPostProcessor:在这里不执行(在createBeanInstance之后执行)- 解析
javax.annotation包下的JSR-250注解:@Resource注解 @PostConstruct注解 和@PreDestroy注解
- 解析
这几个注解的解析在后续的文章中都会一一讲解~
但是这里给个总结:AOP功能在这里会做一个非常重要的事情,后面的文章后讲!
2.1.2 applyBeanPostProcessorsAfterInitialization方法
在讲解从缓存中获取单例Bean的时候就提到过,Spring中的规则是在Bean的初始化后尽可能保证将注册的后处理器的postProcessAfterInitialization方法应用到该Bean中,因为如果返回的Bean不为空,那么便不会再次经历普通Bean的创建过程,所以只能在这里应用后处理器的postProcessAfterInitialization方法。
	public Object applyBeanPostProcessorsAfterInitialization(Object existingBean, String beanName)
			throws BeansException {

		Object result = existingBean;
		for (BeanPostProcessor processor : getBeanPostProcessors()) {
			Object current = processor.postProcessAfterInitialization(result, beanName);
			if (current == null) {
				return result;
			}
			result = current;
		}
		return result;
	}
以上就是resolveBeforeInstantiation方法的功能,总结一下就是:
如果beanFactory中有InstantiationAwareBeanPostProcessors那么就执行所有的BeanPostProcessor的postProcessBeforeInstantiation方法,按照顺序执行,只要有一个BeanPostProcessor的postProcessBeforeInstantiation方法返回值不为空,那么剩下的BeanPostProcessor的postProcessBeforeInstantiation方法都不用执行了,直接返回。
- 若
postProcessBeforeInstantiation的返回值不为空- 执行
beanFactory中的postProcessAfterInitialization方法。
- 执行
- 若
postProcessBeforeInstantiation的返回值为空- 不执行
beanFactory中的postProcessAfterInitialization方法。开始往下执行创建Bean。
- 不执行
在执行完resolveBeforeInstantiation方法后,createBean方法的【功能三】就执行完了。下面该进入Spring的最最最核心的功能doCreateBean方法了。因为这个doCreateBean方法太重要,因此我们留到下一篇文章讲解~
三、总结
getSingleton方法的功能:
- 【功能一】检查缓存中是否已经加载过该
Bean- 若没有加载,进行下面【功能二】-【功能五】的操作
- 若已经加载,直接返回加载好的
Bean,就不用创建了
- 【功能二】加载单例钱记录加载状态(方便循环依赖)
- 【功能三】开始创建
Bean,调用了getSingleton->createBean方法 - 【功能四】移除缓存中针对该
Bean的正在加载状态的记录 - 【功能五】将结果记录至缓存并删除加载
Bean过程中所记录的各种辅助状态
实际上就做了两个事情:处理缓存和创建Bean
createBean方法的功能:
- 【功能一】根据设置的
class属性或者根据className来解析Class - 【功能二】处理
ovverride属性 - 【功能三】应用初始化前的后处理器(第一个
Spring的后处理器扩展点!!)- 若这一步后处理返回了代理的
Bean则不会执行【功能四】,若没有返回则执行【功能四】
- 若这一步后处理返回了代理的
- 【功能四】调用
doCreateBean创建Bean
下一篇文章我们来继续介绍createBean中调用的doCreateBean是如何工作的。
