Bean的完整生命周期 图序
Bean的完整生命周期如下图:
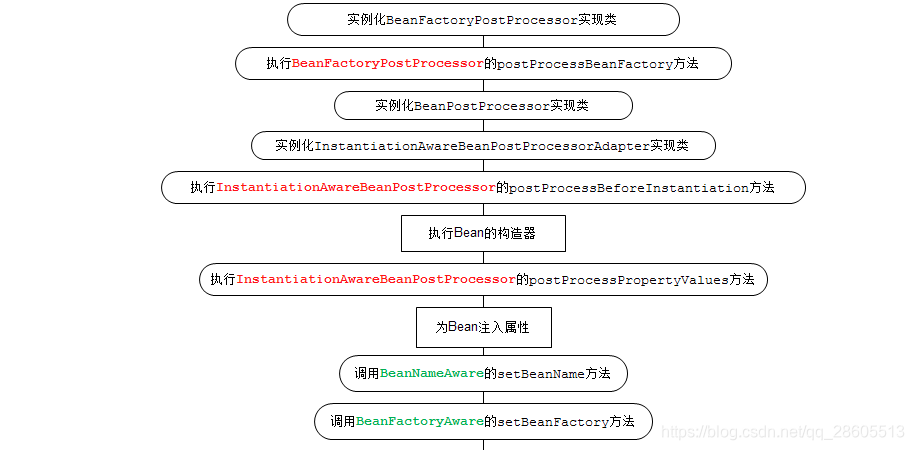

如果容器注册了上述接口,就会按如上顺序执行。
今天先来看Bean级别的接口
BeanFactoryAware、BeanNameAware
BeanFactoryAware:
public interface BeanFactoryAware extends Aware {
    void setBeanFactory(BeanFactory var1) throws BeansException;
}
用于在Bean注入时使Bean感知加载Bean的BeanFactory,可以在该Bean中通过BeanFactory做一些操作,比如获取其他Bean。
BeanNameAware
public interface BeanNameAware extends Aware {
    void setBeanName(String var1);
}
用于在Bean注入时使Bean得到在容器中的名字。
使用案例:
public class Test implements BeanNameAware,BeanFactoryAware {
    @Override
    public void setBeanName(String s) {
        System.out.println("获取BeanName = "+s);
    }

    @Override
    public void setBeanFactory(BeanFactory beanFactory) throws BeansException {
        System.out.println("获取BeanFactory = "+beanFactory);
    }
}

spring的配置文件中配置:
<bean class="com.raycloud.dmj.data.utils.Test"/>


main方法执行:
ApplicationContext context = new ClassPathXmlApplicationContext("bean.xml");
输出结果:
获取BeanName = com.raycloud.dmj.data.utils.Test#0
获取BeanFactory = org.springframework.beans.factory.support.DefaultListableBeanFactory@12cb1b59: defining beans [com.raycloud.dmj.data.utils.Test#0]; root of factory hierarchy
这个BeanFactory在这里就是ApplicationContext的父工厂DefaultListableBeanFactory。
InitializingBean和DisposableBean
InitializingBean:
public interface InitializingBean {
    void afterPropertiesSet() throws Exception;
}
在IOC容器为Bean的属性设置完成后执行。
DisposableBean:
public interface DisposableBean {
    void destroy() throws Exception;
}
在Bean销毁时执行
使用案例:
public class Test implements InitializingBean,DisposableBean {

    private String name;

    public String getName() {
        return name;
    }

    public void setName(String name) {
        System.out.println("设置name");
        this.name = name;
    }

    @Override
    public void destroy() throws Exception {
        System.out.println("destroy");
    }

    @Override
    public void afterPropertiesSet() throws Exception {
        System.out.println("afterPropertiesSet");
    }
}

spring的配置:
<bean class="com.raycloud.dmj.data.utils.Test">
    <property name="name" value="ycf"/>
</bean>
main方法执行
 ApplicationContext context = new ClassPathXmlApplicationContext("bean.xml");
得到结果:
设置name
afterPropertiesSet
main方法执行
ApplicationContext context = new ClassPathXmlApplicationContext("bean.xml");
((ClassPathXmlApplicationContext) context).close();
得到结果:
设置name
afterPropertiesSet
destroy
<bean>的init-method和destroy-method
除了上面通过两个接口来实现Bean初始化和销毁的操作,
还有通过自定义的初始化和销毁方法来实现,注意通过接口实现和通过自定义的实现两者是共存的,且 InitializingBean的afterPropertiesSet先于 bean标签的init-method[或者注解PostConstruct] 执行,DisposableBean的detory先于bean标签的destory-method[或者注解PreDestroy].
public class Test implements InitializingBean,DisposableBean {

    private String name;

    public String getName() {
        return name;
    }

    public void setName(String name) {
        System.out.println("设置name");
        this.name = name;
    }

    @Override
    public void destroy() throws Exception {
        System.out.println("destroy");
    }

    @Override
    public void afterPropertiesSet() throws Exception {
        System.out.println("afterPropertiesSet");
    }

    public void initMethod(){
        System.out.println("自定义init");
    }

    public void destoryMethod(){
        System.out.println("自定义destory");
    }
}

spring配置:
<bean class="com.raycloud.dmj.data.utils.Test" init-method="initMethod" destroy-method="destoryMethod">
    <property name="name" value="ycf"/>
</bean>
main执行:
 ApplicationContext context = new ClassPathXmlApplicationContext("bean.xml");
 ((ClassPathXmlApplicationContext) context).close();
得到结果:
设置name
afterPropertiesSet
自定义init
destroy
自定义destory
源码分析
初始化
注意以上的初始化接口,都是在Bean初始化完毕,并且属性设置完毕后才会执行的,它的入口在doCreateBean中
//设置属性
populateBean(beanName, mbd, instanceWrapper);
//初始化Bean
exposedObject = initializeBean(beanName, exposedObject, mbd);
因此对Bean的初始化,我们需要着重关注initializeBean
protected Object initializeBean(final String beanName, final Object bean, @Nullable RootBeanDefinition mbd) {
		if (System.getSecurityManager() != null) {
			AccessController.doPrivileged((PrivilegedAction<Object>) () -> {
				invokeAwareMethods(beanName, bean);
				return null;
			}, getAccessControlContext());
		}
		else {
		//执行Aware接口的方法
			invokeAwareMethods(beanName, bean);
		}

		Object wrappedBean = bean;
		//Bean的后置处理器在执行初始化前,做一些处理。
		不是今天 的重点
		if (mbd == null || !mbd.isSynthetic()) {
			wrappedBean = applyBeanPostProcessorsBeforeInitialization(wrappedBean, beanName);
		}

		try {
		//执行初始化方法
			invokeInitMethods(beanName, wrappedBean, mbd);
		}
		catch (Throwable ex) {
			throw new BeanCreationException(
					(mbd != null ? mbd.getResourceDescription() : null),
					beanName, "Invocation of init method failed", ex);
		}
		if (mbd == null || !mbd.isSynthetic()) {
		//Bean的后置处理器,在初始化后做一些操作
			wrappedBean = applyBeanPostProcessorsAfterInitialization(wrappedBean, beanName);
		}

		return wrappedBean;
	}

invokeAwareMethods:
这个方法很简单,就是去回调接口的方法
private void invokeAwareMethods(final String beanName, final Object bean) {
		if (bean instanceof Aware) {
			if (bean instanceof BeanNameAware) {
				((BeanNameAware) bean).setBeanName(beanName);
			}
			if (bean instanceof BeanClassLoaderAware) {
				ClassLoader bcl = getBeanClassLoader();
				if (bcl != null) {
					((BeanClassLoaderAware) bean).setBeanClassLoader(bcl);
				}
			}
			if (bean instanceof BeanFactoryAware) {
				((BeanFactoryAware) bean).setBeanFactory(AbstractAutowireCapableBeanFactory.this);
			}
		}
	}

invokeInitMethods:
protected void invokeInitMethods(String beanName, final Object bean, @Nullable RootBeanDefinition mbd)
			throws Throwable {

		boolean isInitializingBean = (bean instanceof InitializingBean);
		if (isInitializingBean && (mbd == null || !mbd.isExternallyManagedInitMethod("afterPropertiesSet"))) {
			if (logger.isTraceEnabled()) {
				logger.trace("Invoking afterPropertiesSet() on bean with name '" + beanName + "'");
			}
			if (System.getSecurityManager() != null) {
				try {
					AccessController.doPrivileged((PrivilegedExceptionAction<Object>) () -> {
						((InitializingBean) bean).afterPropertiesSet();
						return null;
					}, getAccessControlContext());
				}
				catch (PrivilegedActionException pae) {
					throw pae.getException();
				}
			}
			else {
			//执行InitializingBean的afterPropertiesSet
				((InitializingBean) bean).afterPropertiesSet();
			}
		}

		if (mbd != null && bean.getClass() != NullBean.class) {
			String initMethodName = mbd.getInitMethodName();
			if (StringUtils.hasLength(initMethodName) &&
					!(isInitializingBean && "afterPropertiesSet".equals(initMethodName)) &&
					!mbd.isExternallyManagedInitMethod(initMethodName)) {				//执行自定义初始化方法
				invokeCustomInitMethod(beanName, bean, mbd);
			}
		}
	}
如上初始化的过程,先执行Aware的接口,使Bean感知到容器、Bean名称甚至类加载器。
然后执行初始化,先执行InitializingBean的afterPropertiesSet,在执行自定义的初始化方法。
至于初始化前后的BeanPostProcessor并不属于Bean的生命周期,而是属于容器的,因此不再一起去讲。
销毁
销毁时在容器销毁的时候才会去销毁Bean,并且需要注意的是只有单例Bean才需要销毁,如果是原型类型的,本身就不由spring容器缓存,就不可能去销毁。
容器的destory方法最终调用到DisposableBeanAdapter的destroy
public void destroy() {
		if (!CollectionUtils.isEmpty(this.beanPostProcessors)) {
			for (DestructionAwareBeanPostProcessor processor : this.beanPostProcessors) {
				processor.postProcessBeforeDestruction(this.bean, this.beanName);
			}
		}

		if (this.invokeDisposableBean) {
			if (logger.isTraceEnabled()) {
				logger.trace("Invoking destroy() on bean with name '" + this.beanName + "'");
			}
			try {
				if (System.getSecurityManager() != null) {
					AccessController.doPrivileged((PrivilegedExceptionAction<Object>) () -> {			//执行DisposableBean的destory
						((DisposableBean) this.bean).destroy();
						return null;
					}, this.acc);
				}
				else {
					((DisposableBean) this.bean).destroy();
				}
			}
			catch (Throwable ex) {
				String msg = "Invocation of destroy method failed on bean with name '" + this.beanName + "'";
				if (logger.isDebugEnabled()) {
					logger.info(msg, ex);
				}
				else {
					logger.info(msg + ": " + ex);
				}
			}
		}

//执行自定义的销毁方法
		if (this.destroyMethod != null) {
			invokeCustomDestroyMethod(this.destroyMethod);
		}
		else if (this.destroyMethodName != null) {
			Method methodToCall = determineDestroyMethod(this.destroyMethodName);
			if (methodToCall != null) {
				invokeCustomDestroyMethod(methodToCall);
			}
		}
	}
如上也看得到销毁Bean的过程确实是先执行DisposableBean的destory,在执行自定义的销毁方法。