1 Bean的生命周期

在Spring框架中,Bean对象也有着它的生命周期,然而对于Bean对象的生命周期,我们并不是很清楚,因为Spring帮助我们管理了Bean对象,所以,掌握Bean的生命周期,并知晓Spring在每个阶段为我们做了哪些事情是非常有必要的。
对于一个Bean的生命周期,其实非常简单,无非就是从创建对象到销毁的过程,但是Spring作为一个可扩展的框架,其在Bean的创建和销毁过程中加入了非常多的扩展点,这也是为什么Spring能够蓬勃发展至今的一个原因。Bean的生命周期大体可以总结为以下几个阶段:
- Bean的定义
- Bean的注册
- Bean的创建
- Bean的注入
- Bean的初始化
- Bean的销毁
2 Bean的定义、注册及创建过程
其中Bean的定义非常简单,它是由我们来完成的,例如在Spring的配置文件中配置一个Bean:
<bean id="user" class="com.wwj.entity.User">
    <property name="name" value="zs"/>
    <property name="age" value="22"/>
</bean>
又或者是一个注解:
@Component
public class User{


 private String name;
    private Integer age;
}
此时一个Bean就定义好了,接下来Spring在启动的时候就会将这些定义好的Bean注册起来,对于配置文件启动,Spring会解析配置文件中的配置进行Bean的注册,具体体现在refresh方法:
@Override
public void refresh() throws BeansException, IllegalStateException {


    synchronized (this.startupShutdownMonitor) {


        // Prepare this context for refreshing.
        prepareRefresh();

        // Tell the subclass to refresh the internal bean factory.
        ConfigurableListableBeanFactory beanFactory = obtainFreshBeanFactory();

        // Prepare the bean factory for use in this context.
        prepareBeanFactory(beanFactory);

        // Allows post-processing of the bean factory in context subclasses.
        postProcessBeanFactory(beanFactory);

        // Invoke factory processors registered as beans in the context.
        invokeBeanFactoryPostProcessors(beanFactory);

        // Register bean processors that intercept bean creation.
        registerBeanPostProcessors(beanFactory);

        // Initialize message source for this context.
        initMessageSource();

        // Initialize event multicaster for this context.
        initApplicationEventMulticaster();

        // Initialize other special beans in specific context subclasses.
        onRefresh();

        // Check for listener beans and register them.
        registerListeners();

        // Instantiate all remaining (non-lazy-init) singletons. 实例化Bean
        finishBeanFactoryInitialization(beanFactory);

        // Last step: publish corresponding event.
        finishRefresh();
    }
}
其中finishBeanFactoryInitialization(beanFactory)方法就是用来实例化所有的单例Bean,该方法源码如下:
protected void finishBeanFactoryInitialization(ConfigurableListableBeanFactory beanFactory) {


    // Initialize conversion service for this context.
    if (beanFactory.containsBean(CONVERSION_SERVICE_BEAN_NAME) &&
        beanFactory.isTypeMatch(CONVERSION_SERVICE_BEAN_NAME, ConversionService.class)) {


        beanFactory.setConversionService(
            beanFactory.getBean(CONVERSION_SERVICE_BEAN_NAME, ConversionService.class));
    }

    // Register a default embedded value resolver if no bean post-processor
    // (such as a PropertyPlaceholderConfigurer bean) registered any before:
    // at this point, primarily for resolution in annotation attribute values.
    if (!beanFactory.hasEmbeddedValueResolver()) {


        beanFactory.addEmbeddedValueResolver(strVal -> getEnvironment().resolvePlaceholders(strVal));
    }

    // Initialize LoadTimeWeaverAware beans early to allow for registering their transformers early.
    String[] weaverAwareNames = beanFactory.getBeanNamesForType(LoadTimeWeaverAware.class, false, false);
    for (String weaverAwareName : weaverAwareNames) {


        getBean(weaverAwareName);
    }

    // Stop using the temporary ClassLoader for type matching.
    beanFactory.setTempClassLoader(null);

    // Allow for caching all bean definition metadata, not expecting further changes.
    beanFactory.freezeConfiguration();

    // Instantiate all remaining (non-lazy-init) singletons.
    beanFactory.preInstantiateSingletons();
}
我们不具体分析所有的方法,只看重要的部分,其中beanFactory.preInstantiateSingletons()方法实例化了所有的单例Bean,既然知道了创建Bean的地方,那么Spring是如何知道需要创建哪些Bean的呢?换句话说,配置文件是在哪里进行解析的呢?我们回到最初的refresh方法,其中有一个ConfigurableListableBeanFactory beanFactory = obtainFreshBeanFactory(),它就是来解析配置文件的,源码如下:
protected ConfigurableListableBeanFactory obtainFreshBeanFactory() {


    refreshBeanFactory();
    ConfigurableListableBeanFactory beanFactory = getBeanFactory();
    if (logger.isDebugEnabled()) {


        logger.debug("Bean factory for " + getDisplayName() + ": " + beanFactory);
    }
    return beanFactory;
}
它调用了refreshBeanFactory()方法:
@Override
protected final void refreshBeanFactory() throws BeansException {


    if (hasBeanFactory()) {


        destroyBeans();
        closeBeanFactory();
    }
    try {


        DefaultListableBeanFactory beanFactory = createBeanFactory();
        beanFactory.setSerializationId(getId());
        customizeBeanFactory(beanFactory);
        loadBeanDefinitions(beanFactory);
        synchronized (this.beanFactoryMonitor) {


            this.beanFactory = beanFactory;
        }
    }
    catch (IOException ex) {


        throw new ApplicationContextException("I/O error parsing bean definition source for " + getDisplayName(), ex);
    }
}
该方法又调用了loadBeanDefinitions(beanFactory)方法:
@Override
protected void loadBeanDefinitions(DefaultListableBeanFactory beanFactory) throws BeansException, IOException {


    // Create a new XmlBeanDefinitionReader for the given BeanFactory.
    XmlBeanDefinitionReader beanDefinitionReader = new XmlBeanDefinitionReader(beanFactory);

    // Configure the bean definition reader with this context's
    // resource loading environment.
    beanDefinitionReader.setEnvironment(this.getEnvironment());
    beanDefinitionReader.setResourceLoader(this);
    beanDefinitionReader.setEntityResolver(new ResourceEntityResolver(this));

    // Allow a subclass to provide custom initialization of the reader,
    // then proceed with actually loading the bean definitions.
    initBeanDefinitionReader(beanDefinitionReader);
    loadBeanDefinitions(beanDefinitionReader);
}
接着调用loadBeanDefinitions(beanDefinitionReader)方法:
protected void loadBeanDefinitions(XmlBeanDefinitionReader reader) throws{


    Resource[] configResources = getConfigResources();
    if (configResources != null) {


        reader.loadBeanDefinitions(configResources);
    }
    String[] configLocations = getConfigLocations();
    if (configLocations != null) {


        reader.loadBeanDefinitions(configLocations);
    }
}
到这里就差不多了,调用栈比较深,就不继续往下看了,这里就是在解析xml文件并创建Bean实例。
3 Bean的注入过程
在创建对象过程中,我们还需要对对象的属性进行赋值,那么Spring是如何实现的呢?
protected Object doCreateBean(String beanName, RootBeanDefinition mbd, @Nullable Object[] args) throws BeanCreationException {


    BeanWrapper instanceWrapper = null;
    if (mbd.isSingleton()) {


        instanceWrapper = (BeanWrapper)this.factoryBeanInstanceCache.remove(beanName);
    }

    if (instanceWrapper == null) {


        instanceWrapper = this.createBeanInstance(beanName, mbd, args);
    }
    ......
        try {


            // 看这里
            this.populateBean(beanName, mbd, instanceWrapper);
            exposedObject = this.initializeBean(beanName, exposedObject, mbd);
        } catch (Throwable var18) {


        }

}
this.populateBean(beanName, mbd, instanceWrapper)方法就是用来实现属性赋值的:
protected void populateBean(String beanName, RootBeanDefinition mbd, @Nullable BeanWrapper bw) {


    if (bw == null) {


        if (mbd.hasPropertyValues()) {


            throw new BeanCreationException(
                mbd.getResourceDescription(), beanName, "Cannot apply property values to null instance");
        }
        else {


            // Skip property population phase for null instance.
            return;
        }
    }

    // Give any InstantiationAwareBeanPostProcessors the opportunity to modify the
    // state of the bean before properties are set. This can be used, for example,
    // to support styles of field injection.
    if (!mbd.isSynthetic() && hasInstantiationAwareBeanPostProcessors()) {


        for (BeanPostProcessor bp : getBeanPostProcessors()) {


            if (bp instanceof InstantiationAwareBeanPostProcessor) {


                InstantiationAwareBeanPostProcessor ibp = (InstantiationAwareBeanPostProcessor) bp;
                if (!ibp.postProcessAfterInstantiation(bw.getWrappedInstance(), beanName)) {


                    return;
                }
            }
        }
    }

    PropertyValues pvs = (mbd.hasPropertyValues() ? mbd.getPropertyValues() : null);

    int resolvedAutowireMode = mbd.getResolvedAutowireMode();
    if (resolvedAutowireMode == AUTOWIRE_BY_NAME || resolvedAutowireMode == AUTOWIRE_BY_TYPE) {


        MutablePropertyValues newPvs = new MutablePropertyValues(pvs);
        // Add property values based on autowire by name if applicable.
        if (resolvedAutowireMode == AUTOWIRE_BY_NAME) {


            autowireByName(beanName, mbd, bw, newPvs);
        }
        // Add property values based on autowire by type if applicable.
        if (resolvedAutowireMode == AUTOWIRE_BY_TYPE) {


            autowireByType(beanName, mbd, bw, newPvs);
        }
        pvs = newPvs;
    }

    boolean hasInstAwareBpps = hasInstantiationAwareBeanPostProcessors();
    boolean needsDepCheck = (mbd.getDependencyCheck() != AbstractBeanDefinition.DEPENDENCY_CHECK_NONE);

    PropertyDescriptor[] filteredPds = null;
    if (hasInstAwareBpps) {


        if (pvs == null) {


            pvs = mbd.getPropertyValues();
        }
        for
            if (bp instanceof

                PropertyValues pvsToUse = ibp.postProcessProperties(pvs, bw.getWrappedInstance(), beanName);
                if (pvsToUse == null) {


                    if (filteredPds == null) {


                        filteredPds = filterPropertyDescriptorsForDependencyCheck(bw, mbd.allowCaching);
                    }
                    pvsToUse = ibp.postProcessPropertyValues(pvs, filteredPds, bw.getWrappedInstance(), beanName);
                    ifnull) {


                        return;
                    }
                }
                pvs = pvsToUse;
            }
        }
    }
    if (needsDepCheck) {


        ifnull) {


            filteredPds = filterPropertyDescriptorsForDependencyCheck(bw, mbd.allowCaching);
        }
        checkDependencies(beanName, mbd, filteredPds, pvs);
    }

    if (pvs != null) {


        applyPropertyValues(beanName, mbd, bw, pvs);
    }
}
这个方法非常地长,就不带大家一句一句看了,感兴趣的同学可以自己翻阅一下源码。
4 Bean的销毁过程
销毁过程就非常简单了,当调用容器的close方法时,Spring就会自动去调用Bean的销毁方法实现销毁逻辑。
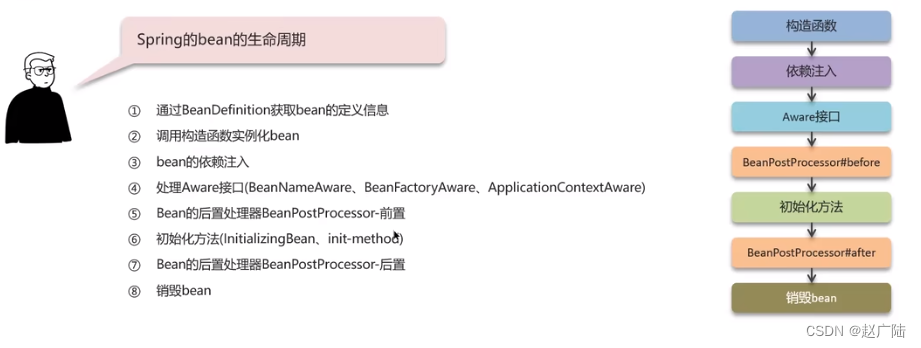
5 Bean的生命周期
以上内容只是对Bean生命周期的一个大概介绍,实际上, Spring提供了非常多的扩展点穿插在整个生命周期中,具体流程如下:
- 创建Bean实例
- 调用Bean中的setter()方法设置属性值
- 检查Bean是否实现了Aware接口,若实现了,则调用对应的接口方法
- 若容器中有BeanPostProcessor,则调用其postProcessAfterInitialization
- 检查Bean是否实现了InitializingBean,若实现了,则调用其afterPropertiesSet方法
- 检查是否指定了Bean的init-method属性,若指定了,则调用其指定的方法
- 若容器中有BeanPostProcessor,则调用其postProcessorAfterInitialization
- 检查Bean是否实现了DisposableBean,若实现了,则调用其方法
- 检查是否指定了Bean的destroy-method属性,若指定了,则调用其指定的方法
我们可以来测试一下:
public class User implements ApplicationContextAware, InitializingBean, DisposableBean {


    private
    private

    public User() {


        System.out.println("1--》创建User实例");
    }

    public void setName(String name) {


        this.name = name;
"2--》设置User的name属性");
    }

    public void setAge(Integer age) {


        this.age = age;
"2--》设置User的age属性");
    }

    public void init() {


"6--》调用init-method属性指定的方法");
    }

    public void myDestroy() {


"9--》调用destroy-method属性指定的方法");
    }

    @Override
    public void setApplicationContext(ApplicationContext applicationContext) throws BeansException {


"3--》调用对应Aware接口的方法");
    }

    @Override
    public void afterPropertiesSet() throws Exception {


"5--》调用InitializingBean接口的afterPropertiesSet方法");
    }

    @Override
    public void destroy() throws Exception {


"8--》调用DisposableBean接口的destroy方法");
    }
}
这个Bean实现了Spring提供的一些扩展点,包括ApplicationContextAware、InitialzingBean、DisposableBean等,所以我们来编写一个Bean的后置处理器:
public class MyBeanPostProcessor implements BeanPostProcessor {


    @Override
    public Object postProcessAfterInitialization(Object bean, String beanName) throws BeansException {


        System.out.println("7--》调用MyBeanPostProcessor的postProcessBeforeInitialization方法");
        return BeanPostProcessor.super.postProcessAfterInitialization(bean, beanName);
    }

    @Override
    public Object postProcessBeforeInitialization(Object bean, String beanName) throws BeansException {


        System.out.println("4--》调用MyBeanPostProcessor的postProcessAfterInitialization方法");
        return BeanPostProcessor.super.postProcessBeforeInitialization(bean, beanName);
    }
}
最后将它们注册到容器中,并且指定Bean对应的初始化和销毁方法:
@Configuration
public class MyBeanConfig {


    @Bean(initMethod = "init", destroyMethod = "myDestroy")
    public User user() {


        User user = new User();
        user.setName("zs");
        user.setAge(30);
        return user;
    }

    @Bean
    public BeanPostProcessor beanPostProcessor() {


        return new MyBeanPostProcessor();
    }
}
运行结果如下:
1--》创建User实例
2--》设置User的name属性
2--》设置User的age属性
3--》调用对应Aware接口的方法
4--》调用MyBeanPostProcessor的postProcessAfterInitialization方法
5--》调用InitializingBean接口的afterPropertiesSet方法
6--》调用init-method属性指定的方法
7--》调用MyBeanPostProcessor的postProcessBeforeInitialization方法
8--》调用DisposableBean接口的destroy方法
9--》调用destroy-method属性指定的方法
正如我们预想的那样,Spring依次调用了每个扩展点,熟悉了整个Bean的生命周期和扩展点之后,我们就能够在每个阶段做我们想做的事情,实现业务的定制化。