一、 下载包:
从Ueditor的官网下载1.4.3.3jsp版本的Ueditor编辑器,官网地址为:http://ueditor.baidu.com/website/download.html
下载解压后会得到如果下文件目录:
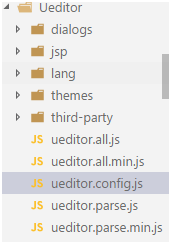
将上述Ueditor文件夹拷贝到vue项目的static文件夹中,此文件夹为项目的静态服务文件夹;
二、 修改配置
在ueditor.config.js中修改如下代码:
// 这里是配置Ueditor内部进行文件请求时的静态文件服务地址

 window.UEDITOR_HOME_URL = "/static/Ueditor/"

 var URL = window.UEDITOR_HOME_URL || getUEBasePath();
三、 文件的引入
在vue项目的入口文件main.js中将Ueditor所有的基础文件引入如下:(路径自行配制)
  import'../static/Ueditor/ueditor.config.js'

  import'../static/Ueditor/ueditor.all.min.js'

  import'../static/Ueditor/lang/zh-cn/zh-cn.js'

  import'../static/Ueditor/ueditor.parse.min.js'
四、 在相应vue的componnent文件中使用富文本编辑器
 1 <template>
 2
 3     <div>
 4
 5     <!--editor的div为富文本的承载容器-->
 6
 7     <div id="editor"></div>
 8
 9     <button type="" @click="gettext">点击</button>
10
11     </div>
12
13     </template>
14
15     <script>
16
17     exportdefault {
18
19             data() {
20
21         return {
22
23                     editor: null,
24
25                }
26
27           },
28
29           mounted() {
30
31       // 实例化editor编辑器
32
33       this.editor = UE.getEditor('editor');
34
35       // console.log(this.editor.setContent("1223"))
36
37           },
38
39           methods: {
40
41               gettext() {
42
43       // 获取editor中的文本
44
45                   console.log(this.editor.getContent())
46
47               }
48
49           },
50
51         destroyed() {
52
53   // 将editor进行销毁
54
55   this.editor.destroy();
56
57           }
58
59       }
60
61  </script>
五、 执行上述代码可能会出现的问题
- 1. 出现如下报错
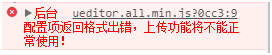
出现此种现象的原因是配置ueditor的图片以及文件的后台上传接口不正确;
如果Ueditor不需要使用文件以及图片的上传则在ueditor.config.js中进行如下配置:(将serverUrl注释掉)
  // 服务器统一请求接口路径

  // serverUrl: URL + "jsp/controller.jsp",
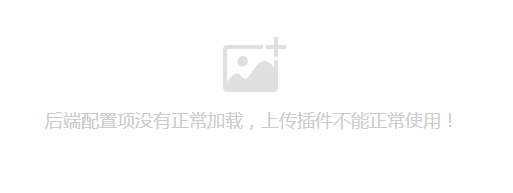
以后将不会再出现上述报错,但是也将无法进行图片的上传:如下图:
如果Ueditor需要使用文件以及图片的上传则在ueditor.config.js中进行如下配置:
  // 服务器统一请求接口路径,配置的服务端接口

          serverUrl: "http://127.0.0.1:9999/api/UE",

  //或者如果使用了代理,则可以如下进行配置

          serverUrl: "/api/ue",
六、 如果使用的是node的express做服务端,接口开发如下
首先下载编辑器包
npm install –save-dev ueditor
服务端项目文件中在public中增加如下目录以及文件
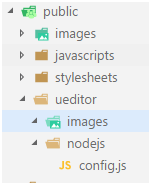
注:ueditor中的images文件夹是上传图片后存储的地方
nodejs中的config.js就是下载的ueditor包的jsp文件夹下config.json文件
开发接口
//加载ueditor 模块

  var ueditor = require("ueditor");

  //使用模块

  app.use("/api/ue", ueditor(path.join(__dirname, 'public'), function(req, res, next) {

  // ueditor 客户发起上传图片请求

  if (req.query.action === 'uploadimage') {

  var foo = req.ueditor;

  var imgname = req.ueditor.filename;

  var img_url = '/ueditor/images/';

          res.ue_up(img_url); //你只要输入要保存的地址。保存操作交给ueditor来做

          res.setHeader('Content-Type', 'text/html'); //IE8下载需要设置返回头尾text/html 不然json返回文件会被直接下载打开

    }

  //  客户端发起图片列表请求

  elseif (req.query.action === 'listimage') {

  var dir_url = '/ueditor/images/';

          res.ue_list(dir_url); // 客户端会列出 dir_url 目录下的所有图片

      }

  // 客户端发起其它请求

  else {
          console.log('config.json')

        res.setHeader('Content-Type', 'application/json');

        res.redirect('/ueditor/nodejs/config.js');

    }

}));
注:
上述接口中的"/api/ue"接口就是配置在前台项目ueditor.config.js文件中的serverUrl地址;
上述接口中img_url的'/ueditor/images/'和res.redirect的'/ueditor/nodejs/config.js'配置都是使用的express静态文件服务对图片存储路径和图片默认配置文件的存储和请求;
进行上述配置后,一定要在webpack的代理中添加如下代理:
  // 配置ueditor的图片上传服务器预览路径

  '/ueditor': {

    //后台接口地址

                target: 'http://localhost:9999',

    //这里可以模拟服务器进行get和post参数的传递

                changeOrigin: true,

    //前端所有的/ueditor'请求都会请求到后台的/ueditor'路径之下

                pathRewrite: {

            '^/ueditor': '/ueditor'

                }

            }