快速建立一个html选项卡(tabs)
在网页中常常会看到这样的标签页,其实实现的方法也不难,接下来就介绍如何快速的建立一个html标签卡
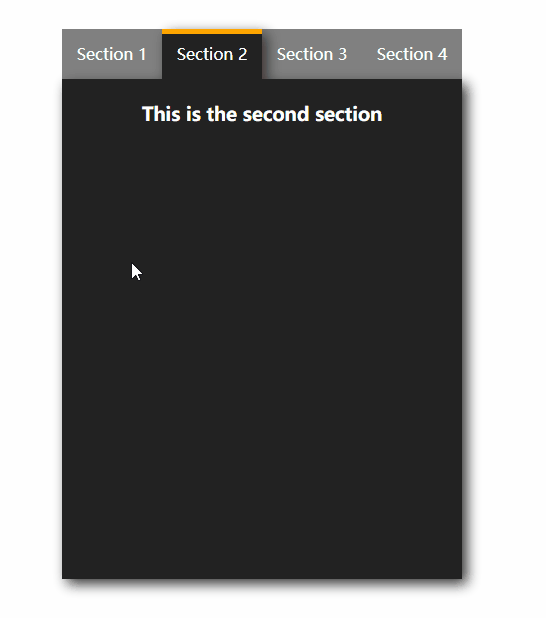
这是我做好的demo预览效果
使用的软件以及技术:
- sublime text 3编辑器
- html+css
- jQuery
1.建立一个html,并写好基本的结构
如果你使用的是sublime text 3并安装emmet插件,就可以快速创建了:div>(ul>li{Section $}*4)+div*4,然后敲击tab键。

给整体的div添加class为label,给第一个li添加class为showed,给第一个小div添加class为showed,并完善div里的文字内容
<div class="label">
	<ul>
		<li class="showed">Section 1</li>
		<li>Section 2</li>
		<li>Section 3</li>
		<li>Section 4</li>
	</ul>
	<div class="showed"><h3>This is the first section</h3></div>
	<div><h3>This is the second section</h3></div>
	<div><h3>This is the third section</h3></div>
	<div><h3>This is the fourth section</h3></div>
</div>
2.编写css样式
- 设定label的大小为宽400,高500,位置和文字都居中。
- 设定ul的大小为宽400,高50,
- 设定li的大小为宽100,高50,无头部样式,向左浮动,默认的背景色为灰色,文字为白色上下居中。
- 设定下面的内容宽400,高50,绝对定位(让四个div重叠),文字为白色,背景为灰黑色,默认隐藏。
- li标签中的showed类就是现在要展示的标签,突出展示,颜色为灰黑色,顶部有橘色的边框,文字调整高度居中,设置阴影突出立体感。
- div标签中的showed类就是对应展现的内容了,display改为block显示,并设置阴影突出立体感。
代码如下:
*{
	margin: 0px;
	padding: 0px;
}
.label{
	width: 400px;
	height: 500px;
	margin: 120px auto;
	text-align: center;
}
.label>ul{
	width: 400px;
	height: 50px;
}
.label>ul>li{
	list-style: none;
	float: left;
	width: 100px;
	height: 50px;
	background-color: gray;
	line-height: 50px;
	color: white;
}
.label>div{
	width: 400px;
	height: 500px;
	position: absolute;
	color: white;
	line-height: 70px;
	background-color: #222222;
	display: none;
}
.label li.showed{
	background-color: #222222;
	border-top: 5px solid orange;
	line-height: 40px;
	box-shadow: 5px 5px 20px #333333;
}
.label div.showed{
	display: block;
	box-shadow: 5px 5px 20px #333333;
}
3.编写js
- 首先引入jqurey
- 当鼠标悬停在li标签上时,如果不是showed类的话(不是当前展现的内容),执行以下步骤
- 将带有showed类的标签去掉showed类
- 将当前的li添加上showed类
- 将当前对象li标签在父标签中的位置index()对应的内容div也添上showed类
<script type="text/javascript" src="jquery-1.6.js"></script>
<script>
		$(".label li").mouseenter(function () {
	     if(! $(this).hasClass(".showed")){
	    $(".showed").removeClass("showed");
        $(this).addClass("showed");
    	$(".label>div").eq($(this).index()).addClass("showed");
    	}
    })
</script>
4.完成
这样简单的几个步骤就完成动态的选项卡切换效果,演示在文章的开头,完整的demo文件在百度网盘中。
标签卡Demo.html演示文件:百度网盘 https://pan.baidu.com/s/1bpVwQuV
