本文是使用Relay部署ONNX模型的入门教程。
首先,我们必须安装ONNX软件包。
一个快速的解决方案是安装protobuf编译器,和
pip install onnx --user
或者请参考官方网站。 https://github.com/onnx/onnx
import onnx
import numpy as np
import tvm
import tvm.relay as relay
from tvm.contrib.download import download_testdata
加载预训练的ONNX模型
这里使用的示例超分辨率模型与onnx教程中的模型完全相同 http://pytorch.org/tutorials/advanced/super_resolution_with_caffe2.html 我们跳过了pytorch模型构建部分,并下载了保存的onnx模型
model_url = ''.join(['https://gist.github.com/zhreshold/',
                     'bcda4716699ac97ea44f791c24310193/raw/',
                     '93672b029103648953c4e5ad3ac3aadf346a4cdc/',
                     'super_resolution_0.2.onnx'])
model_path = download_testdata(model_url, 'super_resolution.onnx', module='onnx')
# now you have super_resolution.onnx on disk
onnx_model = onnx.load(model_path)
输出:
File /workspace/.tvm_test_data/onnx/super_resolution.onnx exists, skip.
加载测试图像
一只猫占主导地位的例子!
from PIL import Image
img_url = 'https://github.com/dmlc/mxnet.js/blob/master/data/cat.png?raw=true'
img_path = download_testdata(img_url, 'cat.png', module='data')
img = Image.open(img_path).resize((224, 224))
img_ycbcr = img.convert("YCbCr")  # convert to YCbCr
img_y, img_cb, img_cr = img_ycbcr.split()
x = np.array(img_y)[np.newaxis, np.newaxis, :, :]
输出:
File /workspace/.tvm_test_data/data/cat.png exists, skip.
用relay编译模型
target = 'llvm'

input_name = '1'
shape_dict = {input_name: x.shape}
mod, params = relay.frontend.from_onnx(onnx_model, shape_dict)

with relay.build_config(opt_level=1):
    intrp = relay.build_module.create_executor('graph', mod, tvm.cpu(0), target)
在TVM上执行
dtype = 'float32'
tvm_output = intrp.evaluate()(tvm.nd.array(x.astype(dtype)), **params).asnumpy()
输出:
Cannot find config for target=llvm, workload=('conv2d', (1, 32, 224, 224, 'float32'), (9, 32, 3, 3, 'float32'), (1, 1), (1, 1), (1, 1), 'NCHW', 'float32'). A fallback configuration is used, which may bring great performance regression.
Cannot find config for target=llvm, workload=('conv2d', (1, 64, 224, 224, 'float32'), (32, 64, 3, 3, 'float32'), (1, 1), (1, 1), (1, 1), 'NCHW', 'float32'). A fallback configuration is used, which may bring great performance regression.
Cannot find config for target=llvm, workload=('conv2d', (1, 1, 224, 224, 'float32'), (64, 1, 5, 5, 'float32'), (1, 1), (2, 2), (1, 1), 'NCHW', 'float32'). A fallback configuration is used, which may bring great performance regression.
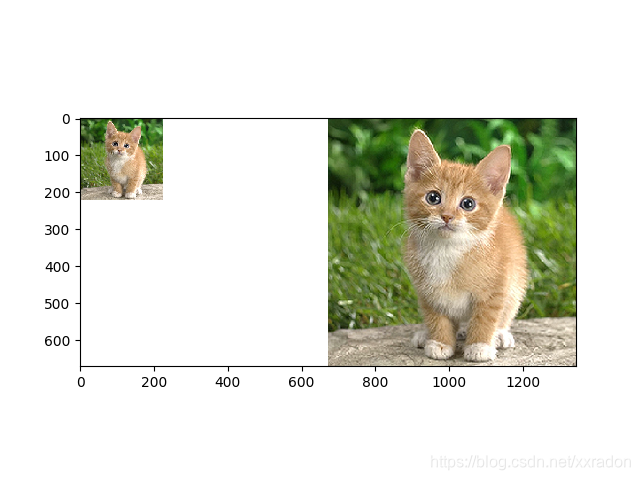
显示结果
把输入输出图像颈部放在脖子上
from matplotlib import pyplot as plt
out_y = Image.fromarray(np.uint8((tvm_output[0, 0]).clip(0, 255)), mode='L')
out_cb = img_cb.resize(out_y.size, Image.BICUBIC)
out_cr = img_cr.resize(out_y.size, Image.BICUBIC)
result = Image.merge('YCbCr', [out_y, out_cb, out_cr]).convert('RGB')
canvas = np.full((672, 672*2, 3), 255)
canvas[0:224, 0:224, :] = np.asarray(img)
canvas[:, 672:, :] = np.asarray(result)
plt.imshow(canvas.astype(np.uint8))
plt.show()