顺序表的构建需要预先知道数据大小来申请连续的存储空间,而在进行扩充时又需要进行数据的搬迁,所以使用起来并不是很灵活。
链表结构可以充分利用计算机内存空间,实现灵活的内存动态管理。
链表的定义
链表(Linked list)是一种常见的基础数据结构,是一种线性表,但是不像顺序表一样连续存储数据,而是在每一个节点(数据存储单元)里存放下一个节点的位置信息(即地址)。
链表分为三类:单向链表,双向链表,循环链表。


实现单个节点的代码如下:
# 单个节点实现
class SingleNode(object):

    # 单链表的节点
    def __init__(self, item):

        # 存放数据元素
        self.item = item

        # next下一个节点的标识
        self.next = None              # 实现单个节点,暂定为None
这里需要注意的是最后一句:self.next = None 这段代码是完成单个节点的编写,所以下一个节点的地址设定为None
实现链表的代码如下:
# 链表实现
class SingleLinkList(object):
    # 单链表
    # 空的单链表
    # 非空单链表
    def __init__(self, node=None):
        self.__head = node
self.__head是指代链表的首地址值。
这里需要注意的是参量node=None,这样写是为了防止是空链表的情况,假如不传参量node,就是空链表,此时默认为None,传参之后,self.__head=node,得到新链表。
实现链表的增删改查等操作的函数:
1、判断链表是否为空的函数
# 判断链表是否为空
    def is_empty(self):
        # if self.__head == None:
        #     return True
        # else:
        #     return False

        return self.__head == None   # 如果self.__head == None,返回true,否则返回False
这里需要注意的是,注释掉的是复杂版本的函数,简介版本代码就是
return self.__head == None,同样能达到要求。
2、计算链表长度函数
# 链表长度
    def length(self):
        # cur游标  指向首节点,用来遍历  相当于指针
        cur = self.__head  # 游标指向首地址

        count = 0          # 正常情况下count=1     空链表的情况下 count只能为0

        while cur != None:
            count += 1
            # 将游标后移动一位
            cur = cur.next         # AttributeError: 'builtin_function_or_method' object has no attribute 'next'    这个错误是上面单节点的设置中cur.next设置出错
        return count
出现过一个错误就是# AttributeError: ‘builtin_function_or_method’ object has no attribute ‘next’
原因就是单节点实现的过程中的self.next 的值设定出错。
3、遍历链表函数
 # 遍历整个链表
    def travel(self):
        cur =self.__head

        while cur != None:
            # 节点中的数据 item
            print(cur.item, end=' ')       # 防止第一个节点数据不会被打印,这个语句应该放在cur = cur.next前面
            cur = cur.next
        print(" ")        # 输出换行
这里注意的是 print(cur.item, end=’ ')语句和cur = cur.next语句的顺序。

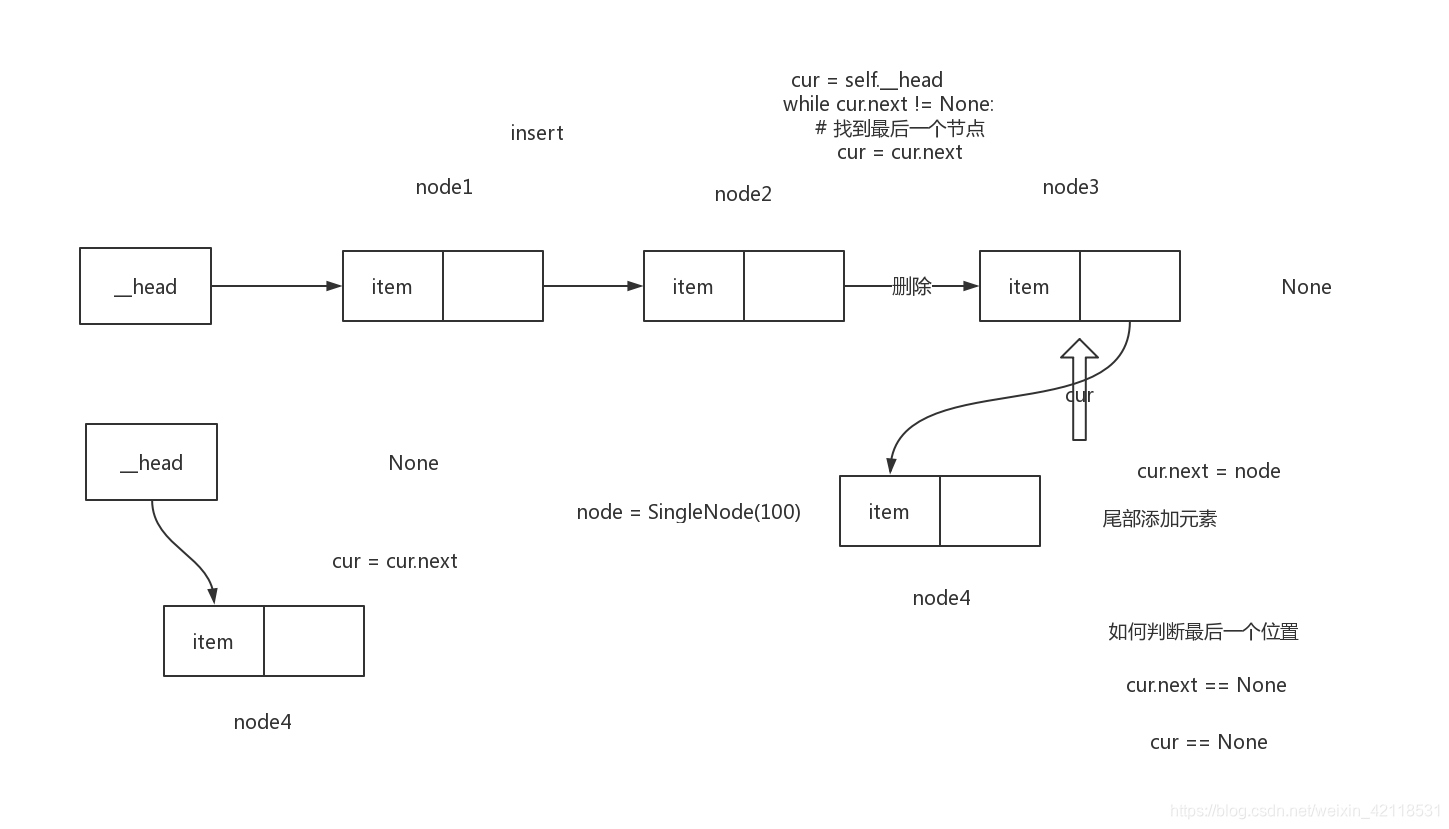
4、链表尾部添加元素函数
# 链表尾部添加元素
    def append(self, item):
        # 链表尾部添加元素数据
        # item 要插入的数据
        node = SingleNode(item)

        # 考虑空链表时候
        if self.is_empty():
            self.__head = node
        else:
            cur = self.__head    # 如果是空链表,此时cur为None

            # 如果链表本身是空的,添加数据就会报错,:
            # AttributeError: 'NoneType' object has no attribute 'next'
            while cur.next != None:
                # 找到最后一个节点
                cur = cur.next
            # 将添加后的元素的地址标志
            cur.next = node
尾部添加元素函数实现的示意图:
5、链表头部添加元素函数
# 链表头部添加元素
    def add(self, item):
        node = SingleNode(item)   # 创建新节点,即要查入的新的元素

        # 第一步:将新的节点的地址指向初始链表的第一个元素
        node.next = self.__head

        # 第二步:将新链表的首地址指向新添加元素
        self.__head = node
头部添加元素示意图:

6、指定链表的位置添加元素函数
# 指定链表的位置添加元素    pos 指定位置
    def insert(self, pos , item):
        node = SingleNode(item)  # 创建新节点   item是插入的值

        # 考虑特殊情况
        # 头部插入
        if pos <= 0:
            self.add(item)
        # 尾部插入
        elif pos > self.length()-1:
            self.append(item)
        else:
            # 指定位置插入
            '''
            # 第一步:先执行将新节点的地址指向插入的后一项节点数据
            node.next = cur.next
            # 第二步:将插入元素的前一项的地址指向新元素
            cur.next = node
            '''
            # 引入一个新的游标pre,指代插入元素的前一项,则将上面的语句修改

            pre = self.__head    # 将pre当作新的游标进行使用,cur这个游标是代表插入数据的
            count = 0            # 需要用到count与插入位置做对比
            while count < (pos-1):     # 为了判断游标pre循环遍历停止的位置,停止在哪,就在哪里插入数值item
                count += 1
                pre = pre.next

            # 第一步:当前插入元素的地址指向之前指向的后一项元素地址
            node.next = pre.next
            # 第二步:前一项数据的地址指向新元素
            pre.next = node
指定链表的位置添加元素示意图:

7、删除节点函数
# 删除节点
    def remove(self, item):
        cur = self.__head
        pre = None    # 最开始的游标地址指向pre,默认地址为None

        while cur != None:
            if cur.item == item:   # 找到了指定元素
                # 删除第一个元素的情况  找到第一个地址
                if cur == self.__head:
                    self.__head = cur.next
                else:
                    # 删除元素
                    # 将删除元素的前一项的地址指向当前要删除元素指向的地址
                    pre.next = cur.next
                    # pre.next = pre.next.next     与上式表达意思相同
                break

            else:    # 继续循环遍历查找,游标地址值往后移动
                pre = cur
                cur = cur.next
删除节点示意图:

8、查找节点是否存在函数
 # 查找节点是否存在
    def search(self, item):
        cur = self.__head

        while cur != None:    # 不能使用cur.next!=None,防止尾节点查找不到    尾节点的next为None,此时尾节点可能会退出循环,不被执行
            if cur.item == item:
                return True
            else:
                # 游标继续执行 查询下一个节点
                cur = cur.next
        return False
9、实现链表整体代码如下:
# -*- encoding: utf-8 -*-
"""
@File    : single_link_list.py
@Time    : 2019/11/9 21:04
@Author  : chen

"""
'''
单链表
节点实现
链表实现
'''
# 节点实现
class SingleNode(object):

    # 单链表的节点
    def __init__(self, item):

        # 存放数据元素
        self.item = item

        # next下一个节点的标识
        self.next = None              # 实现单个节点,暂定为None

# 链表实现
# [] append empty
class SingleLinkList(object):
    # 单链表

    # 空的单链表
    # 非空单链表
    def __init__(self, node=None):
        self.__head = node

    # 判断链表是否为空
    def is_empty(self):
        # if self.__head == None:
        #     return True
        # else:
        #     return False

        return self.__head == None   # 如果self.__head == None,返回true,否则返回False

    # 链表长度
    def length(self):
        # cur游标  指向首节点,用来遍历  相当于指针
        cur = self.__head  # 游标指向首地址

        count = 0          # 正常情况下count=1     空链表的情况下 count只能为0

        while cur != None:
            count += 1
            # 将游标后移动一位
            cur = cur.next         # AttributeError: 'builtin_function_or_method' object has no attribute 'next'    这个错误是上面单节点的设置中cur.next设置出错
        return count

    # 遍历整个链表
    def travel(self):
        cur =self.__head

        while cur != None:
            # 节点中的数据 item
            print(cur.item, end=' ')       # 防止第一个节点数据不会被打印,这个语句应该放在cur = cur.next前面

            cur = cur.next
        print(" ")        # 输出换行

    # 链表尾部添加元素
    def append(self, item):
        # 链表尾部添加元素数据
        # item 要插入的数据
        node = SingleNode(item)

        # 考虑空链表时候
        if self.is_empty():
            self.__head = node
        else:
            cur = self.__head    # 如果是空链表,此时cur为None

            # 如果链表本身是空的,添加数据就会报错,:
            # AttributeError: 'NoneType' object has no attribute 'next'
            while cur.next != None:
                # 找到最后一个节点
                cur = cur.next
            # 将添加后的元素的地址标志
            cur.next = node

    # 链表头部添加元素
    def add(self, item):
        node = SingleNode(item)   # 创建新节点,即要查入的新的元素

        # 第一步:将新的节点的地址指向初始链表的第一个元素
        node.next = self.__head

        # 第二步:将新链表的首地址指向新添加元素
        self.__head = node

    # 指定链表的位置添加元素    pos 指定位置
    def insert(self, pos , item):
        node = SingleNode(item)  # 创建新节点   item是插入的值

        # 考虑特殊情况
        # 头部插入
        if pos <= 0:
            self.add(item)
        # 尾部插入
        elif pos > self.length()-1:
            self.append(item)
        else:
            # 指定位置插入
            '''
            # 第一步:先执行将新节点的地址指向插入的后一项节点数据
            node.next = cur.next
            # 第二步:将插入元素的前一项的地址指向新元素
            cur.next = node
            '''
            # 引入一个新的游标pre,指代插入元素的前一项,则将上面的语句修改

            pre = self.__head    # 将pre当作新的游标进行使用,cur这个游标是代表插入数据的
            count = 0            # 需要用到count与插入位置做对比
            while count < (pos-1):     # 为了判断游标pre循环遍历停止的位置,停止在哪,就在哪里插入数值item
                count += 1
                pre = pre.next

            # 第一步:当前插入元素的地址指向之前指向的后一项元素地址
            node.next = pre.next
            # 第二步:前一项数据的地址指向新元素
            pre.next = node

    # 删除节点
    def remove(self, item):
        cur = self.__head
        pre = None    # 最开始的游标地址指向pre,默认地址为None

        while cur != None:
            if cur.item == item:   # 找到了指定元素
                # 删除第一个元素的情况  找到第一个地址
                if cur == self.__head:
                    self.__head = cur.next
                else:
                    # 删除元素
                    # 将删除元素的前一项的地址指向当前要删除元素指向的地址
                    pre.next = cur.next
                    # pre.next = pre.next.next     与上式表达意思相同
                break

            else:    # 继续循环遍历查找,游标地址值往后移动
                pre = cur
                cur = cur.next

    # 查找节点是否存在
    def search(self, item):
        cur = self.__head

        while cur != None:    # 不能使用cur.next!=None,防止尾节点查找不到    尾节点的next为None,此时尾节点可能会退出循环,不被执行
            if cur.item == item:
                return True
            else:
                # 游标继续执行 查询下一个节点
                cur = cur.next
        return False


# 一个节点存放了参量100,实例化
# node = SingleNode(100)


s = SingleLinkList()
# 测试
print(s.is_empty())
print(s.length())

s.append(1)
print(s.is_empty())
print(s.length())

# 链表尾部添加元素
s.append(2)
s.append(5)
s.append(9)
s.append(11)
print(s.is_empty())
print(s.length())
s.travel()

# 链表头部添加元素
s.add(10)
s.travel()

# 插入新数据
s.insert(-1, 555)    # 头部插入
s.insert(2, 333)     # 指定位置插入
s.insert(10, 999)    # 尾部插入
s.travel()

# 测试查找和删除
s.remove(999)        # 删除尾部元素
s.remove(555)        # 删除头部元素
s.remove(000)        # 删除不存在元素
s.travel()
print(s.search(1))
print(s.search(666))
对比链表和顺序表

