简介
上一篇文章说了 Shiro 基于 ini 文件的方式实现用户认证和授权的的简单案例,明白了 Shiro 的运行机制。实际上在真实项目中不会用基于 ini 文件的方式去实现,这太不灵活了,所以这篇文章谈谈怎么在实际项目中运用 Shiro。
一、自定义Realm
Realm域: Shiro 从 Realm 获取安全数据(如用户、角色、权限),就是 SecurityManager 要验证用户身份,那么它需要从 Realm 获取相应的用户进行比较以确定用户身份是否合法;也需要从 Realm 得到用户相应的角色/权限进行验证用户是否能进行操作;可以把 Realm 看成 DataSource,即安全数据源。
- 配置shiro的ini配置文件(shiro-realm.ini)
[main]
#声明realm(全限定名)
permReam=cn.itcast.shiro.PermissionRealm
#注册自定义的realm域到securityManager中
securityManager.realms=$permReam
- 自定义Realm域
/**
 * 自定义realms对象 继承AuthorizingRealm 重写方法 doGetAuthorizationInfo:授权 获取到用户的授权数据(用户的权限数据)
 * doGetAuthenticationInfo:认证 根据用户名密码登录,将用户数据保存(安全数据)
 */
public class PermissionRealm extends AuthorizingRealm {

  /** 自定义realm域名称,一般取当前类名 */
  public void setName(String name) {
    super.setName("permissionRealm");
  }

  // 授权:授权的主要目的就是根据认证数据获取到用户的权限信息
  /**
    * principalCollection:包含了所有已认证的安全数据
    * AuthorizationInfoInfo:授权数据
   */
  protected AuthorizationInfo doGetAuthorizationInfo(PrincipalCollection principalCollection) {
    System.out.println("执行授权方法");
    // 1.获取安全数据  username,用户id
    String username = (String) principalCollection.getPrimaryPrincipal();
    // 2.根据id或者名称查询用户
    // 3.查询用户的角色和权限信息,这里是模拟获取到了用户的角色和权限
    List<String> perms = new ArrayList<>();
    perms.add("user:save");
    perms.add("user:update");
    List<String> roles = new ArrayList<>();
    roles.add("role1");
    roles.add("role2");
    // 4.构造返回
    SimpleAuthorizationInfo info = new SimpleAuthorizationInfo();
    // 设置权限集合
    info.addStringPermissions(perms);
    // 设置角色集合
    info.addRoles(roles);
    return info;
  }

  // 认证:认证的主要目的,比较用户名和密码是否与数据库中的一致
  // 将安全数据存入到shiro进行保管
  // 参数:authenticationToken登录构造的usernamepasswordtoken
  protected AuthenticationInfo doGetAuthenticationInfo(AuthenticationToken authenticationToken)
      throws AuthenticationException {
    System.out.println("执行认证方法");
    // 1.构造uptoken
    UsernamePasswordToken upToken = (UsernamePasswordToken) authenticationToken;
    // 2.获取输入的用户名密码
    String username = upToken.getUsername();
    String password = new String(upToken.getPassword());
    // 3.根据用户名查询数据库,这里写死的,但正式系统需要去数据库查询
    // 4.比较密码和数据库中的密码是否一致(密码可能需要加密)
    if ("123456".equals(password)) {
      // 5.如果成功,向shiro存入安全数据
      SimpleAuthenticationInfo info =
          new SimpleAuthenticationInfo(username, password, getName()); // 1.安全数据,2.密码。3。当前realm域名称
      return info;
    } else {
      // 6.失败,抛出异常或返回null
      throw new RuntimeException("用户名或密码错误");
    }
  }
}
- 验证
public class ShiroTest03 {

  private SecurityManager securityManager;

  @Before
  public void init() {
    // 1.根据配置文件创建SecurityManagerFactory
    Factory<SecurityManager> factory = new IniSecurityManagerFactory("classpath:shiro-realm.ini");
    // 2.通过工厂获取SecurityManager
    SecurityManager securityManager = factory.getInstance();
    // 3.将SecurityManager绑定到当前运行环境
    SecurityUtils.setSecurityManager(securityManager);
  }

  @Test
  public void testLogin() {
    Subject subject = SecurityUtils.getSubject();
    //模拟获取到的用户登录的账号和密码
    String username = "tom";
    String password = "123456";
    UsernamePasswordToken token = new UsernamePasswordToken(username, password);

    // 执行login-->自动调用realm域中的认证方法
    subject.login(token);

    // 授权:-->自动调用realm域中的授权方法
    System.out.println(subject.hasRole("role1"));
    System.out.println(subject.isPermitted("user:save"));
  }
}
二、总结
- 认证流程

1.首先调用 Subject.login(token) 进行登录,其会自动委托给 Security Manager,调用之前必须通过 SecurityUtils. setSecurityManager() 将 SecurityManager 绑定到当前运行环境;
2.SecurityManager 负责真正的身份验证逻辑;它会委托给 Authenticator 进行身份验证;
3.Authenticator 才是真正的身份验证者,Shiro API 中核心的身份认证入口点,此处可以自定义插入自己的实现;
4.Authenticator 可能会委托给相应的 AuthenticationStrategy 进行多 Realm 身份验证,默认 ModularRealmAuthenticator 会调用 AuthenticationStrategy 进行多 Realm 身份验证;
5.Authenticator 会把相应的 token 传入Realm,从 Realm 获取身份验证信息,如果没有返回/抛出异常表示身份验证失败了。此处可以配置多个 Realm,将按照相应的顺序及策略进行访问。 - 授权流程
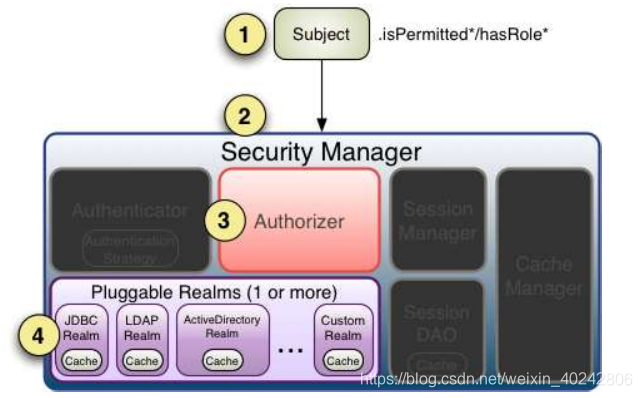
1.首先调用 Subject.isPermitted/hasRole 接口,其会委托给 SecurityManager,而 SecurityManager 接着会委托给 Authorizer;
2.Authorizer 是真正的授权者,如果我们调用如 isPermitted(“user:view”),其首先会通过 PermissionResolver 把字符串转换成相应的 Permission 实例;
3.在进行授权之前,其会调用相应的 Realm 获取 Subject 相应的角色/权限用于匹配传入的角色/权限;
4.Authorizer 会判断 Realm 的角色/权限是否和传入的匹配,如果有多个Realm,会委托给 ModularRealmAuthorizer 进行循环判断,如果匹配 isPermitted/hasRole会返回 true,否则返回 false 表示授权失败。
