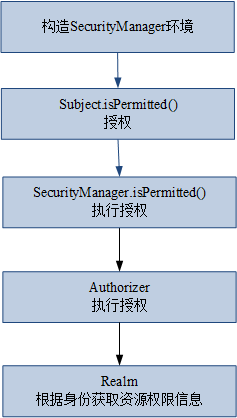
1.授权流程
2 .三种授权方法
Shiro 支持三种方式的授权:
编程式:通过写if/else 授权代码块完成:
Subject subject = SecurityUtils.getSubject();
if(subject.hasRole(“admin”)) {
//有权限
} else {
//无权限
}
注解式:通过在执行的Java方法上放置相应的注解完成:
@RequiresRoles("admin")
public void hello() {
//有权限
}
JSP/GSP 标签:在JSP/GSP 页面通过相应的标签完成:
<shiro:hasRole name="admin">
<!— 有权限—>
</shiro:hasRole>
3.授权
shiro-permission.ini
#用户
[users]
#用户=密码,角色1,角色2
xuxu01=123456,role1,role2
xuxu02=654321,role1

#角色
[roles]
#角色=资源:权限
role1=user:create,user:update
role2=user:create,user:delete权限标识符号规则:资源:操作:实例(中间使用半角:分隔)
user:create:01 表示对用户资源的01实例进行create操作。
user:create:表示对用户资源进行create操作,相当于user:create:*,对所有用户资源实例进行create操作。
user:*:01 表示对用户资源实例01进行所有操作。
测试类
/*
 * 用户授权测试
 */
public class AuthorizationTest1 {

	@Test
	public void Authorization(){
		Factory<SecurityManager> factory =
				new IniSecurityManagerFactory("classpath:shiro-permission.ini");
		SecurityManager securityManager = factory.getInstance();
		SecurityUtils.setSecurityManager(securityManager);
		Subject subject = SecurityUtils.getSubject();
		UsernamePasswordToken token = new UsernamePasswordToken("xuxu01","123456");

		try {
			subject.login(token);
		} catch (AuthenticationException e) {
			e.printStackTrace();
		}
		System.out.println("用户认证:"+subject.isAuthenticated());
		//授权 基于角色授权 基于资源的授权
		//基于角色授权
		//单个授权
		boolean permitted = subject.hasRole("role1");
		System.out.println("单个角色授权:"+permitted);
		//多个
		permitted = subject.hasAllRoles(Arrays.asList("role1","role2"));
		System.out.println("多个角色授权:"+permitted);
		//和上面返回true false不同 这里如果没有角色会抛异常
		subject.checkRole("role1");

		//基于资源的授权
		//单个
		permitted =subject.isPermitted("user:update");
		System.out.println("单个资源授权:"+permitted);
		//多个
		permitted=subject.isPermittedAll("user:update","user:create");
		System.out.println("多个资源授权:"+permitted);
		subject.checkPermission("user:update:1");
	}
}
结果:
用户认证:true
单个角色授权:true
多个角色授权:true
单个资源授权:true
多个资源授权:true
4.自定义realm授权
shiro-permission-myrealm.ini
[main]
#自定义realm
myRealm=com.xuxu.realm.MyRealmPermission
#将myRealm设置进securityManager 相当于spring中注入自定义realm
securityManager.realms=$myRealm
MyRealmPermission
public class MyRealmPermission extends AuthorizingRealm{
	/*
	 * 用户自定义授权
	 */
	@Override
	protected AuthorizationInfo doGetAuthorizationInfo(PrincipalCollection principals) {
		String principal = (String) principals.getPrimaryPrincipal();
		//根据传入凭证 principal 数据库查询权限
		List<String> permissions = new ArrayList<String>();
		permissions.add("user:creat");
		permissions.add("user:update");

		SimpleAuthorizationInfo authorizationInfo = new SimpleAuthorizationInfo();
		authorizationInfo.addStringPermissions(permissions);

		return authorizationInfo;
	}


	@Override
	protected AuthenticationInfo doGetAuthenticationInfo(AuthenticationToken token) throws AuthenticationException {
		//第一步从token中取出身份信息(token代表用户输入的传下来的信息)
				String userName = (String) token.getPrincipal();

				//第二步:根据用户输入的userCode从数据库查询
				//数据库中通过名称查询出对应的用户信息

				//判断数据库中查出用户是否为空

				//假设数据库中查出用户账号密码为
				String name = "xuxu01";
				String password="123456";

				SimpleAuthenticationInfo authenticationInfo =
							new SimpleAuthenticationInfo(name, password, this.getName());
				return authenticationInfo;
	}

}
用户授权测试
/*
 * 用户授权测试
 */
public class AuthorizationTest2 {

	@Test
	public void Authorization(){
		Factory<SecurityManager> factory =
				new IniSecurityManagerFactory("classpath:shiro-permission-myrealm.ini");
		SecurityManager securityManager = factory.getInstance();
		SecurityUtils.setSecurityManager(securityManager);
		Subject subject = SecurityUtils.getSubject();
		UsernamePasswordToken token = new UsernamePasswordToken("xuxu01","123456");

		try {
			subject.login(token);
		} catch (AuthenticationException e) {
			e.printStackTrace();
		}

		//用户认证成功
		System.out.println("用户认证:"+subject.isAuthenticated());
		boolean permitted = subject.isPermitted("user:update");
		System.out.println("单个权限验证:"+permitted);
		permitted = subject.isPermittedAll("user:creat","user:update");
		System.out.println("多个权限验证:"+permitted);
		try {
			subject.checkPermission("user:update");
		} catch (Exception e) {
			e.printStackTrace();
		}

	}
}
结果

将上诉中user:update 改为user:delete
结果
用户认证:true
DEBUG [main] - No authorizationCache instance set.  Checking for a cacheManager...
DEBUG [main] - No cache or cacheManager properties have been set.  Authorization cache cannot be obtained.
单个权限验证:false
DEBUG [main] - No authorizationCache instance set.  Checking for a cacheManager...
DEBUG [main] - No cache or cacheManager properties have been set.  Authorization cache cannot be obtained.
DEBUG [main] - No authorizationCache instance set.  Checking for a cacheManager...
DEBUG [main] - No cache or cacheManager properties have been set.  Authorization cache cannot be obtained.
多个权限验证:false
DEBUG [main] - No authorizationCache instance set.  Checking for a cacheManager...
DEBUG [main] - No cache or cacheManager properties have been set.  Authorization cache cannot be obtained.
org.apache.shiro.authz.UnauthorizedException: Subject does not have permission [user:delete]
	at org.apache.shiro.authz.ModularRealmAuthorizer.checkPermission(ModularRealmAuthorizer.java:323)
5.执行流程
1、对subject进行授权,调用方法isPermitted("permission串")

2、SecurityManager执行授权,通过ModularRealmAuthorizer执行授权


3、ModularRealmAuthorizer执行realm(自定义的CustomRealm)从数据库查询权限数据
调用realm的授权方法:doGetAuthorizationInfo
4、realm从数据库查询权限数据,返回ModularRealmAuthorizer

5、ModularRealmAuthorizer调用PermissionResolver进行权限串比对
6、如果比对后,isPermitted中"permission串"在realm查询到权限数据中,说明用户访问permission串有权限,否则 没有权限,抛出异常。
