一.源码包安装Nginx。
1.安装Nginx。
1)安装依赖程序。
[root@Centos ~]# yum -y install pcre-devel zlib-devel gcc gcc-c++ openssl-devel zlib
2)创建nginx中账户。
[root@Centos ~]# useradd -M -s /sbin/nologin nginx
3)配置,编译,安装源码包
[root@nginx nginx-1.6.0]# ./configure --prefix=/usr/local/nginx --with-http_dav_module --with-http_stub_status_module --with-http_addition_module --with-http_sub_module --with-http_flv_module --with-http_mp4_module --with-http_ssl_module --with-http_gzip_static_module --user=nginx --group=nginx && make && make install
--with-http_dav_module:启用支持(增加PUT,DELETE,MKCOL:创建集合,COPY和MOVE方法)
--with-http_stub_status_module:启用支持(获取Nginx上次启动以来的工作状态)
--with-http_addition_module:启用支持(作为一个输出过滤器,支持不完全缓冲,分部分相应请求)
--with-http_sub_module:启用支持(允许一些其他文本替换Nginx相应中的一些文本)
--with-http_flv_module:启用支持(提供支持flv视频文件支持)
--with-http_mp4_module:启用支持(提供支持mp4视频文件支持,提供伪流媒体服务端支持)
2.优化nginx,配置nginx服务。
1)优化nginx程序执行位置。
[root@Centos nginx-1.6.0]# ln -s /usr/local/nginx/sbin/nginx /usr/local/sbin
2)nginx管理。
nginx -t 检查配置文件的完整性
nginx 开启nginx服务
killall -s HUP nginx 重新启动nginx
killall -s QUIT nginx 停止nginx服务
3)需编写服务控制脚本。
#!/bin/bash
#chkconfig: 35 90 30
#description: Nginx Server
PROG="/usr/local/nginx/sbin/nginx"
PIDF="/usr/local/nginx/logs/nginx.pid"
case "$1" in
        start)
        $PROG
        ;;
        stop)
        kill -s QUIT $(cat $PIDF)
        ;;
        restart)
        $0 stop
        $0 start
        ;;
        reload)
        kill -s HUP $(cat $PIDF)
        ;;
        *)
        echo "Usage: $0 (start|stop|restart|reload)"
        exit 1
esac
exit 0
4)添加为系统服务,并设置为开机自启。
[root@Centos /]# chmod +x /etc/init.d/nginx
[root@Centos /]# chkconfig --add nginx
[root@Centos /]# chkconfig --level 35 nginx on
3.nginx主配置文件。
1)全局配置。
user nginx; 管理nginx的默认账户
worker_processes 1; 进程数,根据cpu设置,一个cpu一个进程
pid logs/nginx.pid; nginx服务启动后存储服务id位置
error_log logs/error.log; 错误日志位置
2)I/o事件配置。
events
use epoll; 管理模型使用
worker_connections 1024; 每个进程处理的连接数量
3)http配置。
keepalive_timeout 65; http连接保持时间,一般为10s
sendfile on; 启动访问日志
server 一个server代表一个虚拟主机
root html; 网站根目录位置
index index.html index.htm; 网站主页
4.配置基于域名的虚拟主机。
server {
listen 192.168.200.20:80;
charset utf-8;
server_name www.benet.com;
access_log logs/www.benet.com.access.log;
error_log logs/www.benet.com.access.lig;
location / {
root /var/www/benetcom/;
index index.html insex.php;
}
location /status {
stub_status on;
access_log off;
}
}
5.统计网站访问次数。
http://www.benet.com/status
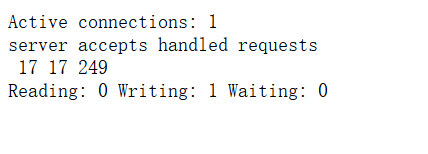
三个数字依次为:
已处理的连接数
成功握手数
请求数
