1、Nginx的简介
nginx是一款轻量级的Web服务器/反向代理服务器及电子邮件(IMAP/POP3)代理服务器;因它的稳定性、丰富的功能集、示例配置文件和低系统资源的消耗而闻名,nginx还有非常丰富的第三方模块。2011年6月1日,nginx 1.0.4发布。nginx的特点是占有内存少,并发能力强,事实上nginx的并发能力确实在同类型的网页服务器中表现较好,中国大陆使用nginx网站用户有:百度、京东、新浪、网易、腾讯、淘宝等。
2、Nginx的特性和优点
特性:
nginx是一个很厉害的高性能Web和反向代理服务器,在高连接并发的情况下,nginx是Apache服务器不错的替代品,能够支持高达50000个并发连接数的响应;使用epoll and kqueue作为开发模型;nginx作为负载均衡服务器:nginx既可在内部直接支持和PHP程序对外进行服务,也可支持作为HTTP代理服务器对外进行服务;nginx采用C进行编写,不论系统资源开销还是CPU使用效率都比Perlbal要好很多。
优点:
1)高并发连接:官方测试能够支撑5万并发连接,在实际生产环境中跑到2-3万并发连接数
2)内存消耗少:在3万并发连接下,开启的10个nginx进程才消耗150M内存(15M*10=150M)
3)配置文件非常简单:风格跟程序一样通俗易懂
4)成本低廉:nginx为开源软件,可以免费使用。而购买F5 BIG-IP、NetScaler等硬件负载均衡交换 机则需要十多万至几十万人民币
5)支持Rewrite重写规则:能够根据域名、URL的不同,将HTTP请求分到不同的后端服务器群组
6)内置的健康检查功能:如果Nginx Proxy后端的某台Web服务器宕机了,不会影响前端访问
7)节省带宽:支持GZIP压缩,可以添加浏览器本地缓存的Header头
8)稳定性高:用于反向代理,宕机的概率微乎其微
9)模块化设计:模块可以动态编译
10)外围支持好:文档全,二次开发和模块较多
11)支持热部署:可以不停机重载配置文件
12)支持事件驱动、AIO(AsyncIO,异步IO)、mmap(Memory Map,内存映射)等性能优化
3、Nginx的功能和应用类型
基本功能:
1)静态资源的web服务器,能缓存打开的文件描述符
http、smtp、pop3协议的反向代理服务器
2)缓存加速、负载均衡
3)支持FastCGI(fpm,LNMP),uWSGI(Python)等
4)模块化(非DSO机制),过滤器zip、SSI及图像的大小调整
5)支持SSL
扩展功能:
1)基于名称和IP的虚拟主机
2)支持keepalive
3)支持平滑升级
4)定制访问日志、支持使用日志缓冲区提高日志存储性能
5)支持URL重写
6)支持路径别名
7)支持基于IP及用户的访问控制
8)支持速率限制,支持并发数限制
应用类别:
1)使用nginx结合FastCGI运行PHP、JSP、Perl等程序
2)使用nginx作反向代理、负载均衡、规则过滤
3)使用nginx运行静态HTML网页、图片
4)nginx与其他新技术的结合应用
4、Nginx的编译安装
1)基础配置:
配置yum源和关闭防火墙、selinux等
[root@www ~]# mount /dev/sr0 /mnt/cdrom/
mount: /dev/sr0 is write-protected, mounting read-only
[root@www ~]# yum repolist all
Loaded plugins: fastestmirror
Repodata is over 2 weeks old. Install yum-cron? Or run: yum makecache fast
Loading mirror speeds from cached hostfile
repo id                                               repo name                                         status
!jyy                                                  jyy                                               enabled: 3,723
repolist: 3,723
[root@www ~]# systemctl disable firewalld
[root@www ~]# iptables -X
[root@www ~]# iptables -F
[root@www ~]# iptables -Z
[root@www ~]# setenforce 0
setenforce: SELinux is disabled
[root@www ~]#
2)下载源码包并解压缩
[root@www ~]# mkdir /application
[root@www ~]# cd /application/
[root@www application]# ls
nginx-1.8.1.tar.gz
[root@www application]# tar -xf nginx-1.8.1.tar.gz
[root@www application]# cd nginx-1.8.1
[root@www nginx-1.8.1]# ls
auto  CHANGES  CHANGES.ru  conf  configure  contrib  html  LICENSE  man  README  src
[root@www nginx-1.8.1]#
3)编译安装源码包
[root@www ~]# wget -O /etc/yum.repos.d/CentOS-Base.repo http://mirrors.aliyun.com/repo/Centos-7.repo
--2019-03-18 13:30:15--  http://mirrors.aliyun.com/repo/Centos-7.repo
Resolving mirrors.aliyun.com (mirrors.aliyun.com)... 59.47.129.231, 59.47.129.229, 59.47.129.232, ...
Connecting to mirrors.aliyun.com (mirrors.aliyun.com)|59.47.129.231|:80... connected.
HTTP request sent, awaiting response... 200 OK
Length: 2523 (2.5K) [application/octet-stream]
Saving to: ‘/etc/yum.repos.d/CentOS-Base.repo’

100%[============================================================================>] 2,523       --.-K/s   in 0s

2019-03-18 13:30:15 (111 MB/s) - ‘/etc/yum.repos.d/CentOS-Base.repo’ saved [2523/2523]
[root@www yum.repos.d]# yum repolist all
Loaded plugins: fastestmirror
Loading mirror speeds from cached hostfile
base                                                                                           | 3.6 kB  00:00:00
(1/2): base/x86_64/group_gz                                                                    | 166 kB  00:00:00
(2/2): base/x86_64/primary_db                                                                  | 6.0 MB  00:00:02
repo id                                repo name                                                       status
base/x86_64                            CentOS-7 - Base - mirrors.aliyun.com                            enabled: 10,019
jyy                                    jyy                                                             enabled:  3,723
repolist: 13,742
[root@www yum.repos.d]# yum install gcc gcc-c++  - y           //安装编译器工具
、、、、、、、、、、、、、、、、、、、、、             //过程省略
[root@www yum.repos.d]# cd /application/
[root@www application]# groupadd nginx
[root@www application]# useradd -r -g nginx nginx
[root@www application]#
[root@www application]# ls
nginx-1.8.1  nginx-1.8.1.tar.gz
[root@www application]# cd nginx-1.8.1
[root@www nginx-1.8.1]# ls
auto  CHANGES  CHANGES.ru  conf  configure  contrib  html  LICENSE  man  README  src
[root@www nginx-1.8.1]# ./configure --prefix=/usr/local/nginx   --user=nginx --group=nginx
checking for OS
 + Linux 3.10.0-957.el7.x86_64 x86_64
checking for C compiler ... found
 + using GNU C compiler
 + gcc version: 4.8.5 20150623 (Red Hat 4.8.5-36) (GCC)
checking for gcc -pipe switch ... found
checking for gcc builtin atomic operations ... found
checking for C99 variadic macros ... found
checking for gcc variadic macros ... found
checking for unistd.h ... found
checking for inttypes.h ... found
checking for limits.h ... found
checking for sys/filio.h ... not found
checking for sys/param.h ... found
checking for sys/mount.h ... found
checking for sys/statvfs.h ... found
checking for crypt.h ... found
checking for Linux specific features
checking for epoll ... found
checking for EPOLLRDHUP ... found
checking for O_PATH ... found
checking for sendfile() ... found
checking for sendfile64() ... found
checking for sys/prctl.h ... found
checking for prctl(PR_SET_DUMPABLE) ... found
checking for sched_setaffinity() ... found
checking for crypt_r() ... found
checking for sys/vfs.h ... found
checking for poll() ... found
checking for /dev/poll ... not found
checking for kqueue ... not found
checking for crypt() ... not found
checking for crypt() in libcrypt ... found
checking for F_READAHEAD ... not found
checking for posix_fadvise() ... found
checking for O_DIRECT ... found
checking for F_NOCACHE ... not found
checking for directio() ... not found
checking for statfs() ... found
checking for statvfs() ... found
checking for dlopen() ... not found
checking for dlopen() in libdl ... found
checking for sched_yield() ... found
checking for SO_SETFIB ... not found
checking for SO_ACCEPTFILTER ... not found
checking for TCP_DEFER_ACCEPT ... found
checking for TCP_KEEPIDLE ... found
checking for TCP_FASTOPEN ... found
checking for TCP_INFO ... found
checking for accept4() ... found
checking for eventfd() ... found
checking for int size ... 4 bytes
checking for long size ... 8 bytes
checking for long long size ... 8 bytes
checking for void * size ... 8 bytes
checking for uint64_t ... found
checking for sig_atomic_t ... found
checking for sig_atomic_t size ... 4 bytes
checking for socklen_t ... found
checking for in_addr_t ... found
checking for in_port_t ... found
checking for rlim_t ... found
checking for uintptr_t ... uintptr_t found
checking for system byte ordering ... little endian
checking for size_t size ... 8 bytes
checking for off_t size ... 8 bytes
checking for time_t size ... 8 bytes
checking for setproctitle() ... not found
checking for pread() ... found
checking for pwrite() ... found
checking for sys_nerr ... found
checking for localtime_r() ... found
checking for posix_memalign() ... found
checking for memalign() ... found
checking for mmap(MAP_ANON|MAP_SHARED) ... found
checking for mmap("/dev/zero", MAP_SHARED) ... found
checking for System V shared memory ... found
checking for POSIX semaphores ... not found
checking for POSIX semaphores in libpthread ... found
checking for struct msghdr.msg_control ... found
checking for ioctl(FIONBIO) ... found
checking for struct tm.tm_gmtoff ... found
checking for struct dirent.d_namlen ... not found
checking for struct dirent.d_type ... found
checking for sysconf(_SC_NPROCESSORS_ONLN) ... found
checking for openat(), fstatat() ... found
checking for getaddrinfo() ... found
checking for PCRE library ... not found
checking for PCRE library in /usr/local/ ... not found
checking for PCRE library in /usr/include/pcre/ ... not found
checking for PCRE library in /usr/pkg/ ... not found
checking for PCRE library in /opt/local/ ... not found

./configure: error: the HTTP rewrite module requires the PCRE library.      //缺少pcre软件包
You can either disable the module by using --without-http_rewrite_module
option, or install the PCRE library into the system, or build the PCRE library
statically from the source with nginx by using --with-pcre=<path> option.

[root@www nginx-1.8.1]#
[root@www nginx-1.8.1]# yum list all | grep -i pcre
pcre.i686                                   8.32-17.el7                    @base
pcre.x86_64                                 8.32-17.el7                    @base
pcre-devel.i686                             8.32-17.el7                    base
pcre-devel.x86_64                           8.32-17.el7                    base
pcre-static.i686                            8.32-17.el7                    base
pcre-static.x86_64                          8.32-17.el7                    base
pcre-tools.x86_64                           8.32-17.el7                    base
pcre2.i686                                  10.23-2.el7                    base
pcre2.x86_64                                10.23-2.el7                    base
pcre2-devel.i686                            10.23-2.el7                    base
pcre2-devel.x86_64                          10.23-2.el7                    base
pcre2-static.i686                           10.23-2.el7                    base
pcre2-static.x86_64                         10.23-2.el7                    base
pcre2-tools.x86_64                          10.23-2.el7                    base
pcre2-utf16.i686                            10.23-2.el7                    base
pcre2-utf16.x86_64                          10.23-2.el7                    base
pcre2-utf32.i686                            10.23-2.el7                    base
pcre2-utf32.x86_64                          10.23-2.el7                    base
[root@www nginx-1.8.1]# yum install pcre-devel.x86_64  -y
Loaded plugins: fastestmirror
Loading mirror speeds from cached hostfile
Resolving Dependencies
--> Running transaction check
---> Package pcre-devel.x86_64 0:8.32-17.el7 will be installed
--> Finished Dependency Resolution

Dependencies Resolved

======================================================================================================================
 Package                       Arch                      Version                        Repository               Size
======================================================================================================================
Installing:
 pcre-devel                    x86_64                    8.32-17.el7                    base                    480 k

Transaction Summary
======================================================================================================================
Install  1 Package

Total download size: 480 k
Installed size: 1.4 M
Downloading packages:
pcre-devel-8.32-17.el7.x86_64.rpm                                                              | 480 kB  00:00:00
Running transaction check
Running transaction test
Transaction test succeeded
Running transaction
  Installing : pcre-devel-8.32-17.el7.x86_64                                                                      1/1
  Verifying  : pcre-devel-8.32-17.el7.x86_64                                                                      1/1

Installed:
  pcre-devel.x86_64 0:8.32-17.el7

Complete!

//重新检查编译环境
[root@www nginx-1.8.1]# ./configure --prefix=/usr/local/nginx   --user=nginx --group=nginx
、、、、、、、、、、、、、、、、、、、、、   //过程省略

./configure: error: the HTTP gzip module requires the zlib library.              //提示缺少一个zlib的软件包,安装即可
You can either disable the module by using --without-http_gzip_module
option, or install the zlib library into the system, or build the zlib library
statically from the source with nginx by using --with-zlib=<path> option.
[root@www nginx-1.8.1]# yum install zilb-devel  -y
Loaded plugins: fastestmirror
Loading mirror speeds from cached hostfile
No package zilb-devel available.
Error: Nothing to do
[root@www nginx-1.8.1]#
[root@www nginx-1.8.1]# yum install zlib-devel  -y
Loaded plugins: fastestmirror
Loading mirror speeds from cached hostfile
Resolving Dependencies
--> Running transaction check
---> Package zlib-devel.x86_64 0:1.2.7-18.el7 will be installed
--> Finished Dependency Resolution

Dependencies Resolved

======================================================================================================================
 Package                      Arch                     Version                           Repository              Size
======================================================================================================================
Installing:
 zlib-devel                   x86_64                   1.2.7-18.el7                      base                    50 k

Transaction Summary
======================================================================================================================
Install  1 Package

Total download size: 50 k
Installed size: 132 k
Downloading packages:
zlib-devel-1.2.7-18.el7.x86_64.rpm                                                             |  50 kB  00:00:00
Running transaction check
Running transaction test
Transaction test succeeded
Running transaction
  Installing : zlib-devel-1.2.7-18.el7.x86_64                                                                     1/1
  Verifying  : zlib-devel-1.2.7-18.el7.x86_64                                                                     1/1

Installed:
  zlib-devel.x86_64 0:1.2.7-18.el7

Complete!

[root@www nginx-1.8.1]# ./configure --prefix=/usr/local/nginx   --user=nginx --group=nginx
、、、、、、、、、、、、、、、、、、、、

Configuration summary
  + using system PCRE library
  + OpenSSL library is not used
  + using builtin md5 code
  + sha1 library is not found
  + using system zlib library

  nginx path prefix: "/usr/local/nginx"
  nginx binary file: "/usr/local/nginx/sbin/nginx"
  nginx configuration prefix: "/usr/local/nginx/conf"
  nginx configuration file: "/usr/local/nginx/conf/nginx.conf"
  nginx pid file: "/usr/local/nginx/logs/nginx.pid"
  nginx error log file: "/usr/local/nginx/logs/error.log"
  nginx http access log file: "/usr/local/nginx/logs/access.log"
  nginx http client request body temporary files: "client_body_temp"
  nginx http proxy temporary files: "proxy_temp"
  nginx http fastcgi temporary files: "fastcgi_temp"
  nginx http uwsgi temporary files: "uwsgi_temp"
  nginx http scgi temporary files: "scgi_temp"

[root@www nginx-1.8.1]# make && make install      //没有报错,开始编译
、、、、、、、、、、、、、、、、、、、、、、、、、
[root@www nginx-1.8.1]# cd /usr/local/nginx/
[root@www nginx]# ls
conf  html  logs  sbin
[root@www nginx]# cd sbin/                 //启动服务
[root@www sbin]# ls
nginx
[root@www sbin]# ./nginx
[root@www sbin]# ss -tunlp | grep nginx
tcp    LISTEN     0      128       *:80                    *:*                   users:(("nginx",pid=11465,fd=6),("nginx",pid=11464,fd=6))
[root@www sbin]#
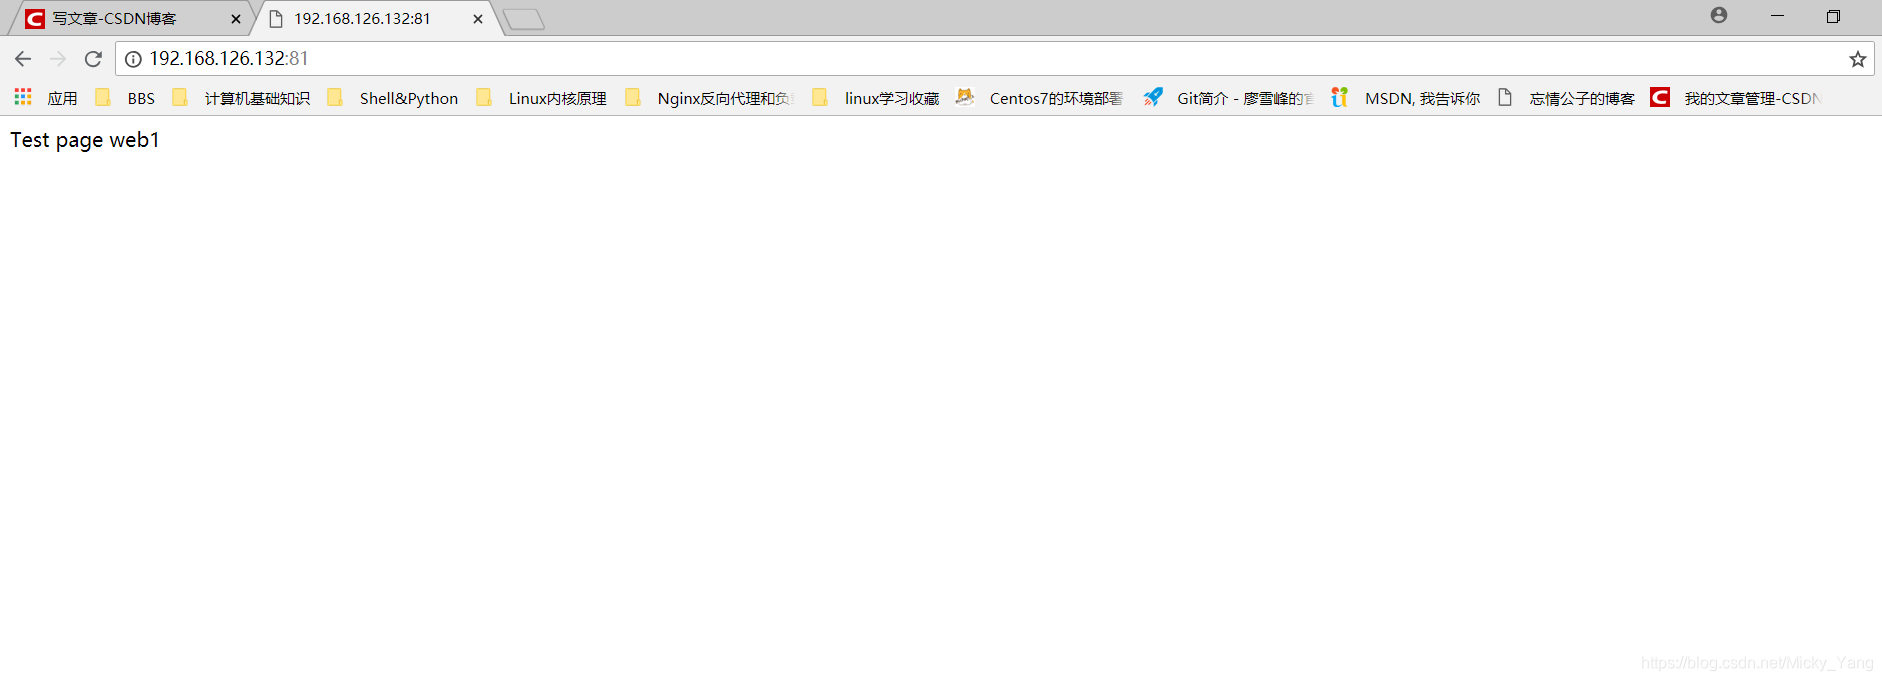
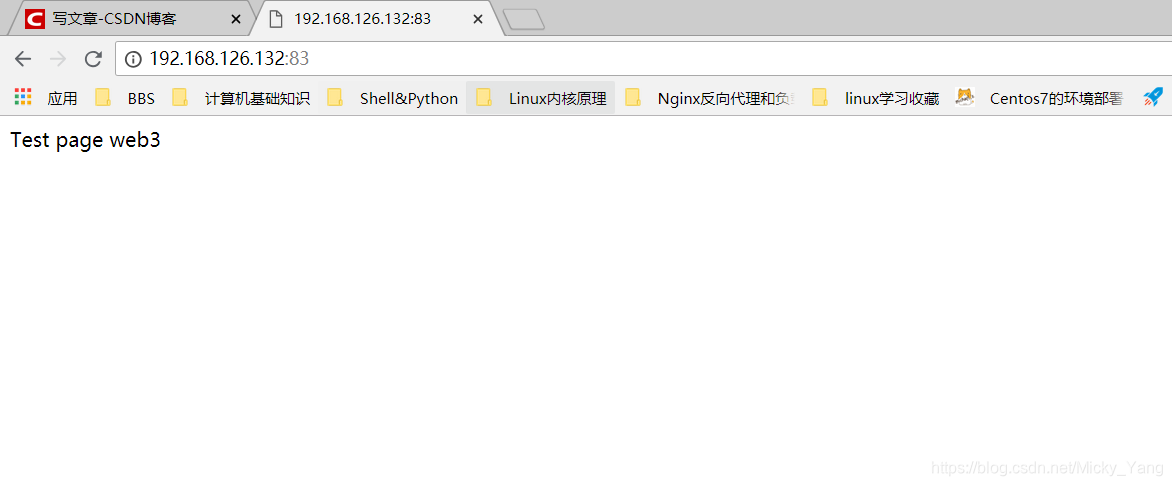
4)在浏览器中查看欢迎页面

5、基于端口的虚拟主机配置
1)创建三个首页的家目录和index页面
[root@www conf]# mkdir /test/{web1,web2,web3}   -pv
mkdir: created directory ‘/test’
mkdir: created directory ‘/test/web1’
mkdir: created directory ‘/test/web2’
mkdir: created directory ‘/test/web3’
[root@www conf]#
[root@www conf]# echo "Test page web1"  > /test/web1/index.html
[root@www conf]# echo "Test page web2"  > /test/web2/index.html
[root@www conf]# echo "Test page web3"  > /test/web3/index.html
[root@www conf]# ls /test/ -l
total 0
drwxr-xr-x 2 root root 23 Mar 18 13:53 web1
drwxr-xr-x 2 root root 23 Mar 18 13:54 web2
drwxr-xr-x 2 root root 23 Mar 18 13:54 web3
2)修改主配置文件,定义虚拟主机
[root@www conf]# vim nginx.conf
添加以下内容:
server {
        listen       81;
        server_name  localhost;

        location / {
            root   /test/web1;
            index  index.html index.htm;
        }
    }

   server {
        listen       82;
        server_name  localhost;

        location / {
            root   /test/web2;
            index  index.html index.htm;
        }
    }

 server {
        listen       83;
        server_name  localhost;

        location / {
            root   /test/web3;
            index  index.html index.htm;
        }
    }
3)重载服务并查看端口是否监听
[root@www conf]# /usr/local/nginx/sbin/nginx -s reload
[root@www conf]#
[root@www conf]# netstat -tunlp
Active Internet connections (only servers)
Proto Recv-Q Send-Q Local Address           Foreign Address         State       PID/Program name
tcp        0      0 0.0.0.0:80              0.0.0.0:*               LISTEN      11615/nginx: master
tcp        0      0 0.0.0.0:81              0.0.0.0:*               LISTEN      11615/nginx: master
tcp        0      0 0.0.0.0:82              0.0.0.0:*               LISTEN      11615/nginx: master
tcp        0      0 0.0.0.0:83              0.0.0.0:*               LISTEN      11615/nginx: master
tcp        0      0 0.0.0.0:22              0.0.0.0:*               LISTEN      6762/sshd
tcp        0      0 127.0.0.1:25            0.0.0.0:*               LISTEN      6861/master
tcp6       0      0 :::22                   :::*                    LISTEN      6762/sshd
tcp6       0      0 ::1:25                  :::*                    LISTEN      6861/master
udp        0      0 0.0.0.0:68              0.0.0.0:*                           6470/dhclient
[root@www conf]#
4)在浏览器中查看虚拟主机主页面

6、基于IP地址的虚拟主机的配置
1)首先添加三个ip地址
[root@www conf]# ip addr add 192.168.126.141/24  dev  eno16777736
[root@www conf]# ip addr add 192.168.126.142/24  dev  eno16777736
[root@www conf]# ip addr add 192.168.126.143/24  dev  eno16777736
[root@www conf]#
[root@www conf]# ip a
1: lo: <LOOPBACK,UP,LOWER_UP> mtu 65536 qdisc noqueue state UNKNOWN group default qlen 1000
    link/loopback 00:00:00:00:00:00 brd 00:00:00:00:00:00
    inet 127.0.0.1/8 scope host lo
       valid_lft forever preferred_lft forever
    inet6 ::1/128 scope host
       valid_lft forever preferred_lft forever
2: eno16777736: <BROADCAST,MULTICAST,UP,LOWER_UP> mtu 1500 qdisc pfifo_fast state UP group default qlen 1000
    link/ether 00:0c:29:60:18:fd brd ff:ff:ff:ff:ff:ff
    inet 192.168.126.132/24 brd 192.168.126.255 scope global noprefixroute dynamic eno16777736
       valid_lft 1251sec preferred_lft 1251sec
    inet 192.168.126.141/24 scope global secondary eno16777736
       valid_lft forever preferred_lft forever
    inet 192.168.126.142/24 scope global secondary eno16777736
       valid_lft forever preferred_lft forever
    inet 192.168.126.143/24 scope global secondary eno16777736
       valid_lft forever preferred_lft forever
    inet6 fe80::20c:29ff:fe60:18fd/64 scope link noprefixroute
       valid_lft forever preferred_lft forever
2)编辑配置文件,指明虚拟主机的ip地址
[root@www conf]# vim nginx.conf
server {
        listen       192.168.126.141:80;
        server_name  localhost;

        location / {
            root   /test/web1;
            index  index.html index.htm;
        }
    }

   server {
        listen       192.168.126.142:80;
        server_name  localhost;

        location / {
            root   /test/web2;
            index  index.html index.htm;
        }
  }

  server {
        listen       192.168.126.143:80;
        server_name  localhost;

        location / {
            root   /test/web3;
            index  index.html index.htm;
        }
    }
3)重载配置文件
[root@www conf]# /usr/local/nginx/sbin/nginx -s reload
[root@www conf]# netstat -tunlp
Active Internet connections (only servers)
Proto Recv-Q Send-Q Local Address           Foreign Address         State       PID/Program name
tcp        0      0 0.0.0.0:80              0.0.0.0:*               LISTEN      11615/nginx: master
tcp        0      0 0.0.0.0:22              0.0.0.0:*               LISTEN      6762/sshd
tcp        0      0 127.0.0.1:25            0.0.0.0:*               LISTEN      6861/master
tcp6       0      0 :::22                   :::*                    LISTEN      6762/sshd
tcp6       0      0 ::1:25                  :::*                    LISTEN      6861/master
udp        0      0 0.0.0.0:68              0.0.0.0:*                           6470/dhclient
[root@www conf]#
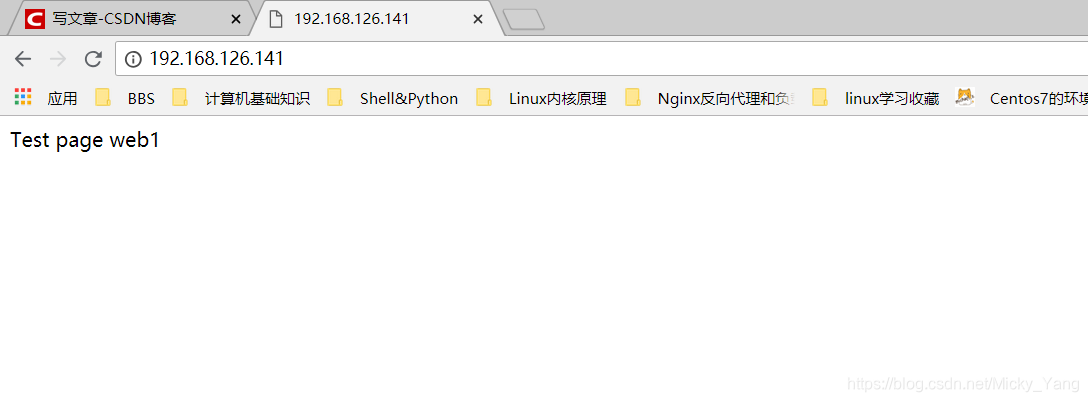
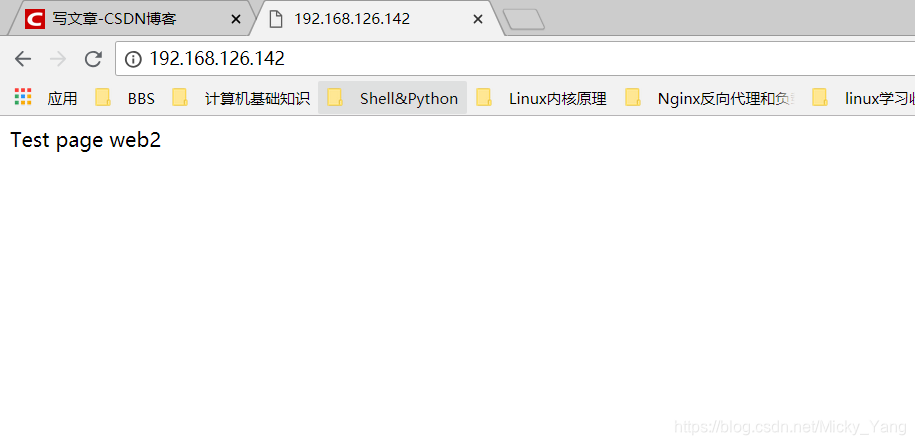
4)在浏览器中输入ip地址查看虚拟主机

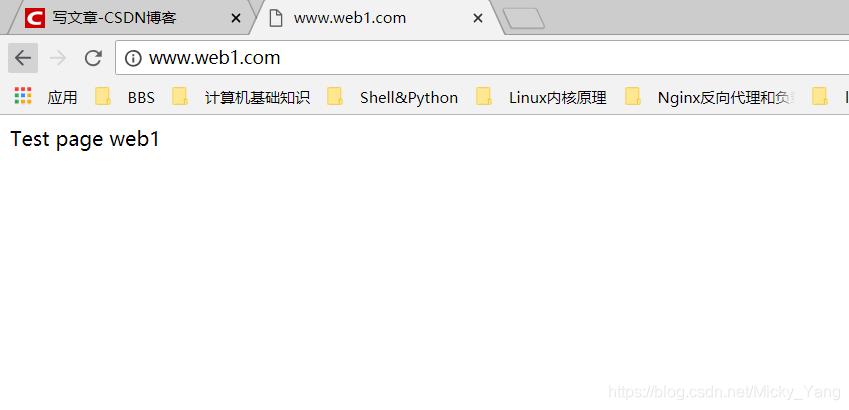
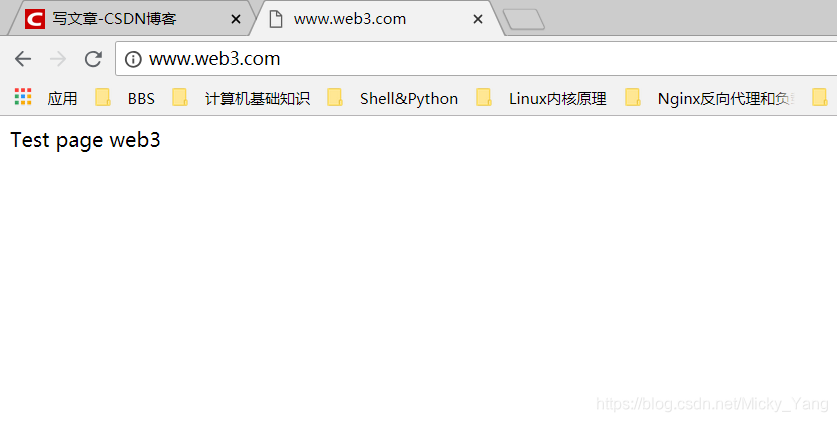
7、基于不同主机名的虚拟主机配置
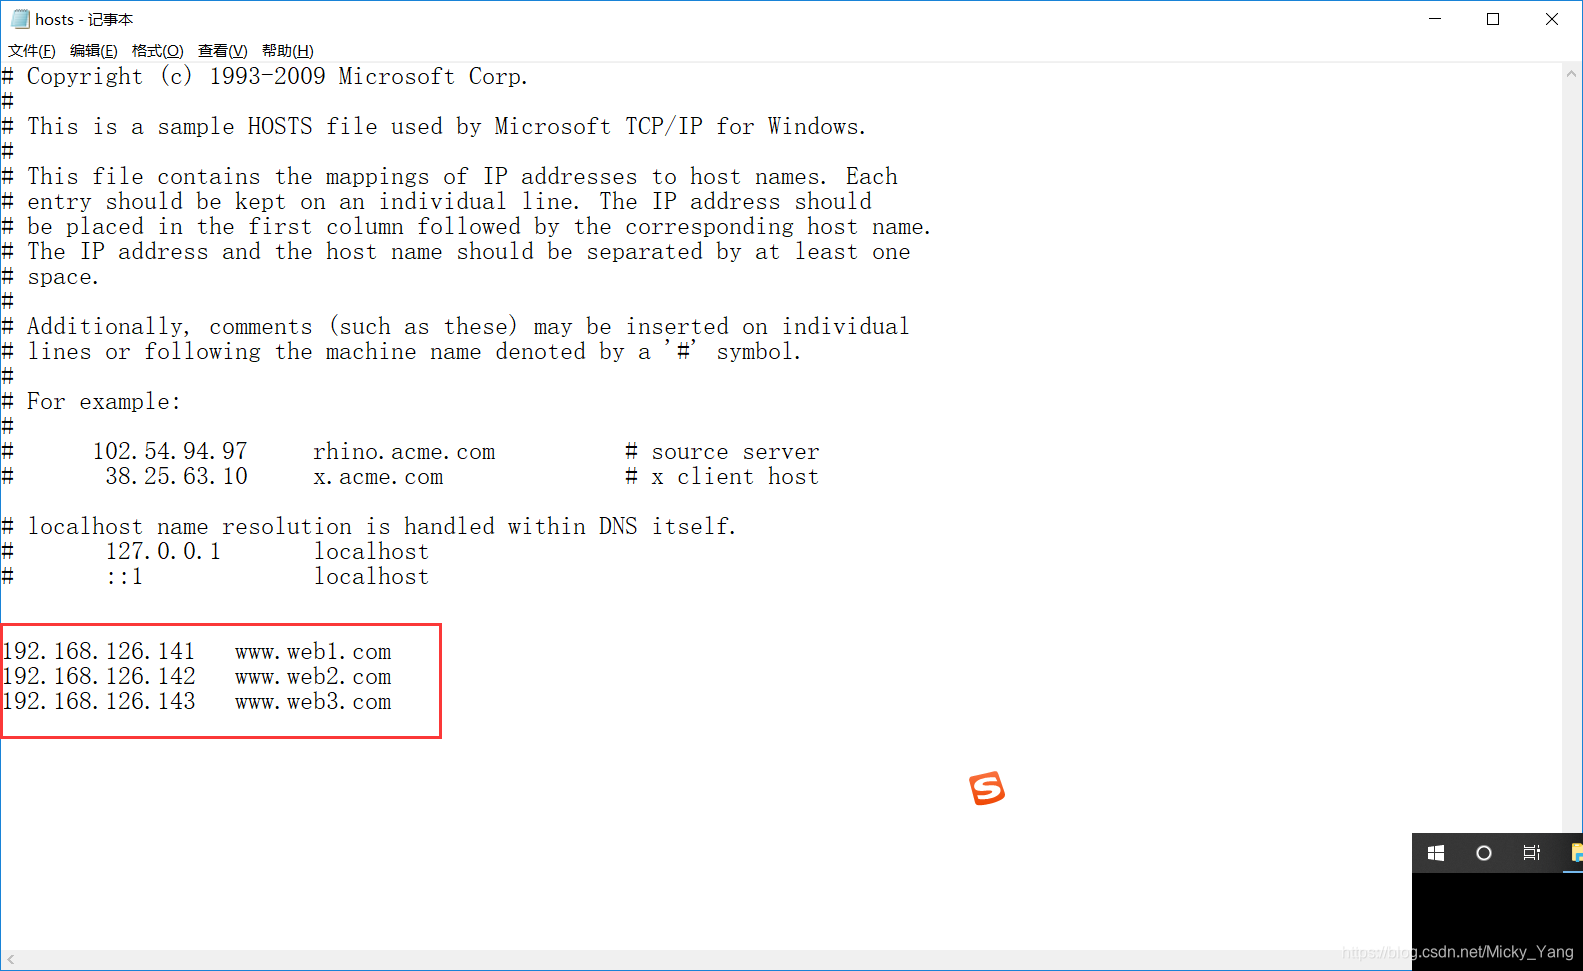
1)修改主机的hosts文件,添加对应记录
[root@www conf]#
[root@www conf]# vim /etc/hosts
127.0.0.1   localhost localhost.localdomain localhost4 localhost4.localdomain4
::1         localhost localhost.localdomain localhost6 localhost6.localdomain6
192.168.126.141  www.web1.com
192.168.126.142  www.web2.com
192.168.126.143  www.web3.com
2)编辑主配置文件,添加主机名
    server {
        listen       192.168.126.141:80;
        server_name  www.web1.com;

        location / {
            root   /test/web1;
            index  index.html index.htm;
        }
    }

   server {
        listen       192.168.126.142:80;
        server_name  www.web2.com;

        location / {
            root   /test/web2;
            index  index.html index.htm;
        }
  }
 server {
        listen       192.168.126.143:80;
        server_name  localhost;

        location / {
            root   /test/web3;
            index  index.html index.htm;
        }
    }
3)重载服务并查看服务
[root@www conf]# /usr/local/nginx/sbin/nginx -s reload
[root@www conf]# netstat -tunlp
Active Internet connections (only servers)
Proto Recv-Q Send-Q Local Address           Foreign Address         State       PID/Program name
tcp        0      0 0.0.0.0:80              0.0.0.0:*               LISTEN      11615/nginx: master
tcp        0      0 0.0.0.0:22              0.0.0.0:*               LISTEN      6762/sshd
tcp        0      0 127.0.0.1:25            0.0.0.0:*               LISTEN      6861/master
tcp6       0      0 :::22                   :::*                    LISTEN      6762/sshd
tcp6       0      0 ::1:25                  :::*                    LISTEN      6861/master
udp        0      0 0.0.0.0:68              0.0.0.0:*                           6470/dhclient
[root@www conf]#
4)在windows主机上添加hosts记录
文件路径:C:\Windows\System32\drivers\etc
5)在浏览器中查看主页