Nginx网站服务
实验材料
centos7一台Xshell连接,ip 192.168.100.102 vm1
win2008server一台,做dns解析 ip 192.168.100.66 vm1
安装及运行控制
1.编译安装Nginx
1)安装支持软件
[root@CentOS7-02 ~]# yum -y install pcre-devel zlib-devel
2)创建运行用户,组
[root@CentOS7-02 ~]# useradd -M -s /sbin/nologin nginx
3)编译安装Nginx
包拖入Xshell中
[root@CentOS7-02 ~]# tar zxf nginx-1.12.0.tar.gz
[root@CentOS7-02 ~]# cd nginx-1.12.0
[root@CentOS7-02 nginx-1.12.0]# ./configure --prefix=/usr/local/nginx --user=nginx --group=nginx --with-http_stub_status_module
[root@CentOS7-02 nginx-1.12.0]# make && make install
(注意,如果你不可以make,就是前面yum安装支持软件时候,可能打错字母了,安错基础包了,然后你把原来的nginx软件包删了,从新解包和make)
[root@CentOS7-02 nginx-1.12.0]# ln -s /usr/local/nginx/sbin/nginx /usr/local/sbin/
2.Nginx的运行控制
1)检查主配置文件
[root@CentOS7-02 nginx-1.12.0]# nginx -t (只要下面第一行是ok,配置文件就没问题)
nginx: the configuration file /usr/local/nginx/conf/nginx.conf syntax is ok
nginx: configuration file /usr/local/nginx/conf/nginx.conf test is successful
2)启动,停止Nginx
[root@CentOS7-02 ~]# nginx
[root@CentOS7-02 ~]# netstat -anpt | grep nginx
tcp 0 0 0.0.0.0:80 0.0.0.0:* LISTEN 8276/nginx: master
[root@CentOS7-02 ~]# yum -y install elinks
[root@CentOS7-02 ~]# elinks http://localhost
(上面命令,会显示一个页面,就对了,ctrl+C退出)
[root@CentOS7-02 ~]# yum -y install psmisc (安装killall命令)
[root@CentOS7-02 ~]# killall -s HUP nginx (重载nginx服务)
[root@CentOS7-02 ~]# killall -s QUIT nginx (停止nginx服务)
[root@CentOS7-02 ~]# netstat -anpt | grep nginx (已经没了)
3)使用Nginx服务脚本
[root@CentOS7-02 ~]# vim /etc/init.d/nginx (后面有我打好的,比图里清楚)
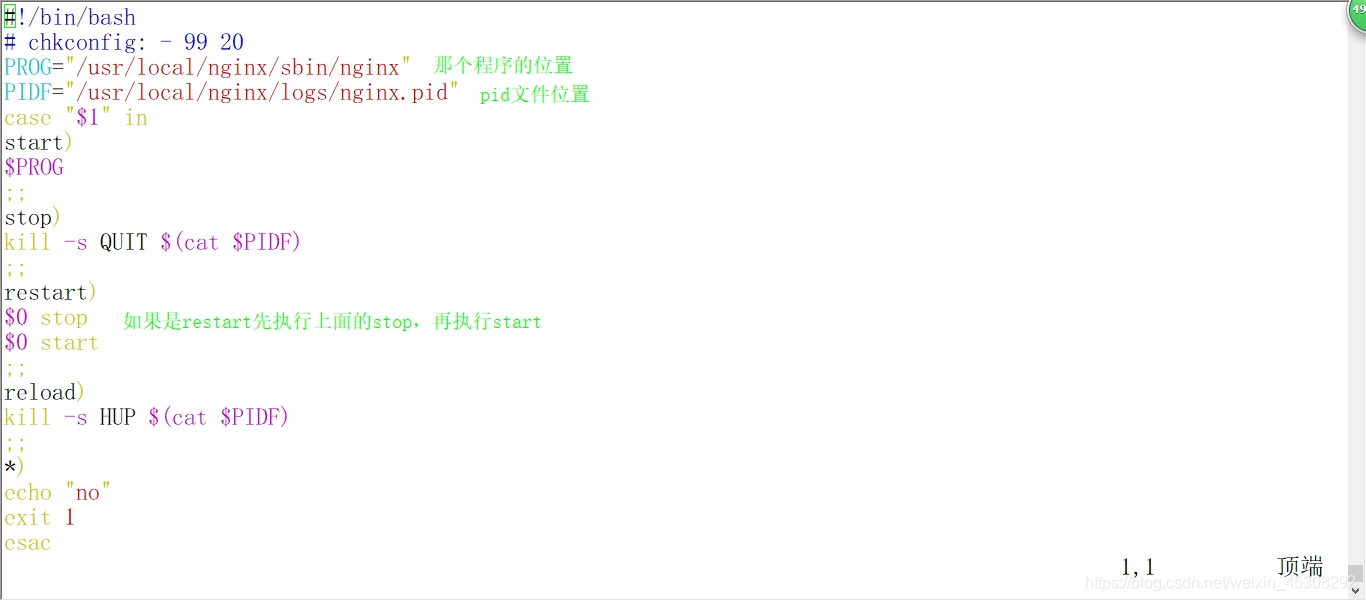
#!/bin/bash
# chkconfig: - 99 20
PROG="/usr/local/nginx/sbin/nginx"
PIDF="/usr/local/nginx/logs/nginx.pid"
case "$1" in
start)
$PROG
;;
stop)
kill -s QUIT $(cat $PIDF)
;;
restart)
$0 stop
$0 start
;;
reload)
kill -s HUP $(cat $PIDF)
;;
*)
echo "no"
exit 1
esac
exit 0
[root@CentOS7-02 init.d]# chmod +x nginx
[root@CentOS7-02 init.d]# chkconfig --add nginx
[root@CentOS7-02 init.d]# ./nginx start
[root@CentOS7-02 init.d]# ./nginx stop (如果你nginx已经是关闭状态,使用这个,它会报kill错,不用管,那个restart也是)
[root@CentOS7-02 init.d]# nginx
访问状态统计及虚拟主机应用
1.Nginx的访问状态统计
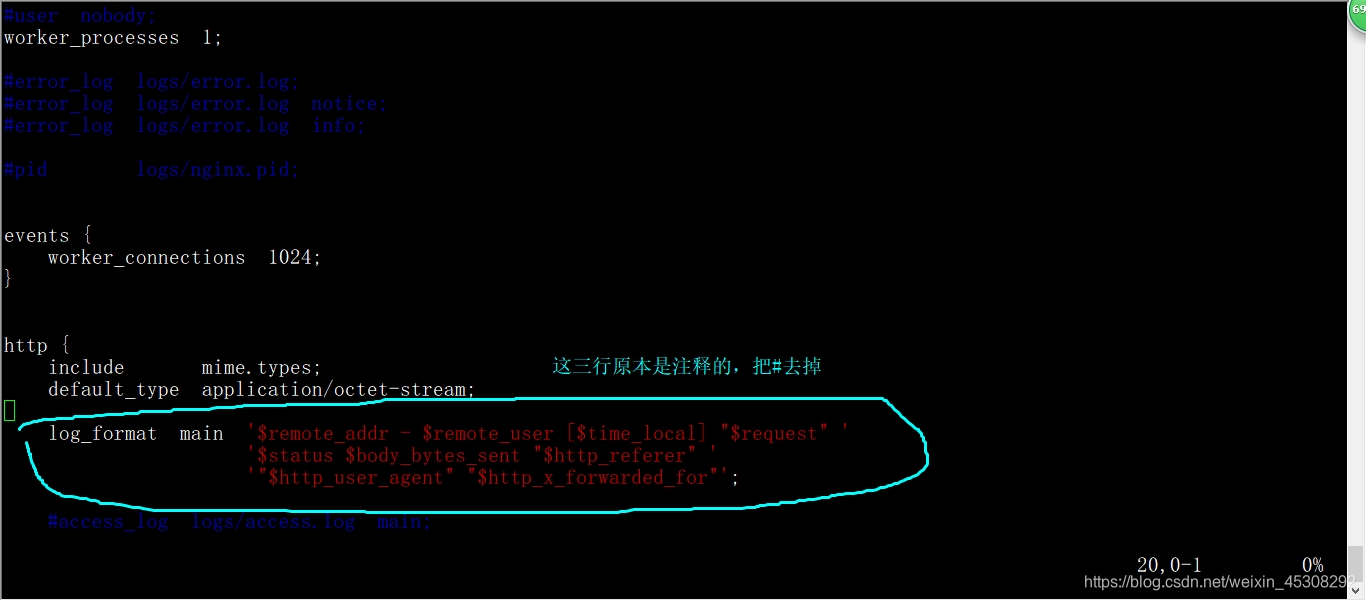
[root@CentOS7-02 ~]# vim /usr/local/nginx/conf/nginx.conf
添加如图中
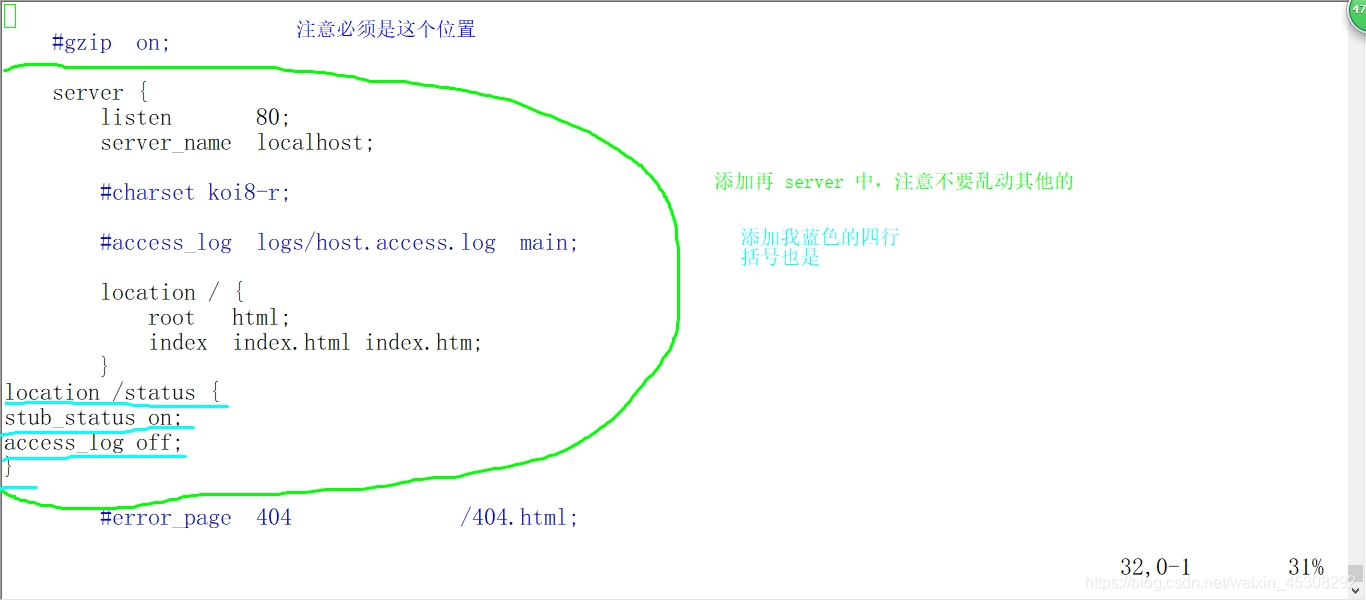
[root@CentOS7-02 ~]# nginx -t (检查上面的主配置文件,显示ok就行)
[root@CentOS7-02 ~]# cd /etc/init.d/
[root@CentOS7-02 init.d]# ./nginx restart
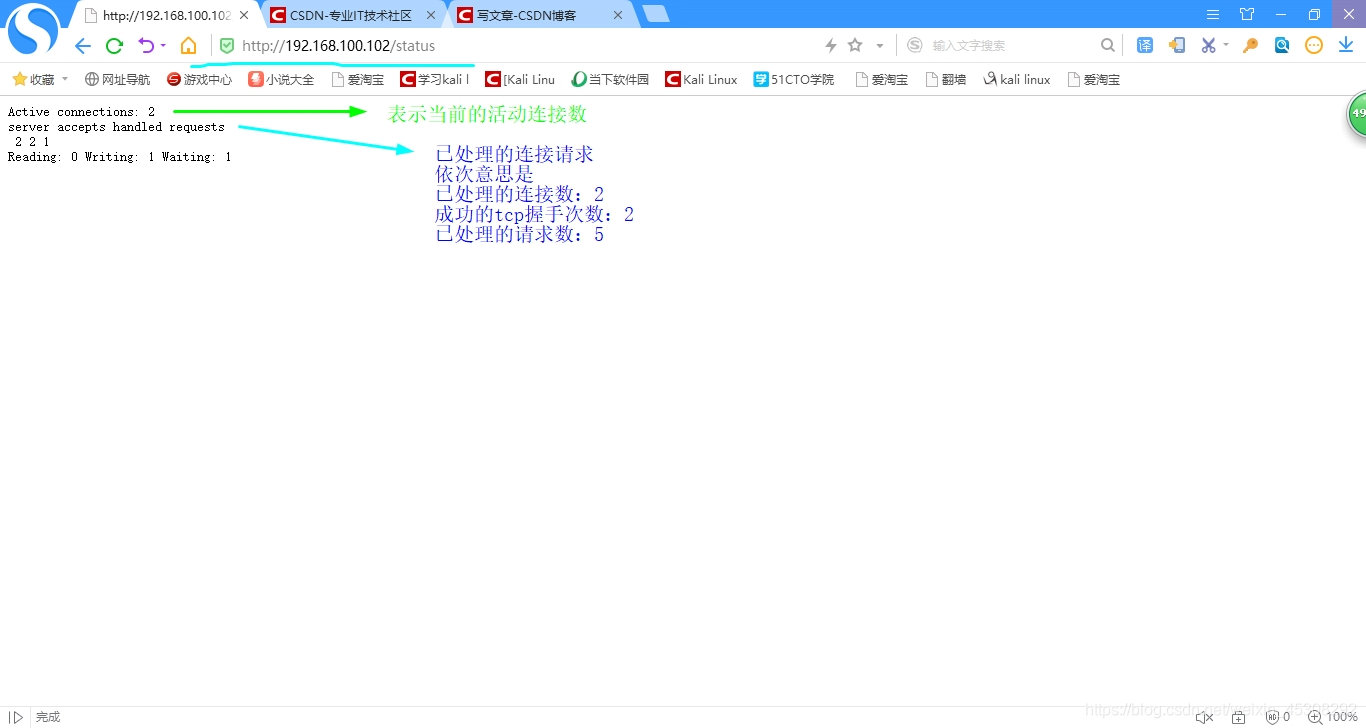
访问测试,在windows中
http://192.168.100.102/status
2.基于域名的虚拟Web主机
1)配置dns解析,把www.baidu.com 和 www.youxi.com都解析到
192.168.100.102(nginx服务器IP)
2)准备网站目录及测试文件
[root@CentOS7-02 ~]# mkdir -p /var/www/baidu
[root@CentOS7-02 ~]# mkdir -p /var/www/youxi
[root@CentOS7-02 ~]# echo "www.baidu.com" > /var/www/baidu/index.html
[root@CentOS7-02 ~]# echo "www.youxi.com" > /var/www/youxi/index.html
3)调整主配置文件,配置两个“server{}区域,分别对应两个web站点
[root@CentOS7-02 ~]# vim /usr/local/nginx/conf/nginx.conf
首先
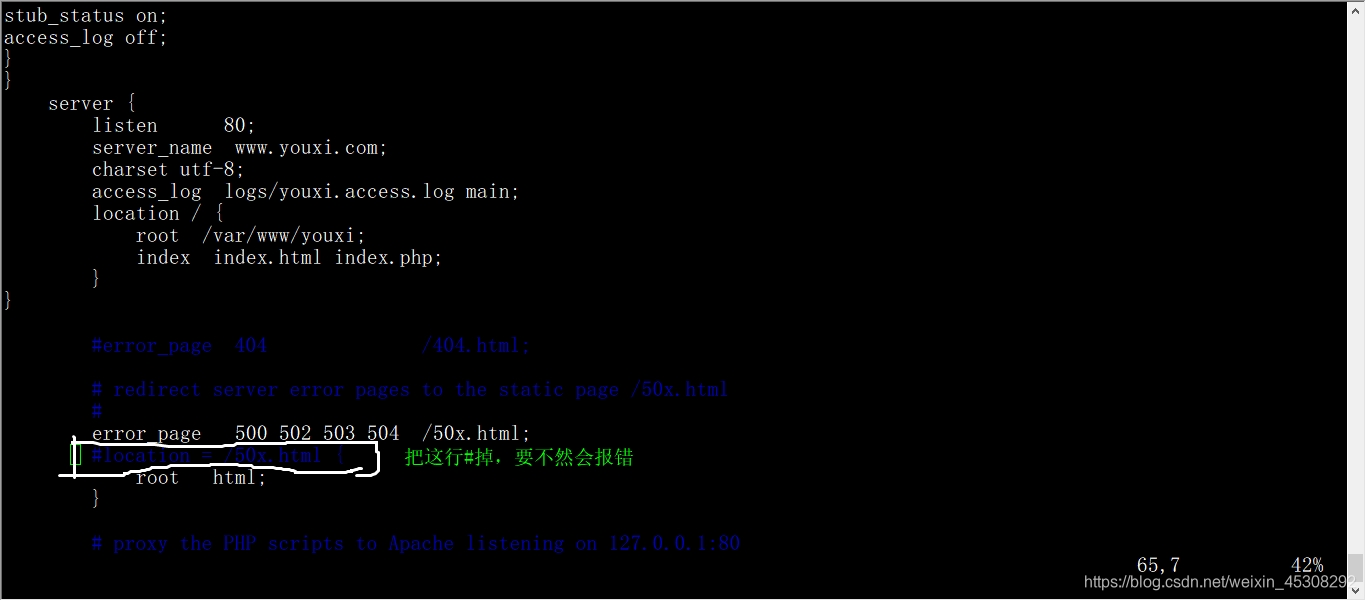
然后打上我这些,第一个server配置项改一下,第二个要手打

保存退出后,
[root@CentOS7-02 ~]# nginx -t
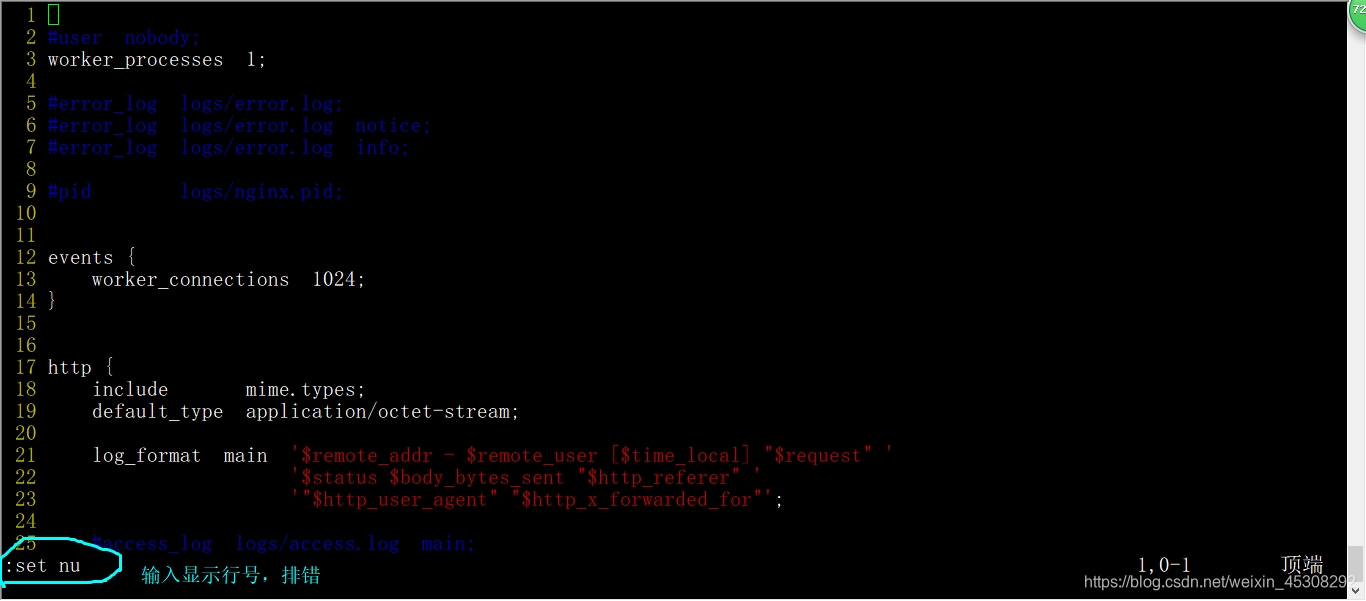
一定会报错,在第一行有具体的行号,再次进入配置文件,输入图中命令,根据行号排错,一般都是括号的问题,只要删除没有用的括号就行了
保存退出
[root@CentOS7-02 ~]# nginx -t
nginx: the configuration file /usr/local/nginx/conf/nginx.conf syntax is ok
nginx: configuration file /usr/local/nginx/conf/nginx.conf test is successful
[root@CentOS7-02 ~]# cd /etc/init.d/
[root@CentOS7-02 init.d]# ./nginx restart
访问测试
在真机中,对应的vm1网卡中,dns指向dns服务器的ip我这里是192.168.100.66
结果如下

另一个

