前面一篇大致简单的介绍了下Input System,并且通过官方的 SimpleDemo_UsingPlayerInput 来了解了PlayerInput组件的使用。接下来让我们通过其他几个Demo来了解下Input System的其他几种使用方法。
SimpleDemo_UsingActionAsset Demo
这个Demo,相比SimpleDemo_UsingPlayerInput,会发现在这个Demo中并没有使用到Player Input组件,而在SimpleController_UsingActionAsset.cs中,多了一个SimpleControls的类。
我们来看下SimpleControls内部,首先有个Json格式的字符串,大致看下内容会发现其就是SimpleDemo_UsingPlayerInput中PlayerInput通过Create Action生成的SimpleControls.inputactions文件的内容。再往后便是声明inputactions文件中配置的Actions等等。
使用起来也不需要在Player Input组件中去绑定事件,只需要使用代码来绑定即可,例如:
m_Controls = new SimpleControls();

m_Controls.gameplay.fire.performed +=
    ctx =>
{
    //to something
};
m_Controls.gameplay.fire.started +=
    ctx =>
{
    //to something
};
而要读取输入设备的值也很方便,例如
public void Update()
{
    var look = m_Controls.gameplay.look.ReadValue<Vector2>();
    var move = m_Controls.gameplay.move.ReadValue<Vector2>();
    //todo something
}
那么这个SimpleControls.cs脚本是如何生成的呢,我们点击SimpleControls.inputactions,在Inspector面板中,我们可以发现可以将其生成C#文件,设置好参数后点击Apply即可生成对应的C#文件。

SimpleDemo_UsingActions Demo
这个Demo中同样没有使用到Player Input组件,而是在脚本中添加了几个InputAction事件。在Inspector面板中,我们可以看见这几个InputAction的设置。
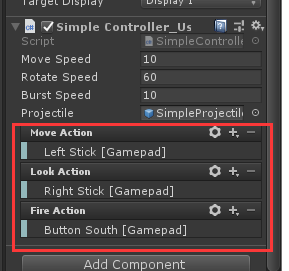
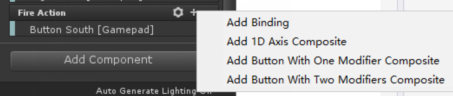
可以看见demo中绑定的都是手柄GamePad的输入,我们可以在Fire Action中点击 + 号,选择Add Binding,然后绑定鼠标左键。这样运行的时候可以通过点击左键来触发开火功能。

具体的代码实现也很简单,通过给InputAction绑定事件,以及通过ReadValue方法来读取值即可。
SimpleDemo_UsingState Demo
这个Demo和上一篇文章中,最初的方法一样,通过Gamepad.current来获取输入设备并且绑定事件等,这里就不在复述了。
随着Input System的更新,官方的Demo可能也会有所出入,文章用的版本是1.0.0 preview.4。
个人认为通过inputactions文件生成C#类,再去操作的方法比较适合项目的开发,因为大部分都是靠代码来实现的把。
后续还待深入研究。。。
