安装
Input System是新的输入系统,用来取代旧的Input Manager,方便接收不同的输入设备

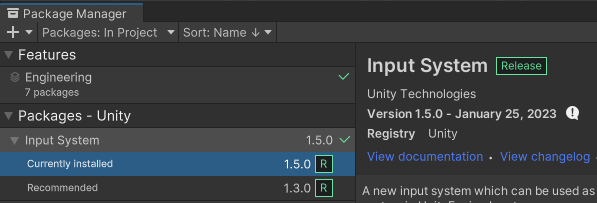
在Package Manager里安装

安装后可以选择只使用新的Input System,或选Both两者都使用,考虑很多插件还在使用旧的Input Manager,推荐选择Both
映射
右键 -> Create -> Input Actions,就可以创建一个名为xxx.inputactions的资源,它管理输入事件和输入设备之间的映射关系
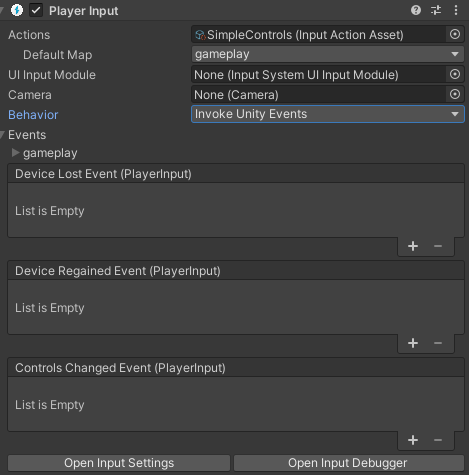
主要有两种方式来接受用户的输入,一种是在角色身上挂Player Input脚本,通过事件来触发逻辑
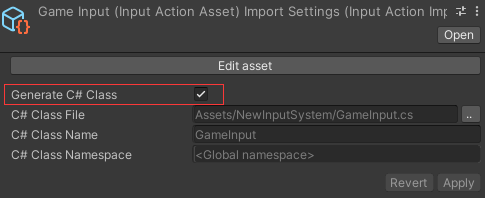
另一种是勾选Generate C# Class,生成对应类的脚本,通过类对象来添加逻辑,这种方式可以更好的解耦,推荐使用这种方式
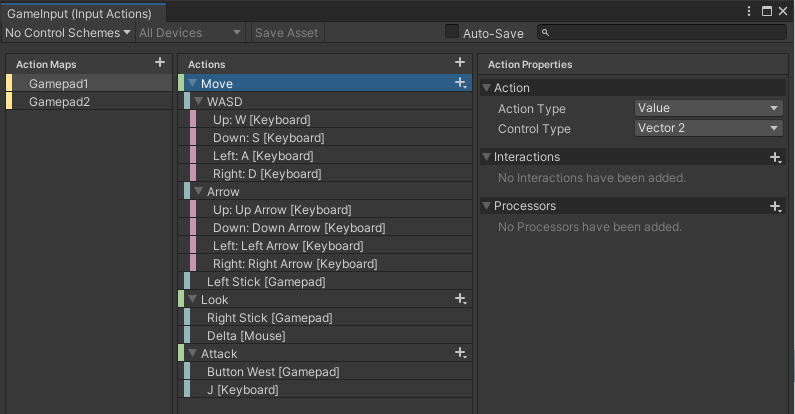
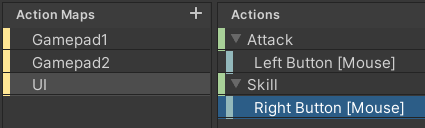
点击Edit asset编辑映射关系,左边的Action Maps(动作表)定义了一系列InputAction(输入事件)集合,每个集合可以看作是一套输入方案,开发中可能需要设计不同的输入方案,它们的映射关系不同,例如这里定义两个输入方案Gamepad1和Gamepad2,可以根据使用场景激活其中一个输入方案
public class SimpleInput : MonoBehaviour
{


    public enum InputPlan
    {


        Gamepad1,
        Gamepad2,
    }

    private GameInput _gameInput;
    private InputPlan _inputPlan;

    public void Awake()
    {


        _gameInput = new GameInput();
    }

    public void OnEnable()
    {


        _gameInput.Enable();
        switch (_inputPlan)
        {


            case InputPlan.Gamepad1:
                _gameInput.Gamepad1.Enable();
                _gameInput.Gamepad2.Disable();
                break;
            case InputPlan.Gamepad2:
                _gameInput.Gamepad1.Disable();
                _gameInput.Gamepad2.Enable();
                break;
        }
    }

    public void OnDisable()
    {


        _gameInput.Disable();
    }
}
GameInput 是通过asset文件生成的类,这里使用枚举来切换当前使用的输入方案,注意_gameInput.Enable() 会把所有的Action Maps都激活,所以需要根据当前使用的方案单独激活对应的Action Map
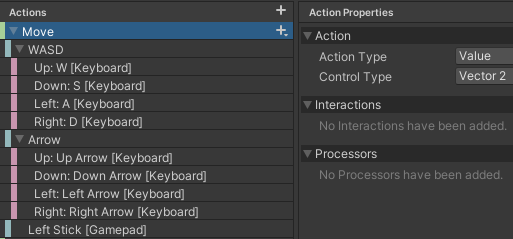
中间的Actions定义InputAction(输入事件),右边的Action Properties定义相关属性,一个InputAction可以绑定多个设备,这里Move这个InputAction绑定了键盘的WASD键,上下左右方向键和左摇杆,两个设备的输入都会触发Move这个输入事件

点击加号绑定设备
| 类型 | 描述 |
|---|---|
| Add Binding | 普通绑定,可以绑定一个按钮,光标,摇杆 |
| Add Positive/Negative Binding | 两个按钮组合,一个按钮代表正,一个按钮代表负,返回值为float,例如左右键 |
| Add Up/Down/Left/Right | 四个按钮组合,或者摇杆,返回值为Vector2 |
| Add Binding With One Modifier | 两个按钮组合键,如Ctrl + b |
| Add Binding With Two Modifiers | 三个按钮组合键,如Shift + Ctrl + b |
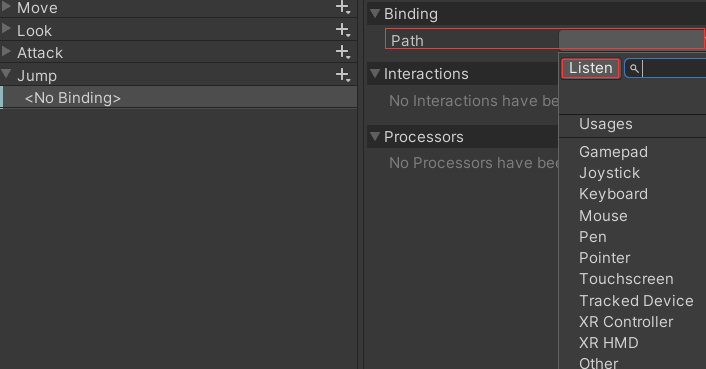
新建一个Input Action,点击Path进行设备绑定,点击Listen监听当前的输入设备,进行快速选择
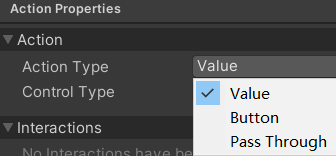
Action Type有三种类型
| Action Type | 描述 |
|---|---|
| Value | 各种连续变化的输入,如鼠标移动,键盘的WASD,手柄的摇杆,它会监听所有的输入设备,选择输入值最大的作为输入源 |
| Button | 按钮输入,键盘,鼠标,手柄按钮,在按下,按住,抬起时会调用输入事件 |
| Pass Through | 和Value基本相同,但它会获取所有设备的输入 |
比如,当Action Type 为Value时,左摇杆向右稍微移动产生一个输入值,假设为(0.3,0),输入源是手柄,此时按下键盘的w键,产生输入值(0,1),因为(0,1)向量模长更大,输入源就切换到键盘
当Action Type 为Pass Through时,会优先考虑最近的输入值,而不管它有多大
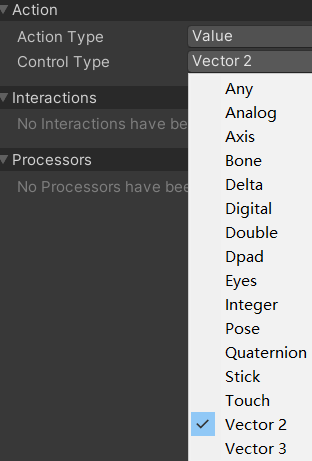
操作类型(Control Type)是输入值的类型,一般移动或改视角都用Vector2
对于Value这种连续变化的值,需要在Update中读取值,然后再做相应的逻辑
    public void Update()
    {


        Vector2 move = _gameInput.Gamepad1.Move.ReadValue<Vector2>();
        Move(move);
    }

    private void Move(Vector2 direction)
    {


        if (direction.sqrMagnitude < 0.01)
            return;
        //DoSomething
        Debug.LogError(direction);
    }
对于按钮类型的事件,它有三个阶段
| 阶段 | 描述 |
|---|---|
| wasPressedThisFrame | 按下,触发一次 |
| isPressed | 按住,按住时一直触发,即触发多次 |
| wasReleasedThisFrame | 抬起,触发一次 |
键盘操作
// old
if (Input.GetKeyDown(KeyCode.A)) //按下A兼
	DoSomething();
if (Input.GetKeyUp(KeyCode.A))   //抬起
	DoSomething();
if (Input.GetKey(KeyCode.A))     //按住
	DoSomething();

// new
if (Keyboard.current.aKey.wasPressedThisFrame) 	//按下A键
	DoSomething();
if (Keyboard.current.aKey.wasReleasedThisFrame) //抬起
	DoSomething();
if (Keyboard.current.aKey.isPressed)     		//按住
	DoSomething();
鼠标操作
// old
Vector2 mousePos = Input.mousePosition; //鼠标位置
if (Input.GetMouseButtonDown(0)) 	    //按下鼠标左键
	DoSomething();
if (Input.GetMouseButtonUp(1))   		//抬起右键
	DoSomething();
if (Input.GetMouseButton(2))     		//按住中键
	DoSomething();

// new
Vector2 mousePos = Mouse.current.position.value;
if (Mouse.current.leftButton.wasPressedThisFrame) 	//按下鼠标左键
	DoSomething();
if (Mouse.current.rightButton.wasReleasedThisFrame) //抬起右键
	DoSomething();
if (Mouse.current.middleButton.isPressed)     		//按住中键
	DoSomething();
手柄操作
if (Gamepad.current.leftShoulder.wasPressedThisFrame) 	//按下左肩键
    DoSomething();
if (Gamepad.current.rightTrigger.wasReleasedThisFrame)  //抬起右扳机键
    DoSomething();
if (Gamepad.current.buttonNorth.isPressed)     		    //按住右侧上方的按键
    DoSomething();
对于每个InputAction,它有三个阶段
| 阶段 | 描述 |
|---|---|
| started | 开始阶段,类似按钮按下,触发一次 |
| performed | 执行阶段,类似按钮按住,但默认触发一次 |
| canceled | 取消阶段,类似按钮抬起,触发一次 |

以这个名为Attack的InputAction为例
    public void Awake()
    {


        _gameInput = new GameInput();

        _gameInput.Gamepad1.Attack.started += context =>
        {


            Debug.LogError("started--" + Time.time);
        };
        _gameInput.Gamepad1.Attack.performed += context =>
        {


            Debug.LogError("performed--" + Time.time);
        };
        _gameInput.Gamepad1.Attack.canceled += context =>
        {


            Debug.LogError("canceled--" + Time.time);
        };
    }
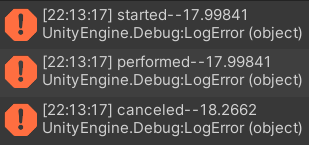
可以看到,默认情况下,started 和 performed 是在同一时间
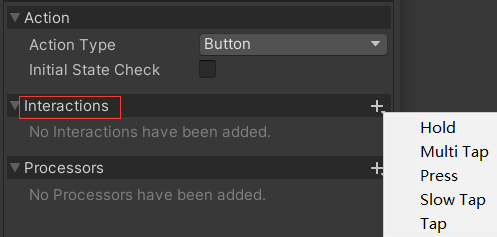
Interactions 交互操作
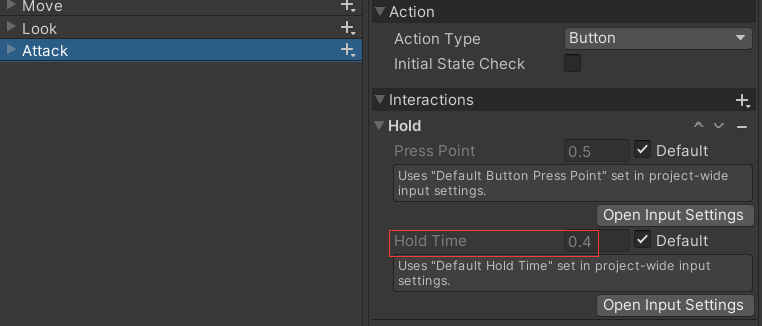
Hold,长按,按住时间到达Hodl Time才会触发performed阶段。Press Point指按钮按下幅度阈值,0未按下,1按下,超过0.5就表示按下,使用默认值就行,也可以取消Default前面的勾选,自己设定值
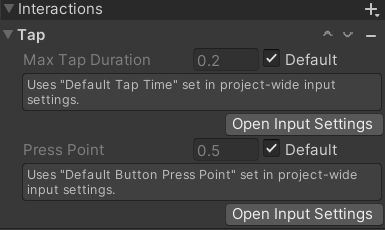
Tap,快速按下并抬起,当按住时间 <= Max Tap Duration,抬起时会触发 performed 阶段,但是不会触发 canceled 阶段,当按住时间 > Max Tap Duration,会触发 canceled 阶段
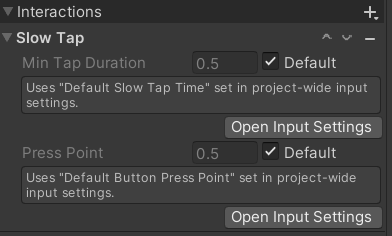
Slow Tap,按下至少一段时间后抬起,当按住时间 < Min Tap Duration,抬起时会触发 canceled 阶段,,当按住时间 > Min Tap Duration,抬起时会触发 performed 阶段
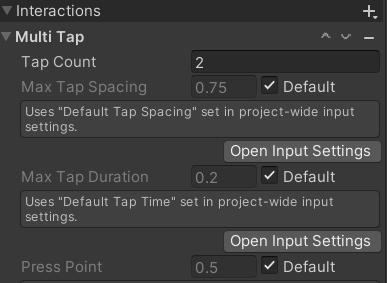
Multi Tap,连点,短时间内连点Tap Count次,两次点击的间隔不能超过Max Tap Spacing,单次点击按下的时间不能超过Max Tap Duration
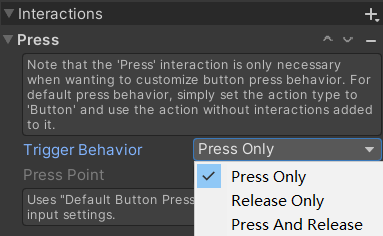
Press,按下或抬起时触发事件,选择Press Only,按下时触发started 和 performed 阶段,选择Release Only,抬起时触发 performed 和 canceled 阶段,选择Press And Release,按下时触发started 和 performed 阶段,抬起时触发 performed 和 canceled 阶段
一个按钮上可以绑定多个Interactions,根据类型执行不同的逻辑
    _gameInput.Gamepad1.Attack.performed += context =>
    {


        if (context.interaction is HoldInteraction)
        {


            //长按逻辑
        }
        else if (context.interaction is TapInteraction)
        {


            //快点按下并抬起
        }
    };
Processors 输入值处理
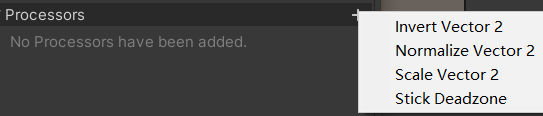
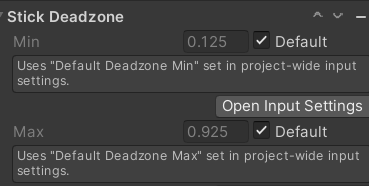
Stick Deadzone,输入向量的模长小于Min,输入向量会变成(0,0),输入向量模长大于Max,输入向量会归一化到1,这个主要是处理摇杆漂移的问题
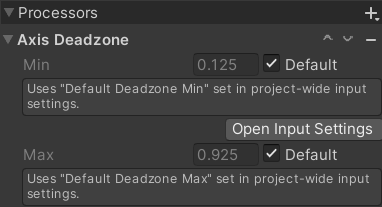
Axis Deadzone,输入值小于min的为0,输入值大于max的为1或-1,和Stick Deadzone类似,只是处理一维的值
Normalize Vector2 归一化处理,这与调用Vector2.normalized相同
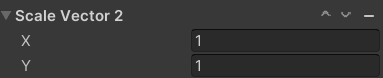
Scale Vector2 对输入向量的x,y进行缩放处理
Invert Vector2 对输入值取反
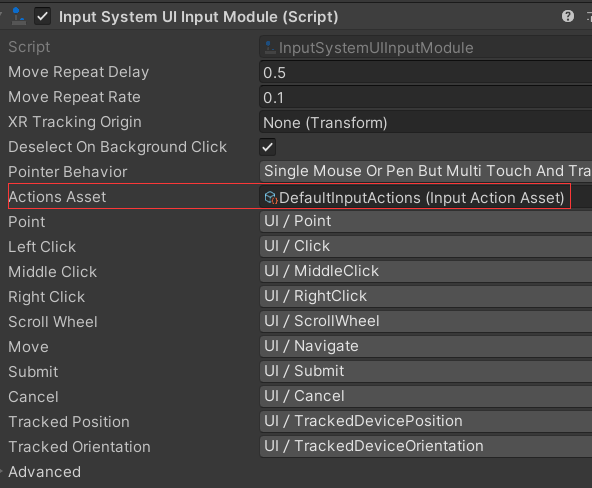
UI 输入操作
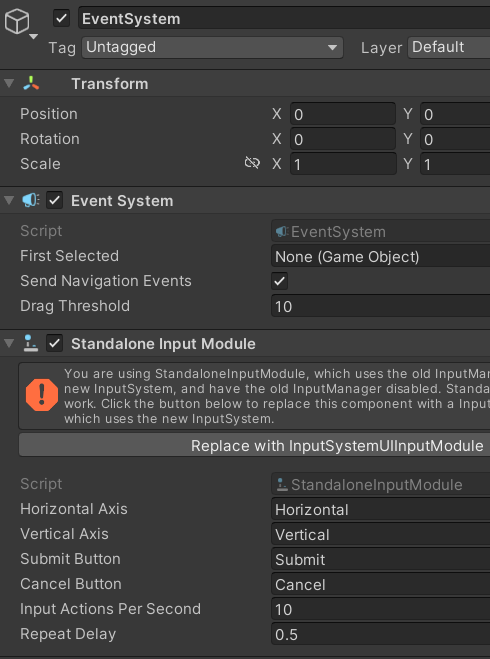
EventSystem 默认使用Standalone Input Module,它是用旧的Input Manager驱动的,点击Replace with Input System UI Input Module
一般不需要修改,使用默认值就行
也可以定义UI上的点击操作,比如左键攻击,右键释放技能

UI上的摇杆,只要在Image挂上On Screen Stick脚本,Control Path 选择摇杆,那么它会创建一个虚拟摇杆作为输入,Movement Range是摇杆可移动范围
游戏中一般是左摇杆移动,屏幕右侧拖动改变视角,这个屏幕拖动的逻辑就得在UI中写逻辑实现

屏幕上的按钮添加On Screen Button脚本,也会创建一个虚拟按键作为输入
组合键和单独按键冲突
比如,b键定义了方法1,ctrl + b定义了方法2,按下ctrl后再按b键,方法1和方法2会同时触发,针对这种冲突的情况需要在代码中处理
     if (Keyboard.current.bKey.wasPressedThisFrame)
     {


         if(Keyboard.current.ctrlKey.isPressed)
             //执行 ctrl + b 操作
         else
             //执行 b键 操作
     }
手柄按键冲突也一样
    if (Gamepad.current.buttonNorth.wasPressedThisFrame)
    {


        if(Gamepad.current.leftShoulder.isPressed)
            //执行 leftShoulder + buttonNorth 操作
        else
            //执行 buttonNorth 操作
    }
Switch Pro 连接问题
目前Package Manager中,默认Input System最新版本是1.3.0
这个版本蓝牙连接 Switch Pro 手柄有问题,左摇杆没有移动但是一直有输入值,导致移动没法用,下面的代码有随机输入值
Vector2 move = _playerInput.Player.Move.ReadValue<Vector2>();
升级到1.5.0版本可以解决这个问题
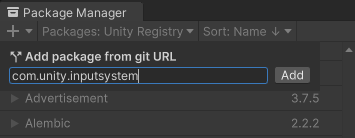
通过url添加1.5.0版本,com.unity.inputsystem