文章目录
Cobble实现自动安装 Centos{6,7,8}
安装包,查看步骤说明书
yum install dhcp cobbler cobbler-web pykickstart -y
systemctl enable --now cobblerd httpd tftp
cobbler check
设置 cobbler
vim /etc/cobbler/settings
	server: 192.168.43.7
	next_server: 192.168.43.7
	manage_dhcp: 1
	default_password_crypted: "$1$yrUZfZWk$VkG8IUkQ6u8Ym3EwfkQJ91" //引用下面的密码
生成密码
openssl passwd -1
Password:
Verifying - Password:
$1$yrUZfZWk$VkG8IUkQ6u8Ym3EwfkQJ91
配置 dhcp
vim /etc/cobbler/dhcp.template
subnet 192.168.43.0 netmask 255.255.255.0 {
     option routers             192.168.43.2;
     option domain-name-servers 192.168.43.2;
     option subnet-mask         255.255.255.0;
     range dynamic-bootp        192.168.43.100 192.168.43.200;
     default-lease-time         21600;
     max-lease-time             43200;
     next-server                $next_server;
     class "pxeclients" {
          match if substring (option vendor-class-identifier, 0, 9) = "PXEClient";
          if option pxe-system-type = 00:02 {
                  filename "ia64/elilo.efi";
          } else if option pxe-system-type = 00:06 {
                  filename "grub/grub-x86.efi";
          } else if option pxe-system-type = 00:07 {
                  filename "grub/grub-x86_64.efi";
          } else if option pxe-system-type = 00:09 {
                  filename "grub/grub-x86_64.efi";
          } else {
                  filename "pxelinux.0";
          }
     }

}
下载启动相关文件
cobbler get-loaders
task started: 2020-02-17_181422_get_loaders
task started (id=Download Bootloader Content, time=Mon Feb 17 18:14:22 2020)
downloading https://cobbler.github.io/loaders/README to /var/lib/cobbler/loaders/README
downloading https://cobbler.github.io/loaders/COPYING.elilo to /var/lib/cobbler/loaders/COPYING.elilo
downloading https://cobbler.github.io/loaders/COPYING.yaboot to /var/lib/cobbler/loaders/COPYING.yaboot
downloading https://cobbler.github.io/loaders/COPYING.syslinux to /var/lib/cobbler/loaders/COPYING.syslinux
downloading https://cobbler.github.io/loaders/elilo-3.8-ia64.efi to /var/lib/cobbler/loaders/elilo-ia64.efi
downloading https://cobbler.github.io/loaders/yaboot-1.3.17 to /var/lib/cobbler/loaders/yaboot
downloading https://cobbler.github.io/loaders/pxelinux.0-3.86 to /var/lib/cobbler/loaders/pxelinux.0
downloading https://cobbler.github.io/loaders/menu.c32-3.86 to /var/lib/cobbler/loaders/menu.c32
downloading https://cobbler.github.io/loaders/grub-0.97-x86.efi to /var/lib/cobbler/loaders/grub-x86.efi
downloading https://cobbler.github.io/loaders/grub-0.97-x86_64.efi to /var/lib/cobbler/loaders/grub-x86_64.efi
*** TASK COMPLETE ***
将启动文件同步到 /var/lib/tftpboot/ , 启动 dhcpd服务
systemctl restart cobblerd
cobbler sync
systemctl enable --now dhcpd
启动菜单优化
vim /etc/cobbler/pxe/pxedefault.template
	MENU TITLE Cobbler | http://cobbler.studywin.com
导入Centos系统的安装文件,生成相应的yum源,生成菜单项
添加2个光驱,放入光盘,挂载

cobbler import --name=CentOS-7.7-x86_64 --path=/mnt/cdrom --arch=x86_64
cobbler import --name=CentOS-8.0-x86_64 --path=/mnt/cdrom1 --arch=x86_64
cobbler import --name=CentOS-6.9-x86_64 --path=/mnt/cdrom2 --arch=x86_64
在 /var/lib/tftpboot/pxelinux.cfg/default 文件中会增加三个菜单项
到此就可以实现系统的自动安装了
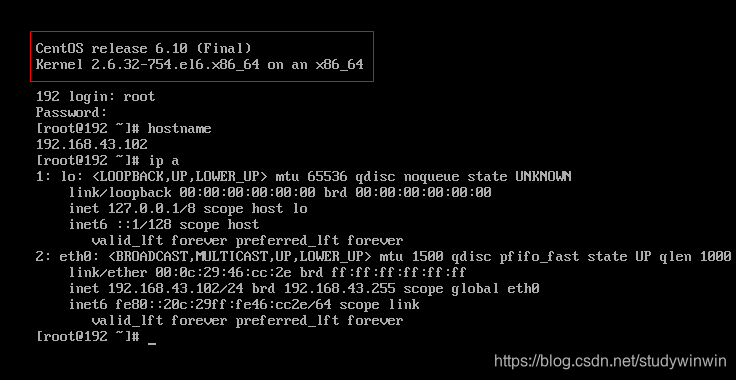
新开一台虚拟机试试,从网卡启动
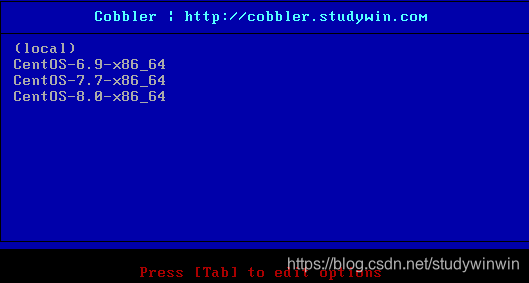
这三个菜单项都是系统默认生成的,用的都是系统最小化安装
一些相关的命令
cobbler --help
cobbler distro list  // 查看系统发行版本
cobbler profile list  //查看菜单项
cobbler profile report  // 可以看到 Distribution 与 Kickstart 的对应关系
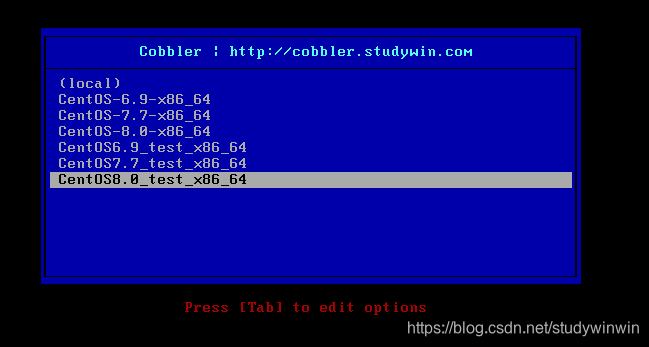
自定义菜单项
- 将自己准备好的 ks.cfg 文件放到 /var/lib/cobber/kickstarts/目录下
- 修改 ks.cfg 文件
vim ks.cfg
	url --url=$tree
- 生成菜单项
cobbler profile add --name=CentOS6.9_test_x86_64 --distro=CentOS-6.9-x86_64 --kickstart=/var/lib/cobbler/kickstarts/ks6.cfg
cobbler profile add --name=CentOS7.7_test_x86_64 --distro=CentOS-7.7-x86_64 --kickstart=/var/lib/cobbler/kickstarts/ks7.cfg
cobbler profile add --name=CentOS8.0_test_x86_64 --distro=CentOS-8.0-x86_64 --kickstart=/var/lib/cobbler/kickstarts/ks8.cfg
测试
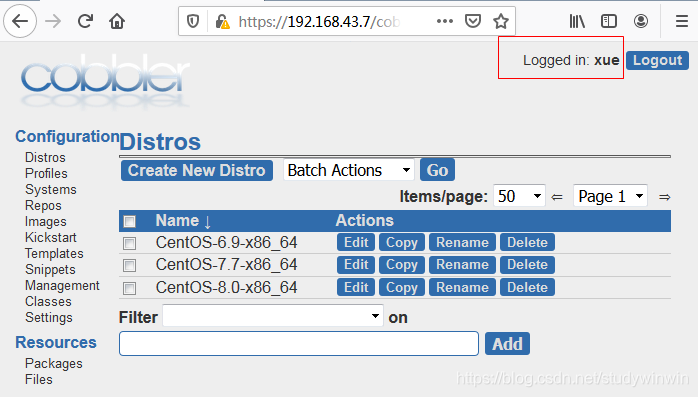
cobbler的web管理实现
登陆
systemctl restart httpd
https://192.168.43.7/cobbler_web
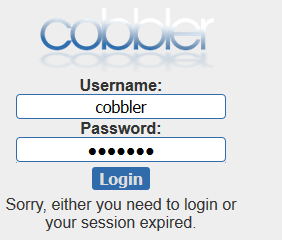
默认 用户名:cobbler,密码:cobbler
验证方式
- 基于文件验证用户名密码
/etc/cobbler/modules.conf //验证方式配置文件
vim /etc/cobbler/modules.conf
[authentication]
module = authn_configfile  // 默认验证方式
添加一个Cobbler用户
htdigest /etc/cobbler/users.digest Cobbler xuepeng 添加一个cobbler用户

htdigest -c /etc/cobbler/users.digest Cobbler zhangsan  会替换每一行用户的信息
- 基于pam验证用户密码
vim /etc/cobbler/modules.conf
[authentication]
module = authn_pam
vim /etc/cobbler/users.conf
[admins]
admin = "xue"   // 管理员
cobbler = "common" //普通用户
建立与之一样的系统账号
useradd xue && echo xue|passwd --stdin xue
useradd common && echo common|passwd --stdin common
重启 cobblerd服务,验证
systemctl restart cobblerd